Who should read this article: Administrators
Guidelines to help you get started creating your own chatbot.
This is part 4 of the Build your own chatbot use case.
Now that you have planned your chatbot and have prepared your contact center, you are ready to use Flow Builder to create your chatbot.
The following use case demonstrates how to build a simple chatbot for a travel service. You can adapt the same principles to suit the needs of your organization.
Use Case: Travel services
This use case assumes that you have already added digital channels to your contact center and assigned them to both users and a digital interaction flow. Refer to Chatbot prerequisites.
To begin, navigate to Inbound > Flows and select the flow you created. On the Edit Flow page, click Launch builder.
1. Greeting and introduction
Add a Message node to the flow canvas that welcomes the contact. Since some people still resist the idea of chatting with a chatbot, try to make the interaction as friendly and engaging as possible. For example:
Hello! Welcome to Global travel.

I'm Emily, your digital assistant.

I'm here to assist you with your travel plans.
You can include some emojis in the Message node to be playful and engaging if it suits your business process. For example:
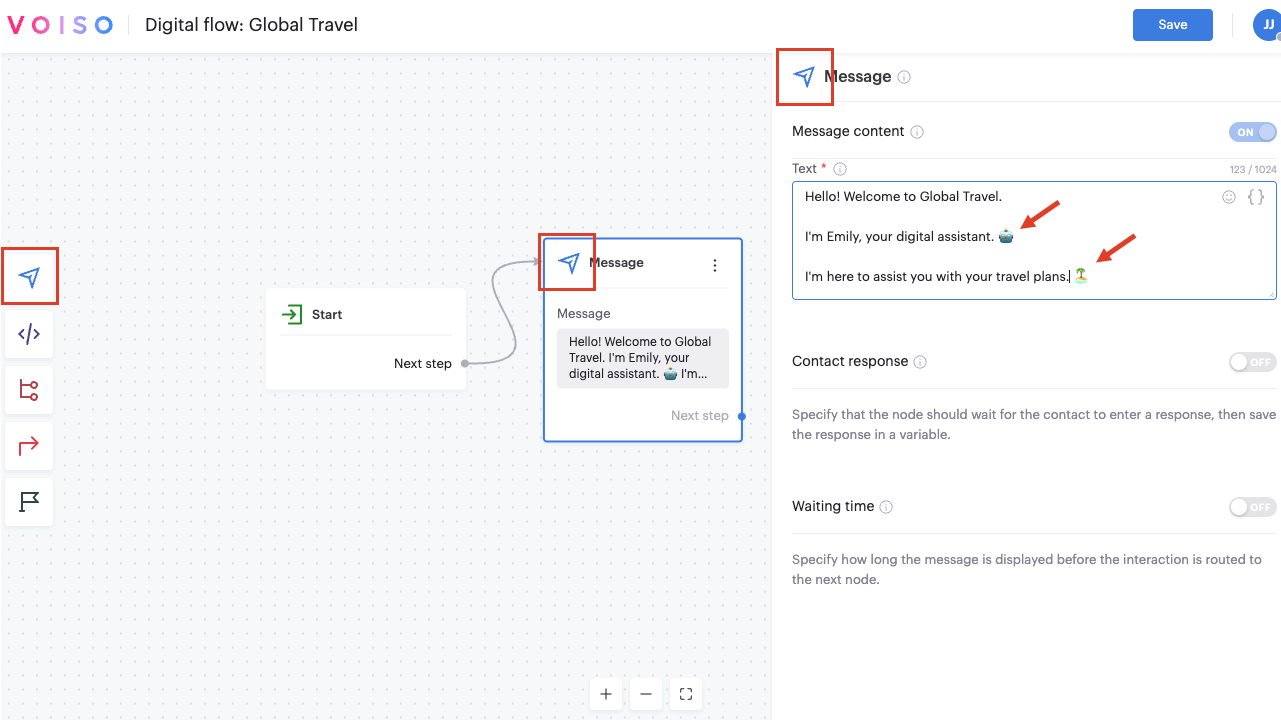
The greeting message should not expect a contact response. That is the job of the next node.
2. Presenting the main options
The next message after the greeting should present the contact with a list of options for your most common tasks.
Add another Message node to the canvas and enable the following sections in the configuration panel:
- Message content: The list of options for the contact.
- Contact response: Create a custom variable to store the contact's response for analysis in the next step.
- Waiting time: Set a timeout in case the contact does not respond.
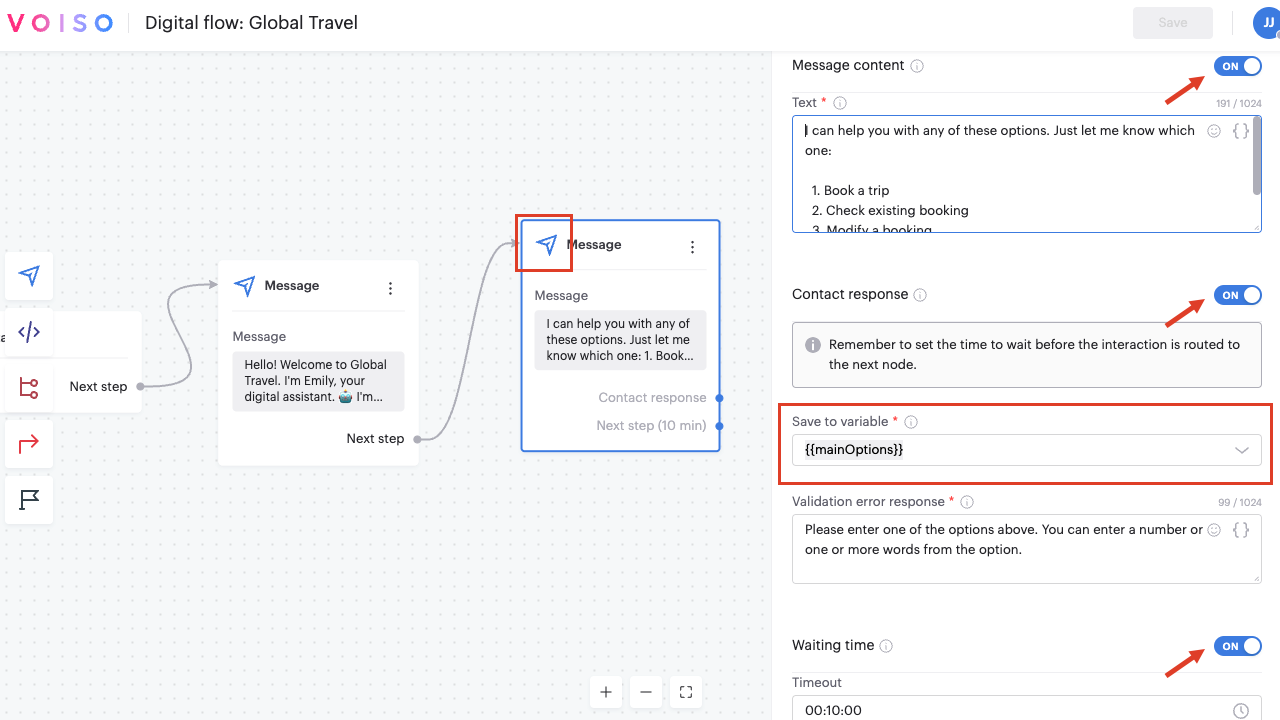
In our example we want the contact to tell us what kind of trip they are interested in, so our messsge will be:
Please choose from the following options:
  1. Book a trip
  2. Check existing booking
  3. Modify a booking
  4. Ask about travel packages
  5. Speak to an agent
We'll add a variable called {{mainOptions}} to store the contact's response.
This short video walks you through the steps to setup the Message node (we recommend you expand it to full screen).
3. Testing the response
Add a Conditions node to automatically analyze the response from the contact.
If the contact responds to the Message node in the previous step, the interaction is routed through the Contact response connection (1). Add a connection from this connection to the new Conditions node.
If they don’t respond before the timeout, it’s routed through Next step (x).
In the Conditions node, add one condition for each option, then add rules for each condition to intelligently analyze the response message from the contact that was stored in a variable.
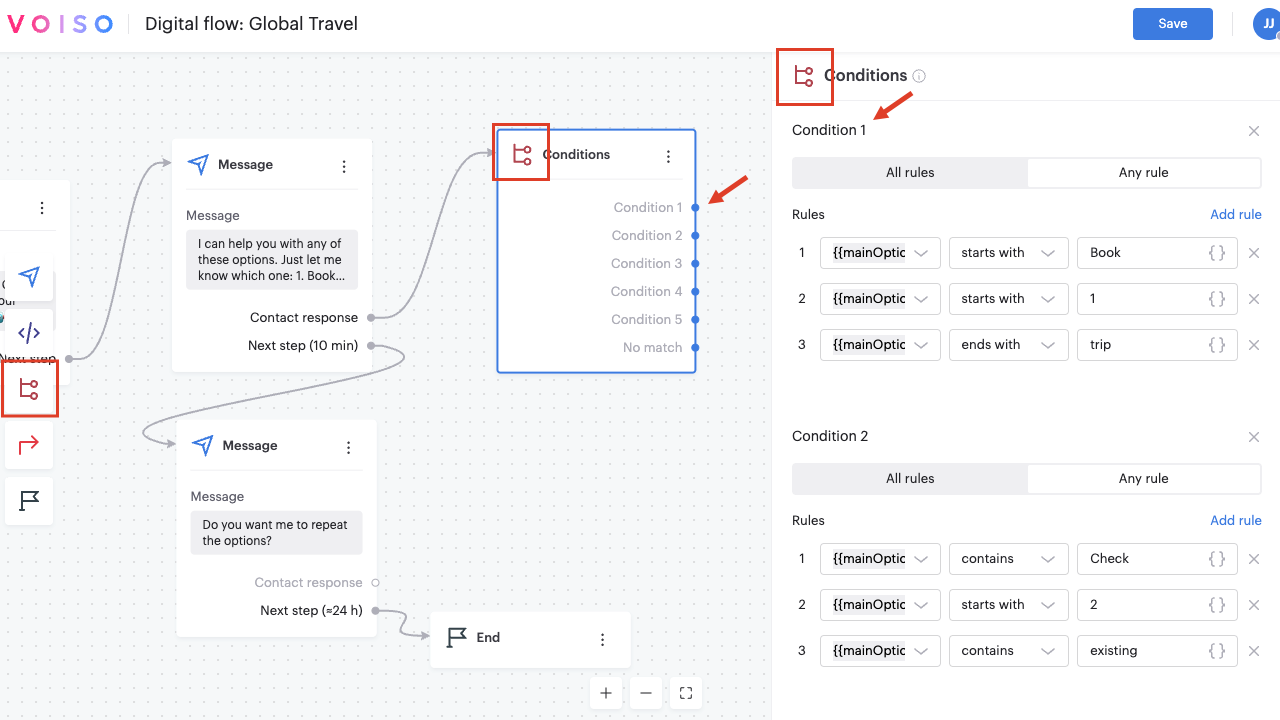
The Conditions node tests the content of the variable containing the contact's response from the previous Message node, then routes the interaction based on the conditions and rules you specify. If there is no match, the interaction is routed by the No match connection.
Refer to Conditions for details about using the Conditions node.
This short video walks you through the steps to setup the Conditions node (we recommend you expand it to full screen).
4. Automatic routing: Book a trip
In our example, if the contact responded with Book a trip, Condition 1 is a match. The interaction will be routed using a link from the Condition 1 connection.
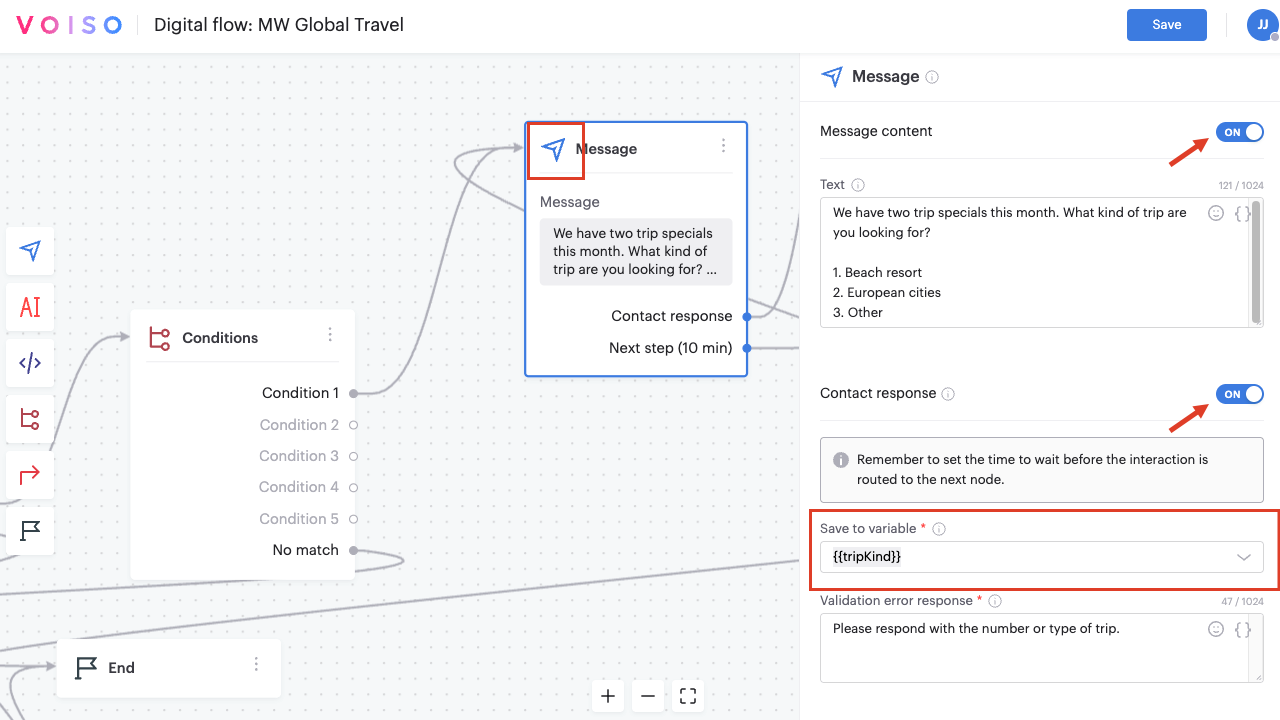
Let's route to a new Message node to continue the conversation and gather more information.
For example, you might have specials that you want to push. Present those as new options in the next message.
For example:
We have two trip specials this month. What kind of trip are you looking for?

1. Beach resort
2. European cities
3. Other
5. Automatic routing: Retrieving data
Use another Conditions node to analyze the contact's response, and then retrieve data about their selection using the HTTP Request node.
Create multiple conditions to test for different responses from the contact. Try to include unique keywords in each response to make it easy to discriminate between them.
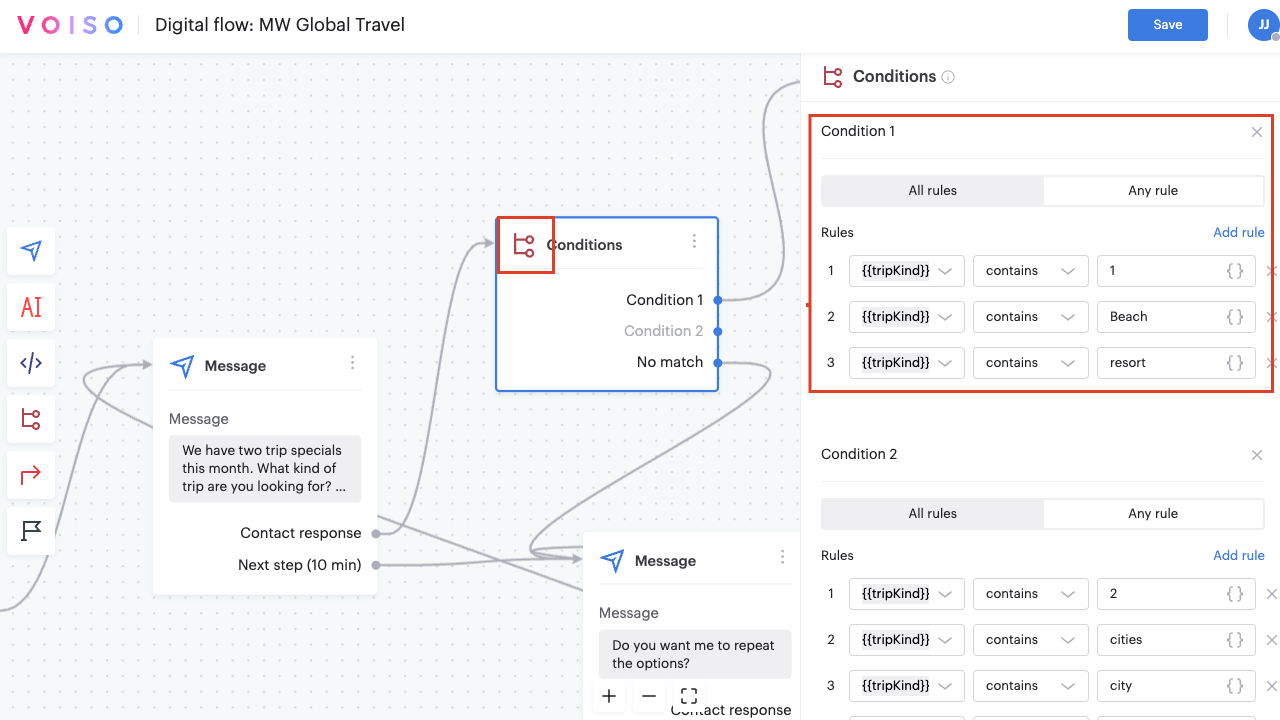
In our example, the contact responds with I'm interested in a Beach resort. This response, which the node stores in the {{tripKind}} variable, contains two words that match Condition 1, so the interaction is routed through the Condition 1 connection.
Data from your data center can add intelligence to your chatbot. Use the HTTP request node to retrieve data from your data center using a JSON GET request.
Refer to HTTP Request for details about using the HTTP request node.
Our data center has the following information about Beach resort holidays:
[
  {
    "vacationType": "beachResort",
    "saleType": "winter",
    "datesAvailable": "2024-01-05",
    "price": "$1200",
    "location": "Spain"
  }
]
Let's construct a GET request to retrieve the available dates to determine if they match the contact's travel plans.
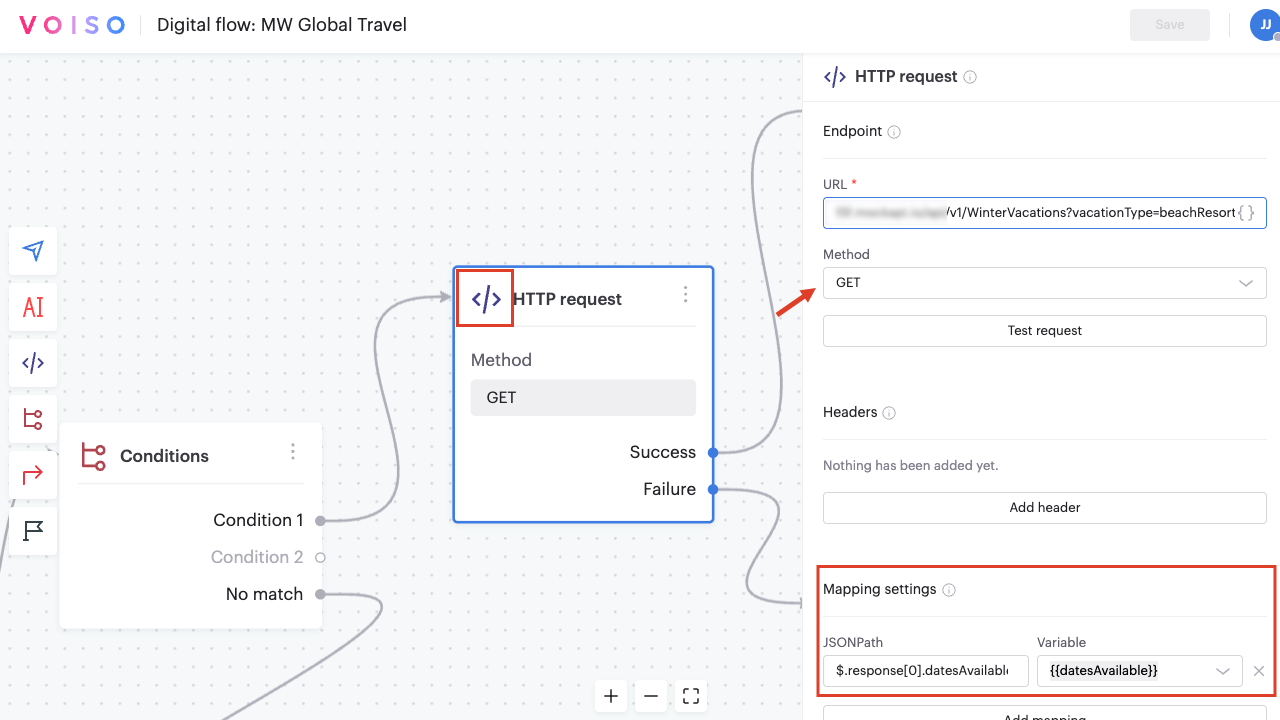
Specify the URL of your data center, and add request parameters, including variables from the flow either to the URL or as key-value pairs in the header.
Add mapping of data fields to variables in the flow. In this case we are storing the response in the {{datesAvailable}} custom variable.
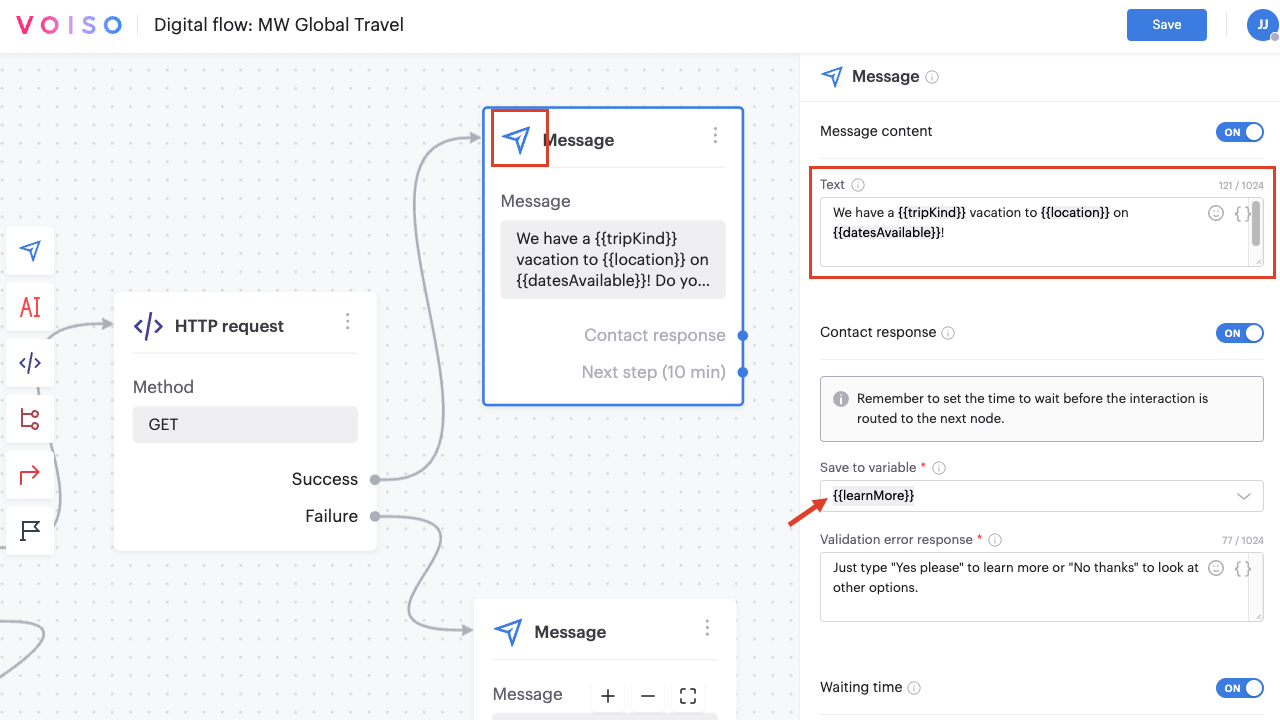
You can then use the Message node to display information about their request by filling variables with data values from the request. For example:
We have a {{tripKind}} vacation to {{location}} on {{datesAvailable}}!
6. Automatic routing: Hand-off to an agent or your API
As your chatbot collects information, you may reach a point where it’s time to take action—either by handing off to an agent or by triggering an external system.
-
To connect the contact with a live agent, use the Route node. You can route the interaction to a specific queue, phone number, or internal extension depending on your flow setup.
-
To send contact data to your booking or business system, use the HTTP Request node again—this time with a POST method. Include the variables you gathered to create or update records in your system.
These paths are useful when the chatbot cannot resolve the issue on its own or when you want to trigger an automated workflow in parallel with the human hand-off.