Who should read this article: Administrators
How to create your first IVR using Flow Builder.
User story
As a contact center administrator with simple routing requirements, I want an IVR to handle the inbound calls to your contact center, and route the calls to one or more targets, depending on which key the caller presses. I want a simple IVR that provides simple choices for my callers.
Use Case: Creating a simple IVR
It's easy to add a simple IVR to your inbound call flows using the Voiso Flow Builder.
Prep your contact center resources
First, create an inbound queue and assign agents to the queue. Next, obtain an inbound phone number for your contact center.
For more details, refer to the How to start receiving calls article.
IVRs rely on recorded messages (media files) to explain the keypress selections available to callers.
Create a recorded message as a media file (for example, an MP3). The message can be quite simple. For example, the message could be:
Welcome to Our Organization. Press 1 to be connected to an agent, press 2 to leave a voicemail, or press any other number to hear this message again.
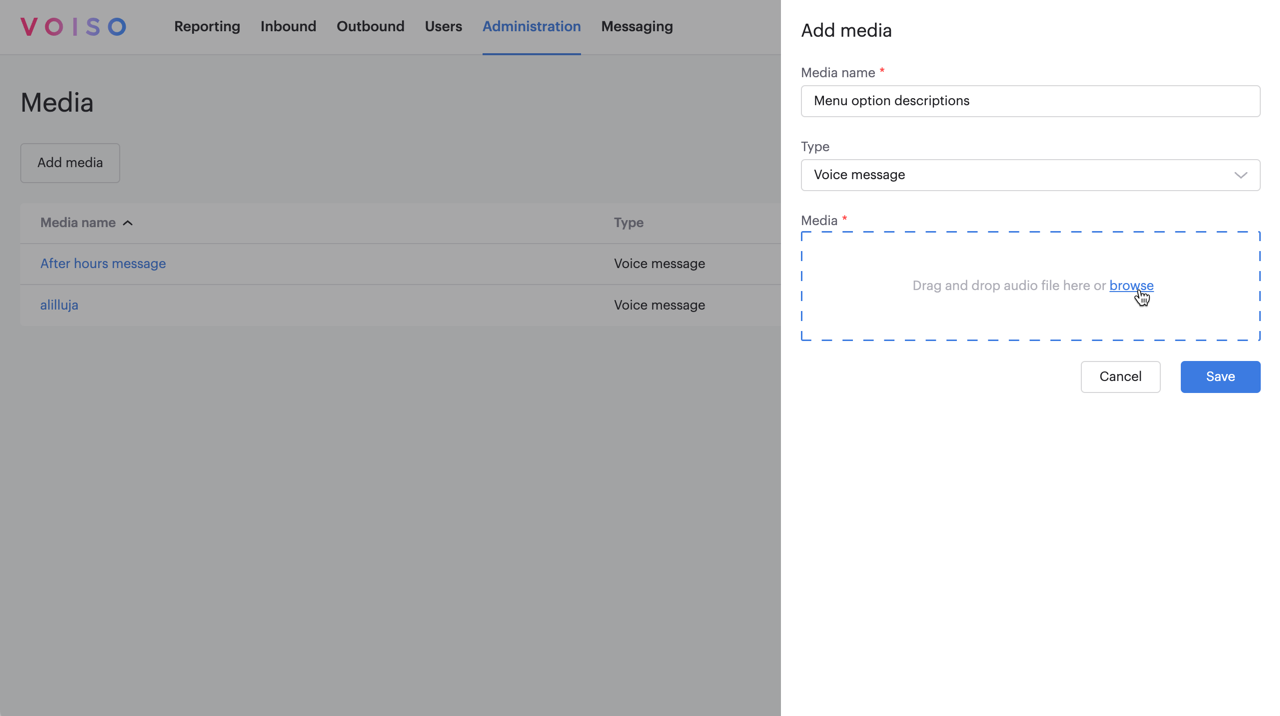
Upload your audio message to your contact center media collection (navigate to Administration > Media in the main navigation bar).
Adding media
To upload a new audio file to your media library, follow these steps:
- Click Add media.
- In the Add media panel, enter a name for the file. This name appears in the Media table and in selection menus throughout the application.
- From the Type dropdown, select the media type that matches how the audio will be used (e.g., MOH, Voice Message, or Ringtone).
- In the Media section, either drag and drop an audio file from your computer or click browse to select a file.
- Click Save to upload the file.
For supported audio formats and file size limits, refer to Supported file formats.
Create your simple IVR
You are now ready to create your IVR. The following video walks you through the steps to create an IVR with two options: connecting to a queue or leaving a voicemail.
Of course, you can have many other options, including routing to a specific agent or phone number, sending an SMS or WhatsApp message, a voice message, or terminating the call.
The following video walks you through the steps below:
Some parts of the user interface shown in this video have changed since it was recorded. An updated version of the video is planned and will be published shortly.
Setting up a call flow
- Using the Voiso Navigation Bar, navigate to Inbound > Flows.
- On the Flows page, click Add flow.
- Complete the General settings:
- Give your flow a name.
- Select Voice for the flow type.
- Choose one of your inbound numbers. Calls to this number are routed through this flow.
- Set the times that this flow is active by clicking the days of the week and specifying the hours for each day in the Business hours section. Calls outside of these days and times are not handled by this flow. You can create another flow to handle days and times that are outside of business hours, then select that flow in the Outside business hours section. For more information about the options in the Add flow page, refer to Flows.
- Save the flow. You are now ready to create the call flow for your IVR.
Add nodes in Flow Builder
- Click the name of your new flow from the list of flows on the Flows page.
- In the Flow builder section of the Edit flow page, click Launch. Flow builder opens in a new browser tab.
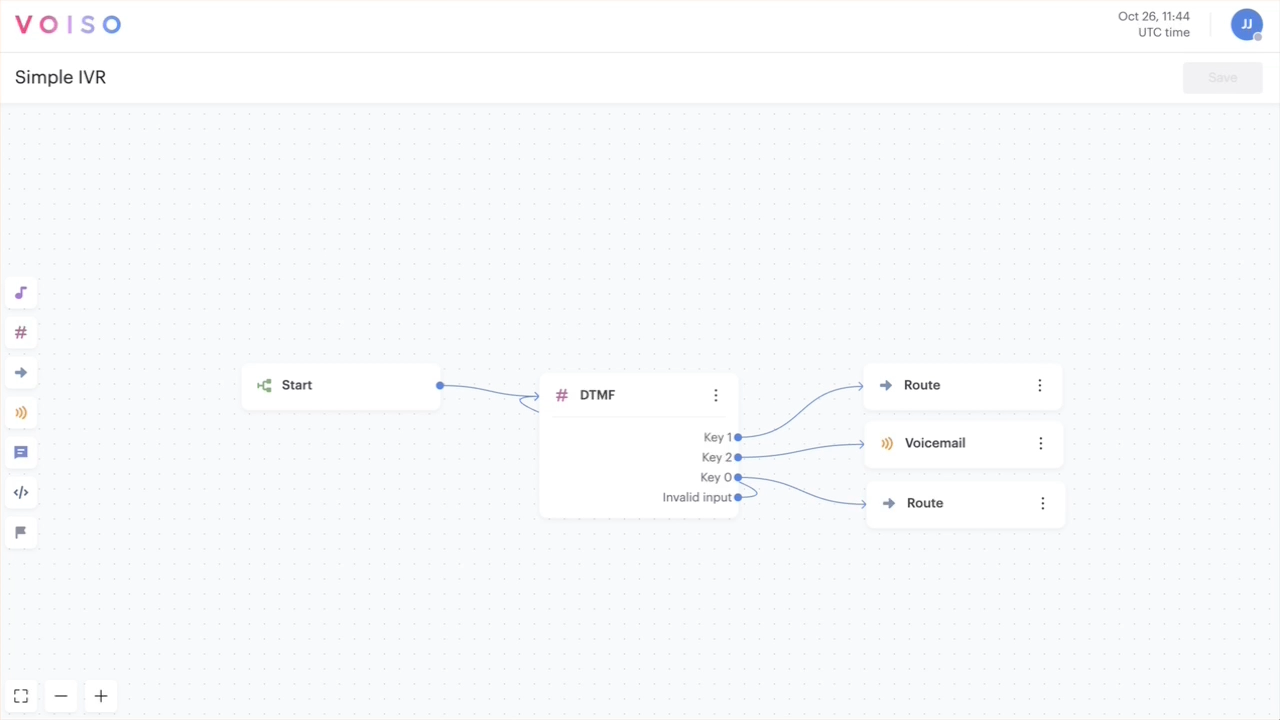
- To create your IVR, click the DTMF icon to add a DTMF node to the flow.
- Click the node to set it up. In the DTMF, panel make the following settings:
- Choose the media that contains the voice message you created to describe the keypress options for your IVR.
- Specify the number of seconds without a keypress from the caller before the IVR times out and repeats the message or ends the call.
- Specify the number of times the message is repeated when there is no keypress from the caller.
- Click the dial pad keys route to an action. It's common to have 0 route to a specific agent or phone number by using the Route node.
- If your contact center supports dialing by extension, select this option as well.
Make routing connections
- You are now ready to start making routing connections from your IVR.
- Drag a connection from the Invalid input output point back to the input point of the DTFM node. If the caller presses a key other than the ones you configured for the IVR, the call is routed back to the input point of the DTMF node.
- Add other nodes to the flow, such as Route and Voicemail, then drag connections from the relevant DTMF node output points to the input points of the other nodes.
- Configure the other nodes, then click Save to return to the Edit flow page.
- Click Save to activate your IVR.
Rename the node
Beginning with the September 15 - 19, 2025 release, you may name nodes in Flow Builder. Click a node in the node palette to add it to the flow. The node is added to the flow and is named Node N, where N represents the number of the node; for example, Node 6. Below the node name is the node type, such as Play Audio. Click the node to open the node configuration panel, then click the name of the node to edit it. Enter a new name, then the check mark to save your change.
Use Case: Routing to different queues
If you are new to Voiso and are setting up your contact center for the first time, check out these resources before attempting to create a queue and call flow:
If you have already set up the following basic resources in your contact center, you can create a flow to route to a queue:
- Buy or add numbers
- Add users and create teams
- Create caller ID groups
- Add media
- Create queues to distribute calls
To create a simple flow to route calls to different queues based on a DTMF selection, watch this video: