Enabling Omnichannel Workspace
- 06 Aug 2025
- 8 Minutes to read
- Print
- DarkLight
- PDF
Enabling Omnichannel Workspace
- Updated on 06 Aug 2025
- 8 Minutes to read
- Print
- DarkLight
- PDF
Article summary
Did you find this summary helpful?
Thank you for your feedback!
Who should read this article: Administrators
The Omnichannel Workspace requires you to configure flows, queues, and users to handle voice and digital channels.
Introduction
The Omnichannel Workspace supports the following channels:
| Icon | Channel |
|---|---|
| Voice | |
| SMS | |
| Webchat | |
| Telegram | |
| Viber | |
| Facebook Messenger | |
Channel support by plan
The following table shows you which digital channels are supported for your plan:
| Channel | Core | Pro/Custom |
|---|---|---|
| ✔ | ||
| ✔ | ||
| Telegram | ✔ | |
| Viber | ✔ | |
| Webchat | ✔ | ✔ |
| ✔ |
Enabling your contact center to handle digital channels
To enable your contact center to handle digital channels interactions, complete the following steps:
- Contact your Voiso account manager to enable omnichannel capabilities for your contact center and set up accounts with channel providers.
- Add a channel of one of the enabled types to the Digital channels page to make it available for agents, queues, and interaction flows. Navigate to Administration > Digital channels and click Add channel. Refer to Digital channels for additional information and to the individual channel articles in this category for information about channel-specific requirements:
- Enable users or roles to handle one or more digital channels. Refer to Enabling users and roles.
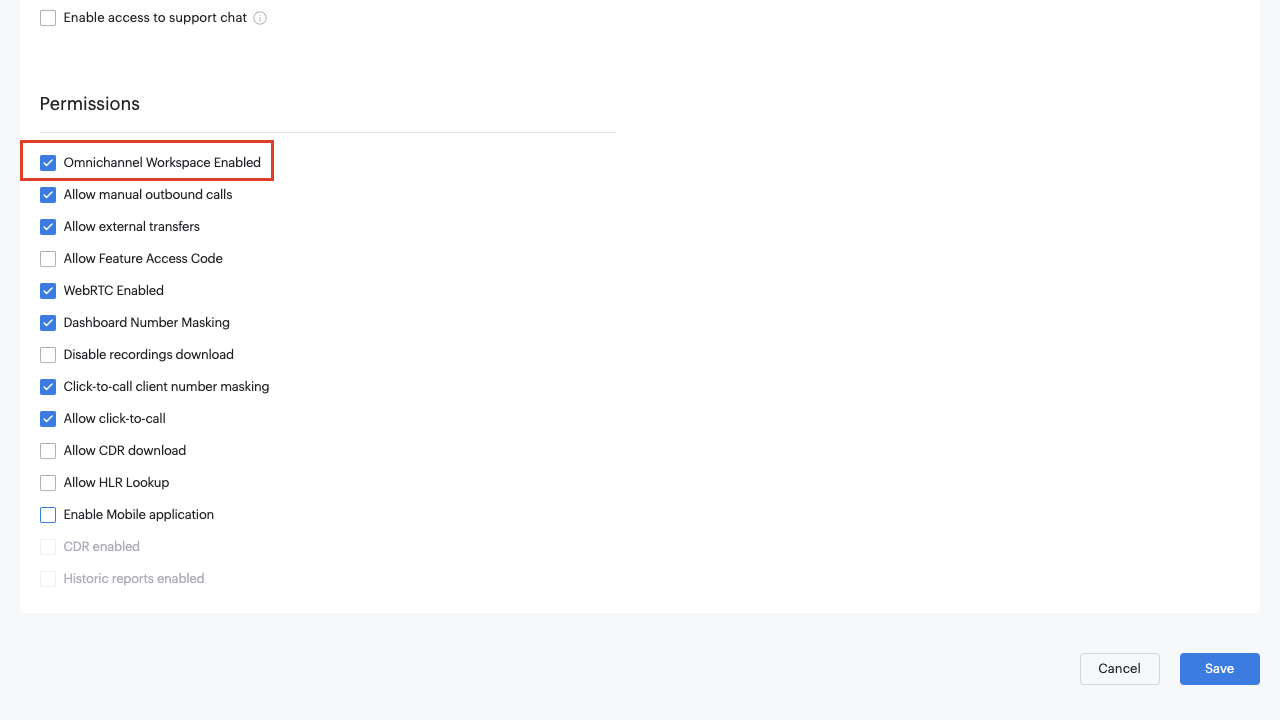
- In contact centers using basic user roles, enable the Omnichannel Workspace Enabled permission on the user profile or by importing a CSV with y indicated in the Omnichannel Workspace Enabled column.
- In contact centers using security access groups enabled, create an access group with omnichannel workspace features enabled and assign the role to the agent.
- Set up agents by editing the user profile to add a channel or import a CSV with the name of the channel assigned to the Channels column. Refer to Setting up an Omnichannel agent.
- Set up one or more queues to handle digital channels interactions. Refer to Setting up an Omnichannel queue.
- Create a flow to handle digital channels interactions and assign the channel to the flow. Refer to Adding a digital queue to a flow.
Enabling users and roles
Contact centers with basic user roles
Individual users
To enable users to use the omnichannel Agent Workspace, ensure the Omnichannel Workspace Enabled permission is granted on the user's profile page.
Bulk users
You can enable multiple users to access the omnichannel Agent Workspace by following these steps:
- Export the current user list as a CSV file from the Users page.
- Open the file and update the Omnichannel Workspace Enabled field:
- Enter y for users who should have access.
- Enter n for users who should not.
- Save the updated file and import it back into the Users page.
For more information, refer to Basic user roles.
Contact centers with security access groups
For contact centers using security access groups, the default roles do not include access to the Omnichannel Workspace. For each role that you want to enable for the Omnichannel Workspace feature, create a new security access group. To create a security access group that enables Omnichannel Workspace for agents, follow these steps:
- From the Voiso navigation bar, navigate to Administration > Security Access Groups.
- Click Add access group (or Import CSV – refer to Importing custom groups from a CSV)
- Grant the Agent role privilege for the new security access group, then grant the Omnichannel Workspace Enabled privilege.
- Save the security access group.
Setting up an omnichannel agent
Watch the video Digital Channels: Assigning a channel:
Contact centers with basic user roles
Contact your Voiso representative to enable the omnichannel feature for your contact center. Once enabled, you can select the Omnichannel Workspace Enabled option on the user profile page.
Next, to enable an agent to use the Omnichannel Workspace and handle digital channels interactions, follow these steps to add or edit a user:
- In the Voiso navigation bar, go to Users > Users.
- Add a new user or edit an existing user (refer to Adding a user.
- On the Add user or Edit user page:
- In the Assigned channels section, click Edit to open the Edit channels panel, then select one or more digital channels.
- In the Capacity section, specify the maximum number of simultaneous digital channels interactions an agent is allowed to handle. Instant Messaging includes Telegram and other channels that might be available in your contact center, plus webchat.
- In the Agent in teams section, assign the agent to a team.
- Click Save to apply the changes.
Bulk users
You can configure omnichannel capabilities for multiple users by following these steps:
- Export the current user list as a CSV file from the Users page.
- Open the file and update the Omnichannel Workspace Enabled field:
- Enter y for users who should have access.
- Enter n for users who should not.
- In the Channels field, add the names of the channels that you want to assign as a semi-colon separated list.
- In the Instant Messaging Capacity field, specify the maximum number of simultaneous digital channels interactions an agent is allowed to handle. Instant Messaging includes Telegram and other channels that might be available in your contact center, plus webchat.
- In the Webchat Capacity field, specify the the maximum number of simultaneous webchat interactions an agent is allowed to handle.
- Save the updated file and import it back into the Users page.
For more information, refer to Basic user roles.
Contact centers with security access groups
For contact centers using security access groups, to enable an agent to use the Omnichannel Workspace and handle digital channels interactions, follow these steps to add or edit a user:
- From the Voiso navigation bar, navigate to Users > Users.
- Add or edit a user.
- On the Add user or Edit user page, assign the user to the security access group you created for omnichannel users.
- In the Assigned channels section, click Edit to display the Edit channels panel. Select one or more of the digital channels.
- In the Capacity section, specify the maximum number of simultaneous digital channels interactions an agent is allowed to handle. Instant Messaging includes Telegram and other channels that might be available in your contact center, plus webchat.
- For other channels:
- WhatsApp: In the WhatsApp Outbound Channels section, click Edit to display the list of WhatsApp channels associated with your contact center. Select a channel.
- Viber: In the Viber Outbound Channels section, click Edit to display the list of Viber channels associated with your contact center. Select a channel.
- In the Agent in teams section, assign an agent to a team.
- Save the user.
Setting up an omnichannel queue
To enable inbound digital channels interactions to be routed to Omnichannel Workspace-enabled agents. Watch the video Digital Channels: Assigning a channel to a queue:
Follow these steps to create an omnichannel queue:
- From the Voiso navigation bar, navigate to Inbound > Queues.
- Add or edit a queue.
- To make a queue that handles both voice and digital channels (Universal Queue), include all the voice settings.
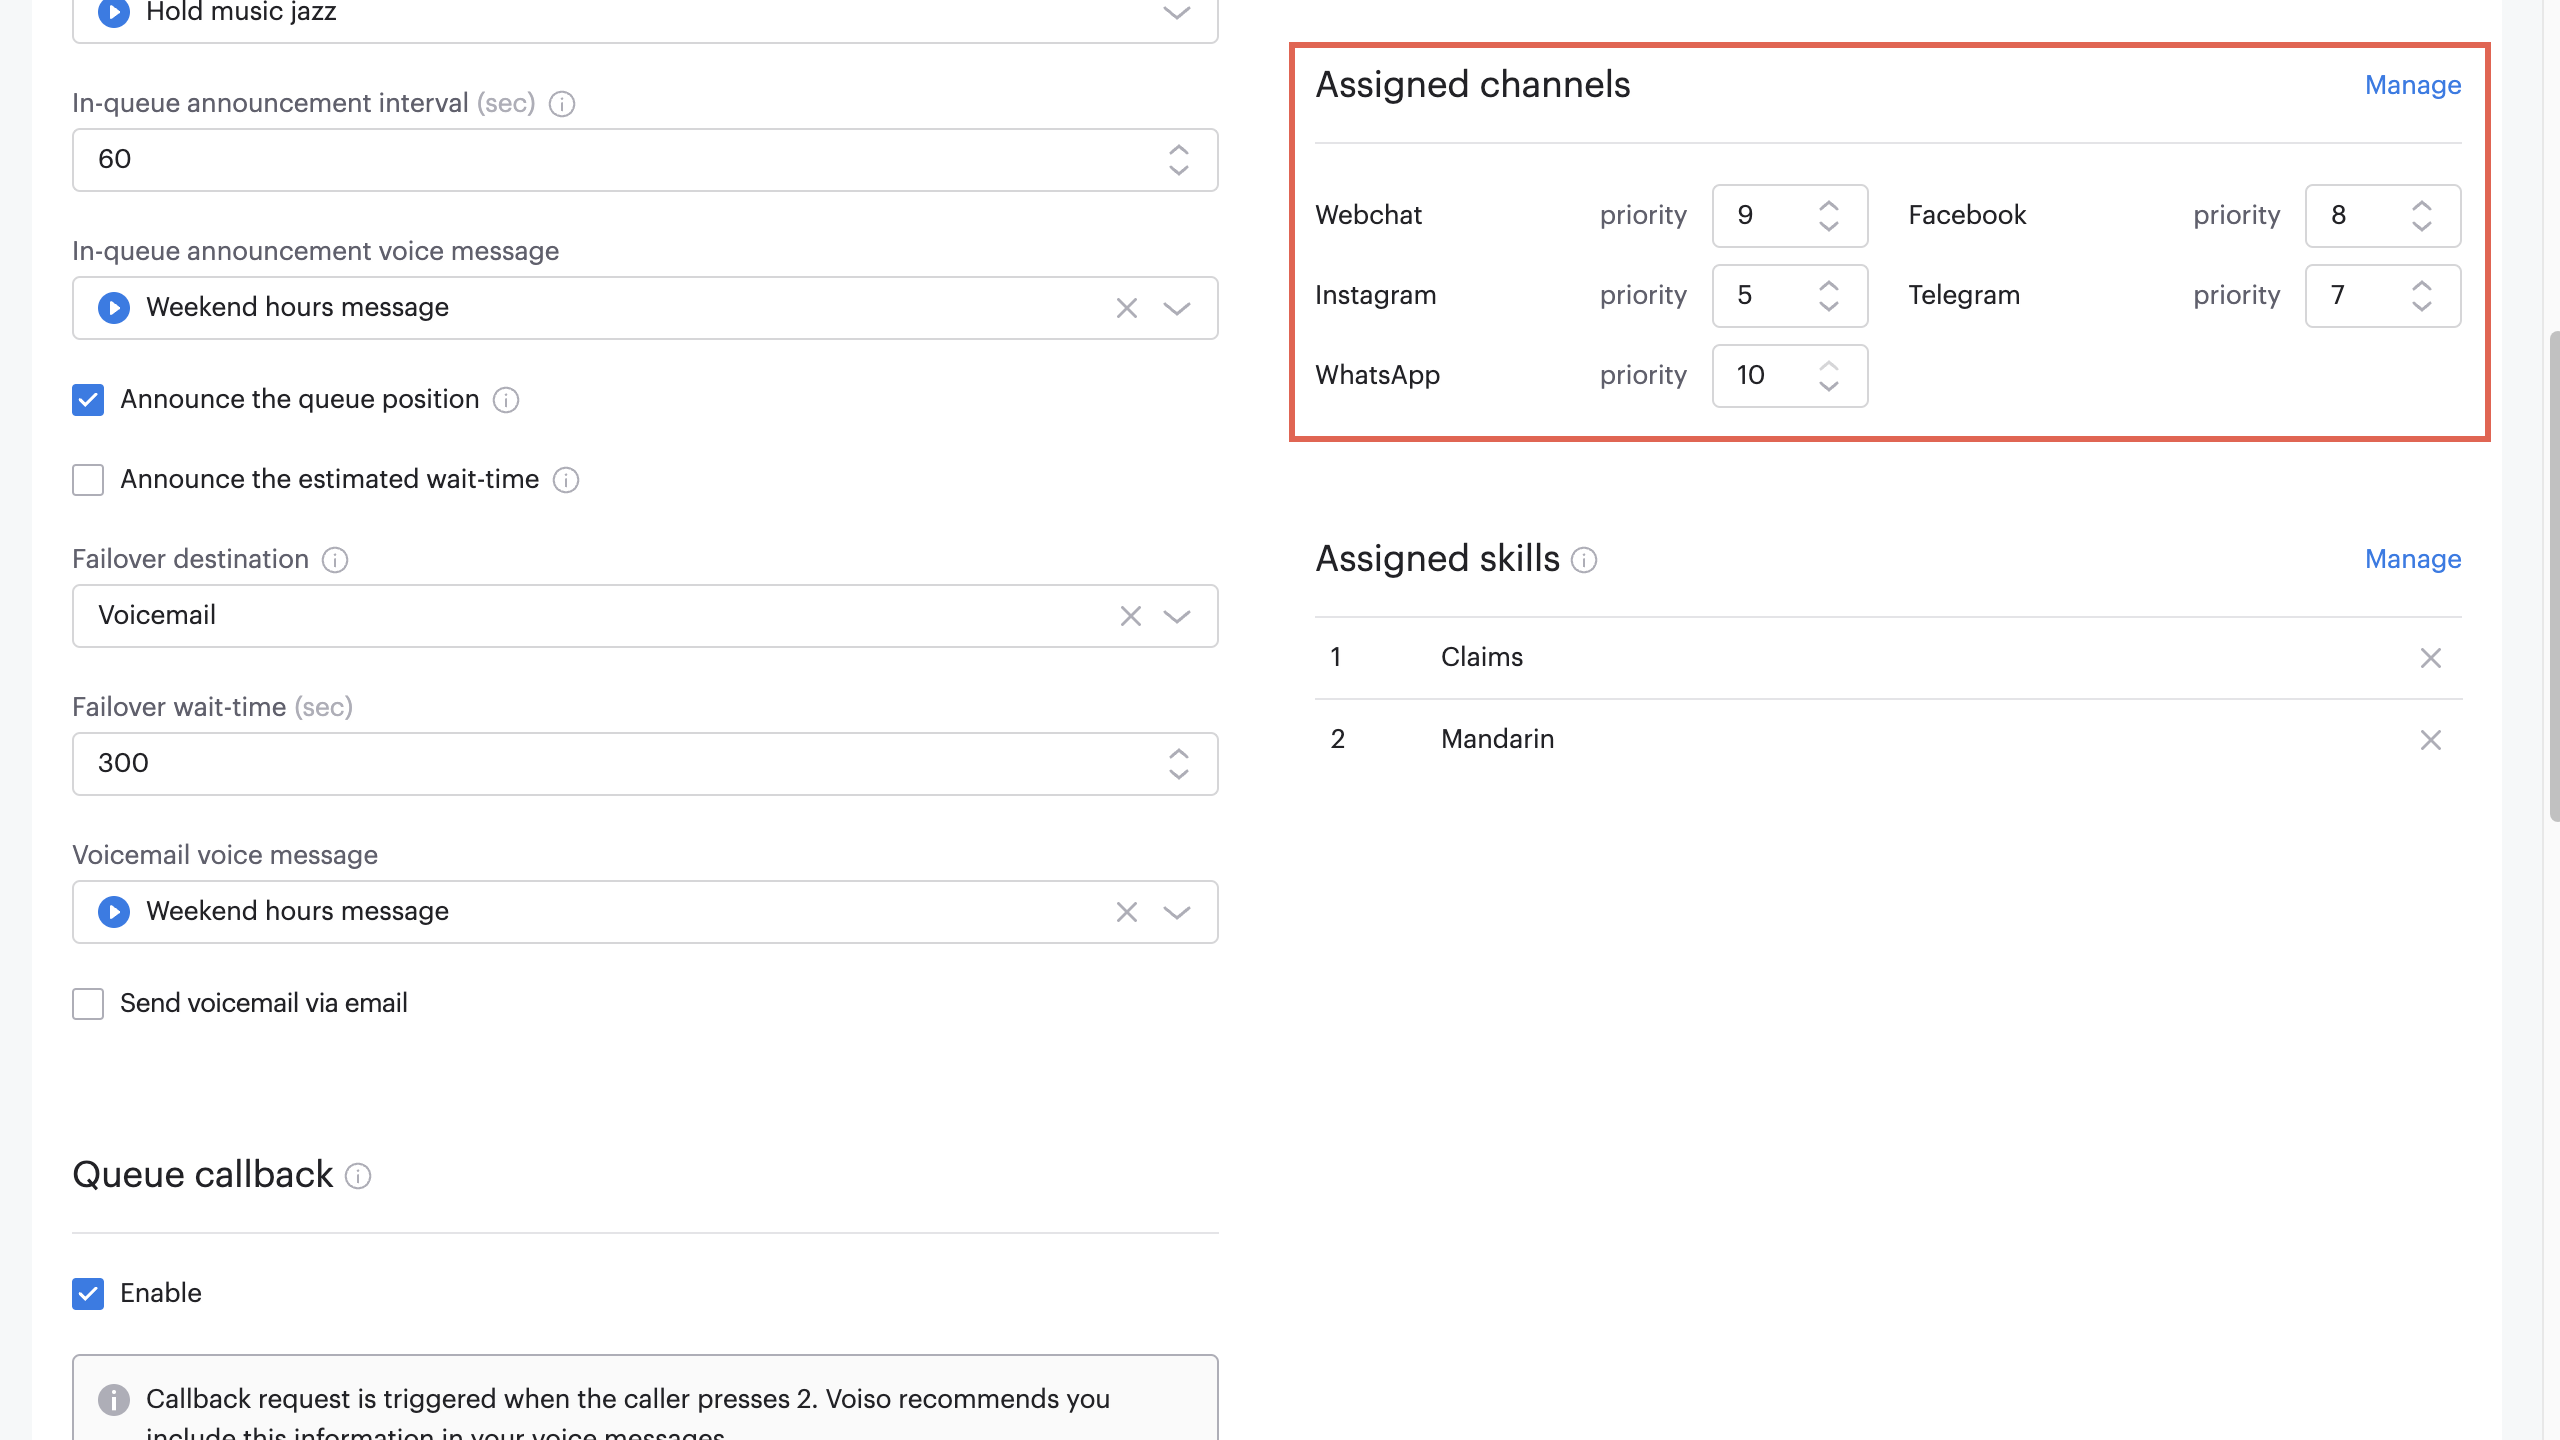
- In the Connected channels section, click Edit to display the Edit connected channels panel. Select one or more digital channels.
- Assign priority to each channel where 1 is the lowest weight. Interactions arriving from channels with a higher priority value are given precedence over those with lower priority values. Channels with the same priority value are handled as first-in, first-out.
- In the Agents section, click Edit to display the Edit agents in queue panel. Select one or more agents.
- Save the queue.
Adding a digital queue to a flow
After you've created one or more digital channels for your contact center, set up interaction queues to handle different types of digital interactions. Then, configure your agents to handle digital channel interactions and assign them to the appropriate queues. Once these steps are complete, you're ready to create inbound interaction flows that route incoming interactions from your digital channels to the correct queues and agents.
Refer to the Flow and Flow builder articles to learn how to create interaction flows.
Watch the video Digital Channels: Assigning a queue to an interaction flow:
Ensuring Service Level compliance
The Service Level timers support compliance with service level guidelines. To set the timers, from the Voiso navigation bar, navigate to Administration > System Settings and click the Timers tab, then scroll down to the Digital sections.

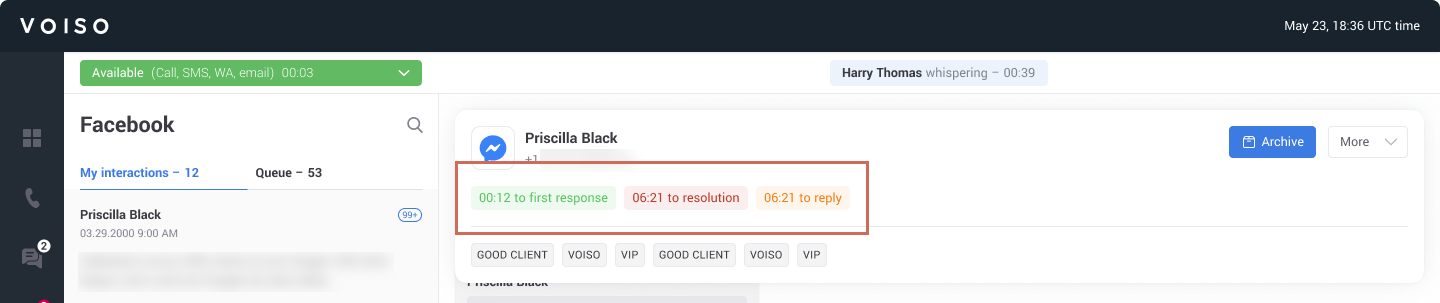
Set timer values that correspond to your business goals. Timers are displayed in the Omnichannel Workspace to guide agents, letting them know how much time they have left to respond to a new interaction, how long to reply to a message, and how long to complete the interaction. You can configure the following timers:
| Feature | Description |
|---|---|
| Time to first response | Specify the duration before an interaction assigned to an agent reaches the maximum allowed time for a first response to a text interaction. A color-coded message is displayed in the Agent Workspace that progresses from green to amber to red as the timeout approaches. |
| Time to reply | Specify the duration before an interaction assigned to an agent reaches the maximum allowed time for a reply to each text message from a contact. A color-coded message is displayed in the Agent Workspace that progresses from green to amber to red as the timeout approaches. |
| Time to resolution | Specify the maximum time that an agent has to archive an interaction. A color-coded message is displayed in the Agent Workspace that progresses from green to amber to red as the timeout approaches. |
| Chat inactivity auto archive timeout | Specify the number of hours of inactivity allowed before an omnichannel interaction is automatically archived. |
Creating message template standard responses
Voiso message templates simplify the process of sending text messages to contacts. With a template, an agent does not have to write the message. They can select a predefined standard response message, fill in specifics such as account numbers, amounts, or names, and then click Send.
Using templates instead of writing individual messages each time an agent sends a text message on a digital channel saves time and ensures accuracy.
You can also create message templates specific to one or more digital channels. This capability lets you tailor your messaging to contacts on specific channels.
To access the Message templates page, from the Voiso navigation bar, navigate to Administration > Message templates. For details about creating message templates, refer to Message templates.
Was this article helpful?