Who should read this article: Administrators
The Message node allows you to send automated messages to inbound digital channel interactions.
Introduction
Use the Message node to send automated messages to contacts during an inbound digital channels flow. You can specify that the node must wait for the contact to respond before moving to the next node. You can also set a timer to automatically progress to the next node if the contact does not respond.
Your message body may include variables so that you can personalize the message.
You can save the contact's response to a variable. This is useful for capturing information such as phone numbers, account numbers, and so on, then passing it to a Conditions or HTTP request node for further processing.
The following digital channels are supported by the Message node:
Connections
The Message node supports unlimited input connections and up to 2 output connections.
Use Case: Chatbot
You can use the Message node to build a self-service chatbot for your contact center. For example, you can use a HTTP Request node to obtain various data from one or more web services, then pass the data as variables to the Message node to create a personalized message and send it to the contact.
The Message node can save contact responses in custom variables which can be used for conditional routing using the Conditions node or to retrieve data from a web service using the HTTP request node.
Using the Message node
To add a Message node to your interaction flow, click the Message icon:

The Message node allows an unlimited number of input connections and up to two output connections. To make an input connection, drag a link to the Message node from any node supporting an output connection. To make an output connection, drag a link from the Message node to any node supporting an input connection.
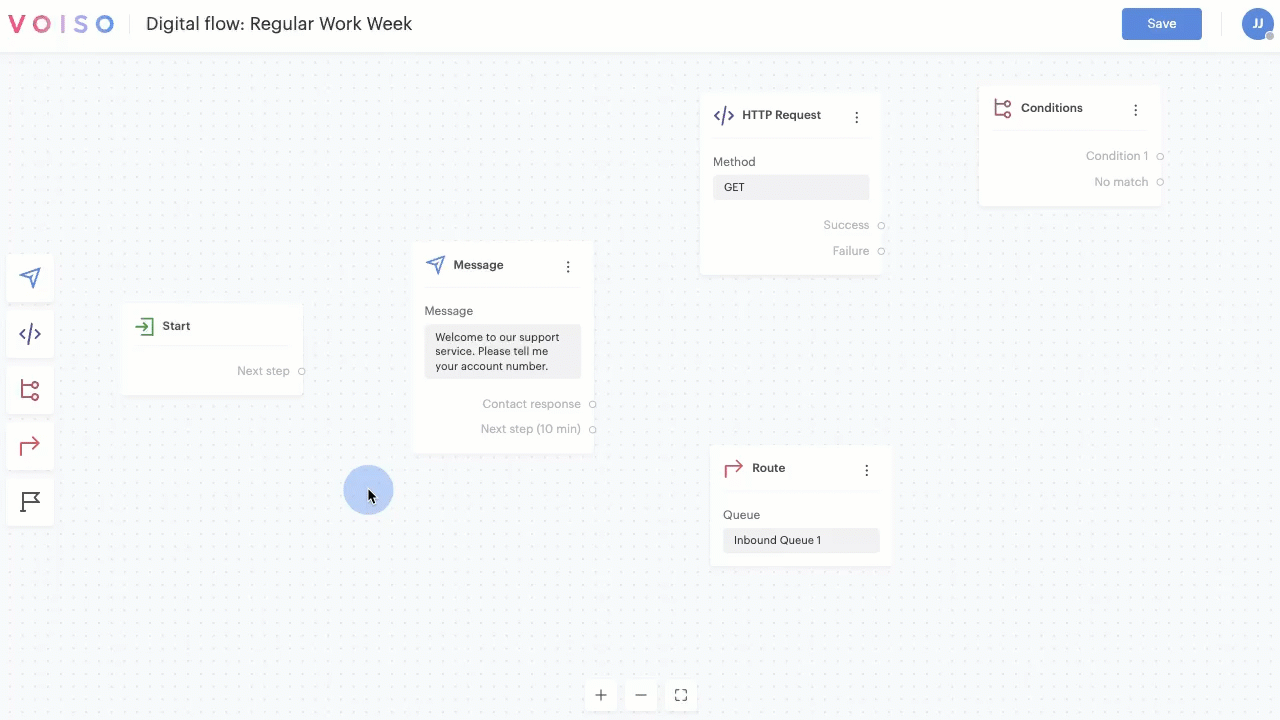
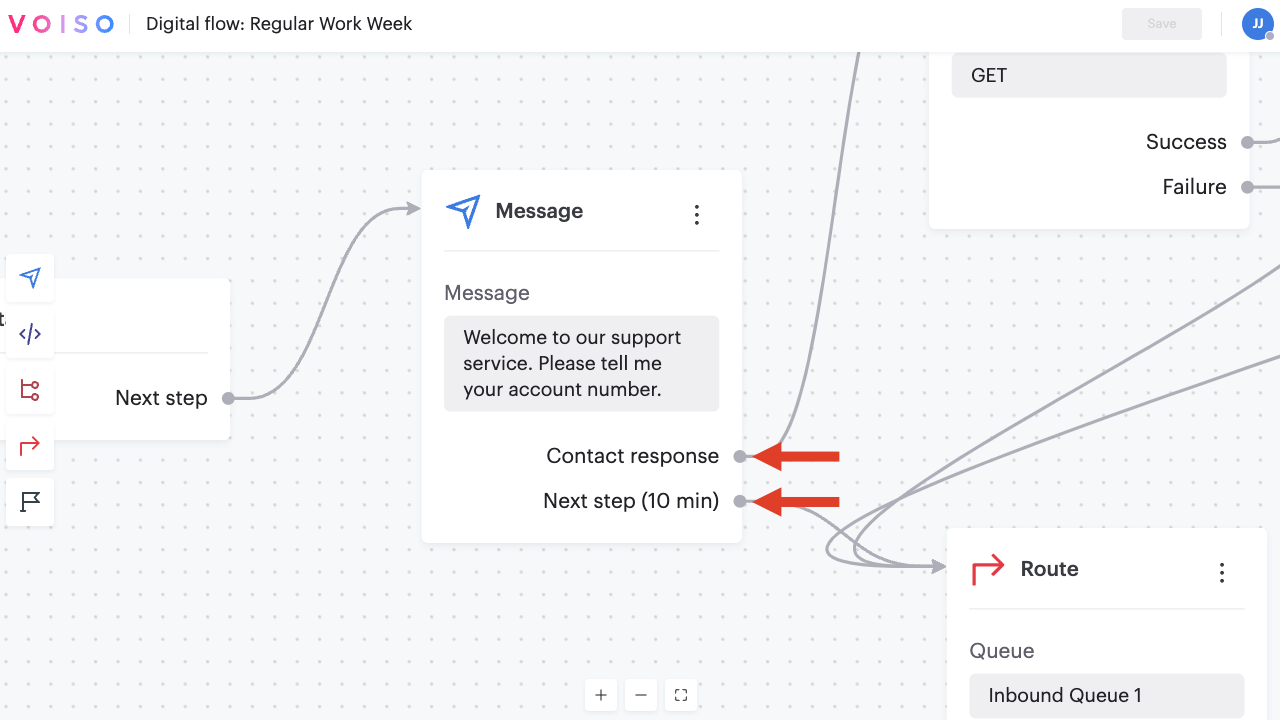
The Message node has two output connections: Contact response and Next step (or Next step (x)).
At least one of these connections must be set. These connections represent one of the possible outcomes for the node. Refer to the sections below for the details of these connections.
By default, only the Next step connection is required. The other connections are added if you request a contact response or set a timeout.
Contact response
If the Contact response option is specified in the Message configuration panel, the Contact response connection is added to the node.
If the contact responds to the message, the interaction is routed through this connection. If you specify a variable name in the Save to variable menu, the contact's response is saved to the variable and is available for processing by other nodes such as HTTP request and Conditions.
Next step
By default, the interaction is routed through the Next step connection unless you specify that a contact response is required.
The Next step (x) connection replaces this connection if a wait time is set.
Next step (x)
The Next step (x) connection replaces the Next step connection when a timeout is set in the Waiting time section.
"X" refers to the specified timeout value, rounded to the nearest hour, minute, or second. For example, a 10 second timeout changes the connection to Next step (10 sec).
Variables
The Message node supports system and custom variables that you can use when building requests and when passing data to the next node.
System variables
System variables can be used in the message text or the validation error response.
The following system (global) variables are available for digital interactions:
| Variable | Description | Example |
|---|---|---|
{{from}} |
A string containing the user's ID for the digital channel. | 55555555555 |
{{to}} |
A string containing the ID of the channel to which the user sent an interaction. | 55555555555 |
{{start_time}} |
The time the interaction started. | 2023-08-21T04:02:18Z |
{{uuid}} |
A string containing the UUID of the interaction. | 07771c38-c159-4965-a878-be0162118b2b |
Custom variables
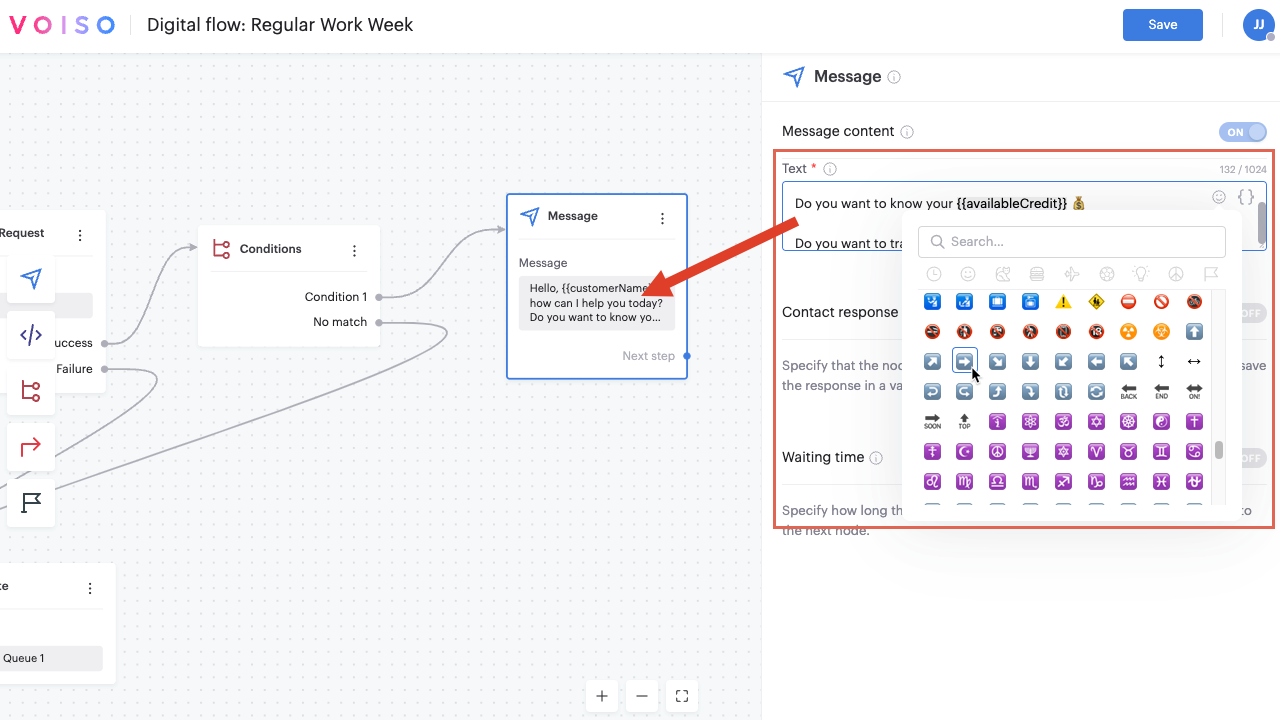
You can include dynamic content in your messages by leveraging custom variables in the Text field. Click "{ }" to display the Variables menu or manually enter a variable by typing its name enclosed in double brace brackets like this: {{variableName}}.
The Message node enables you to define and use custom variables to store data from the contact's response.
Passing data to other nodes
You can reference the custom variable from a Message node in the following nodes:
- Other Message nodes
- HTTP Request node
- Conditions node
- Route node
Configuring the Message node
To configure a Message node in your interaction flow, click the Message node to display the Message node panel. The panel includes three sections:
Rename the node
Beginning with the September 15 - 19, 2025 release, you may name nodes in Flow Builder. Click a node in the node palette to add it to the flow. The node is added to the flow and is named Node N, where N represents the number of the node; for example, Node 6. Below the node name is the node type, such as Play Audio. Click the node to open the node configuration panel, then click the name of the node to edit it. Enter a new name, then the check mark to save your change.
Message content section
Use the Text field of the Message content section to compose the message to be sent to contacts. Your message can include emojis and custom and system variables. Your message may be up to 1024 characters in length.
Contact response section
Use the Contact response section to wait for the contact to enter a response to the message and then route the interaction to the Contact response connection.
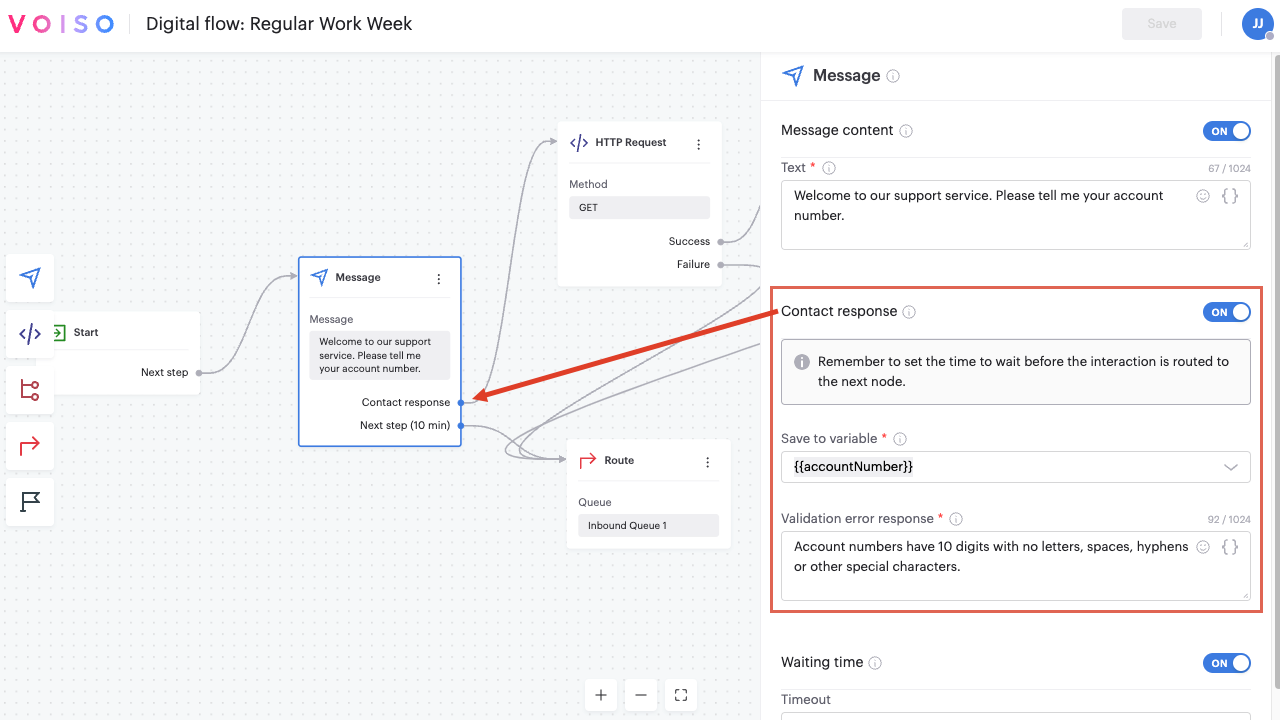
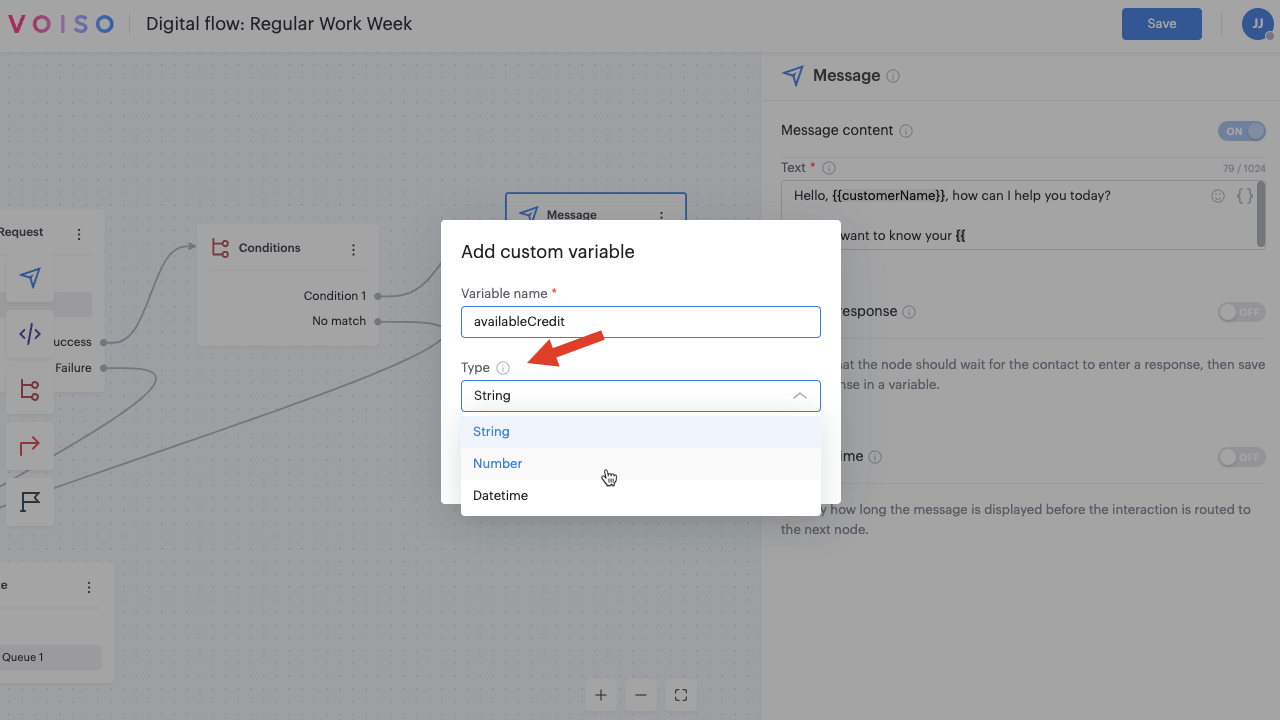
You may optionally save the contact's response in a custom variable. Select an existing custom variable from the Save to variable menu or click "+" to create a new one.
If you choose to save the contact's response, be sure to include a message in the Validation error response field that guides the contact on how to format their answer correctly, according to the data type of the variable. You can enhance this message by adding emojis and using custom or system variables. Your validation text may be up to 1024 characters in length.
The following table provides a description of each data type supported for custom variables.
| Type | Description | Example |
|---|---|---|
String |
Maximum string length is 4096 characters. Used for storing names, URLs, and other text-based information. | "Isabela García" or "https://myservice.com/bal?q={{var}}" |
Number |
Any numerical value up to 255 digits. Both integers and floating point numbers are supported. | "199.95" or "16" |
Datetime |
A single date and time in the following format: YYYY-MM-DD HH:MM:SS |
"2024-04-17 13:45:30" |
Waiting time section
Use the Timeout field in the Waiting time section to specify how long to wait until progressing to the next node.
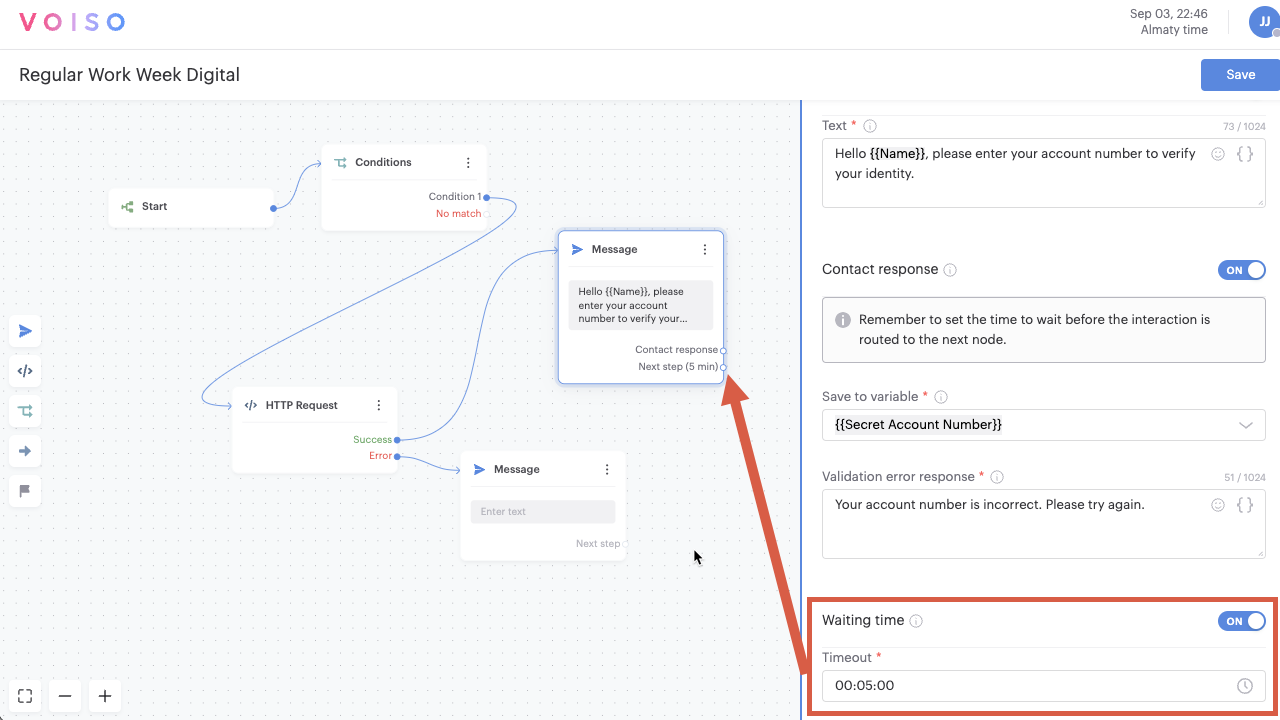
If the Contact response section is turned on, the node will either route the interaction by the Contact response connection if the contact responds to the message, or by the Next step (x) connection when the timeout expires, whichever occurs first.
"X" refers to the specified timeout value, rounded to the nearest hour, minute, or second. For example, a 10 second timeout changes the connection to Next step (10 sec).
If the Contact response section is enabled, the node will route the interaction when the contact responds. If the contact replies before the timeout, the interaction will follow the Contact response connection. If the timeout expires first, the interaction will be routed to the Next step (x) connection.
You may specify timeout values between 00:00:00 and 23:59:59. If no value is specified, the timeout is 24:00:00 by default.