Who should read this article: Administrators
How to create a multi-level IVR to enable callers to navigate your complex service options.
User story
As a contact center administrator, I want to set up a system that guides callers through different options when they call in. This system, called a multi-level IVR (Interactive Voice Response), helps direct callers to the right department or service. For example, if a customer needs help with billing, they can press a button to be connected to the billing department. If they need technical support, they can press a different button to reach the tech support team.
By using this system, I can manage all incoming calls through a single inbound phone number. This makes it easier for customers to get in touch with us, without needing to remember different numbers for different services. It also helps ensure that calls are routed more efficiently, reducing wait times and improving the overall customer experience.
I want the multi-level IVR helps to connect calls to the most suitable agent. This helps to ensure that customers speak with someone who has the right expertise to help them with their specific issue. Overall, this system will streamline our operations and enhances the quality of service we provide to our customers.
Tips for designing nested IVRs
The best IVRs are simple to use and present as few options to callers as possible. However, sometimes it is necessary to present callers with many menu options to help them resolve their questions faster.
It is generally accepted that a IVR should have no more than 5 options in a menu.
So what do you do if you have more than 5 options? Your organization might have many queues for the different services you offer, or you might have a complex set of self-service options.
To avoid giving callers too many choices in a single DTMF node, consider adding multiple DTMF nodes, each with only a few options.
A selection in one node routes the call to the next DTMF node where new options are available for callers.
The following is an example of three IVRs, numbered 1-3, nested together. We'll use this example throughout this article to talk about building a best-practice multi-level IVR.
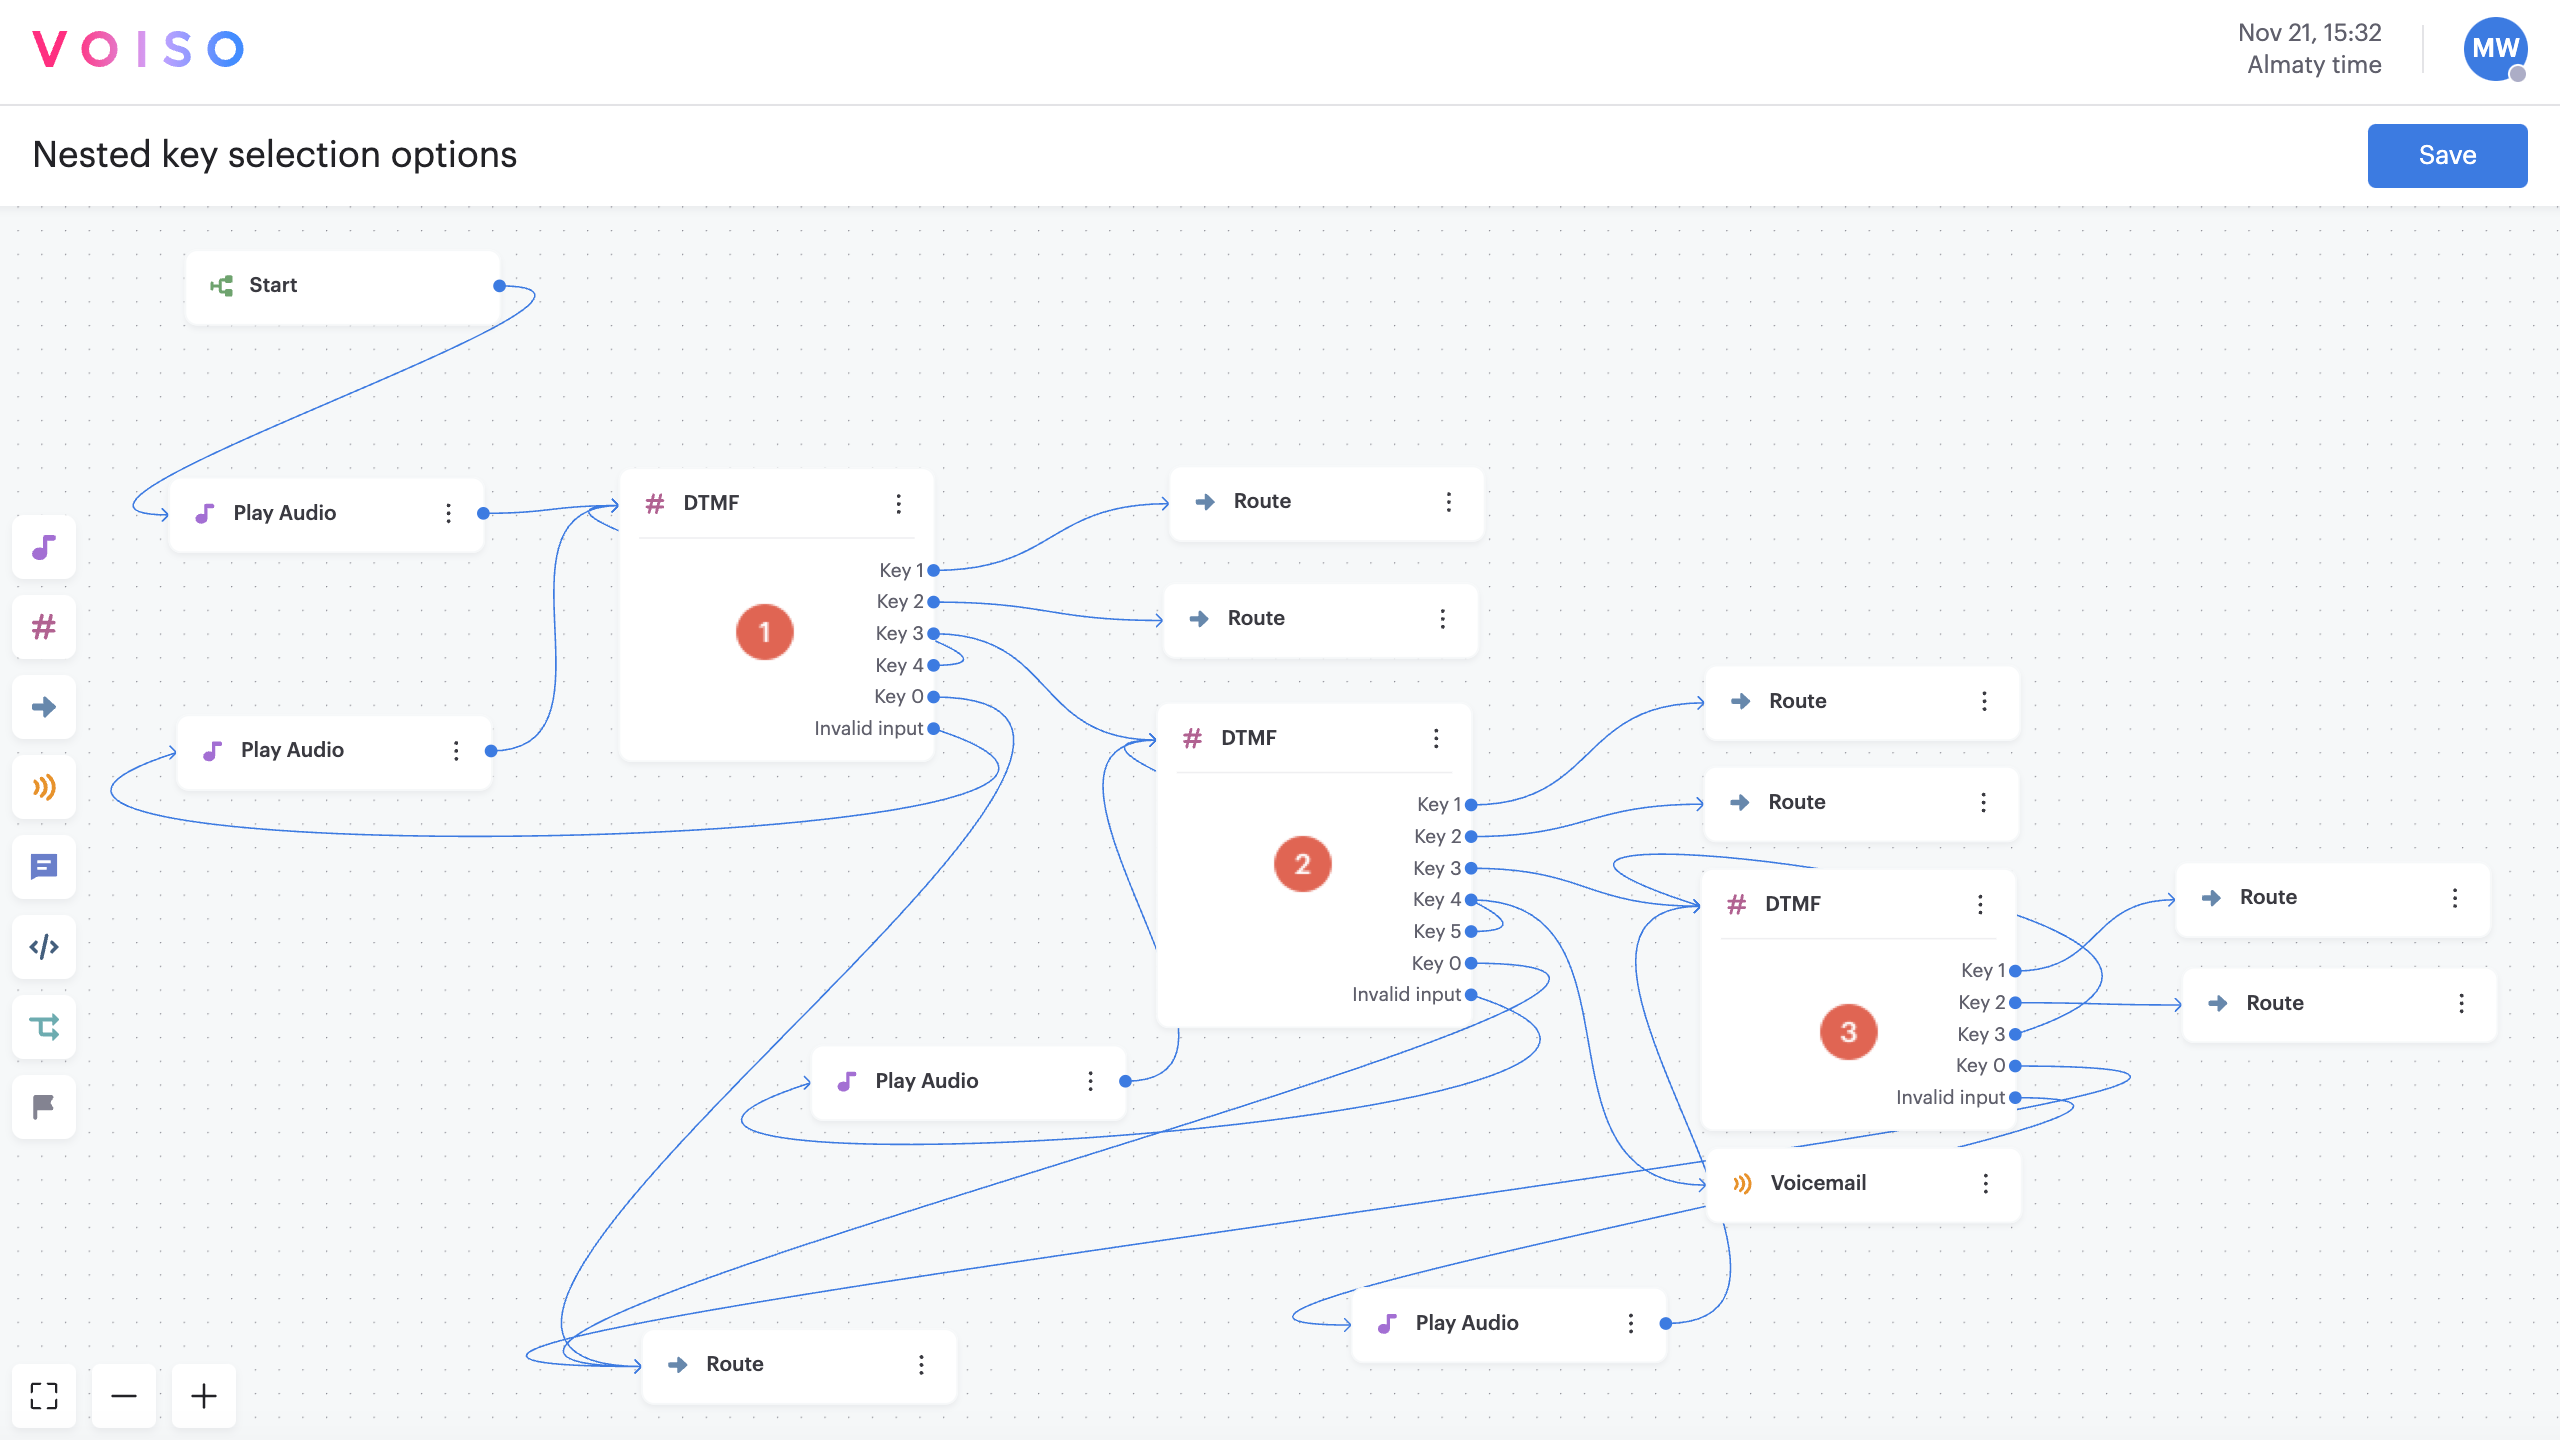
Try to avoid more than three DTMF nodes in a row. One or two is best. Presenting too many options can cause a caller to zero out (press 0 to go directly to someone who will direct the call for them).
Organizing menu options
The purpose of an IVR is to direct callers to the right queue as efficiently as possible. To do this, present the options in an order reflecting the most frequently used selection or those of the highest value to you.
With a multi-level IVR, you can prioritize and separate incoming calls into different queues instead of having all your inbound traffic waiting in one queue.
Segmenting queues enables you to direct the most important or highest-value calls to specific queues while directing the lower-value calls to other queues or to self-service.
For high-value callers, make the path to an agent as short as possible (or consider by-passing the IVR using priority routing altogether).
For lower-value callers, consider building in self-service options rather than directing certain inquiries to an agent queue. Use the Conditions and HTTP request nodes to gather caller data, retrieve information from a web service, and then provide the caller with answers to their queries using the Send message node to send an SMS or WhatsApp message.
Designing your top level menu
This section makes basic recommendations for setting up the top-level IVR in a multi-level setup.
The first DTMF node should include your most critical or highest-value menu options, organized by priority.
The most critical calls should take the shortest path from the IVR to the queue, agent, or other service.
The next one or two items should also be among your most common and highest-value services.
If you still have many more options for your callers, consider making the third or fourth option a link to the next DTMF node. This node could include less common or lower-value services.
Group options in a way that makes sense to your callers. For example, if you're making a customer support IVR, you might have these three options at the top level: billing, technical support, and general inquiries. Billing should go immediately to a queue while technical support and general inquiries might lead to the next level of options.
For very complex organizations with multiple departments and sub-departments, you can have more than one DTMF node linked from your first node.
- People typically have poor short-term recall. To help your callers, include the numbers after you describe each option. For example, say, “For support, press 1” instead of “Press 1 for support."
- Give the caller enough time to make a selection before repeating the options. This makes it easier for mobile users who must move the phone away from their ear to make a key selection.
- Keep the welcome recording separate from the menu prompt recording so the caller does not have to listen to it every time they return to the DTMF request node.
- Avoid unnecessary messaging in the audio prompt. Focus on the options so your callers do not become distracted or confused.
- Provide an option to repeat the options.
Rename the node
Beginning with the September 15 - 19, 2025 release, you may name nodes in Flow Builder. Click a node in the node palette to add it to the flow. The node is added to the flow and is named Node N, where N represents the number of the node; for example, Node 6. Below the node name is the node type, such as Play Audio. Click the node to open the node configuration panel, then click the name of the node to edit it. Enter a new name, then the check mark to save your change.
Use Case: Creating a hierarchy of nested IVRs
The Voiso Flow Builder makes adding a complex IVR to your inbound call flows easy.
There's no limit to the number of levels of key selection options you can specify for your contact center using nested DTMF nodes.
However, it is a best practice to limit the number of key selection options available in each DTMF node to 5 or fewer.
Prep your contact center resources
First, create an inbound queue and assign agents to the queue. Next, obtain an inbound phone number for your contact center.
For more details, refer to the How to start receiving calls with Voiso article.
IVRs rely on recorded messages (media files) to explain the keypress selections available to callers.
Create a recorded message as a media file (for example, an MP3). The message can be quite simple. For example, the message could be:
Welcome to Our Organization. Press 1 to be connected to an agent, press 2 to leave a voicemail, or press any other number to hear this message again.
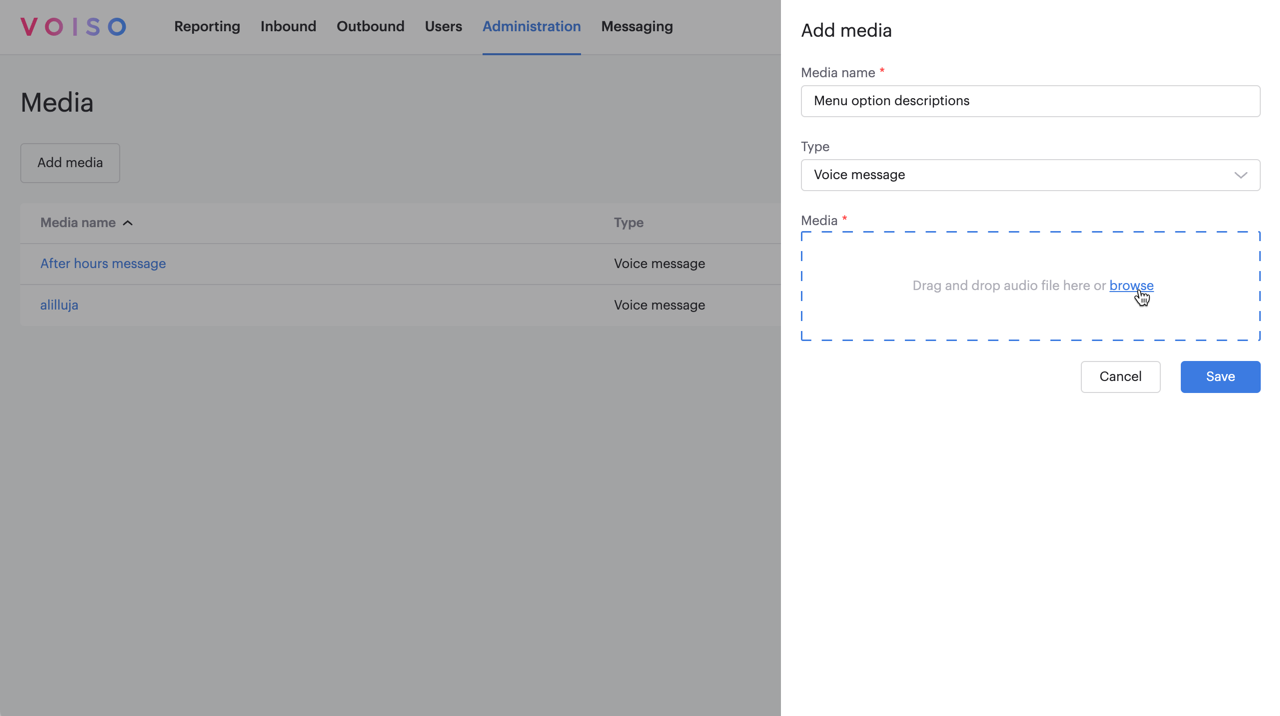
Upload your audio message to your contact center media collection (navigate to Administration > Media in the main navigation bar).
Adding media
To upload a new audio file to your media library, follow these steps:
- Click Add media.
- In the Add media panel, enter a name for the file. This name appears in the Media table and in selection menus throughout the application.
- From the Type dropdown, select the media type that matches how the audio will be used (e.g., MOH, Voice Message, or Ringtone).
- In the Media section, either drag and drop an audio file from your computer or click browse to select a file.
- Click Save to upload the file.
For supported audio formats and file size limits, refer to Supported file formats.
Configure the first level IVR
This section makes recommendations for configuring the DTMF node to optimize the user experience.
Every flow begins with the Start node. After the Start node, consider making it possible for certain contacts to skip the IVR. This technique is not used in this example, but you can read about it in Skipping the IVR.
Before the IVR, use the Play audio node (labeled 1 in the screenshot below) to play a welcome message for your callers. Put this node before the IVR so that callers do not have to listen to your welcome message more than once per call.
Now add the first DTMF node (labeled 2 in the screenshot) and configure its connections to queues and lower-level IVRs.
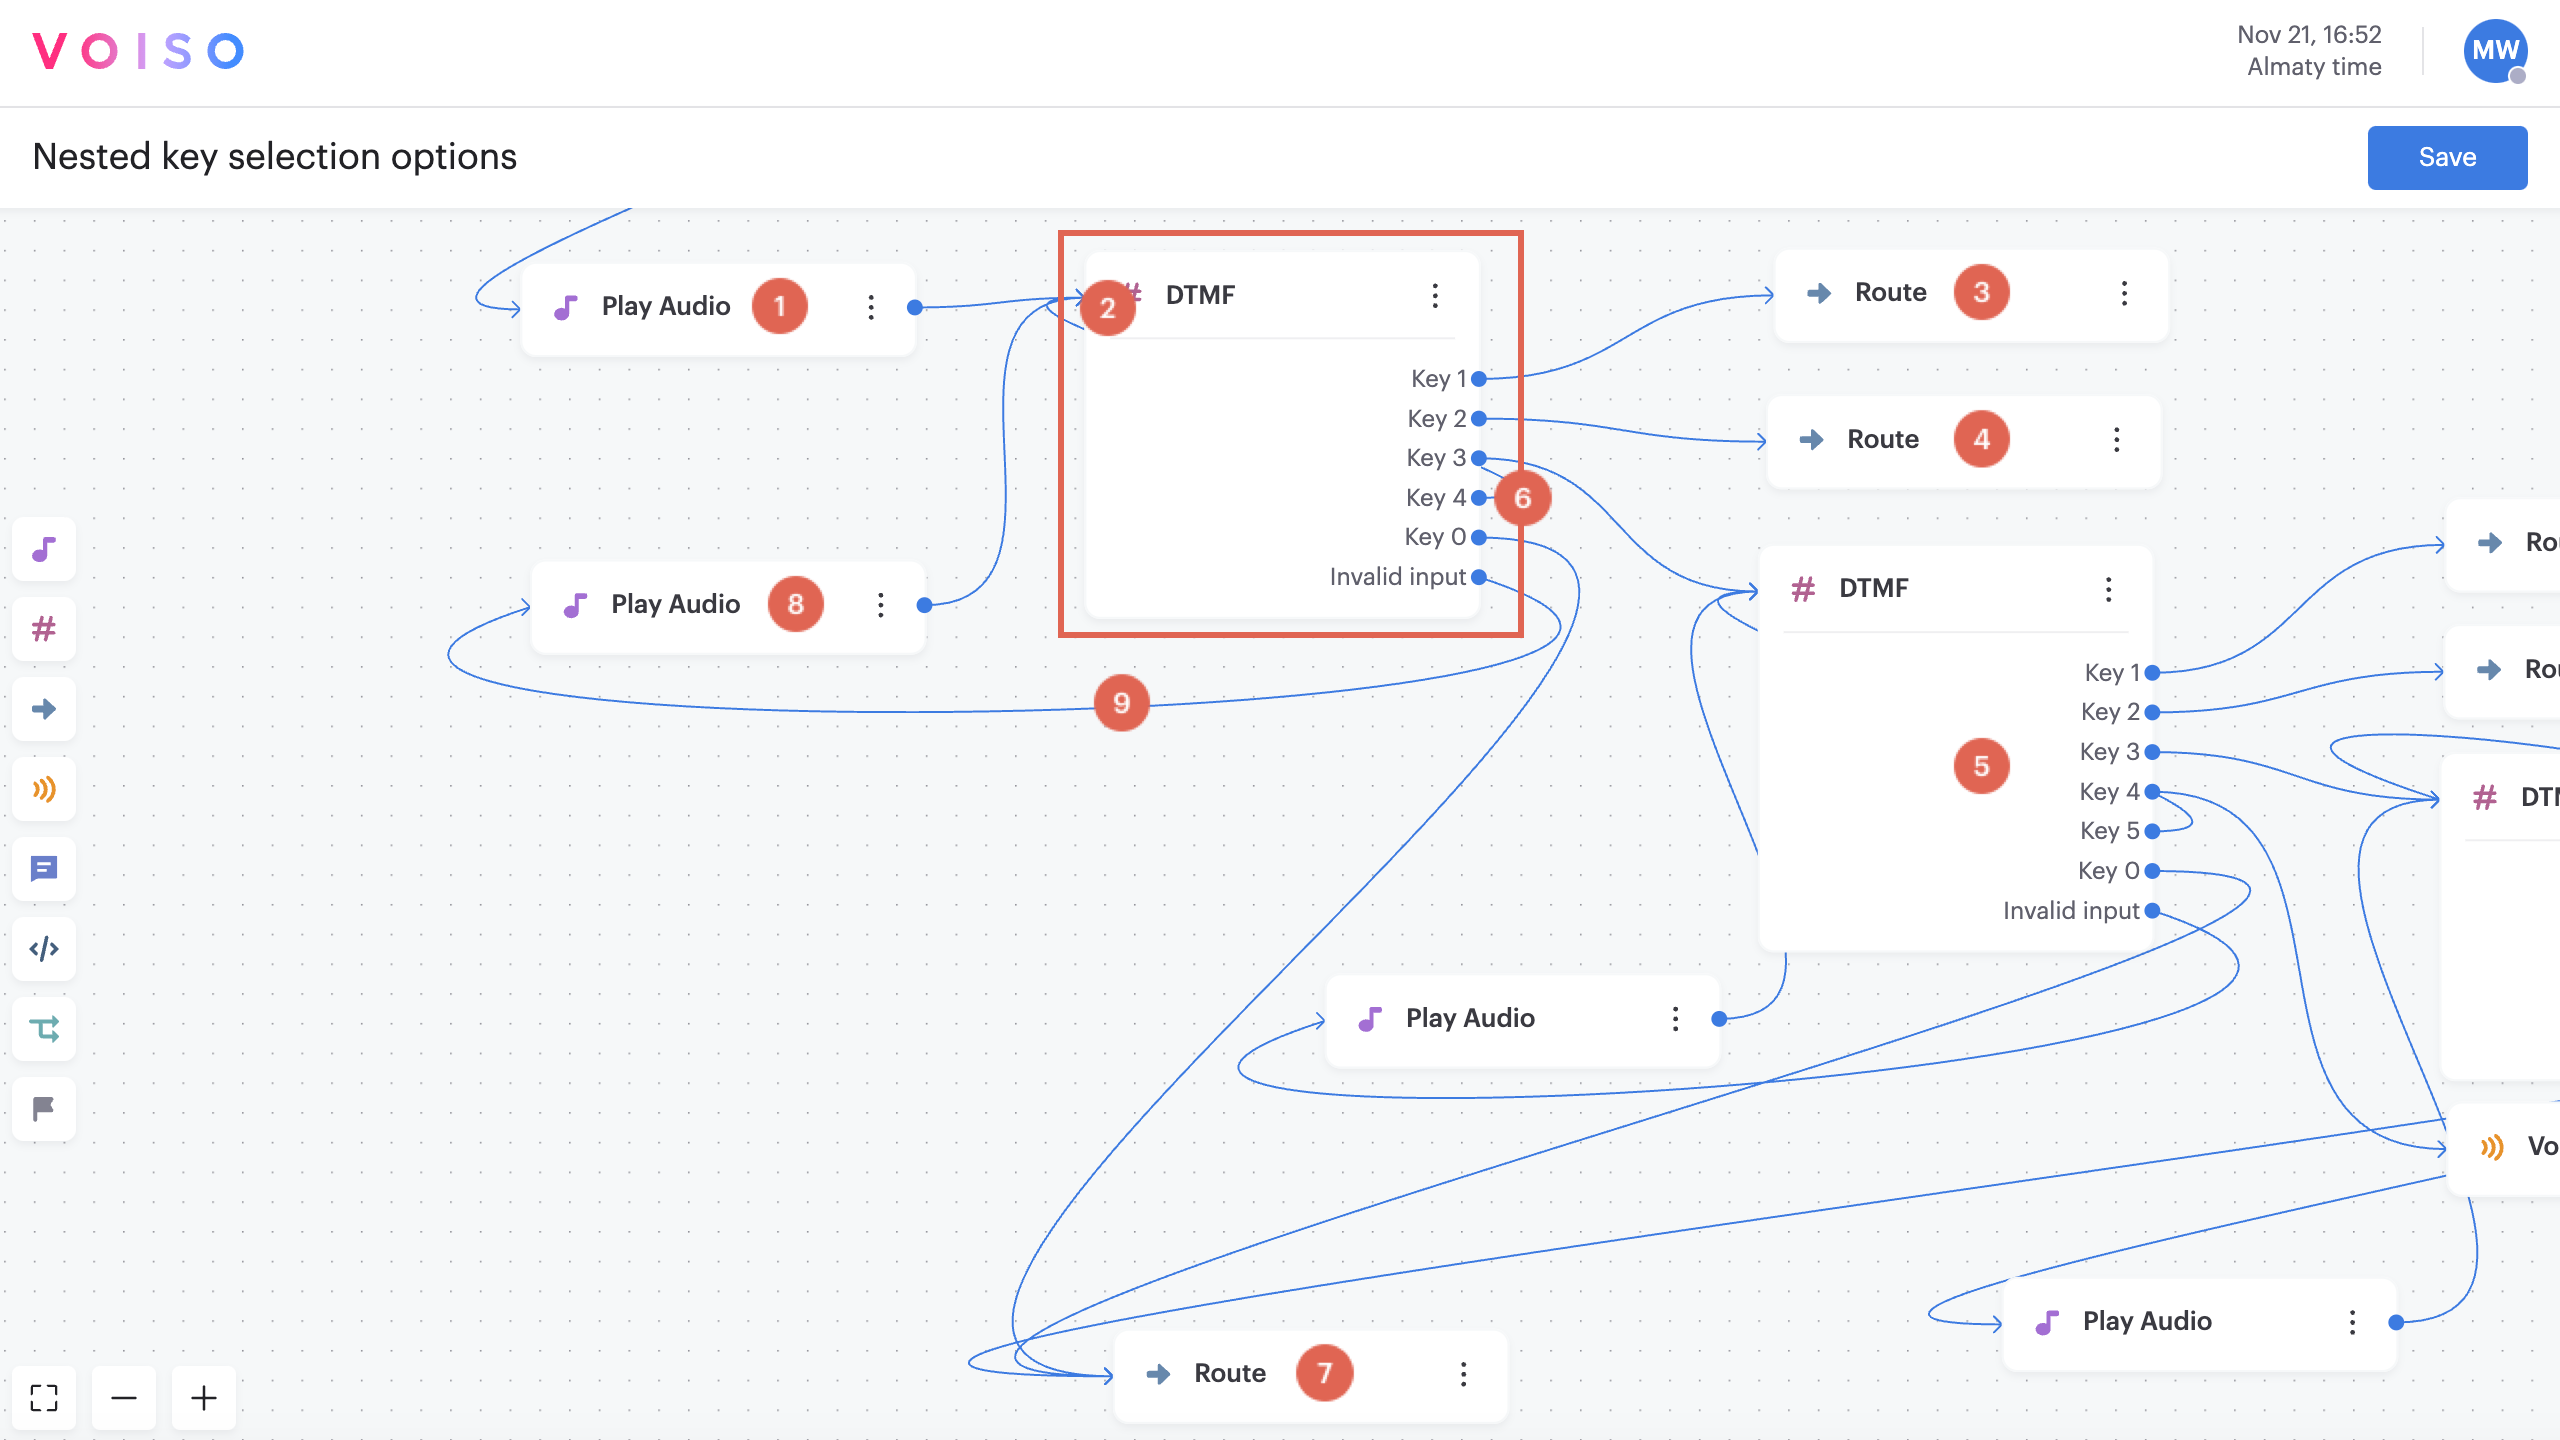
This table explains the numbering in the screenshot.
| # | Description |
|---|---|
| 1 | A welcome audio media is played for the caller at the Play audio node. As a rule of thumb, such messages should be less than 8 seconds. Place it before the IVR to ensure that the caller hears it only once during their call. |
| 2 | This DTMF node is the top-level IVR. It includes an audio message that describes the menu options. For example, it might say: "For Billing, press 1. For Service, press 2. For the Support department, press 3. To repeat these options, press 4. To speak to an operator, press 0." It presents callers with a maximum of 5 options, 1-4 plus 0. |
| 3 | If the caller presses 1, the call is routed to this Route node, which directs the call to the highest value queue – in this example, the Billing queue. |
| 4 | If the caller presses 2, the call is routed to this Route node, which directs the call to the next highest value queue – in this example, the Service queue. |
| 5 | If the caller presses 3, the call is routed to the next level IVR represented by the second DTMF node – in this example, the Support department directory. The IVR includes an audio message that describes the new menu options for the Support department. It routes to queues specific to the Support department and the next level IVR. |
| 6 | If the caller presses 4, the call is routed back to the beginning of the first DTMF node. The audio message describing the menu options is replayed. |
| 7 | If the caller presses 0, their call is routed to this Route node – in this example, the operator queue. This queue is for general inquiries and callers who do not find what they are looking for in the main IVR menu. If your IVR is well designed, only a few calls end up here. |
| 8 | If the caller inputs an invalid number, the call is routed to this Play audio node, which includes an audio message explaining that the number pressed is not a valid option. |
| 9 | After the invalid selection message is played, the call is routed back to the IVR, and the menu description audio message plays again. |
Follow the same principles to set up the other DTMF nodes in the flow. Try to be consistent from IVR to IVR, so your callers have a uniform experience.