Who should read this article: Administrators
Create users and manage access and account properties.
If your contact center does not use Security Access Groups to create and manage roles, refer to Basic user roles to learn more about how to create and manage users with the basic user roles available by default.
Introduction
A user is anyone who works in your contact center who administers the contact center, supervises agents, analyzes data, or handles interactions (agents). Manage user accounts in the Users page. To access the Users page, from the Voiso main menu, navigate to Users > Users.
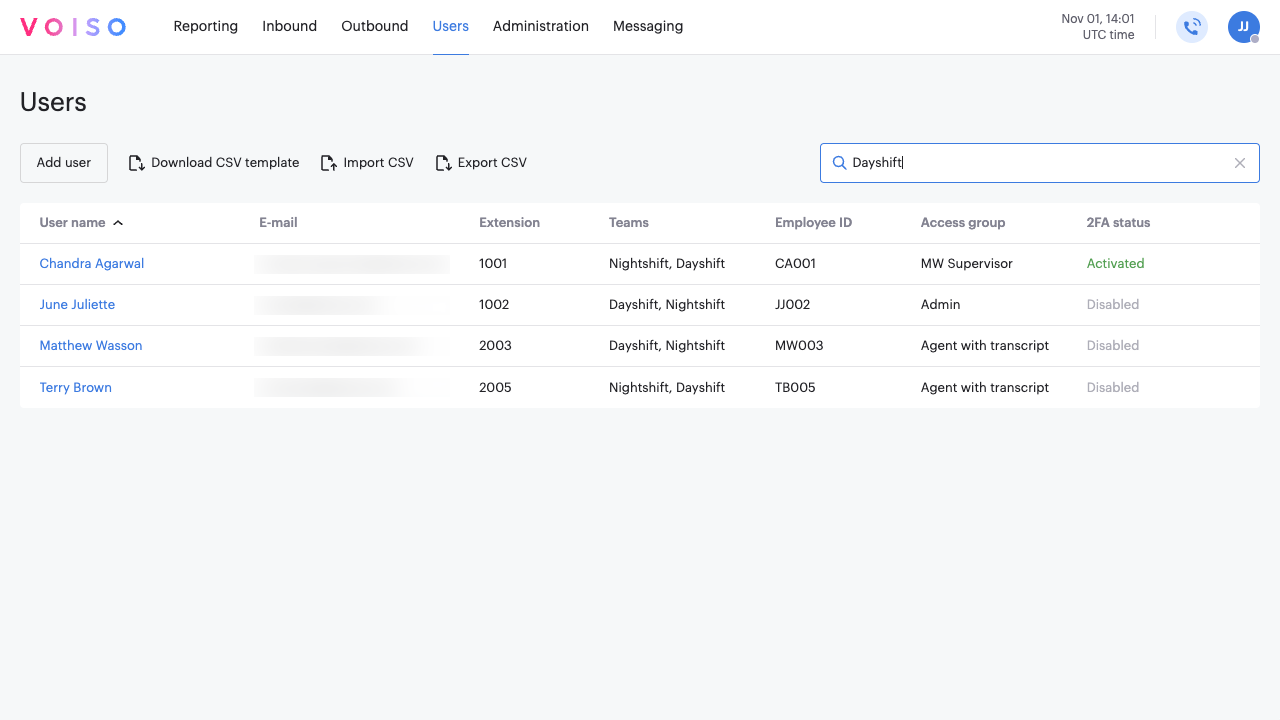
The following information is displayed for each user:
| Property | Description |
|---|---|
| User name | The real name of the person |
| The email address the person uses to log into their Voiso account. If you use a Voiso CRM integration, this email address should be the same address that the person uses to log into your contact center CRM. | |
| Extension | The three- to four-digit extension of the user's phone. The extension is dialable by other users who have access to the Agent Panel. You must assign an extension to every user who will handle transfer, consult, and conference calls from other users. Although agents may search for users and queues by name in the Agent Panel, Voiso requires the target to have a unique extension to route transfer, consult, and conference calls. |
| Teams | The team to which the user belongs. |
| Employee ID | An optional string that you can use to associate an ID from your organization with the user. You can search in the User page for a user based on their Employee ID. |
| Role/Security access group | The user's role. A role determines what access permissions a user has in your contact center. The default roles are Admin, Agent, Analyst, Hardware Phone, and Supervisor. If Security Access Groups are enabled for your contact center, you can create custom roles. Click the name of a security access group to view the access group settings. |
| 2FA status | The current two-factor authentication status for an agent. Disabled means 2FA is not assigned to the user. Pending means that 2FA is assigned to the user, but the user has not yet followed the setup procedure. Activated means the user has completed the setup procedure. |
Click a user's name in the User table to edit the user's account configuration. The Edit user page contains the same fields as the Add user page.
Adding a user
There are two ways to add users to your contact center. The first is to manually add users one at a time, and the second is to import a CSV of user properties.
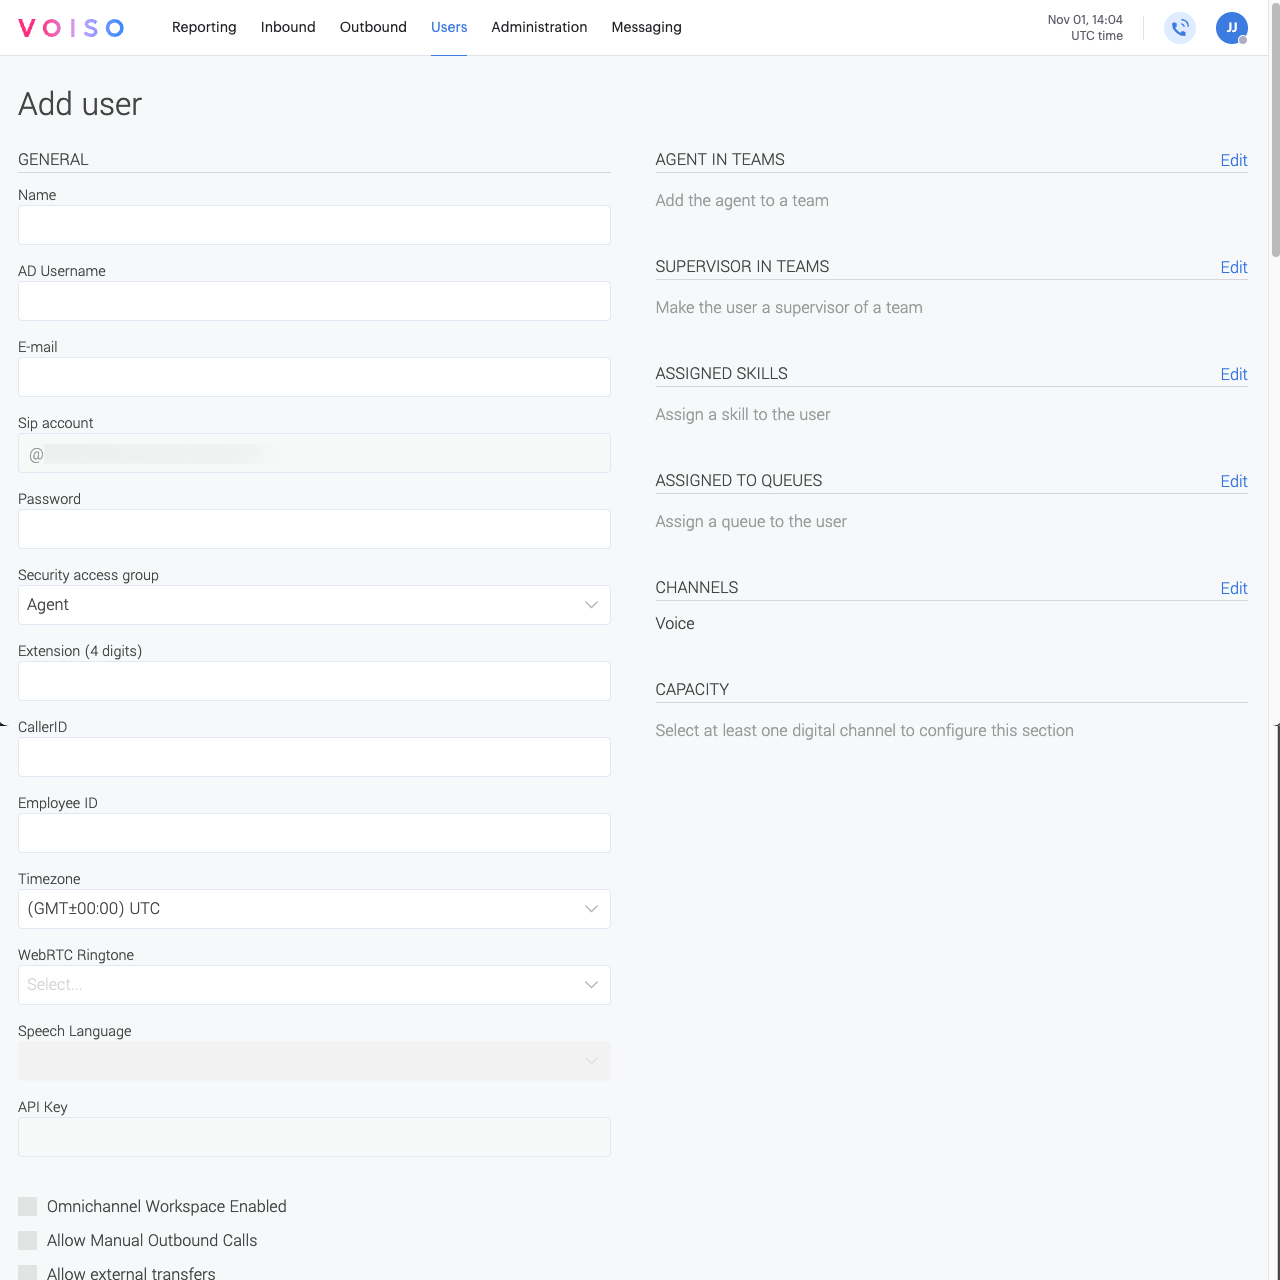
To add a single user, from the Voiso main menu, navigate to Users > Users then, to display the Add user page, click Add user. Specify the user properties, then click Save.
When you save a new user profile or update the email of an existing user, Voiso automatically sends an email to the specified address. The recipient must confirm the email address to activate the user account.
For contact centers that do not use Security Access Groups, if AMD is enabled for your contact center, you can ask your Voiso representative to turn on AMD by default for all new users you create.
On this page you can specify the following user properties:
| Property | Description |
|---|---|
| Name | The real name of the person |
| AD Username | This is a legacy field that is no longer used. |
| The email address the person uses to sign in to their Voiso account. If you use a Voiso CRM integration, this email address should be the same address that the person uses to log into your contact center CRM. | |
| Sip Account | The SIP server address for the user's WebRTC Softphone. The address is generated automatically based on the user's email address. |
| Password | The user's login password. Note: Passwords must include the following: At least one upper case, one lower case, and one special characters, and one number. This password is used along with the email address to log into the Voiso service. |
| Role | For contact centers without Security Access Groups, the user's role. A role determines what access permissions a user has in your contact center. |
| Security access group | For contact centers with Security Access Groups, the user's role. A role determines what access permissions a user has in your contact center. |
| Extension | The three- to four-digit extension of the user's phone. The extension is dialable by other users who have access to the Agent Panel. |
| Caller ID | The Caller ID that is displayed to contacts for manually dialed and click-to-call outbound calls. If the user is assigned to a team and the team has an associated Caller ID group, the Caller ID group numbers take priority over the Caller ID assigned individually when the user selects that Caller ID group in Agent Panel. |
| Employee ID | An optional string that you can use to associate an ID from your organization with the user. You can search in the User page for a user based on their Employee ID. |
| Time zone | The time zone that the user is covering for handling interactions (the contacts' time zone) or the time zone where the user is located. The time zone is displayed in the CDR and audit logs. |
| WebRTC ringtone | The ringtone that plays when the user receives a call through the Agent Panel. Choose either the default ringtone or one from a file of type Ringtone you have added in the Media page. |
| Speech recognition | Specify whether the Speech Analytics feature is enabled |
| Speech language | If the speech recognition feature is enabled, specify the language the user speaks when handling calls. If the Detect language feature is enabled, this field is automatically set to Auto. |
| API key | The identification key that Voiso associates with the user. Use the key with the Voiso CDR, Campaigns, Deleted Users, Queues, Teams, Users, and Wrap-up codes APIs to request information about the user. |
| Agent in teams | If the user is an agent, specify the team or teams to which the user belongs |
| Supervisor in teams | If the user is a supervisor, specify the team or teams that the user supervises |
| Assigned skills | Specify the skill or skills associated with the user for interaction routing purposes |
| Assigned to queues | Specify the inbound voice queue to which the user belongs for call routing purposes |
| Channels | Specify the interaction channels to which the user is assigned, including voice and messaging (digital) channels such as Webchat, WhatsApp, Telegram, Viber, Facebook, and Instagram. |
| Capacity | Specify the number of simultaneous interactions a digital channels user may handle |
| Permissions | A summary of permissions granted to the user, based on their role. If the Security Access Groups feature is not enabled, you can modify the user's permissions. |
| Disable | A list of features that can be disabled for the user, based on their role. If the Security Access Groups feature is not enabled, you can modify the user's permissions. |
Refer to the Multi-factor authentication article for information about enabling the 2FA feature.
Example: Granting Outgoing Call Permissions to a User
By default, new users do not have permission to make manual outbound calls. You must grant this permission in the user's profile or import a bulk user CSV with the Allow Manual Outbound Calls field set to y.
To enable manual outbound calling for a new user, follow these steps:
- Navigate to Users > Users in the Voiso main menu.
- Click Add user to create a new user profile.
- Enter the user's Name.
- Specify the AD Username—this is the name displayed in Agent Panel.
- Enter the Email address the user will use to sign in.
- Select the Role for the user:
- Choose Agent for users who will handle interactions.
- Set the user's Extension—this number is used for call transfers and routing.
- Enter the Caller ID that will be displayed when making outbound calls.
- If left blank, the default Caller ID is used.
- Select the user's Time zone.
- In the Permissions section, enable Allow manual outbound calls.
- This is required only if the user will manually dial outbound calls.
- If the user will only handle inbound calls or participate in outbound Dialer campaigns, this setting is not required.
- (Optional) To allow click-to-call from your CRM, enable Allow click-to-call.
- Assign the user to a Team. Note: An agent can belong to multiple teams only if all teams share the same Effective Call Duration setting.
- If the user will handle inbound calls, assign them to a Queue.
- Click Save to create the user profile.
Standard users and Virtual agents
The Virtual agent feature is available for contact centers on the Pro plan or higher.
If the Virtual agent feature is enabled in your contact center, a dialog is displayed when you click Add user to enable you to select either a standard user or a virtual agent. In the Add user dialog, choose Standard user, then click Continue. Configure the standard user as described in the Adding a user section.

Bulk User Account Management
To efficiently manage multiple users in your contact center, Voiso enables bulk user account creation and modification using a CSV file. Export the current user list to act as a template, modify user properties, and re-import the updated file. This ensures all settings align with your contact center's latest configurations and available features.
Watch this video to learn how to export a list of existing users as a CSV file, edit it to modify user details, and import the updated file to apply changes and add new users to your contact center.
Exporting the User List
To begin, export a list of current users in CSV format. This file serves as both a reference for existing user settings and a template for adding new users.
To export the current user list:
- Navigate to Users > Users in the Voiso navigation bar.
- Click Export CSV.
- A file named
users-YYYY-MM-DD.csvis downloaded to your Downloads folder.
The exported file includes the latest available user settings and permissions, reducing the likelihood of formatting errors during import.
To ensure you are using the most up-to-date format, always export the latest user list instead of using an old CSV file.
Preparing the CSV File
For contact centers using basic roles
Ensure that you follow role-specific guidelines:
- Default permissions are assigned based on the user’s role.
- Some permissions are editable, while others are fixed.
- If you leave permissions fields blank, the default permission for the specificed role will be assigned.
For details on available user roles and permissions, refer to User Role Permissions and Basic user roles.
For contact centers using security access groups
If your contact center uses security access groups, DO NOT modify user permissions in the CSV file. Permissions are tied to roles. To change permissions for a user, first create a role with the required permission set, then assign that role to the user.
If you are importing new users in bulk, LEAVE ALL THE PERMISSIONS BLANK as these will be set by the assigned role.
For details on available user roles and permissions, refer to User Role Permissions.
Here are the basic steps to update the CSV file to get it ready to be imported:
- To modify existing users, open the exported CSV file in a spreadsheet or text editor and update user properties as needed.
- To add new users, follow these steps:
- Use the existing format to add new users to the file.
- Ensure required fields, such as Name, Email, Role, and Timezone, are populated.
- Save the updated CSV file.
- Import the CSV file on the Users page.
Importing the CSV File
Once the CSV file is ready:
- Navigate to Users > Users.
- Click Import CSV.
- Select the modified CSV file from your device.
- Click Upload to apply the changes.
New user accounts are created, and updates to existing users are applied immediately.
User Role and Permissions
The following sections outline the permissions available for each user role.
- The contents of the template change from time to time as new features are made available to you. Please export the latest user file from the Users page to ensure that you have all the up to date fields.
- The exported CSV of current users reflects the latest role configurations. Do not use the user template.
User template (basic user roles)
Use the following information to guide you to set up your CSV file (for contact centers that do not use security access groups).
Click to expand
| Head | Example Value | Required | Notes |
|---|---|---|---|
| Name | John Smith | Yes | |
| 0_example@yourcontactcentername.com | Yes | The email used to sign in to Voiso | |
| Password | John1234#_0 | Yes | |
| Sip account | 0_example | Yes | |
| Role | agent | Yes | agent, admin, supervisor, analyst, or hardware phone |
| Extension | 0111 | No | |
| CallerID | 1555555555 | No | If empty, the default Caller ID is used. |
| CTI | disabled | No | |
| Timezone | Amsterdam | Yes | Default is UTC |
| Queues | First queue;Second queue | No | The names of queues in your contact center |
| Skills | Speaking: 1;Learning: 1 | No | |
| Teams Supervisor | Team 0; Team 1 | No | The names of teams the user supervises |
| Teams Agent | Team 2; Team 3 | No | The teams the user is a member of. Note: An agent can belong to multiple teams only if all teams share the same Effective Call Duration setting. |
| WebRTC Ringtone | Test Ringtone | No | The name of a ringtone file on your contact center media page |
| Allow Manual Outbound Calls | n | Yes | |
| Enable Answering Machine Detection | n | Yes | |
| Allow Feature Access Code | y | Yes | The user can use dialing prefixes to monitor calls |
| WebRTC Enabled | y | Yes | The user may access Agent Panel to handle calls |
| Dashboard Number Masking | n | Yes | |
| Disable recordings download | n | Yes | |
| Click-to-call Client Number Masking | n | Yes | |
| Allow click-to-call | n | Yes | |
| Allow CDR Downloads | y | Yes | |
| Allow HLR Lookup requests | n | Yes | |
| Allow external transfers | y | Yes | |
| CDR enabled | y | Yes | Allow access to Call Detail Records |
| Historic report enabled | n | Yes | |
| Enable access to support chat | n | Yes |
User template (with Security Access Groups)
Use the following information to guide you to set up your CSV file (for contact centers with security access groups).
Click to expand
| Head | Example Value | Required | Notes |
|---|---|---|---|
| Name | John Smith | Yes | |
| 0_example@yourcontactcentername.com | Yes | The email used to sign in to Voiso | |
| Password | John1234_0 | Yes | |
| Sip account | 0_example | Yes | |
| Access Group | agent | Yes | agent, admin, supervisor, analyst, or hardware phone |
| Extension | 0666 | No | |
| CallerID | 1555555555 | No | If empty, the default CallerID is used. |
| Employee ID | 123ABCdef0 | No | |
| CTI | disabled | No | |
| Timezone | Jerusalem | Yes | Default is UTC |
| Queues | First queue;Second queue | No | |
| Skills | Speaking: 1;Learning: 1 | No | |
| Teams Supervisor | Team 0; Team 1 | No | The teams the user supervises. |
| Teams Agent | Team 2; Team 3 | No | |
| WebRTC Ringtone | Test Ringtone | No | |
| Speech language | en_us | No | Use ISO standard language and country codes. |
| Allow Manual Outbound Calls | n | Yes | |
| Enable Answering Machine Detection | y | Yes | |
| Allow Feature Access Code | n | Yes | |
| WebRTC Enabled | n | Yes | |
| SMS Enabled | n | Yes | |
| Call Notes Enabled | n | Yes | |
| Replace client numbers with Acc IDs | n | Yes | |
| Enable selective recording | y | Yes | |
| Dashboard Number Masking | n | Yes | |
| Disable recordings download | n | Yes | |
| Click-to-call Client Number Masking | n | Yes | |
| Allow click-to-call | y | Yes | |
| Allow CDR Downloads | y | Yes | |
| Allow HLR Lookup requests | y | Yes | |
| Allow external transfers | n | Yes | |
| CDR enabled | n | Yes | |
| Historic report enabled | y | Yes | |
| Speech recognition enabled | y | Yes | |
| Omnichannel Workspace Enabled | y | Yes | |
| Enable Mobile application | y | Yes | |
| Enable access to support chat | y | Yes | |
| Channels | Instagram;WhatsApp | No | |
| Instant Messaging Capacity | 526 | No | |
| Webchat Capacity | 121 | No | |
| WhatsApp Outbound Numbers | 2051111111110;6542222222220 | No | |
| Viber Sender IDs | sender10;sender20 | No | |
| 2FA Enabled | n | Yes | Refer to Multi-factor authentication. |
Reset 2FA
The Reset 2FA feature allows you to reset a user's two-factor authentication (2FA) status from the Edit user page. This option is available when 2FA is currently enabled for the user and the user has requested a reset during the authentication process.
A reset may be required if a user loses access to their 2FA device or encounters errors during initial setup. Once reset, the user will be prompted to complete the 2FA setup again at their next login. This helps ensure continued account security while minimizing support delays.
When a user has requested that their 2FA status be reset, a red alert icon is displayed in the Users page in the user's table row.
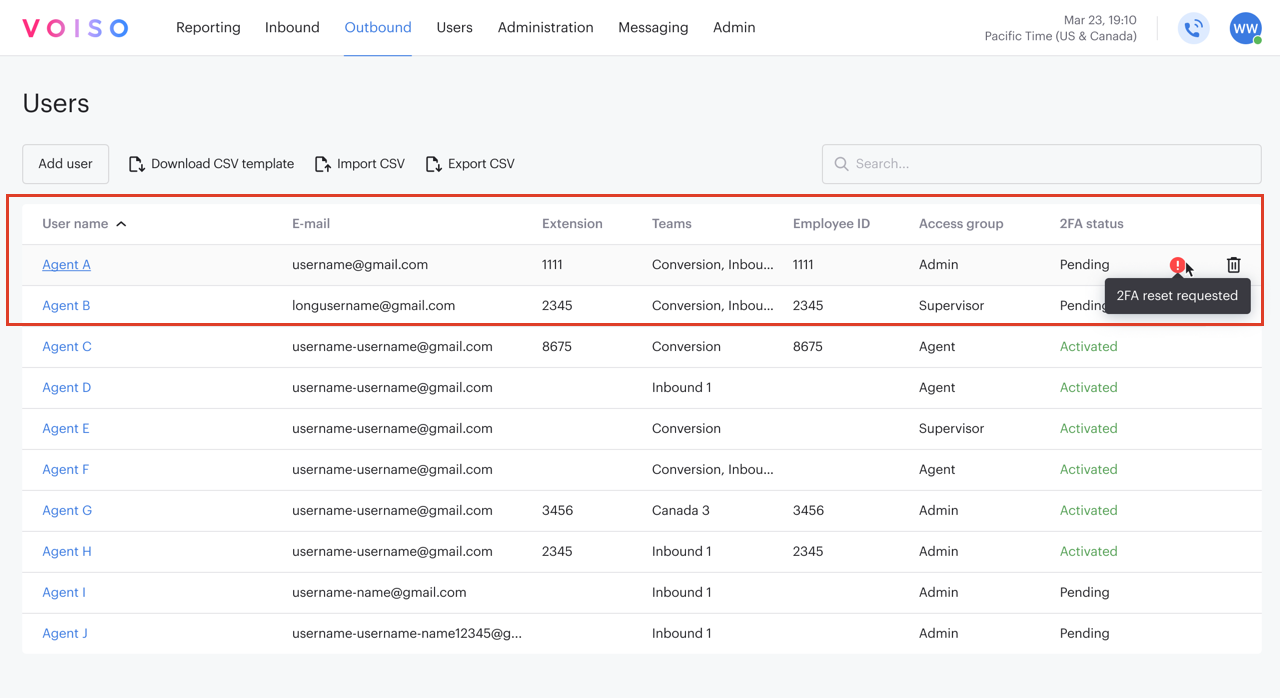
Click the user's name to open the Edit user page. For users who have requested 2FA reset, the following notice is displayed at the top of the page:
This user cannot log in and requested 2FA reset. Click here to manually reset it.
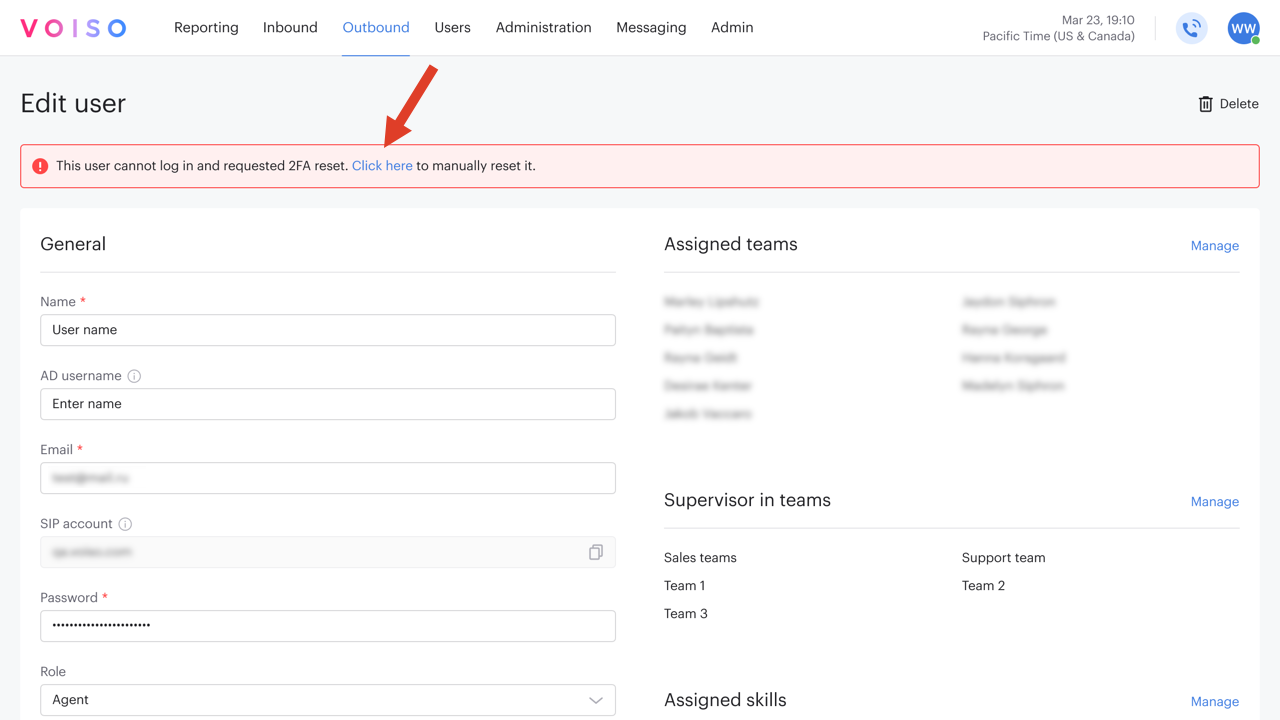
Click the link to reset the user's 2FA status. The next time the user signs in they will have to repea the 2FA setup.
User Profile
User's can view some account properties and manage their user interface settings by using the User Profile menu.
Adding WhatsApp outbound channels
If you assign the WhatsApp channel to a user, in the Channels section, the WhatsApp Outbound Channels section is added to the Add user or Edit user page.
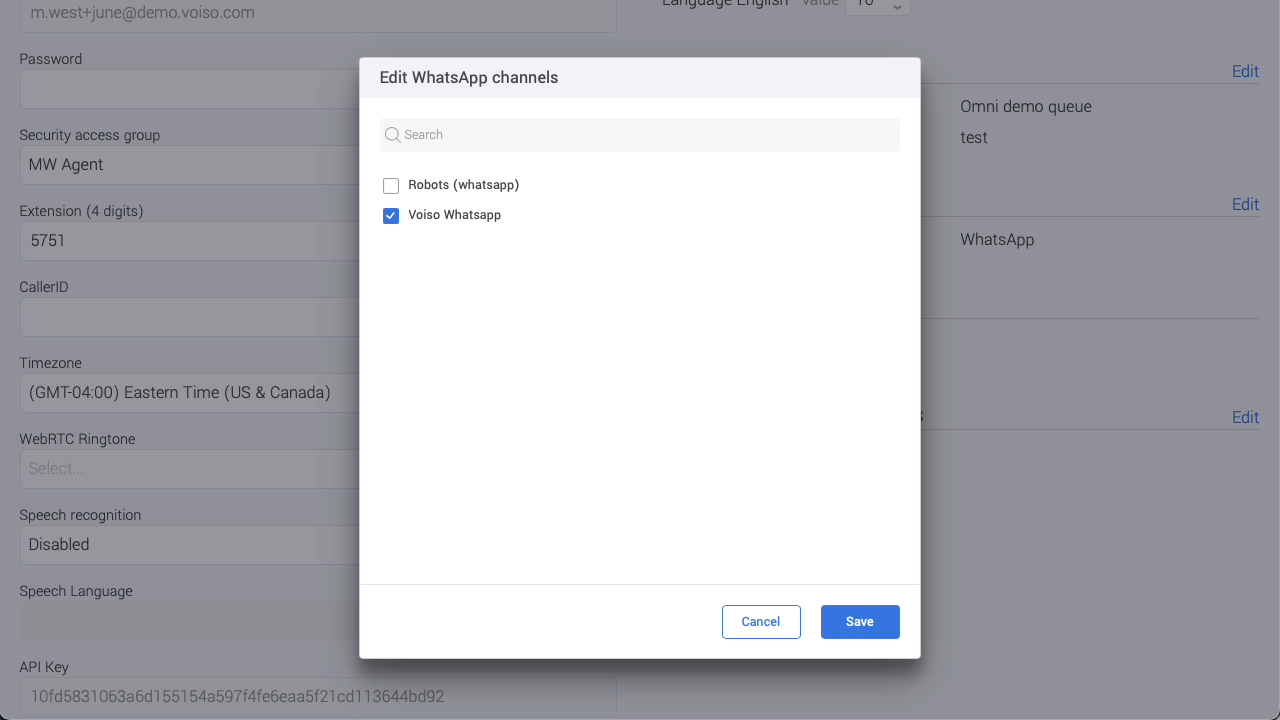
Use the WhatsApp Outbound Channels section to specify which WhatsApp outbound channel the agents uses to send outbound messages. To specify a channel, follow these steps:
- On the Add user or Edit user page, in the Channels section, click Edit.
- In the Edit channels panel, enable WhatsApp.
- Click Save.
- Scroll to the WhatsApp Outbound Channels section, then click Edit.
- In the Edit WhatsApp channels, select one or more WhatsApp channels.
- Click Save.