Who should read this article: Administrators, Supervisors
Queues are the point of entry for inbound interactions. Queues hold and distribute inbound interactions to agents assigned to the queue.
Introduction
The Queues page enables you to create and maintain your Queues. Flows direct inbound interactions to queues, then queues distribute interactions to agents based on configured agent and queue parameters. Configure parameters in the Add queue page.
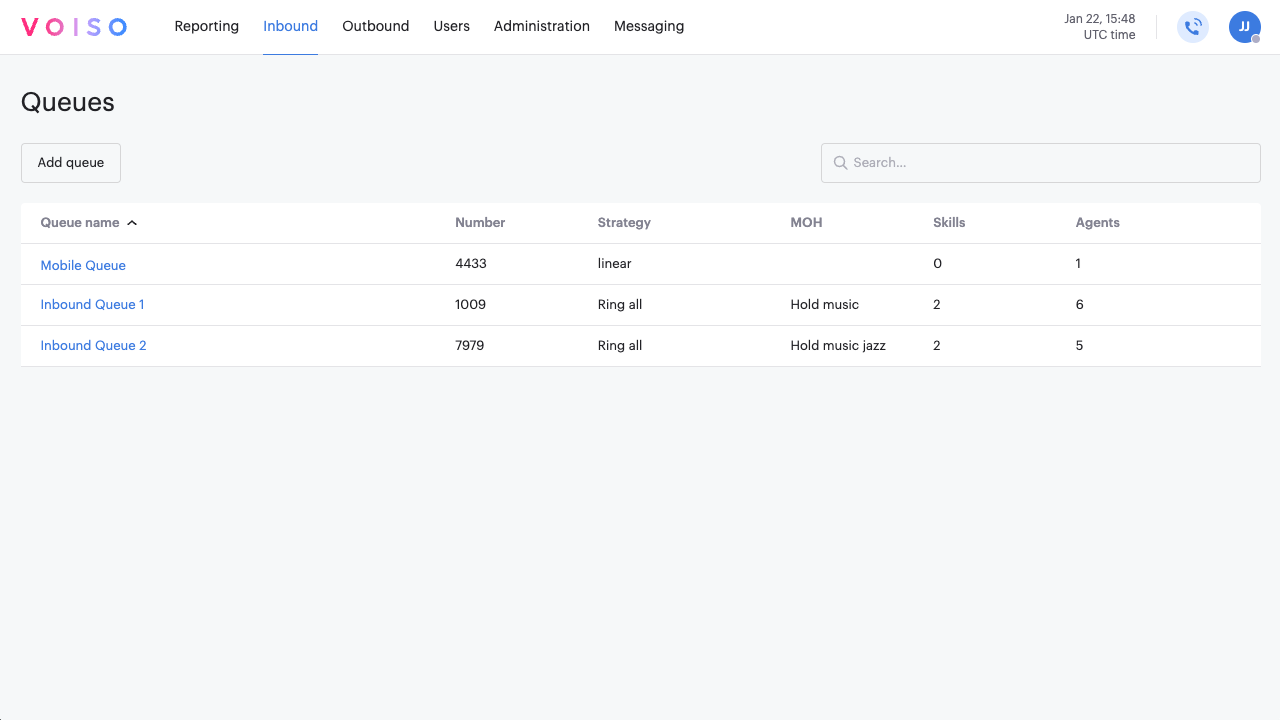
To display the Queues page, from the Voiso navigation bar, navigate to Inbound > Queues.
The Queues page contains a table listing all your queues. Next to the name of each queue is the number (extension), the strategy, music on hold (MOH), and the number of Skills and agents assigned to the queue. Use the Search field to find a specific queue based on its name or extension. Click the name of a queue to display the Edit queue page. Click Add queue to add a new queue to your contact center.
Add queue
On the Queues page, click Add queue. The Add queue page enables you to specify the parameters for a new queue.
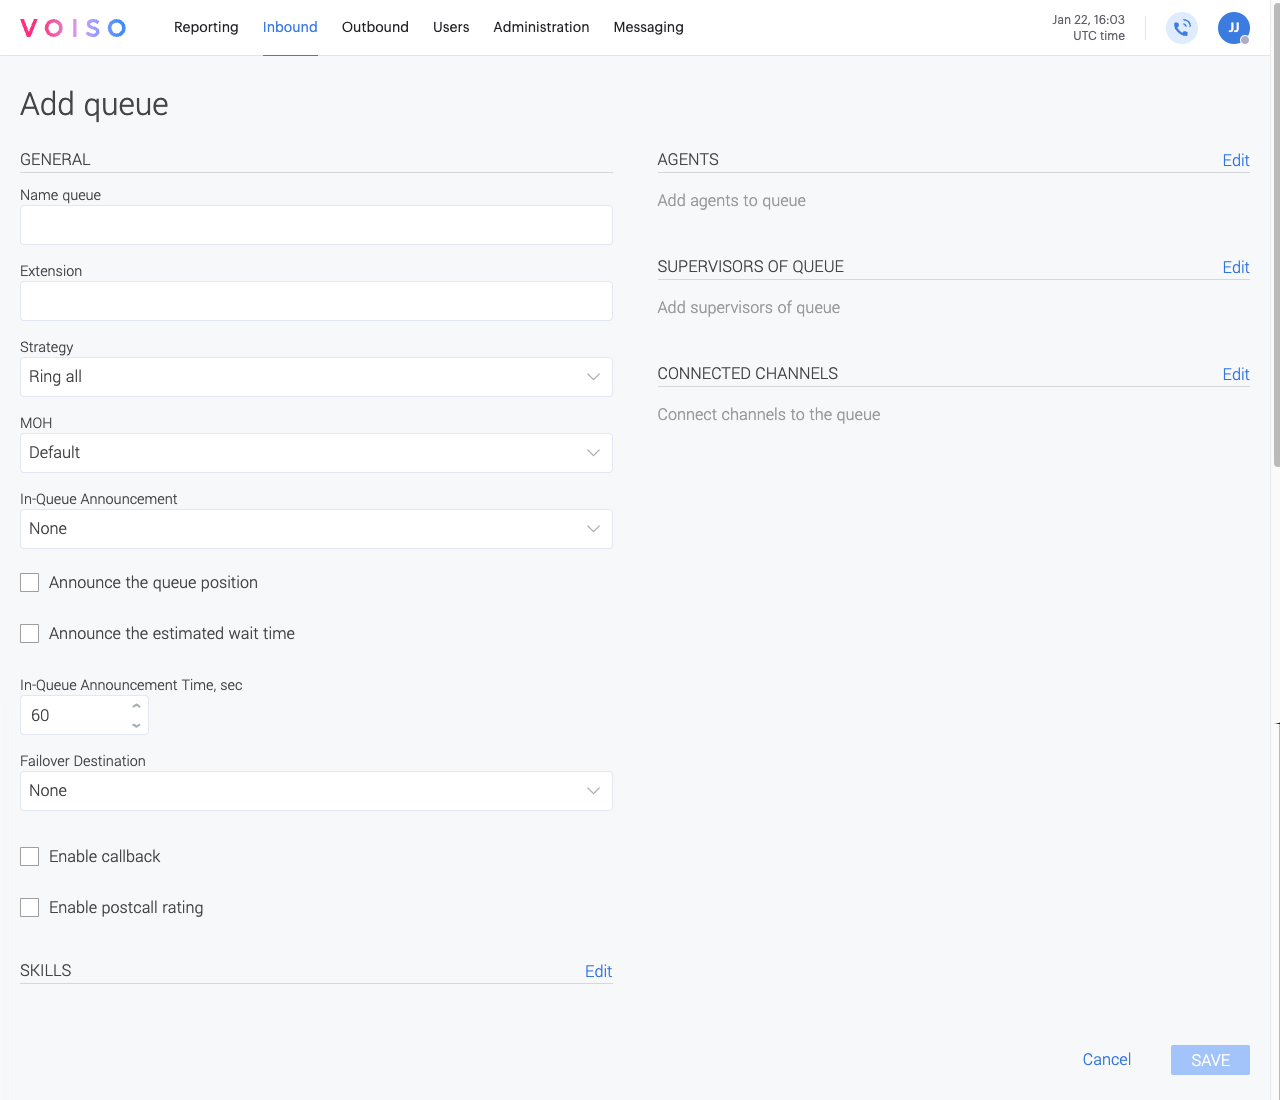
The following subsections describe the contents of the Add queue page. Set up the queue parameters, then click Save.
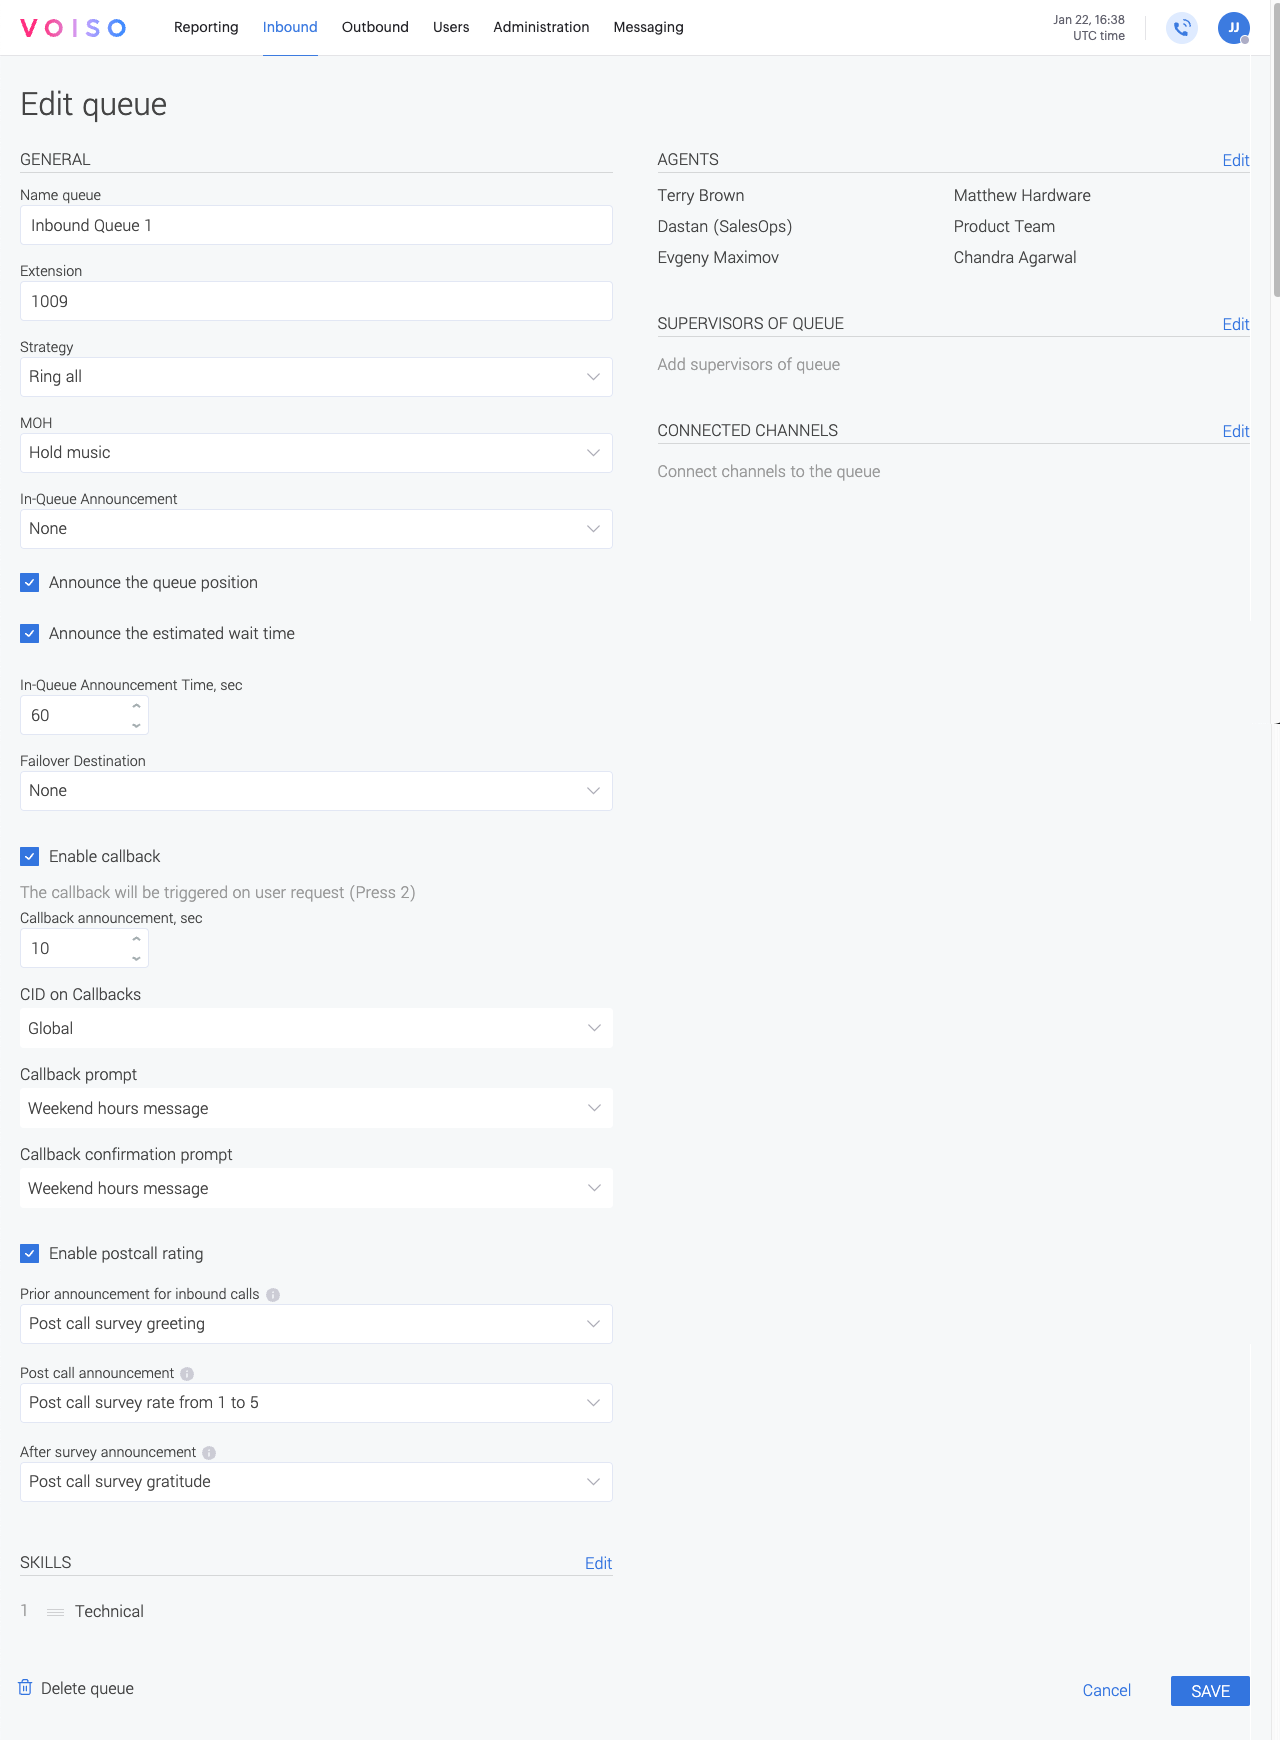
General
The General section of the Add queue page contains the basic parameters that define how the queue handles an interaction before distributing it to a destination.
| Parameter | Description |
|---|---|
| Queue name | A unique name that identifies the queue in the Queues page table. |
| Extension | The three- to twenty-digit extension of the queue within your contact center. Specify the extension length on the System Settings page on the Contact center tab. Users can dial this extension using the Agent Panel for transfer, conference, or consult calls. |
| Strategy | Specifies how interactions are distributed to agents. Refer to the Strategy subsection for more information. |
| Music on hold (MOH) | The media file, of type MOH, that is played to a contact while they wait to be connected to an agent. |
| In-queue announcement interval | The number of seconds between replaying the In-queue announcement voice message, Announce the queue position, and Announce the estimated wait-time messages. |
| In-Queue announcement voice message | The media file, of type Voice Message, that is played to a contact periodically, according to the value specified for In-queue announcement time, while they wait in the queue. |
| Announce the queue position | An automatic announcement of the position in-queue. The message is updated and repeated periodically, according to the value specified for In-queue announcement time. |
| Announce the estimated wait-time | An automatic announcement of the estimated in-queue waiting time before the contact is connected to an agent, repeated periodically according to the value specified for In-queue announcement time. |
| Failover destination | Specifies where the interaction is routed when the duration defined by the Failover wait-time setting is reached. The following options are supported: Queue, Agent, 3rd-party number, Voicemail, or Terminate. Refer to Failover destination for more information about setting destinations. |
| Failover wait-time | The number of seconds to wait for an inbound call to be answered before failing over to the Failover destination. |
Extension
You must assign an extension to every queue that will be used as a target for transfer, consult, and conference calls from users. Although agents may search for users and queues by name in the Agent Panel, Voiso requires the target to have a unique extension to route transfer, consult, and conference calls.
Announcements
Queues support three different optional announcements (refer to the table above):
- In-Queue announcement voice message
- Announce the queue position
- Announce the estimated wait-time
If you specify a value for the In-queue announcement interval repeat option, the announcements you select are repeated sequentially in the above order.
Strategy
Use the Strategy menu to specify how an interaction is directed to an agent. The Ring all strategy directs the interaction to all agents, and the interaction is handled by the first agent to answer it. For the other strategies, the first available agent meeting the criteria for the strategy receives the interaction first.
The following strategy options are available:
| Strategy | Description |
|---|---|
| Ring all | All available agents assigned to the queue receive the interaction, and the interaction is handled by the first agent to answer it. |
| Circular | Interactions are distributed to a list of agents as a round-robin. The first interaction is assigned to the first available agent, the second interaction to the second available agent, and so on. Once all agents have received an interaction, the process repeats, starting with the first agent. The order of the agents is determined by the order you select when you add them to the queue. |
| Least recent | The interaction is routed to the agent who least recently handled an interaction. |
| Fewest calls | The interaction is routed to the agent who has handled the fewest interactions. |
| Linear | Following the order of the agents assigned to the queue, interactions are routed to the next available agent in the list. Each time an interaction is placed in queue, it is always routed to the first available agent, following the list order. |
- The Agent answer timeout timer in the System Settings determines how long a call rings before the call is directed to the next agent for the Circular, Least recent, Fewest calls, and Linear strategies.
- Skills take priority over the agent order for the Circular, Least recent, Fewest calls, and Linear strategies. Skills are ignored for the Ring All strategy.
Failover destination
When an interaction waits in queue longer than the duration specified by the Failover wait-time timeout setting, the interaction is redirected to a failover destination specified by the Failover destination menu.
The Failover wait-time timeout setting is displayed after you select a failover destination. It specifies the number of seconds that an interaction waits in queue before being redirected to the specified failover destination.
The following failover options are supported:
| Destination | Description |
|---|---|
| None | The feature is disabled. The interaction is Terminated when the Inqueue timeout duration is reached. |
| Queue | Choose a different interaction queue from the menu that is displayed when this option is selected. |
| Agent | Choose a specific agent from the menu that is displayed when this option is selected. |
| 3rd-party number | Specify an external phone number in the Transfer number field that is displayed when this option is selected. |
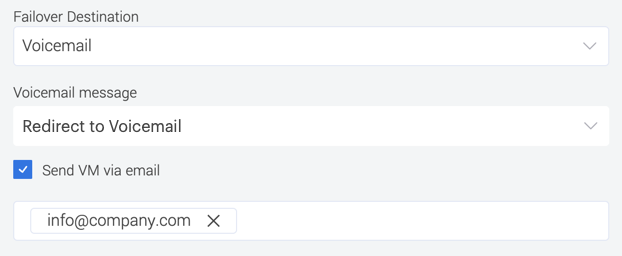
| Voicemail | Specify a media file, of type Voice Message, in the Voicemail message field that is displayed when this option is selected. You can choose also to have the Voicemail message sent to an email recipient by selecting the Send VM via email option. In the Recipients field, specify the email addresses to which the voicemail is directed. |
| Terminate | End the interaction (hang up). |
Queue callback
Enable this option to enable the in-queue Callback feature where a contact is given the opportunity to request a callback from the system when an agent is available rather than waiting on hold in the queue. The use of this feature improves the Call Abandonment Ratio and reduces your cost by limiting the amount of time a contact remains connected to your contact center. The callback occurs only on the number from which the contact called (ANI).
When you select the Enable option, the following additional parameters are displayed:

| Parameter | Description |
|---|---|
| Callback announcement time | Specify the duration between announcements prompting the contact to press 2 to receive a callback. |
| Caller ID group for callbacks | Specify a caller ID group for an outgoing callback to the contact. |
| Callback offer voice message | Specify the media file, of type Voice Message, that is played to a contact to offer a callback option. |
| Callback confirmation voice message | Specify the media file, of type Voice Message, that is played to a contact confirming that they will receive a callback. After the message plays, the call is Terminated. |
When a callback is routed to an agent, the Agent Panel displays information specifying that the call is a callback.
If the contact does not answer the callback call, Voiso redials every 300 seconds for up to 48 hours (Time To Live) until the disposition becomes either Answered or No answer.
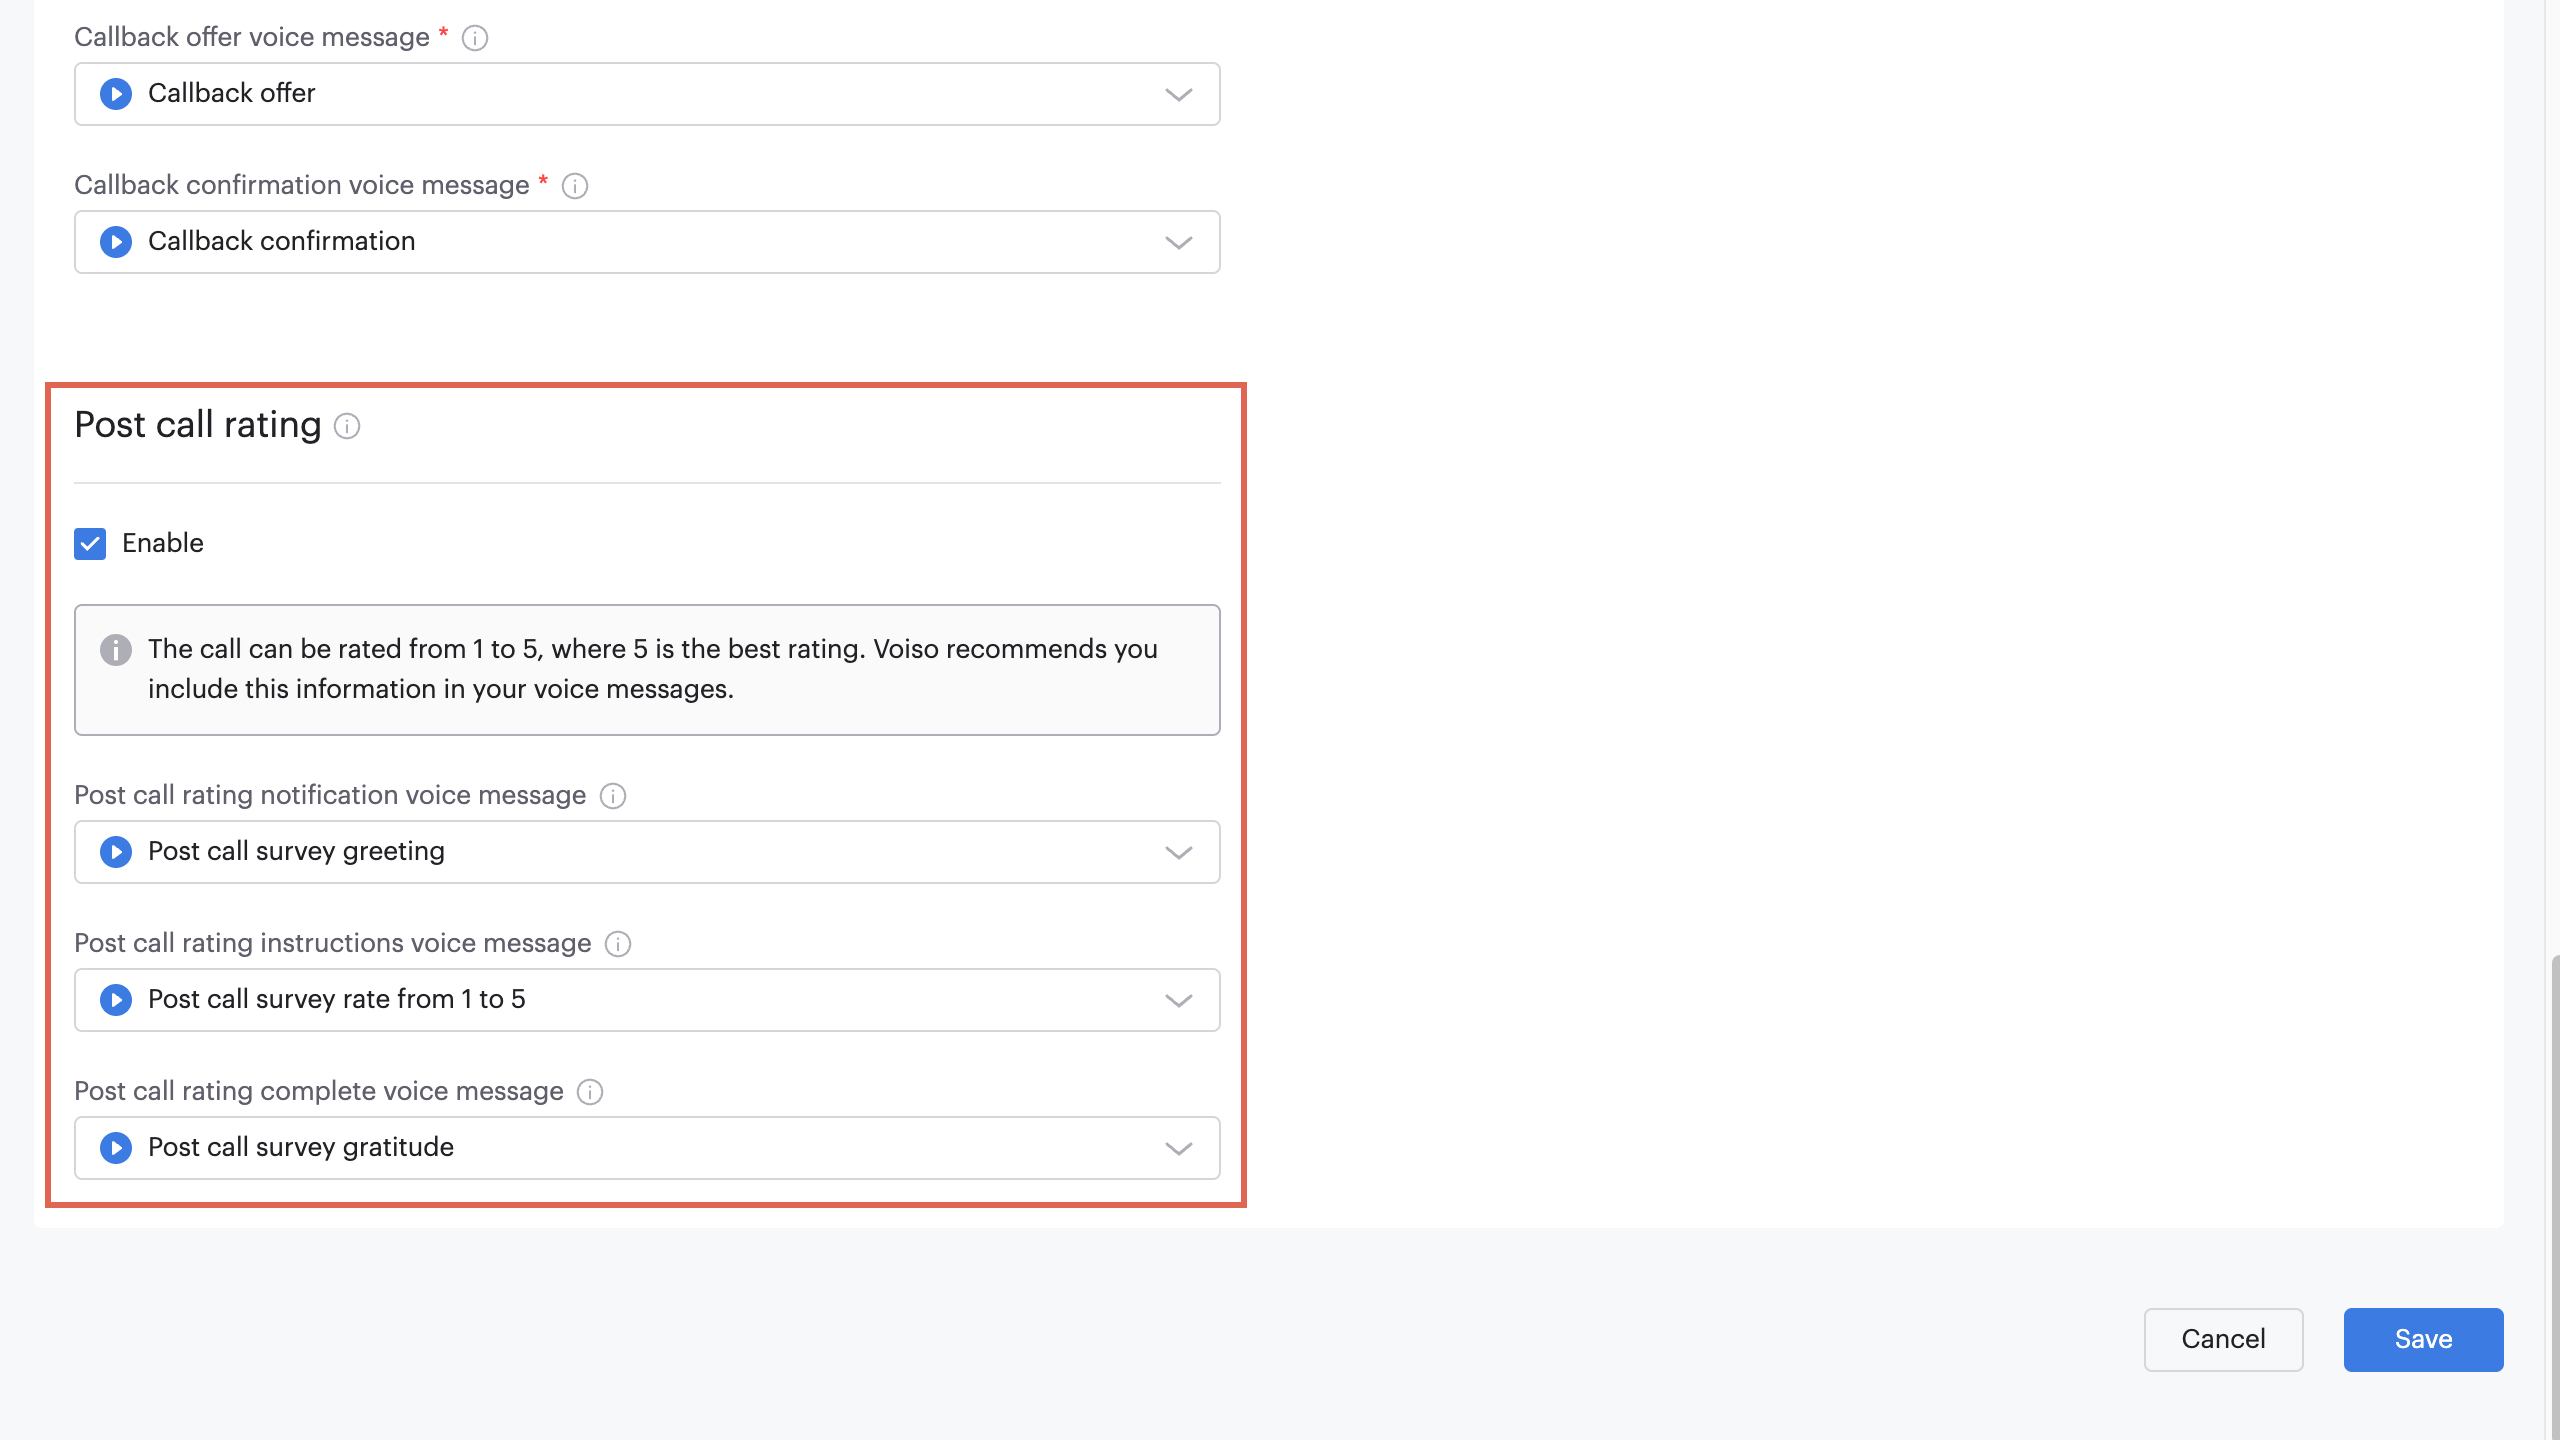
Post call rating
The Post Call Rating feature allows contacts to evaluate the interaction by asking them to participate in a survey. Refer to Post Call Rating for more information.
Three menu options display when post call rating is enabled:
| Parameter | Description |
|---|---|
| Post call rating notification voice message | The greeting message that plays when a contact calls the inbound number associated with the queue. Select the default greeting message, Post call survey greeting, or choose another voice message from your media library. The default message is: "Please rate our service after the call". If you leave the field blank, no message will be played for this stage – instead, you might want to have your agent request that the contact participate in the survey. |
| Post call rating instructions voice message | The reminder message that plays when the agent ends the call. Select the default post call message, Post call survey rate from 1 to 5, or choose another voice message from your media library. The default message is: "Please rate your experience with our company on a scale of 1 to 5, where 1 is poor and 5 is outstanding." If you leave the field blank, no message will be played for this stage – instead, you might want to have your agent request that the contact participate in the survey. |
| Post call rating complete voice message | The "thank you" message that plays after the contact makes a selection. Select the default thank you message, Post call survey gratitude, or choose another voice message from your media library. The default message is: "Thank you for participating in our survey." If you leave the field blank, no message will be played for this stage and the system automatically ends the call. |
Assigned agents
Users with the Agent role are the routing object for inbound interactions. The queue routes interactions to agents based on their availability. The queue only routes interactions to agents who are associated with the queue. To add agents to a queue, click Manage in the Agents section of the Add queue page. Select agents from the Agent assignment panel, then click Save.
Users with the Supervisor and Admin roles may also be assigned as agents on the queue; however, that means that interactions are routed to them when their status is Available.
Assigned supervisors
Users with the Supervisor or Admin role may be assigned as a supervisor for a queue. When a user is assigned as a supervisor for the queue they may access interactions to that queue in the CDR page.
To add supervisors to a queue, click Manage in the Supervisors of queue section of the Add queue page. Select users from the Supervisor assignment panel, then click Save.
Assigned channels
In Omnichannel environments, you can include text-based Channels on the queue for routing. To add message channels to a queue, click Manage in the Assigned channels section of the Add queue page. Select one or more channels from the Channel assignment panel, then click Save.
Assign priority to each channel where 1 is the lowest weighting. Interations arriving from channels with a higher priority value are given precedence over those with lower priority values. Channels with the same priority value are handled as first-in, first-out.
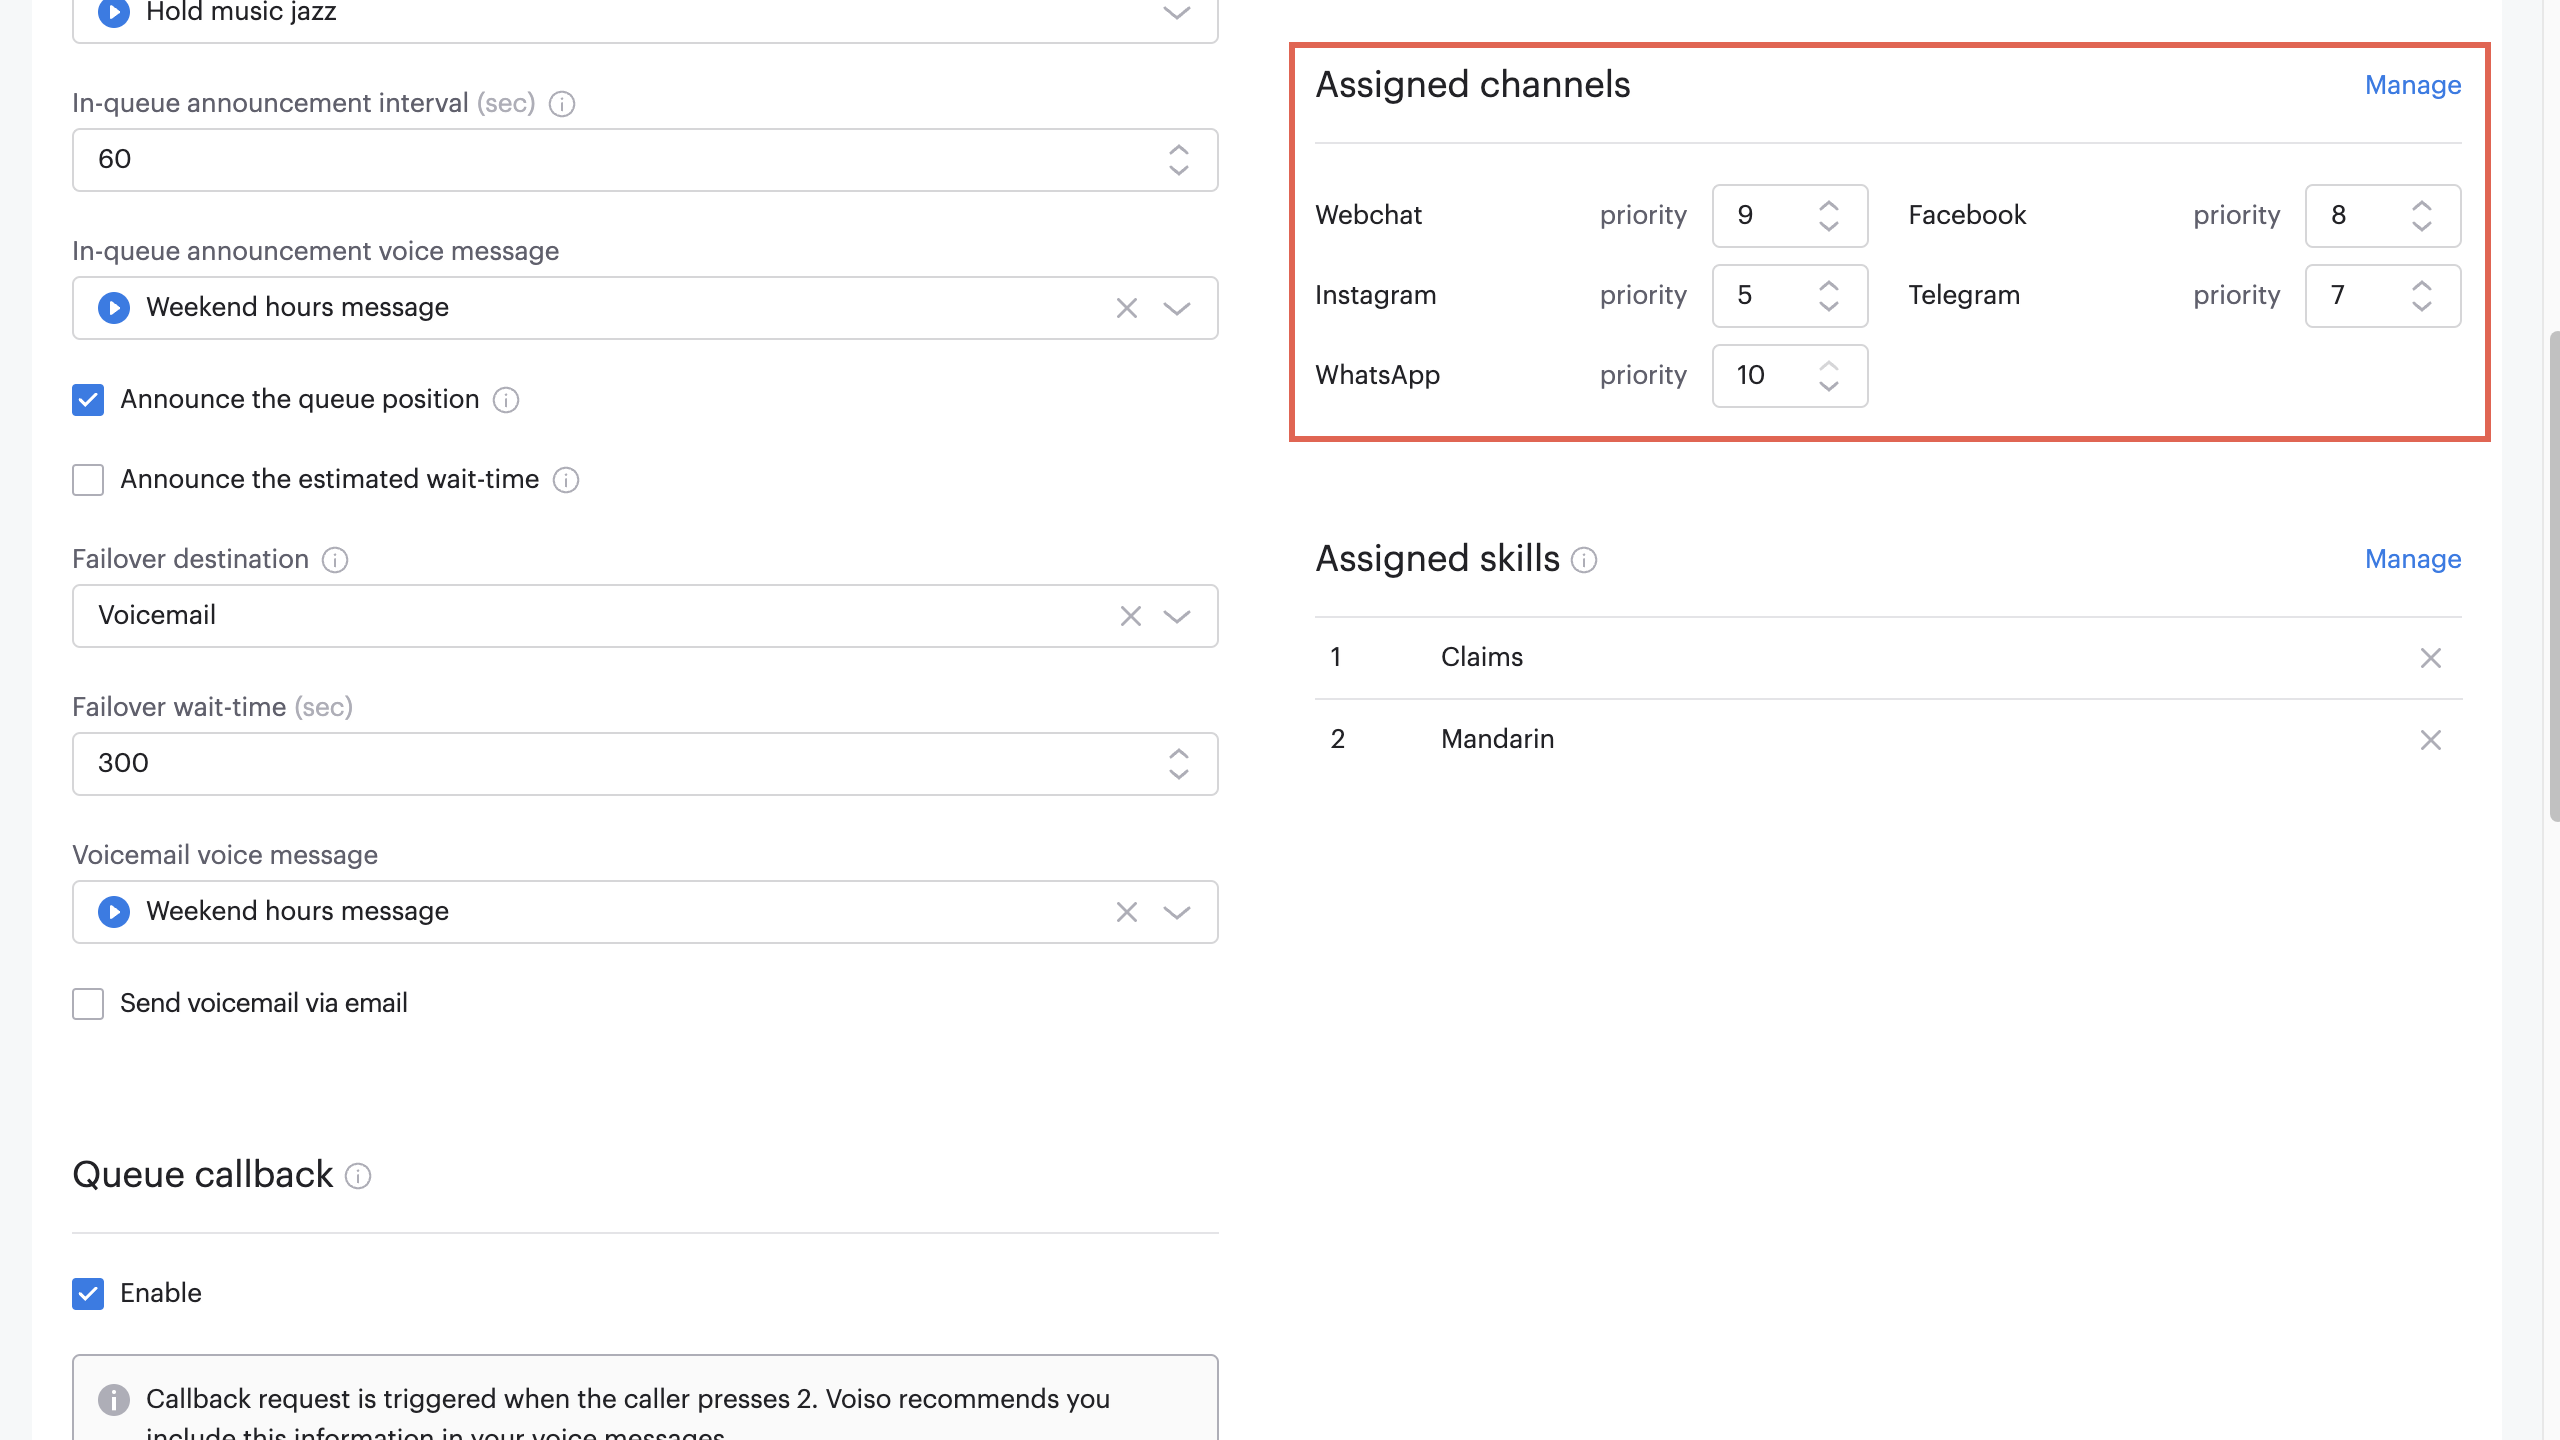
Assigned skills
Skill-based interaction routing helps to ensure that interactions are routed to the most qualified person based on their skills and experience. Skill-based routing works by directing interactions to the available agent with the highest skill level. It enhances agent productivity by minimizing the time agents spend handling inquiries outside of their skillset.
To use skill-based routing, agents assigned to the queue should have all of the skills associated with the queue. Interactions with an associated skill requirement are not routed to agents who do not have the skill assigned.
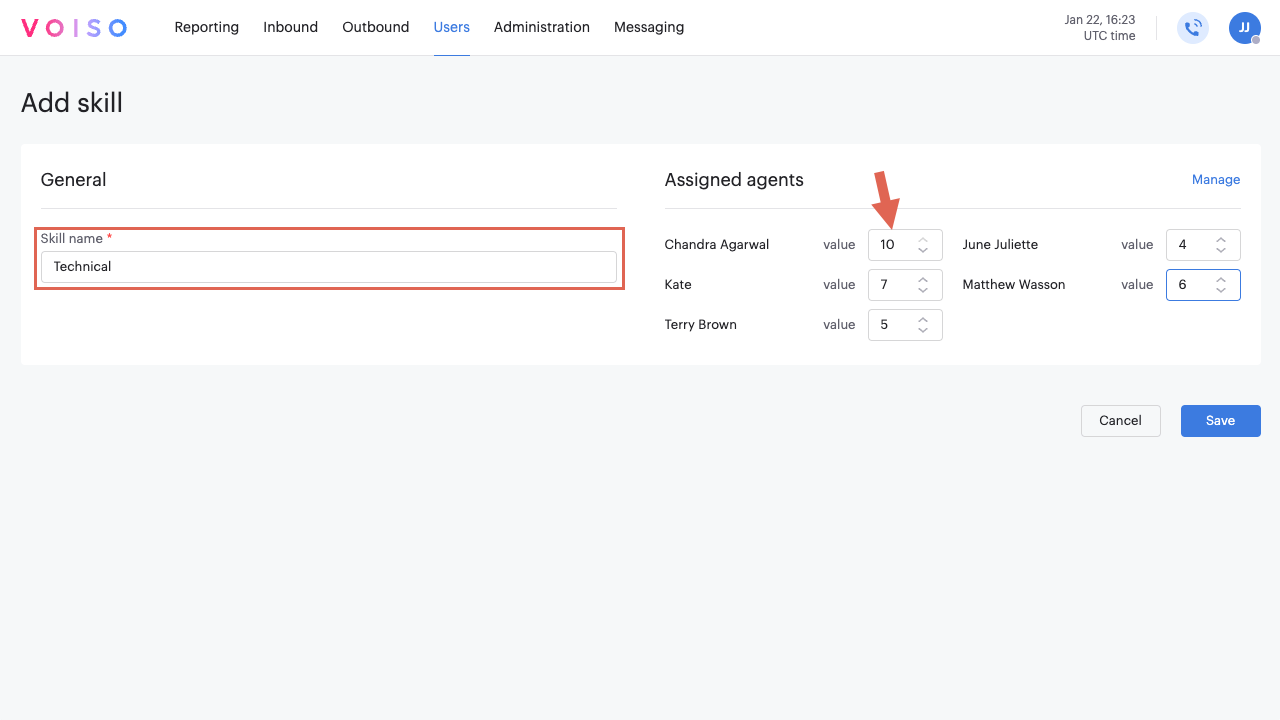
To use skill-based routing, follow these steps:
- Create skills relevant to your organization in the Users > Skills page. Assign the relevant skills and skill value (weight) to each user with the Agent role.
- Add or edit a queue from the Inbound > Queues page:
- On the Add queue or Edit queue page, scroll to the Assigned skills section and click Manage.
- In the Skill assignment panel, select the relevant skills.
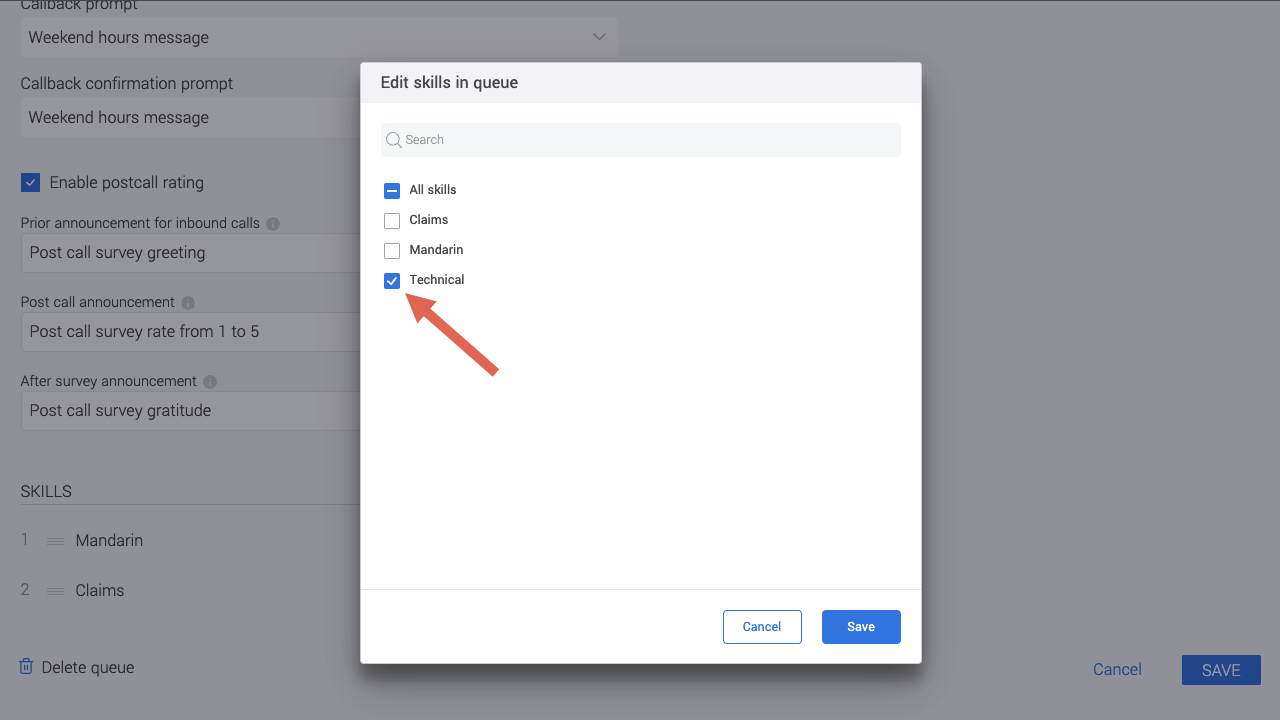
- Click Assign.
- On the Add queue or Edit queue page, click Save.
- To specify the priority for the skills, drag and drop the skills into the order or priority.
Skill-based routing is ignored if the Ring all strategy is used. Skill proficiency is prioritized for the other routing strategies.
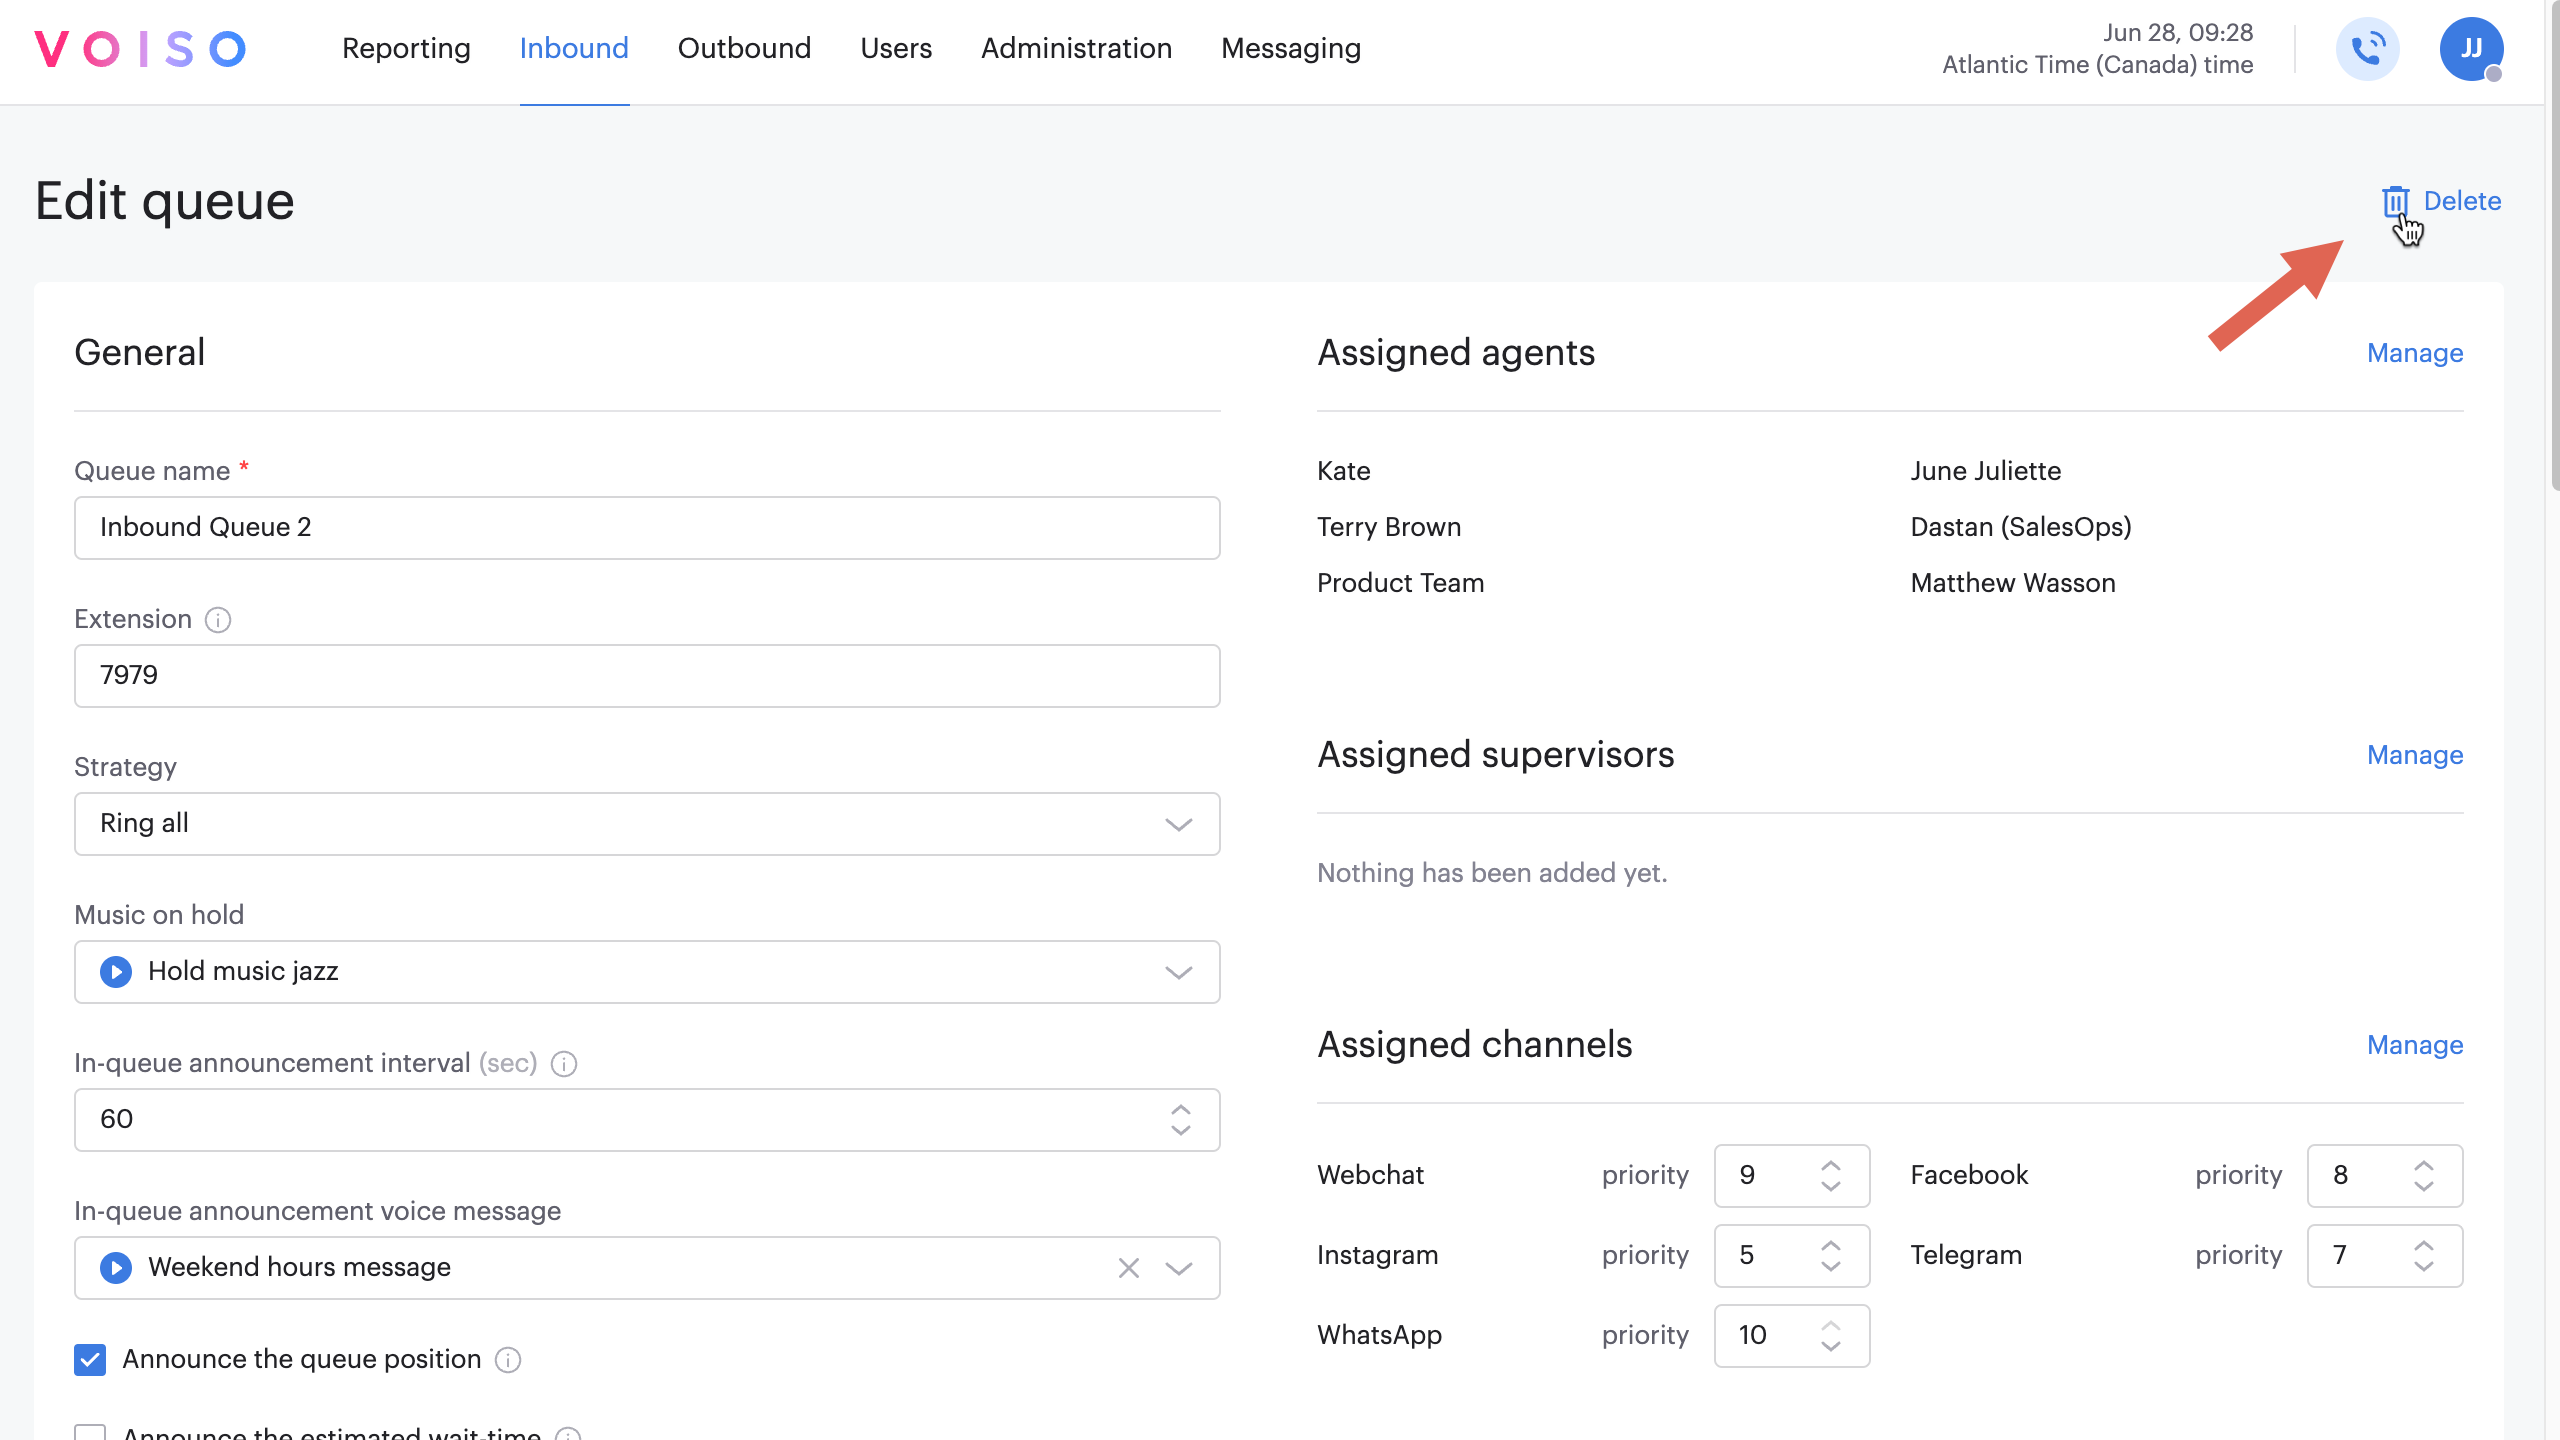
Edit queue
You can make changes to queue parameters at any time, including adding and removing agents, modifying the strategy, changing announcement audio files, and enabling or disabling Callback.
To modify queue parameters, click the name of the queue in the Queues page. Refer to the Add queue section for information about queue parameters.
Deleting a queue
You can delete a queue from two different places:
- From the Queues page, hover your mouse pointer over a queue row, then click Delete (the trash can icon) on the right side.
- From the Edit queue page, click Delete queue on the top right side.