Who should read this article: Administrators, Supervisors
Use the Make automation platform to integrate third-party applications from Make, such as CRMs, Helpdesks, and Google apps, with Voiso features such as live Dialer campaigns, SMS, and WhatsApp.
Benefits of using the Voiso Make integration app
Most businesses have processes and workflows that involve multiple applications. It takes a lot of time and know-how to develop in-house applications that leverage the APIs of different apps to accomplish business goals.
Make already has integrations for thousands of applications. That means you can integrate many Voiso features into your business workflow without knowing how to write code.
While Voiso has native integrations with many popular and niche CRM and HelpDesk applications, you might use an app that does not yet have a native integration. If your favorite app is available on Make, you can easily integrate Voiso with the app by creating a new Scenario.
Search Make.com for a list of supported CRMs here: Verified Apps
Make Scenarios
The Make automation platform takes advantage of applications that have application programming interfaces (APIs) to let Make users connect applications and make them work together.
For example, you can use Make to monitor your CRM and add new leads to your Voiso Dialer campaign.
Automations that you create in Make are called Scenarios. A Scenario is created using a simple click and menu driven interface. Click to choose the apps you want to integrate, make menu selections based on the content available from the apps and link them into a string of triggers and actions.
Scenario are easy to create on the Make website:
- Login to make.com.
- Navigate to your organization, then click Create a new scenario.
- Specify a trigger from another application.
- Select a Voiso action.
- Configure the input and output parameters for the Voiso trigger.
For example, when a new lead is added to your CRM (the trigger) or Google spreadsheet, the Voiso Integration app on Make can add the lead to a live Dialer campaign. You can also monitor Voiso triggers, such as Call Answered or Call Ended, and create an action in your CRM.
The following Voiso features are available to create triggers in Scenarios:
The following Voiso features are available to create actions in Scenarios:
- Send an SMS to a contact
- Send a WhatsApp template to a contact
- Add a contact to a live Dialer campaign
Voiso Integration app
To access the Voiso Integration app on Make, login to your https://www.make.com account, then click this link or paste it into your browser.
Trigger an action when a call is answered
Use the Voiso Call answered integration to trigger actions when a call is answered. It functions the same as the Voiso Call Notify webhook. This integration provides the following data that you can use in your action:
| Name | Parameter | Description |
|---|---|---|
| Callcenter Name | callcenter |
The name of your contact center. |
| Call type | type |
The type of the interaction: inbound, outbound, or dialer |
| Call UUID | uuid |
The unique identifier of the interaction from the Call Detail Record. |
| Agent extension | agent_extension |
The contact center extension of the agent specified in the user profile. |
| Agent name | agent_name |
The name of the agent specified in the user profile. |
| Agent email | agent_email |
The agent's contact center sign-in email address specified in the user profile. |
| Agent ID | agent_id |
The optional Employee ID parameter specified in the user profile. |
| Queue name | queue_name |
For inbound interactions, the name of the queue that routed the call. |
| Script name | script_name |
For inbound interactions, the name of the script or flow that routed the call. |
| Call start time | call_start_time |
The timestamp of when the call started. |
| Agent start time | agent_start_time |
The timestamp of when the agent joined the call. |
| ANI | ani |
The phone number of the person who initiated the call. |
| DNIS | dnis |
The phone number that was dialed to initiate the call. |
Here is an example of the data structure:
{
    "callcenter": "client_name",
    "type": "inbound",
    "uuid": "07771c38-c159-4965-a878-be0162118b2b",
    "agent_extension": "111",
    "agent_name": "John Smith",
    "agent_email": "john@gmail.com",
    "agent_id": 1,
    "queue_name": "Inbound queue name",
    "script_name": "Inbound script name",
    "call_start_time": 1630664544.661,
    "agent_start_time": 1630664545.123,
    "ani": "443336006114",
    "dnis": "18885658889"
}
Call Answered Trigger
Set up the Call Answered trigger Scenario by following these steps:
- Log in to Make and navigate to your organization home.
- Click Create a new scenario.
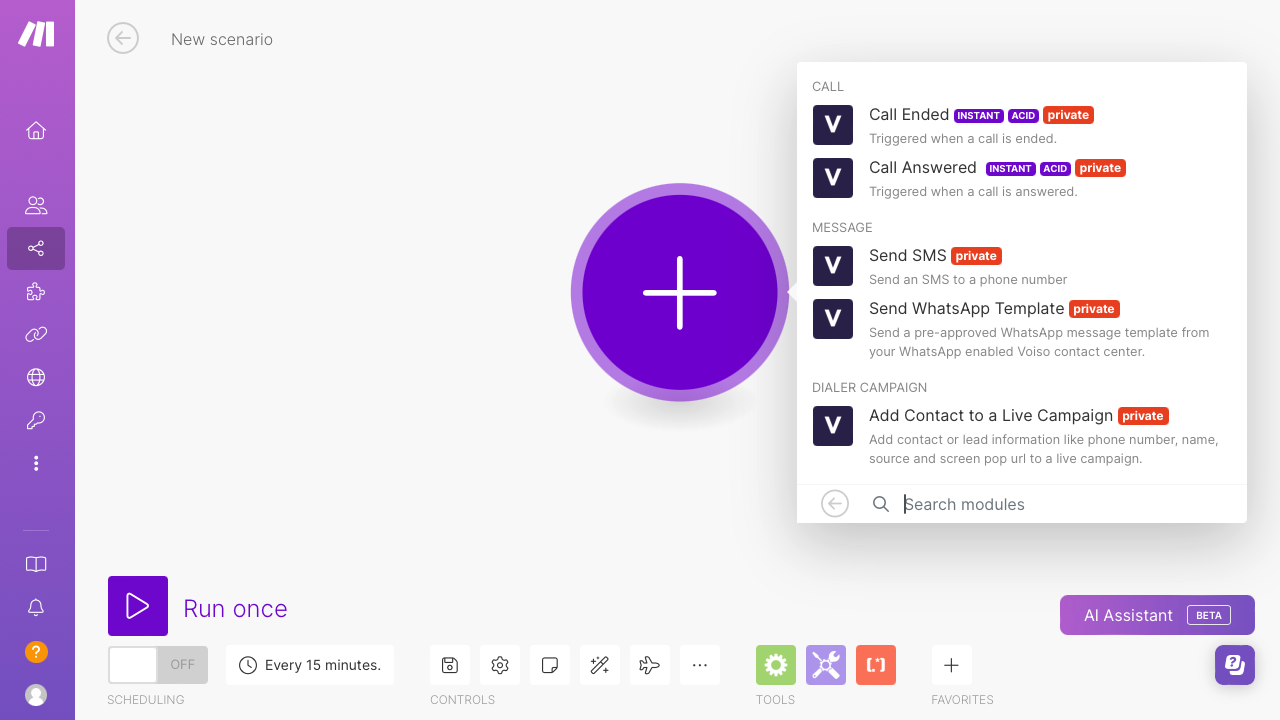
- On the New Scenario page, click "+".
- Use Search applications to find and select the Voiso Integration app.
- Click Call Answered.
- Create a new webhook by clicking Add in the Webhook panel. You need the webhook URL for your scenario, click Copy address to clipboard.
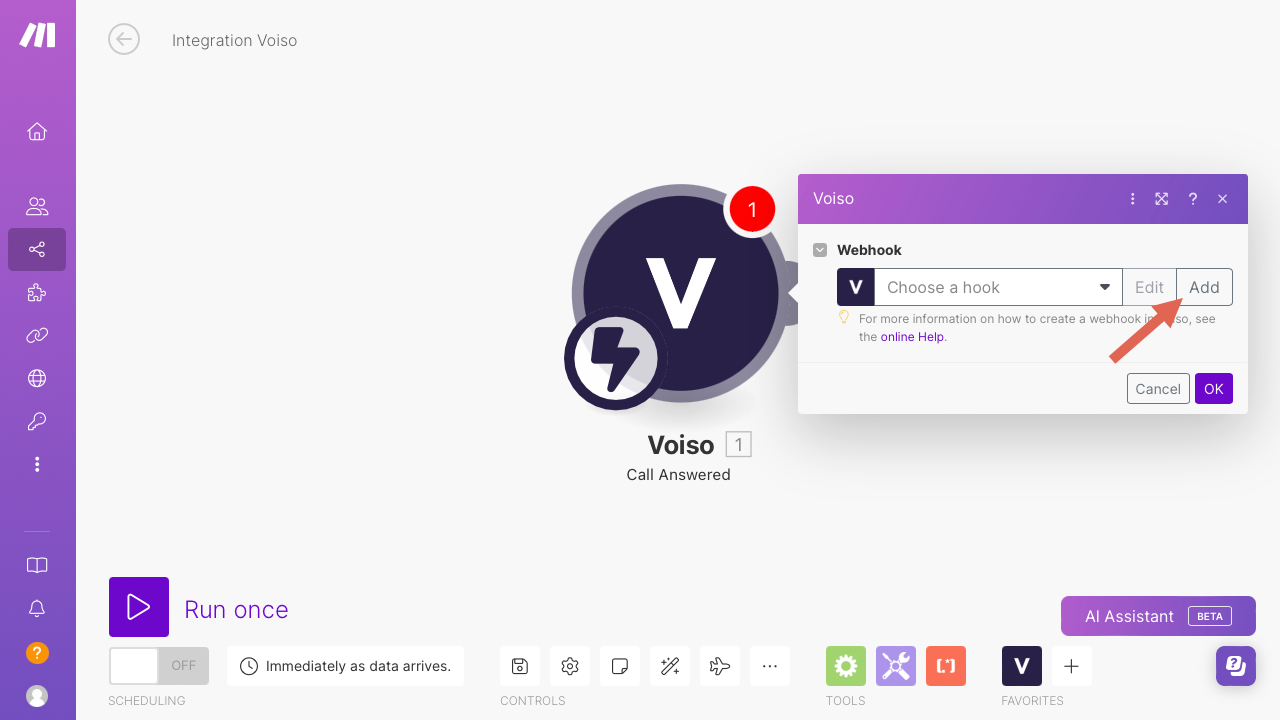
- Click OK to save the webhook.
- In your contact center, navigate to Administration > Webhooks.
- Enter a name for your webhook.
- Paste the webhook URL into the Endpoint URL field.
- Select inbound.call.answered.
- Save your changes.
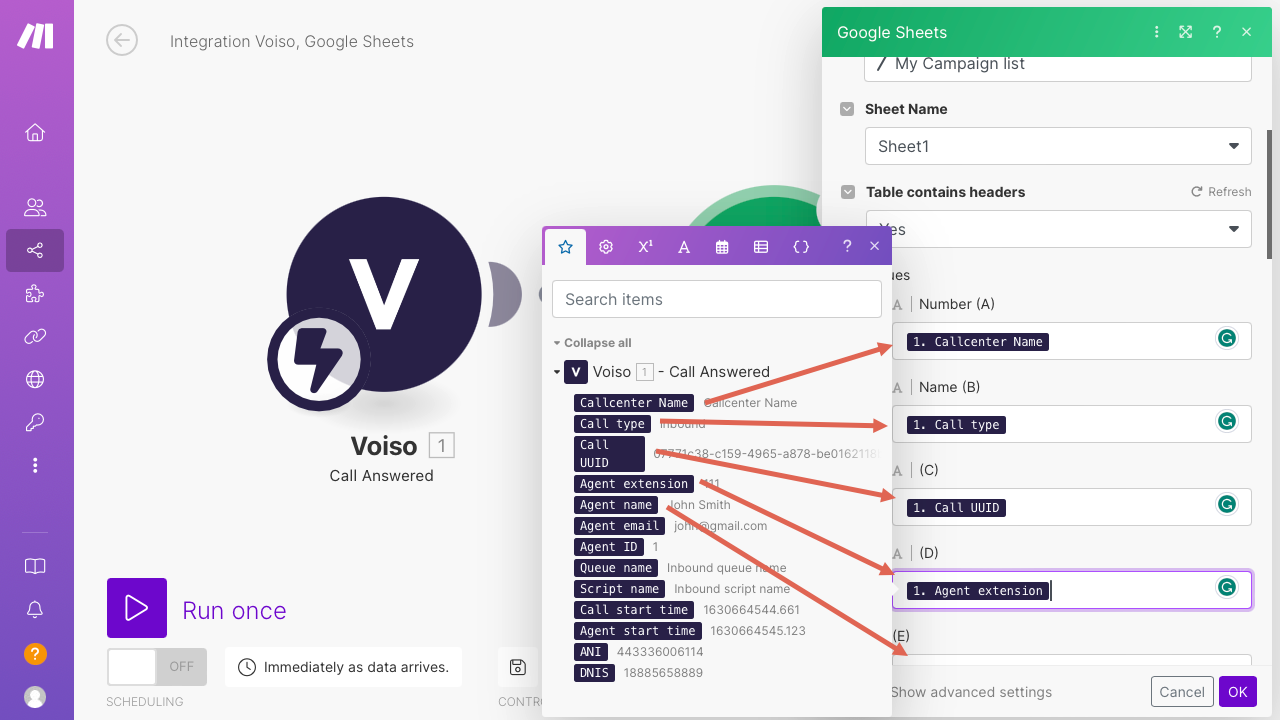
- Return to Make and click Add another module to add the application that is triggered when a call is answered. For example, you could add your CRM or a Google Sheet. Use the parameters from the Call Answered webhook to populate your application. For example you can map the parameters to create or update a record in your CRM, spreadsheet, or database.
- Save and test your Scenario and then turn it on to begin automatically updating your CRM, Helpdesk, or spreadsheet with call information each time a call is answered.
Trigger an action when a call ends
Use the Voiso Call ended integration to trigger actions when a call ends. It functions the same as the Voiso Call Outcome Logging webhook. This integration provides the following data that you can use in your action:
| Name | Parameter | Description |
|---|---|---|
| Call UUID | uuid |
The unique identifier of the interaction from the Call Detail Record. |
| Agent extension | agent_extension |
The contact center extension of the agent specified in the user profile. |
| Call start time | call_start_time |
The timestamp of when the call started. |
| Call end time | call_start_time |
The timestamp of when the call ended. |
| Call duration in seconds | duration |
The duration of the call in seconds. |
| Call type | type |
The type of the interaction: inbound, outbound, dialer, callback, or outbound_sms |
| Call disposition | disposition |
The outcome of the call: answered, failed, busy, no_answer, missed, abandoned, rejected, dialer_abandoned, system_abandoned, answered_by_VM, system_reject, or machine_answered |
| ANI | ani |
The phone number of the person who initiated the call. |
| DNIS | dnis |
The phone number that was dialed to initiate the call. |
Here is an example of the data structure:
{
    "uuid": "07771c38-c159-4965-a878-be0162118b2b",
    "agent_extension": "111",
    "start_time": 1630664544.661,
    "end_time": 1630664575.994,
    "type": "callback",
    "duration": 31.333,
    "disposition": "answered",
    "ani": "443336006114",
    "dnis": "18885658889"
}
Call Ended Trigger
Set up the Call Ended trigger Scenario by following these steps:
- Log in to Make and navigate to your organization home.
- Click Create a new scenario.
- On the New Scenario page, click "+".
- Use Search applications to find and select the Voiso Integration app.
- Click Call Ended.
- Create a new webhook by clicking Add in the Webhook panel. You need the webhook URL for your scenario, click Copy address to clipboard.

- Click OK to save the webhook.
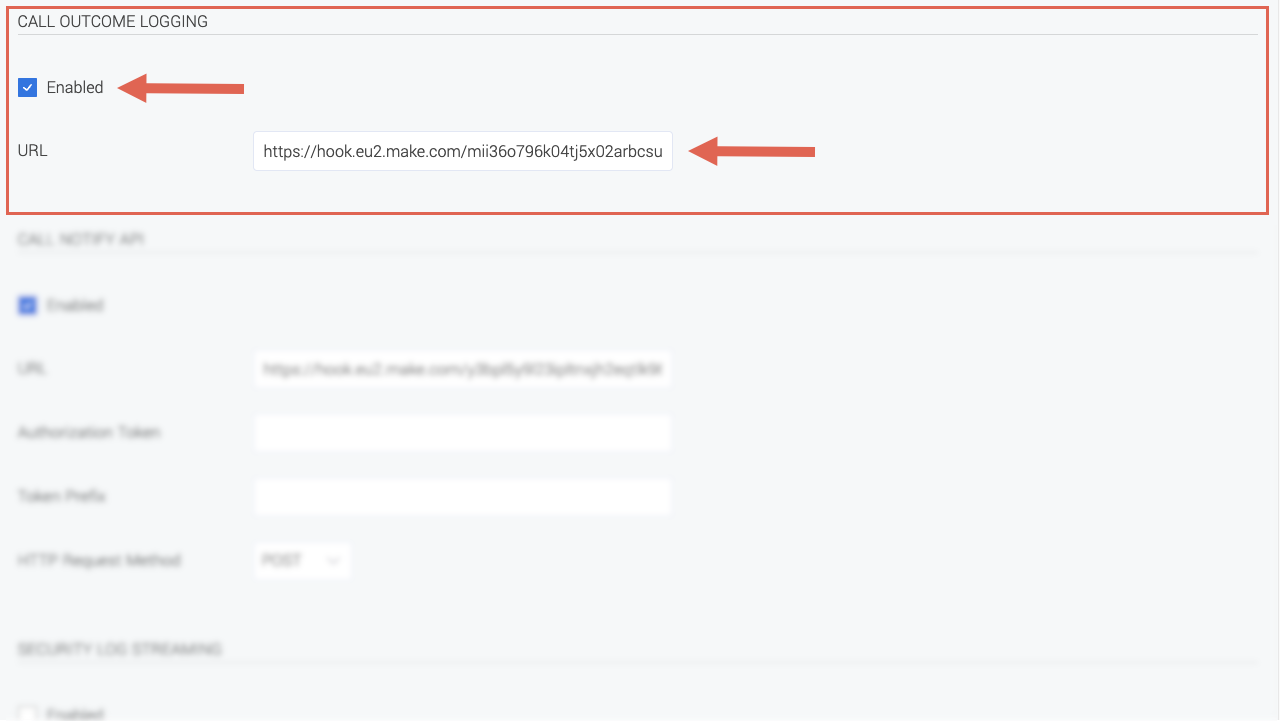
- In your contact center, navigate to Administration > System settings. Scroll down to the CALL OUTCOME LOGGIN section and click Enable. Paste the webhook URL into the URL field. Save your changes.
- Return to Make and click Add another module to add the application that is triggered when a call is ended. For example, you could add your CRM or a Google Sheet. Use the parameters from the Call Ended webhook to populate your application. For example you can map the parameters to create or update a record in your CRM, spreadsheet, or database.
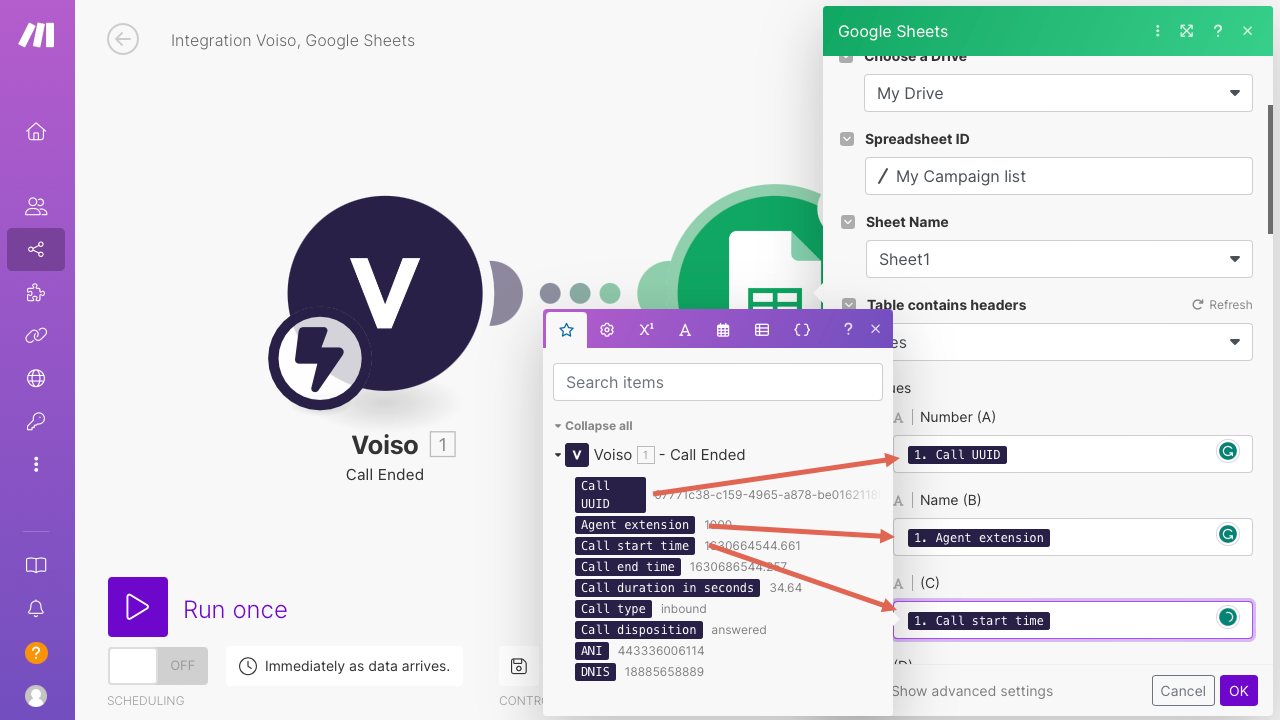
- Save and test your Scenario and then turn it on to begin automatically updating your CRM, Helpdesk, or spreadsheet with call information each time a call is ended.
Send an SMS message
Use the Voiso Send SMS integration to create a
Scenario that automatically sends an SMS to a phone number. For example:
- automatically send a welcome SMS every time you add a contact to your CRM
- notify a contact about an order that is ready for pickup
- confirm a scheduled event
- send automatic appointment reminders
- deliver a summary after a voice call ends
You must have at least one SenderID configured for your contact center.
You can send up to 20 SMS messages to a specific number per day.
SMS Action
Set up the Send SMS action by following these steps:
- Log in to Make and navigate to your organization home.
- Click Create a new scenario.
- On the New Scenario page, click "+".
- Use Search applications to find and select the Voiso Integration app.
- Click Send SMS.
- If you have not previously set up a connection to your contact center, the Connection panel is displayed. Click Create a connection. Provide the following parameters, then click Save:
- Give your connection a name.
- Specify your cluster ID.
- Provide your contact center API key
- The Send SMS panel is displayed. You can change the connection by clicking Add. Add the following parameters:
- Agent Extension: The phone extension of the agent or user account who is sending the SMS.
- Phone Number: The phone number of the recipient. This can be extracted from a CRM, a spreadsheet, a HelpDesk app, or another triggering source.
- SMS Text: The body of the SMS. You can manually enter the text or extract it from the triggering source.
- Sender Identifier: Select a Sender ID from your contact center; otherwise, a Sender ID from the Default group is used.
- Source: The name of the sending application, such as the name of your CRM.
- Account ID: The third-party application account ID of the contact associated with the recipient's phone number. You can manually enter the text or extract it from the triggering source.
- Test your Scenario and then turn it on to begin automatically sending SMS to your contacts.
Try it yourself!
It's easy to create an SMS list in Google Sheets.
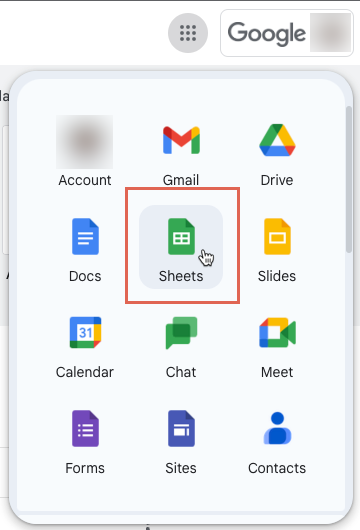
- From your Google account, click the Apps icon, then select Sheets.
- Click Blank to create a new spreadsheet. Alternatively, you can import a spreadsheet or CSV from your computer. See below for a sample CSV file of contacts for a Google Sheet integration.
- The Voiso Make integration requires SMS information in multiple columns:
- Agent Extension: The contact center extension number of the agent who is the sender of the SMS. This can be obtained from the agent's user page.
- Phone Number: The phone number in E.164 format of the SMS recipient.
- SMS Body: The text to be sent as an SMS.
- Call center SenderID: A valid sender ID from your contact center.
- Source: (optional) The name of a CRM or other application that is the source of the contact or lead.
- Account ID (optional) The account ID of the contact in the CRM or other application.
- Log in to Make and navigate to your organization home.
- Click Create a new scenario.
- On the New Scenario page, click "+".
- Use Search applications to find and select the Google Sheets app.
- Choose a trigger, such as Watch new rows.
- Connect the app to your Google drive then specify the parameters of your sheet. Set the Limit to 1 to process each new row individually.
- Add the Voiso SMS action as described in /v1/docs/make-integrations#sms-action above.
- When you activate the Voiso/Google Sheet Scenario, each time you update the spreadsheet, the Voiso Make Send SMS integration sends an SMS to the recipients you specify.
Make Scenario SMS list - Sheet1.csv
Send a WhatsApp template
Use the Voiso Make Send WhatsApp Template integration to create a Scenario that automatically sends a WhatsApp template to a phone number. For example:
- automatically send account updates or other sensitive information
- send order confirmations, shipping updates, and delivery notifications
- provide summaries of customer support inquiries
- deliver special offers and promotions
- provide appointment reminders
- send transaction, balance, and security alerts
- send special event invitations
You can only send pre-approved WhatsApp templates that are available in your Voiso contact center.
CRM Trigger
This example demonstrates creating a Scenario that monitors a CRM for a specific trigger, such as the addition of a new contact. Start a new Scenario by clicking Create a new scenario. Set up a module to monitor your CRM for changes, such as adding a new contact or updating a record.
WhatsApp Action
With your CRM trigger prepared, add the Voiso app as a new module:
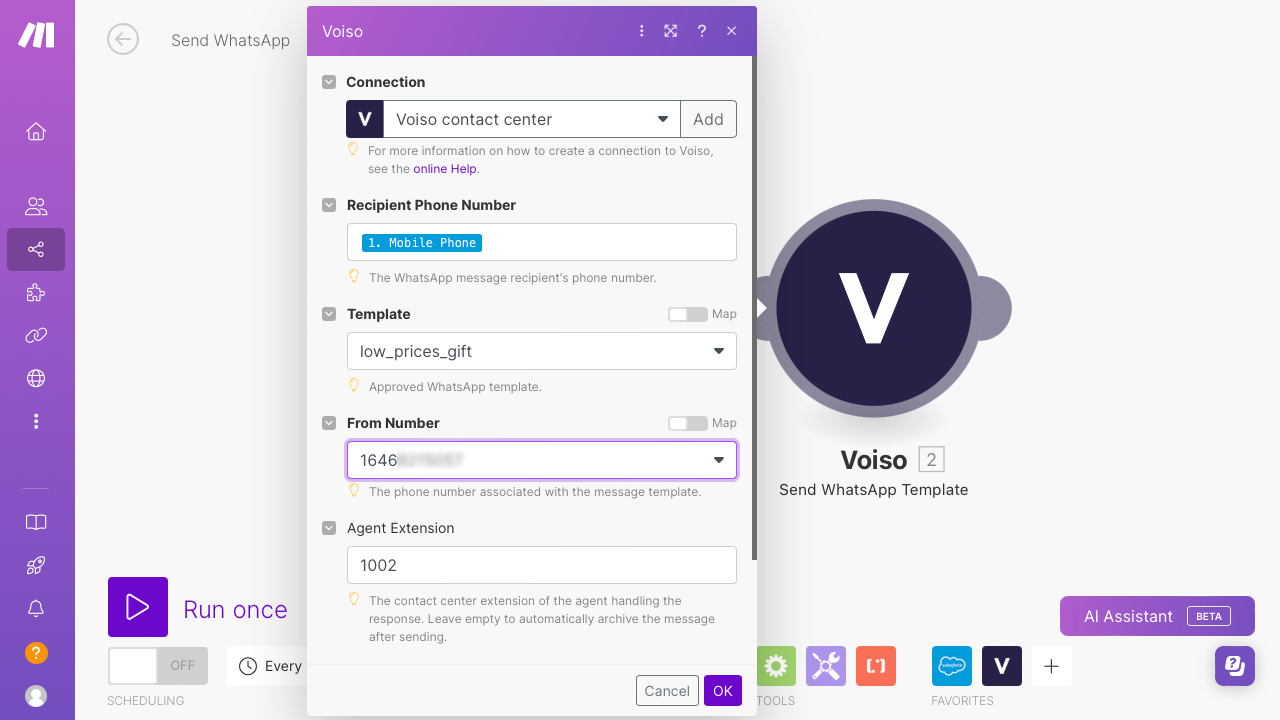
- Set up or specify a connection to your Voiso contact center (See SMS action) in the Connection field.
- In the Recipient Phone Number field specify the phone number field of the new contact created in your CRM. This number can be extracted from a CRM, a spreadsheet, a HelpDesk app, or other triggering source.
- In the Template field select the name of an approved WhatsApp template. You can use the List Temaplate API to obtain the template names.
- In the From number field, enter the WhatsApp channel name.
- In the Agent Extension enter the extension of the agent or user account who is handling the message response. Leave empty to automatically archive the message after sending.
- Account ID: The third-party application account ID of the contact associated with the recipient's phone number.
- Test your Scenario and then turn it on to begin automatically sending WhatApp messages to your contacts.
Creating a calling list integration Scenario
The following is an example of creating a Scenario that adds leads (contacts) to a live Dialer campaign. Not all businesses use a CRM or HelpDesk to build a list of contacts.
In this example, the list of contacts is maintained in a spreadsheet; however, if you use a CRM or HelpDesk to build a list of leads, the principles in this example still apply: whenever a new lead is added (the triggering event), the Voiso Integration app updates the calling list of a live Dialer campaign (the action).
- Create a live Dialer campaign in Voiso.
- From the Voiso main menu, navigate to Outbound > Dialer campaigns.
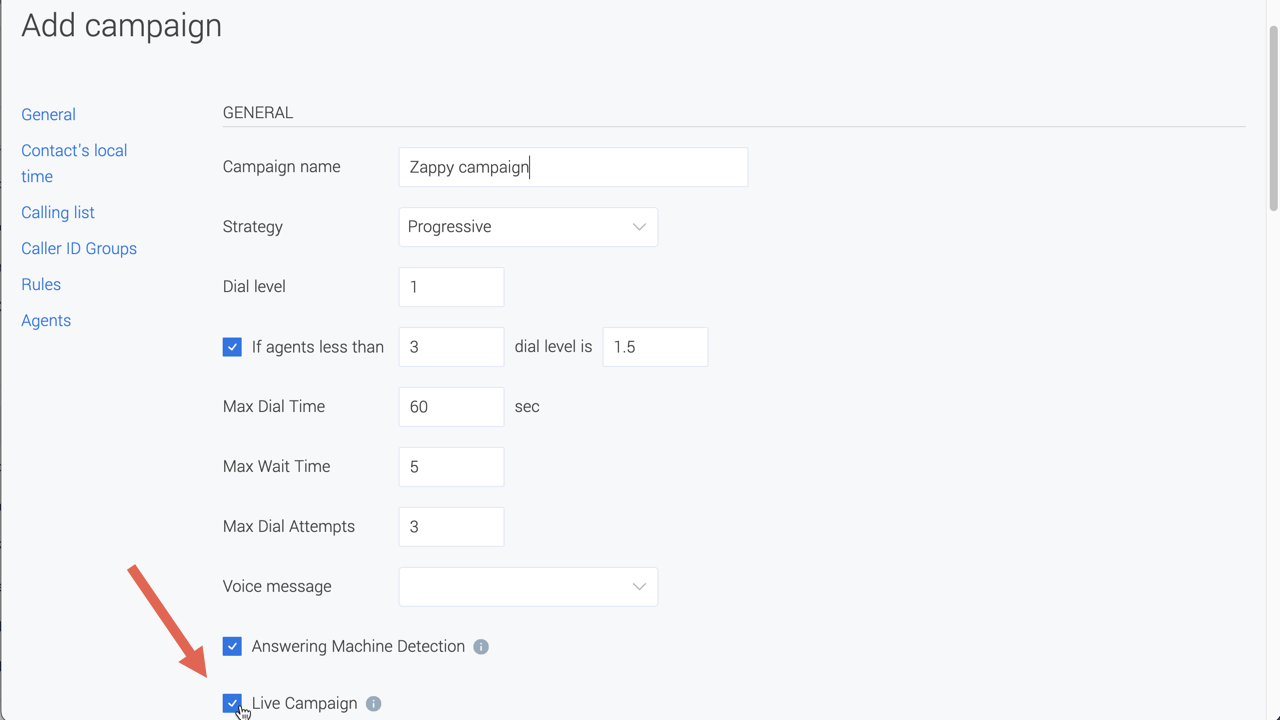
- Click Add Dialer campaign.
- Name your campaign and set up the campaign parameters.
- Click Live Campaign.
- Click Save.
- Log in to Make and navigate to your organization home.
- Click Create a new scenario.
- On the New Scenario page, click "+".
- Use Search applications to find and select the Google Sheets app.
- Choose a trigger, such as Watch new rows.
- Connect the app to your Google drive then specify the parameters of your sheet. Set the Limit between 1 and 1000.
- Click Add another module, then use the search to find the Voiso app.
- Select Add Contact to a Live Campaign.
- Enter the Campaign ID (this can be obtained from the Campaigns page.
- For the other fields, specify the corresponding columns from your Google sheet or other contact source.
- When you activate the Voiso/Google Sheet Scenario, each time you update the spreadsheet, the Voiso Make Add Contact to a Live Campaign integration adds up to 1000 contacts to your live campaign.
See below for a sample CSV file of contacts for a Google Sheet integration.