Multi-factor authentication
    • 18 Jul 2023
    • 7 Minutes to read
    • Dark
      Light
    • PDF

    Multi-factor authentication

    • Dark
      Light
    • PDF

    Article Summary

    Who should read this article: Administrators, Supervisors

    Two-factor (2FA) authentication provides a higher level of security and protection for account users and systems than standard username/password login.

    Introduction

    Two-factor authentication (2FA), also known as multi-factor authentication (MFA), is a security measure that requires users to provide two different forms of identification, or authentication factors, to verify their identity.

    Two-factor authentication significantly reduces the risk of unauthorized access, even if the user's password is compromised. It adds an extra layer of security by requiring an additional form of authentication that is typically more difficult for attackers to obtain or replicate.

    Voiso implements two-factor authentication by requiring users to provide a username and password along with a token from the Google Authenticator app or browser plug-in.

    Important

    Voiso Professional Plan and higher customers, contact your Voiso representative to have two-factor authentication activated for your contact center.

    Enabling 2FA for your contact center

    After two-factor authentication is activated for your contact center, enable it by navigating to Administration > System Settings from the main menu bar. Check the 2FA enabled option.

    2FA Enable In System Settings

    Important

    Once you enable 2FA in System Settings, you can then enable the feature for individual users who are members of one of the default security access groups:

    • Admin
    • Agent
    • Analyst
    • Supervisor

    The Users page

    After you enable 2FA in the System Settings, the 2FA status column is added to the Users page to help you track which users have set up 2FA. 
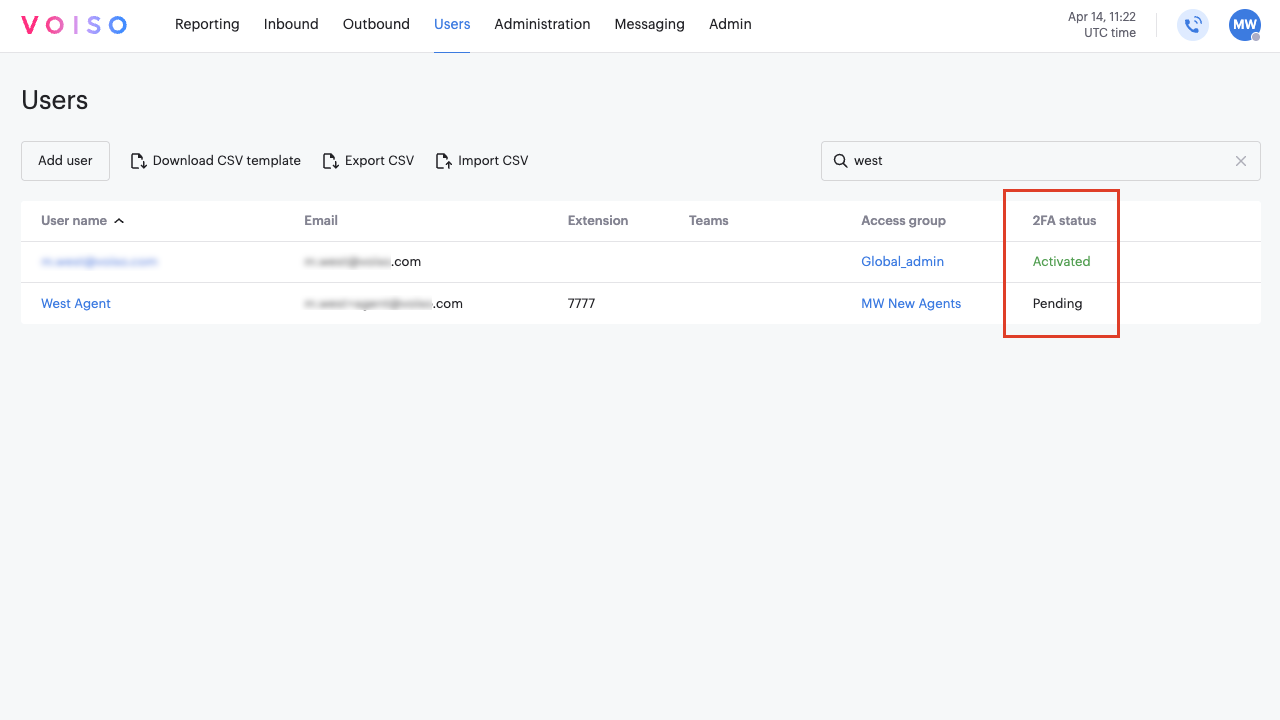
The following statuses are possible:

    StatusDescription
    PendingThe user has 2FA enabled but they have not yet set up 2FA.
    ActivatedThe user has completed the 2FA setup procedure.
    DisabledThe user is a member of a security access group that does not have 2FA enabled or the user is a member of a default security access group and 2FA is not enabled on the user page.

    Activation for custom Security Access Groups

    After you activate 2FA globally for your contact center, enable it for the custom security access groups that you want to use multi-factor authentication.

    From the Voiso navigation bar, navigate to Administration > Security Access Groups. Select an access group, then click Enable 2FA. Click Save.

    2FA Enable 2FA For SAG

    Important

    After 2FA is enabled in the System Settings, 2FA is disabled for new security access groups by default. You must enable it here to activate 2FA for users in new security access groups you create.

    Activation for individual users

    After 2FA is enabled for your contact center, the 2FA status column is added to the Users table.

    To enable 2FA for a single user, click the user name in the Users table. In the Edit user page, scroll down and click 2FA enabled. The status in the Users table changes from Disabled to Pending.

    Tip

    If you do not see the Enable 2FA checkbox in the Edit user page, check the 2FA settings for the user's security access group.

    2FA User Enable

    After the user completes the installation of the Google Authentication app and the initial authentication steps, the 2FA status changes to Activated.

    Refer to Managing bulk 2FA user settings for information about how to enable 2FA for multiple users.

    User set up procedure

    After you enable 2FA, the following notice is displayed at the top of the Voiso page when the user opens the Voiso application:

    Your admin has enabled two-factor authentication for your account. Set it up now.
    

    2FA Set It Up Now Notice

    The notification cannot be dismissed. It displays until the user completes the 2FA setup.

    When the user clicks Set it up now, the Voiso Two-factor authentication process starts.

    2FA First Login and Authentication Masked

    The user must follow these steps to set up 2FA:

    Tip

    A version of this procedure for agents can be found here.

    Important

    During setup, you will be automatically signed out from Voiso. Before you begin, ensure that you have your Voiso username and password ready.

    1. At the top of your Voiso page, click Set it up now in the 2FA notice.
    2. On the Two-factor authentication page, click Get Started.
    3. Using their mobile device, the user must download the Google Authenticator app. The app is available for both Android and iOS devices.
    4. Launch the app on the mobile device.
    5. Follow the on-screen instructions to login to a Google account or continue without an account.
    6. On the Looks like there aren't any Google Authenticator codes yet page, click Add a code. If the user already has a code for another service, they can click the '+' to add a new code.
    7. On the Voiso Install Google Authenticator app click Next after the Google Authenticator app is installed and is ready for a code from Voiso.
    8. The Voiso Scan the QR code page displays a QR code and a text version of the code.
    9. On the Google Authenticator Set up your first account page, scan the QR code or enter the code number.
    10. On the Voiso Scan the QR code page, click Next.
    11. The Google Authenticator displays a 6-digit code.
    12. On the Voiso Verify configuration page, enter the code from the Google Authenticator app and click Confirm.
    13. A notice dislays confirming that the setup is successful. The user must now login to their Voiso contact center account to complete the process. On the Setup successful page, click Go to Sign in.
    14. On the Sign in page, enter username and password, then click Sign in.
    15. On the Two-factor authentication page, enter a new 6-digit code from the Google Authenticator app. Click Confirm.
    Important

    The user must repeat steps 14 and 15 each time they sign in to their Voiso contact center account.

    Authenticator app and time syncing

    Authenticator app 2FA codes rely on the time settings of your mobile device or computer. If you experience issues using the Authenticator app for 2FA, it might be the result of your device's time setting being out of synchronization. This can occur when you manually set the time on your device or if your device has not been connected to the internet for a long time.

    To ensure that your device uses the correct time for your location, switch the time settings from Manual to Automatic. This is done in the Settings app where you specify the date and time. If the setting is already on Automatic, turn the setting off and back on to resynchronize the device time.

    Using the Authenticator browser extension

    If the user does not have access to a mobile device, the Authenticator extension from the Chrome Web Store can be used to generate Google 2FA codes. Follow these steps:

    1. In the Chrome Web Store, search for Authenticator and add it to Chrome as an extension.
      2FA Obtain Chrome Authenticator Extension
    2. Sign in to Voiso and click the Set it up now link to start the Voiso Two-factor authentication process.
    3. Skip the Install Google Authenticator app step.
    4. When the QR code is displayed, click the Authenticator extension icon in the toolbar.
    5. In the Authenticator panel, click the Scan QR Code icon, then drag a selection around the QR code. Click Next to verify the configuration.
      2FA Scan QR With Chrome Authenticator Extension
    6. Click the Authenticator icon to obtain a 6-digit code.
    7. Click the code to automatically copy it, then paste the code into the Verify configuration panel. Click Confirm.
    8. When the Setup successful panel displays, click Go to Sign in to sign back in to Voiso. Sign in with a Voiso username and password, then repeat the process of obtaining a code from the Authenticator extension to complete the two-factor authentication sign in process.
      2FA Login With Chrome Authenticator Extension

    2FA recovery for lost devices

    If a user loses their mobile device or work computer, the user's 2FA settings must be reset.

    Navigate to the Users > Users page. Find the user. Click their name to open the Edit user page. Disable 2FA, then save the settings. Open the Edit user page again and enable 2FA, then save the settings.

    The user must now repeat the procedure to set up two-factor authentication for their account.

    Managing bulk 2FA user settings

    You can use a CSV file to update user accounts for two-factor authentication. Refer to the Users article for details about using CSV files to manage and create user accounts.

    1. Navigate to Users > Users and export your list of users as a CSV file.
    2. Find the 2FA Enabled column at the end of the table.
    3. For each user, add a 'y' to enable 2FA or add an 'n' to not enable 2FA.
    4. Import the modified CSV file to update your users. Those with 2FA enabled will see the notification at the top of the Voiso page when they sign in.

    Was this article helpful?