Who should read this article: Administrators
Embed a webchat widget in your organization's website to enable your contact center to receive and reply to messages from your website visitors.
Introduction
Voiso enables you to add a webchat widget to your organization's website so that your website visitors can initiate chat sessions with your agents.
Connect the webchat channel, optionally specify a greeting message, generate embeddable JavaScript, add the code to your organization's website, and add agents to the webchat channel.
Watch this video, Digital Channels: Adding webchat, or follow the steps in this article to learn how to add a webchat channel to your contact center:
For information about agents and supervisors using the Webchat channel, refer to Webchat interactions.
Connecting Webchat to your contact center
This section describes how you can connect, configure, and manage the Webchat widget in your website. Use the JavaScript code you generate in the Add channel page to embed the Voiso Webchat widget in your website.
Check out the video in the Testing the webchat widget preview section.
Webchat configuration
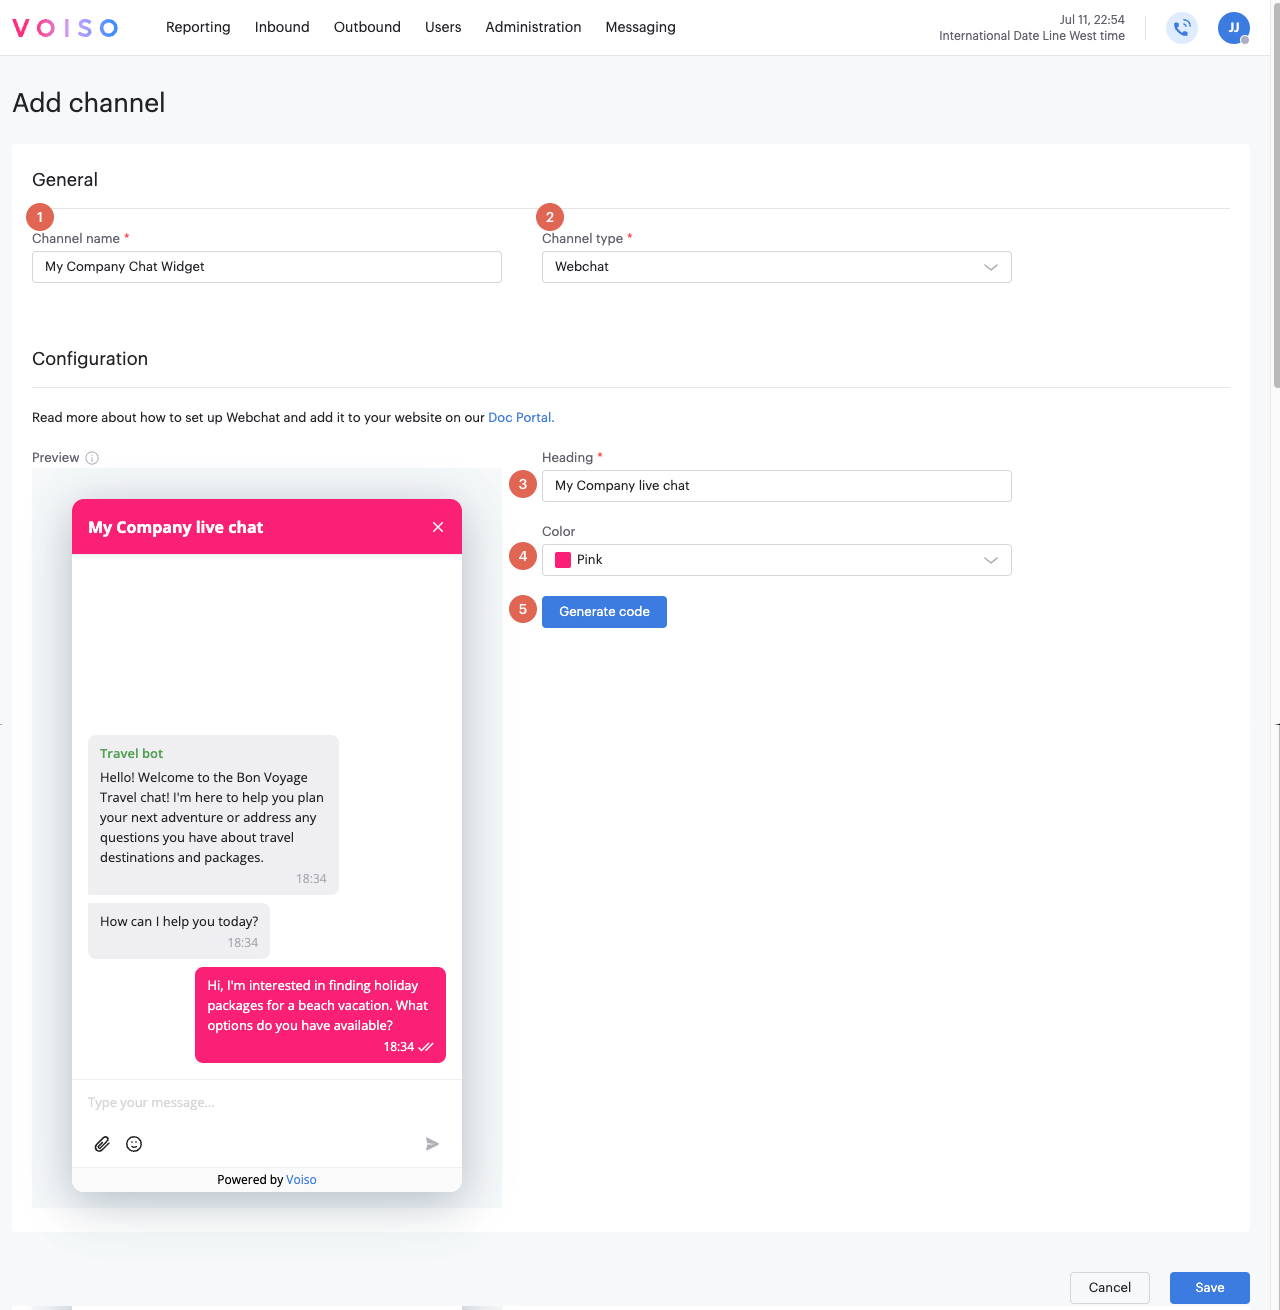
To set up the Webchat channel widget and get JavaScript code that you embed in your website, follow these steps:
-
In the Channel name field, enter a name for your channel.
-
Select the Webchat channel type to display the Configuration section.
-
In the Top heading field, enter the name to appears at the top of the widget.
-
From the Color theme menu, select the color of the agent messages displayed to your website visitors. You can preview the widget in the Preview area.
-
From the Unread messages alert menu, select one of the following options:
- Badge only
- Badge and message preview
-
To display a predefined message to website visitors when they first start a webchat, select the Display greeting message option.
-
Define the message title in the Greeting message title field.
-
Specify the message to be displayed to every visitor who starts a webchat in the Greeting message field. Use the message to provide instructions or guidance to your visitors about what to expect from the webchat.
-
When you are satisfied with the appearance of the widget, click Generate code to display JavaScript code that you can copy and add to your website.
-
To generate a link to preview your widget, follow these steps:
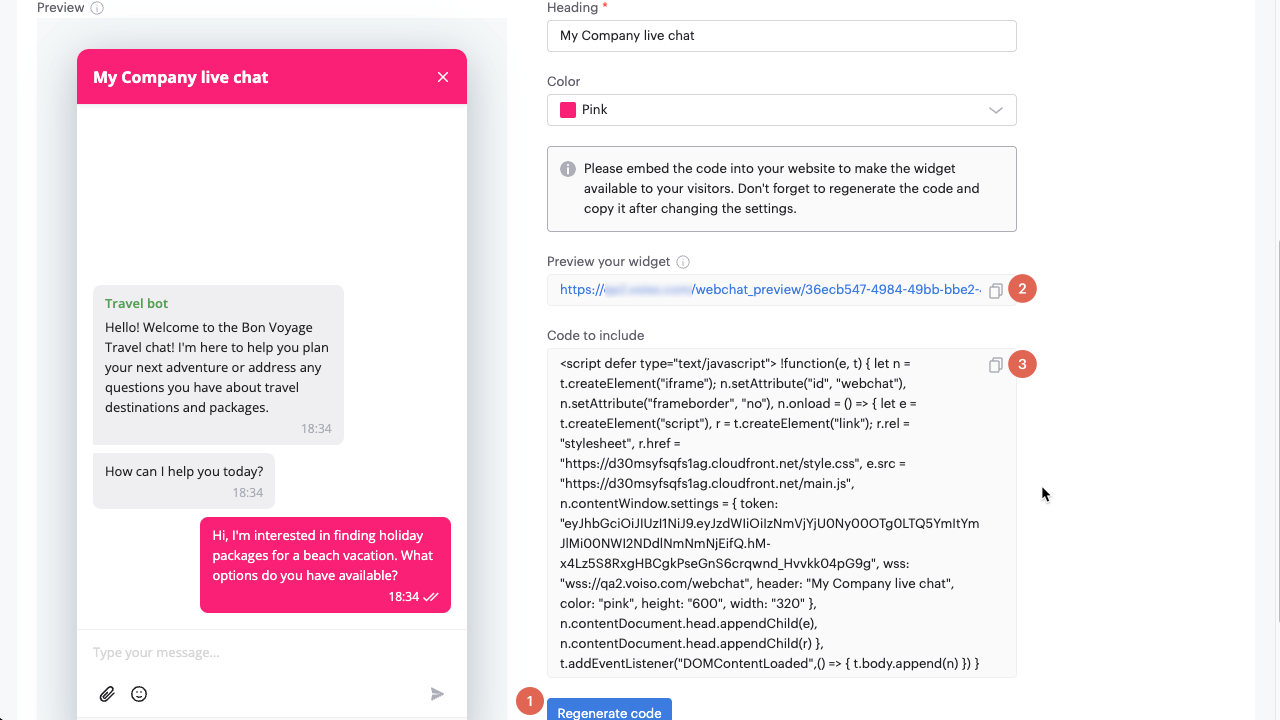
- Click Regenerate code (1).
- In the Preview your widget link field (2), click the Copy button.
- Paste the URL into a new browser tab or window. Refer to Webchat widget preview.
- In the Code to include field (3), click the Copy button to copy the JavaScript code you embed in your website to activate the widget.
TipUse the
usernameparameter in the JavaScript code to automatically insert the name or ID of contacts that are logged in to your website. -
If you make changes to the configuration, click Regenerate code to update the preview and code.
-
Click Save to add the new channel to your contact center.
TipYou can adjust the dimensions of the widget by editing the JS code. The default height and width are 600px by 320px.
- The width can be set to any value between 320px and 768px.
- The height can be set to any value between 600px and 800px.
Identifying contacts
If your website allows contacts to log in before starting a webchat, Voiso offers a username parameter in the widget script. This parameter lets you programmatically insert the contact's name or ID into the script. When a logged-in contact clicks the Chat icon, the page loads and the script launches, allowing your website code to populate it programmatically with the contact’s name or ID. If no data is added to the username parameter, Voiso will display the contact as Guest.
When the username parameter is populated, messages sent to your agent in Omnichannel Workspace include the contact’s name or ID.
Webchat widget preview
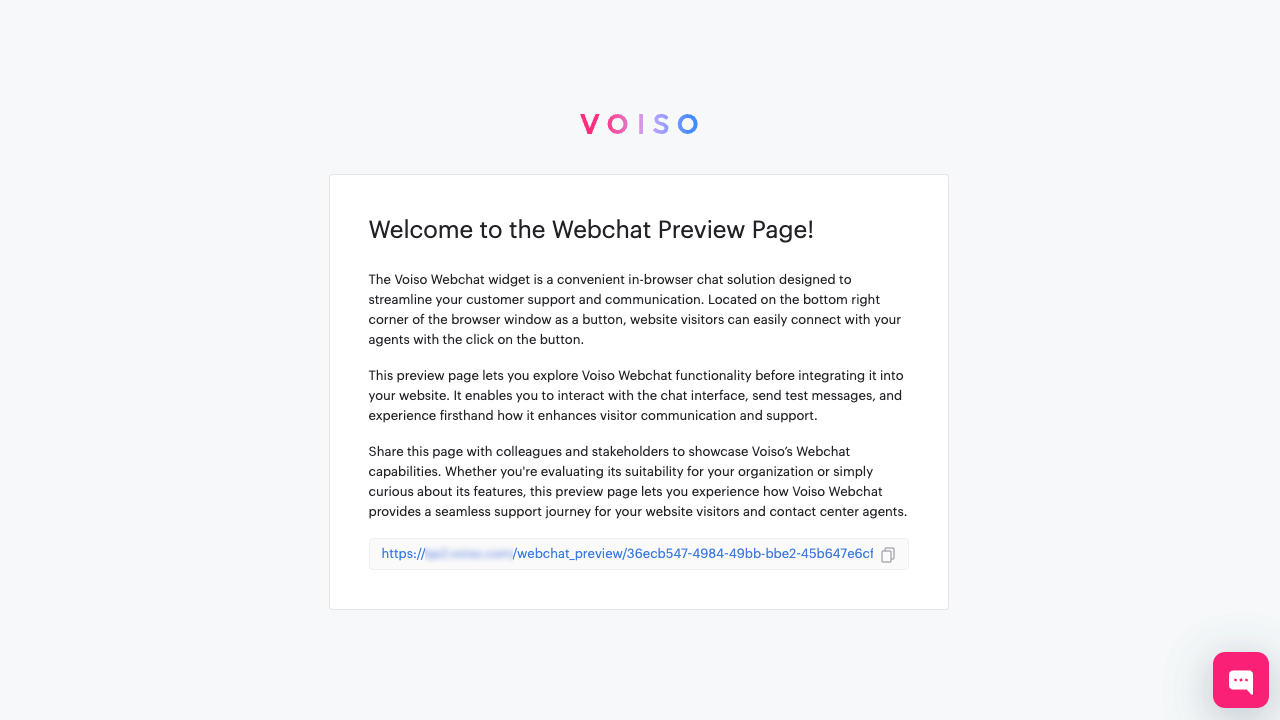
When you configure the Webchat channel, you can preview how the widget will look on a website using the preview URL in the Preview your widget field of the Configuration section.
Any time you modify the widget configuration, click Regenerate code to get the latest preview URL and embeddable code.
Paste the URL into a new browser tab or window to display the preview page.
Testing the webchat widget preview
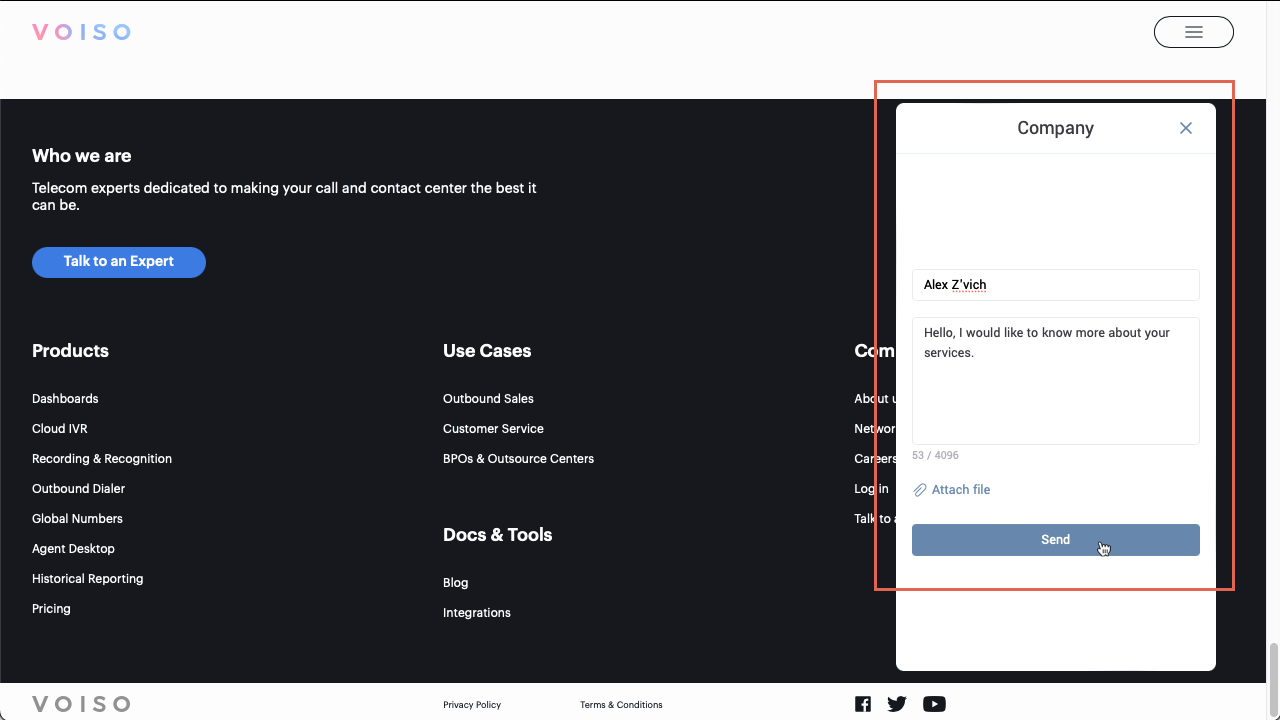
Try out the widget by clicking the Chat icon on the lower right corner of the browser window.
To test the preview webchat, ensure you have the following prerequisites in place:
- You have a webchat digital channel configured.
- You have a user account assigned to the webchat channel.
- You have an inbound interaction queue with the webchat channel assigned to it.
- You have an interaction flow with the queue assigned to it.
Watch this long-form video for an overview of setting up your webchat channel and interaction flow for the first time.
Here is the transcript of the video summarized as a procedure for you:
Testing a Webchat Widget in Your Contact Center
This section walks you through how to test the webchat feature in your contact center using a simple setup. You’ll create a digital channel and widget, set up a test user, assign an inbound queue, and route interactions using a basic interaction flow.
Step 1: Create a Webchat Digital Channel
- Navigate to the Administration menu and select Digital channels.
- On the Digital channels page, click Add channel.
- On the Add channel page:
- Enter a name for the new channel.
- From the Channel type menu, select Webchat.
- Configure the appearance of the webchat widget as needed.
- Add an optional greeting message to be displayed to every website visitor who starts a webchat.
- Click Generate code.
- Copy the URL from the Preview your widget field. You’ll use this URL later to test your widget.
Step 2: Preview the Webchat Widget
- Open a new browser tab or window.
- Paste the copied Preview your widget URL into the address bar and press Enter.
- Return to the Add channel page and click Save.
Step 3: Create a Test User
- Navigate to the Users menu and select Users.
- Click Add user.
- Fill in the required fields:
- Name and optional Display name
- Email address (used to sign in to Voiso)
- Password
- Role – set this to Agent to simulate an agent's experience
- Scroll to the Permissions section:
- Select Omnichannel Workspace Enabled.
- Optionally, select WebRTC Enabled to allow voice calls.
- Scroll to the Assigned channels section and click Manage.
- On the Channel assignment panel, select the Webchat channel and click Assign.
- In the Capacity section, specify how many simultaneous webchat interactions the user can handle.
- Click Save to create the user profile.
Step 4: Create an Inbound Digital Channels Queue
- Navigate to the Inbound menu and select Queues.
- On the Queues page, click Add queue.
- Enter a name for the queue.
- In the Assigned agents section, click Manage:
- Select your test agent and click Assign.
- In the Assigned channels section, click Manage:
- Select Webchat as the channel type and click Assign.
- Click Save to create the queue.
Step 5: Create an Inbound Interaction Flow
- Navigate to the Inbound menu and select Flows.
- On the Flows page, click Add flow.
- In the Add flow panel:
- Enter a name for your flow.
- Set the Type to Digital.
- Select Webchat as the Channel type.
- Click Continue to open the Edit flow page.
- Scroll to the Assigned digital channels section and click Manage.
- In the Digital channels assignment panel:
- Select your Webchat channel and click Assign.
- Click Save.
Step 6: Build a Simple Flow in Flow Builder
- On the Flows page, click the flow name to return to the Edit flow page.
- Click Launch builder to open Flow Builder.
- The Start node appears by default.
- Click the Route node icon to add a Route node to the canvas.
- Connect the Start node to the Route node.
- Click the Route node to open its configuration panel.
- In the Settings section:
- Select Queue from the Route to menu.
- Choose your digital channels queue from the Queue name menu.
- Click Save.
- Switch back to the Edit flow page and click Save again.
Step 7: Test the Webchat Widget
- Sign out of your Voiso admin account.
- Sign back in as your test agent.
- Open the Omnichannel Workspace by clicking the Agent Workspace icon.
- Set your availability status to Available.
- Return to the browser tab with the Webchat Preview Page open.
- Click the webchat widget icon to open the chat.
- Type a message and press Return or click Send.
- Switch back to the Agent Workspace tab. You should see a ringing webchat interaction.
- Click Answer to open the interaction.
- Send a reply from the Agent Workspace.
- Return to the preview widget tab to confirm that the message appears in the transcript.
Step 8: Go Live with Webchat
- Return to the Digital channels page.
- Select your Webchat channel.
- Copy the JavaScript code and embed it in your organization’s webpage.
- Assign live agents to your interaction queue.
- Use Flow Builder to build a more advanced chatbot if needed.
Enabling agents to handle webchat
Once you embed the JavaScript webchat widget code in your organization's website, ensure that the Omnichannel Workspace is enabled for your agents.
Refer to Enabling Omnichannel for details about enabling agents to handle digital interactions, and watch the Digital Channels: Assigning a channel video:
The Webchat widget on mobile phones
The widget appearance you specified when you added it automatically adjusts to fit the entire screen of the mobile phone being used. Fonts and attachment previews are also optimized for mobile displays, so they may appear slightly different from how they look on a desktop browser.
Emojis are managed directly through the mobile device's keyboard, so your contacts will only see the Attach and Send buttons. The Send button becomes highlighted when your contact starts typing in the message field.