Who should read this article: All users
This is part 4 of the How to run a dialer campaign use case.
Agents in your campaign
This article provides an overview of the agent experience in a Voiso outbound Dialer Campaign. Agent Panel provides all the tools that an agent requires to handle campaign calls, select wrap-up codes, and join or leave campaigns.
How agents are notified about campaigns
Voiso offers two methods to notify agents about campaigns they can or should join:
- Broadcast messages: Use Broadcast messages to send targeted notifications to specific teams about upcoming or ongoing campaigns. This ensures that agents are informed and ready to participate.
- Agent Panel notifications: When a campaign is started, logged-in agents automatically receive notifications in the Agent Panel. These alerts inform them about their assignment to one or more campaigns.
Joining a Dialer campaign
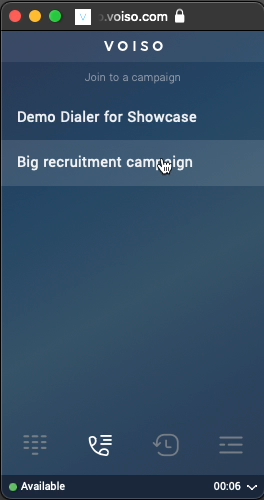
Agents join campaigns directly through Agent Panel. After they sign-in, open Agent Panel, and are ready to start handling campaign calls, they should follow these simple steps:
-
Click the Dialer campaign icon in Agent Panel to open the Dialer campaign page.
-
From the Dialer campaign page, select the name of the campaign they want to join.
-
Campaign calls are automatically routed to them.
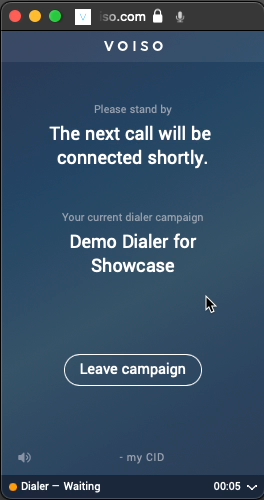
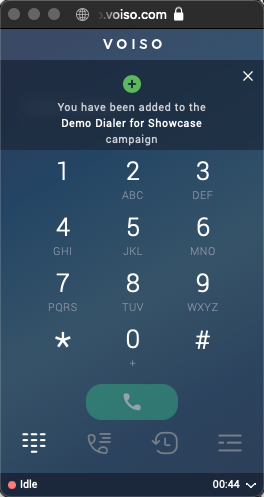
You can customize the audio (MOH) that is played to agents while they are waiting for the Dialer to connect them to the next call by using the Music on dialer waiting setting on the System Settings page.
You can configure an alert to be played when a call is connected. This alert is meant to draw the agent's attention to the call.
Watch this video to see how predictive dialer campaigns work:
Agent Panel call controls
While handling campaign calls, agents have access to a complete set of call controls through the Call screen in Agent Panel. These controls enable them to efficiently manage calls and provide seamless service.
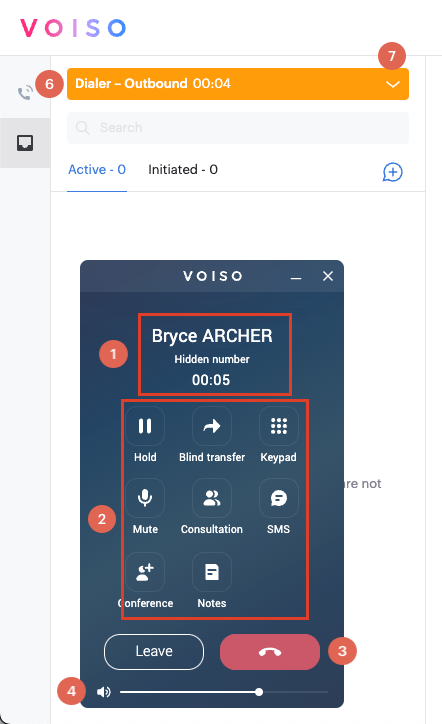
| Feature | Description | |
|---|---|---|
| 1 | Contact information | The name or ID of the contact and their phone number, along with the elapsed time of the call. |
| 2 | Call controls | Buttons enabling you to manage the call. |
| Hold | Place the call on hold so that you and the contact cannot hear one another. For some features such as Consultation, the call is placed on hold automatically. | |
| Blind transfer | Immediately transfer to a number you dial a call without knowing if the call will be answered. | |
| Keypad | Enter numbers using the dial pad to send DTMF. This is commonly used to navigate phone system menus. | |
| Mute | Mute your microphone so that the contact cannot hear you. | |
| Consultation | Speak to another employee about a contact’s case, without the contact hearing the conversation, and transfer the call when necessary. | |
| Conference | Invite another party to join an active call, enabling all parties to hear and speak to one another. | |
| Record | Start, pause, and stop recording a call (this feature is not available in all contact centers). | |
| Audio settings | Select which connected devices to use for microphone and speaker. | |
| SMS | Send an SMS to the contact during the call. | |
| Notes | Add notes about a call during a call or during after call work. Call notes are saved in the call history. | |
| 3 | End | Button to hang up the call |
| 4 | Volume control | Call volume control for your headset. Click it to mute the caller. Hover your mouse pointer to display the volume control slider. |
| 5 | CID | The Caller ID (CID) that is displayed to the contact on their phone |
| 6 | Status | Your current availability status and how long you have been in that status. When you are on an outgoing call, your status is Outbound. |
| 7 | Status menu | You cannot change your status while you are handling a call |
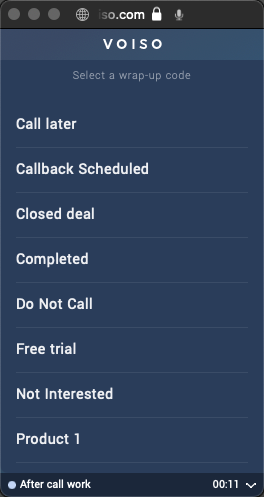
At the conclusion of each call, agents select a wrap-up code that reflects the outcome of the interaction. Ensure that the wrap-up codes you configure align with your campaign objectives and provide meaningful insights for reporting.