Who should read this article: Administrators, Supervisors
Access key data about the performance of your contact center and schedule regular reports.
Introduction
Voiso historical reports enable you to generate detailed insights about your contact center's performance, including Agent activity, Queue usage, ASR, sensitive data access, and Wrap-up code trends. Most reports can be run on demand, and many support scheduled delivery for recurring analysis.
The time shown in Historical Reports reflects the contact center time zone, not the individual user time zone.
Historical reports
The Historical reports page contains a list of reports that you have created to monitor the past performance of your contact center. For real-time monitoring, use the Real-time dashboard.
To access the Historical reports page, from the main menu bar, navigate to Reporting > Historical reports.
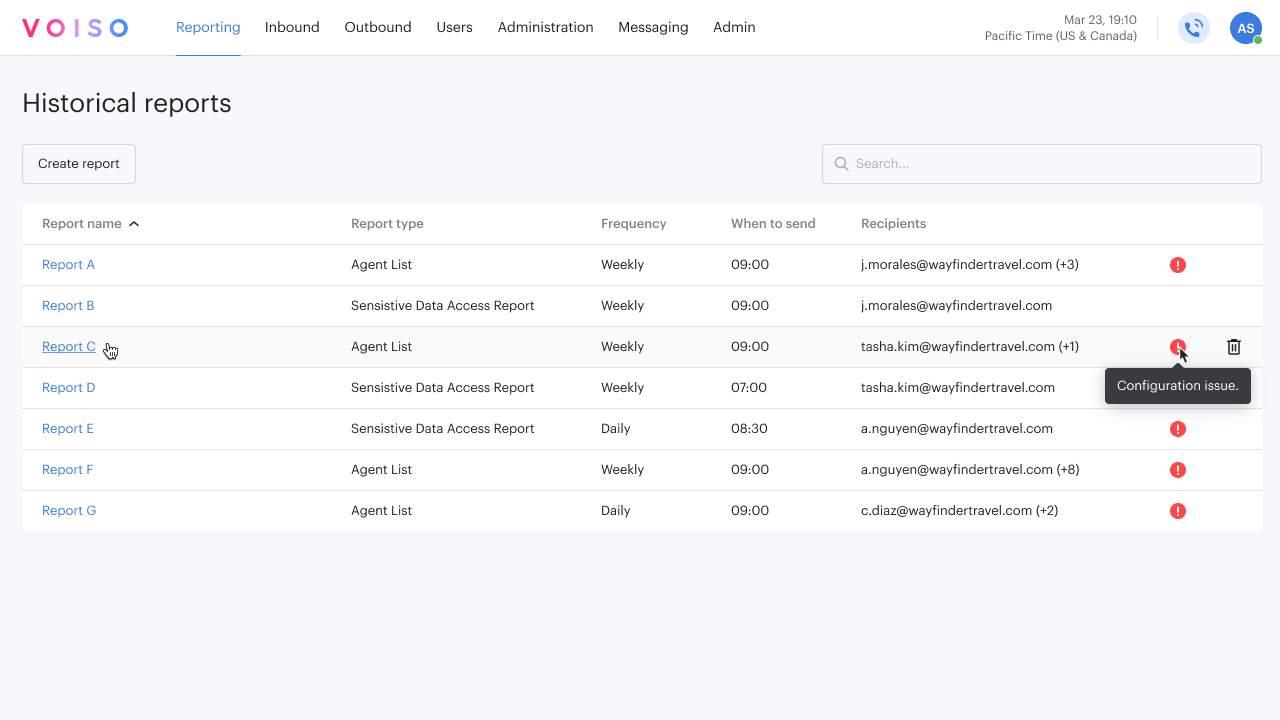
The Historical reports table lists all the scheduled reports added by the supervisors, analysts, and admins in your contact center. The table includes the name, type, frequency, send time, report recipients, and status of each report.
Click a report name to edit its parameters. The only parameter that may not be changed is the Report type.
Reports requiring attention due to configuration issues will have a red alert icon next to them. Configuration issues may include such things as no longer available queues, teams, or agents. Click the report name to update its configuration.
To delete a report, click Delete (trash can icon).
Add a report
To add a new report, click Add report to open the Add report panel. The panel comprises four thematic tabs: Agent, Queue, Calling number, and Financial and system. Use Search to find a specific report type or browse the tabs to find and select a report type.
Select a report type, then click Continue to open the configuration page for your report. Watch this video for a quick overview of how to add a new historical report:
Refer to the following articles for details on how to configure, run, and schedule each report:
| Tab group | Report type | Description | Manual | Scheduled |
|---|---|---|---|---|
| Agent | Agent - Daily Sign-in and Sign-out | A daily record of the first sign-in (login) and last sign-out (logout) timestamps for selected agents or teams. | ✔ | ✔ |
| Agent List | Display a wide variety of agent metrics to evaluate {{glossary.Agent}} performance | ✔ | ✔ | |
| Agent List - Per Hour | Display agent metrics calculated for each hour in a day | ✔ | ✖ | |
| Keyword Group | The use of a keyword group by agents and teams for a specified date or date range | ✔ | ✖ | |
| Redial Counter | Show the number of call attempts to a destination number during the report period | ✔ | ✖ | |
| Wrap-up codes | Wrap-up code usage by {{glossary.team}} for a specified time period | ✔ | ✔ | |
| Queue | In-queue Abandons | Show the percentage of calls abandoned by contacts waiting in {{glossary.Queue}} | ✔ | ✖ |
| In-queue Abandons - Per Hour | Show the percentage of calls abandoned per hour by contacts waiting in {{glossary.Queue}} | ✔ | ✔ | |
| Calling number | ASR by country | Show the ratio of the number of successfully connected calls to the number of call attempts by country | ✔ | ✔ |
| ASR by country by hour | Show the ratio of the number of successfully connected calls to the number of call attempts by specified country per hour in a day | ✔ | ✔ | |
| ASR per Caller ID | Show the ratio of the number of successfully connected calls to the number of attempted calls by specified Caller ID | ✔ | ✔ | |
| Financial and system | Billing | Track how many billing units were used by agents, and teams during the selected period for cost tracking and analysis. You can track by active users, deactivated users, and AMD. | ✔ | ✔ |
| Billing Unit | Track monthly usage-based and recurring charges for each billing unit. | ✔ | ✔ | |
| Sensitive Data Access Report | Monitor access to sensitive data, such as call recordings, by a specific user | ✔ | ✔ |
Scheduled reports
If the selected report supports scheduling, you will see a Schedule section on the Add report page. Configure the frequency, time, and report recipients, then save the report.
Click Generate report to see a preview of the report.
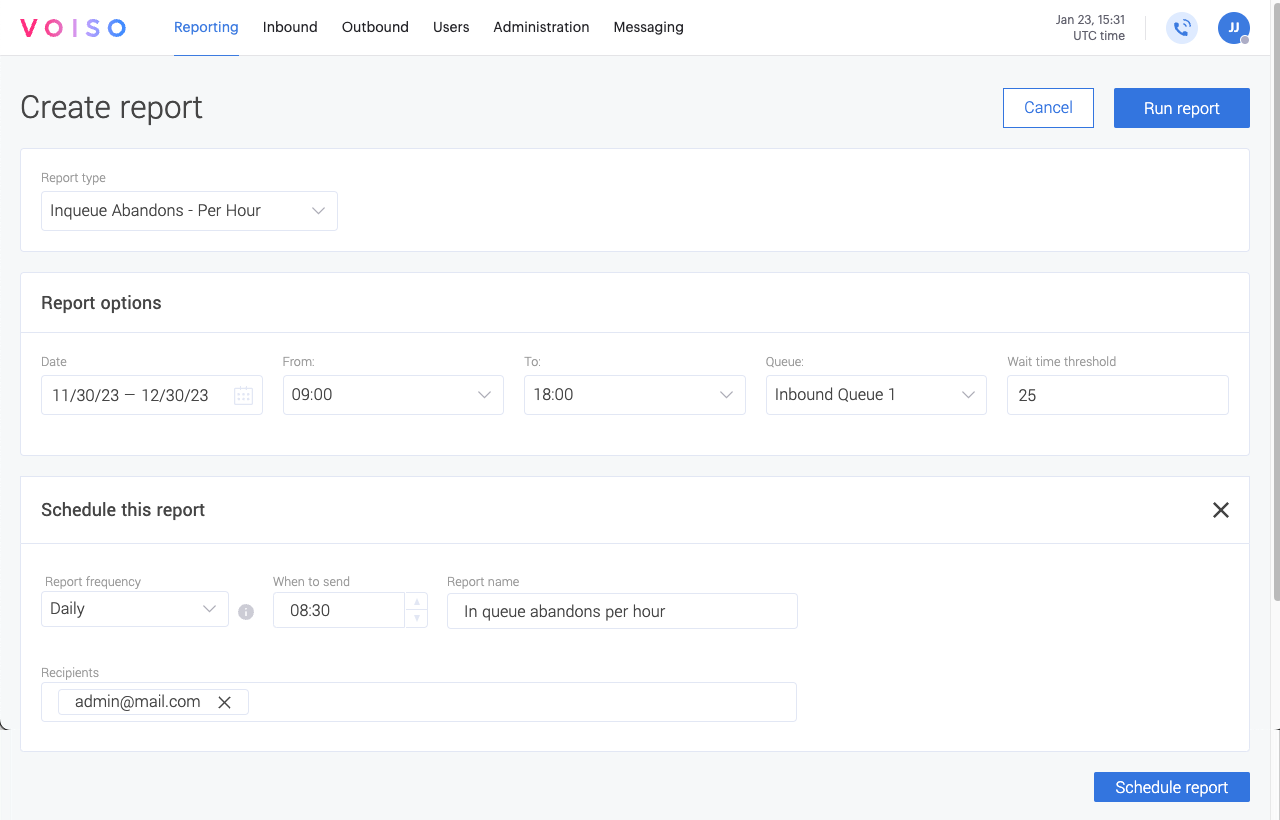
The Schedule section requires the following parameters:
| Parameter | Description |
|---|---|
| Frequency | Select Daily, Weekly, or Monthly. Weekly reports are sent each Monday. Monthly reports are sent on the first day of the month. |
| Run time | Use the time selector to define when the report will run in your time zone. |
| Recipients | Enter one or more email addresses to receive the report. |
| Report name | You define this at the top of the Add report page. This name will be used in the email that delivers the report. |
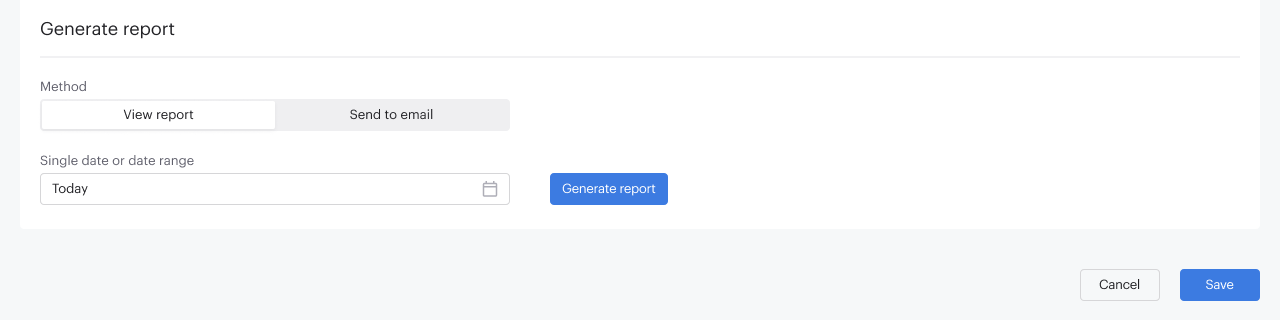
Generate report
The Generate report section enables you to immediately view a downloadable report or send the report as a CSV to a specified email address.
View report
In the Generate report section, define a date or date range, then click Generate report to generate an instant report.
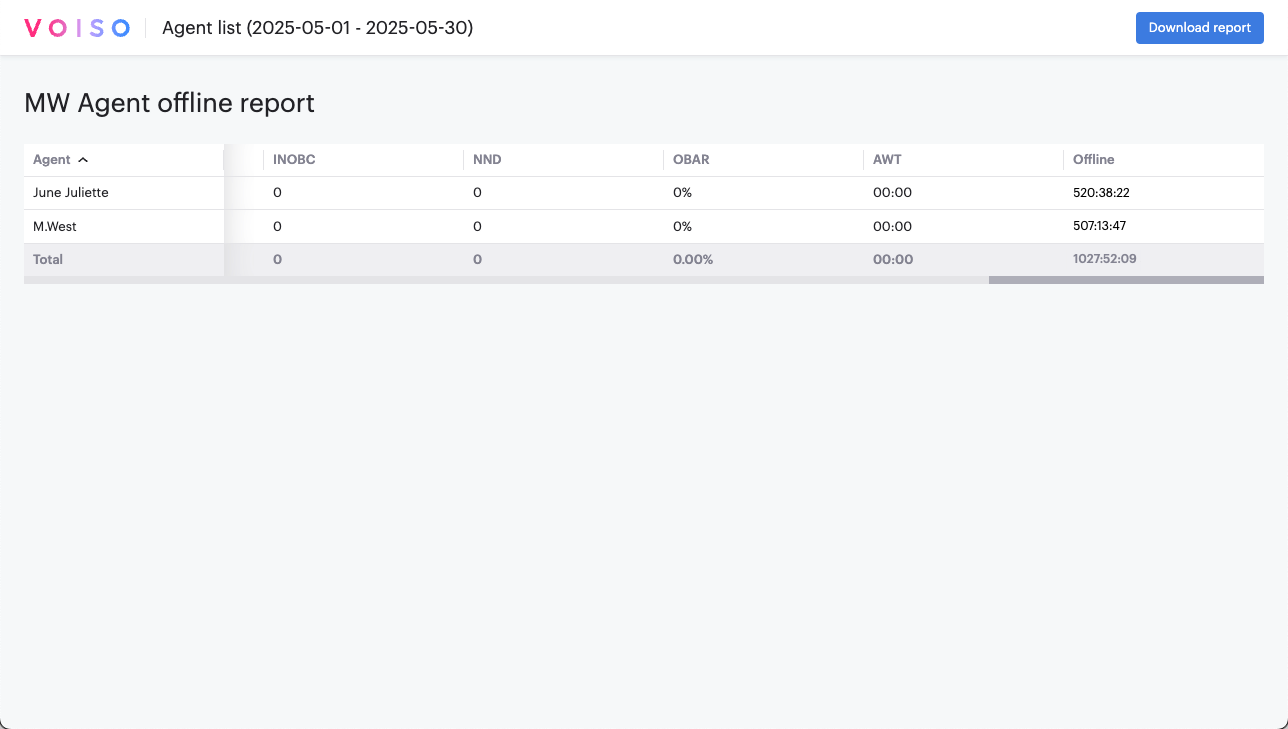
You can change the sorting order of the report by clicking the up and down arrows in the column heads. You can drag and drop columns to change the column order. Changes you make control the sort and column orders in downloaded and emailed reports.
Download report
Adjust the column sort and arrangement of your report, then click Download report to download your one-time report as CSV files for use outside the Voiso platform. Scheduled reports are automatically emailed to recipients after they are run.
Click Cancel if you do not want to create a scheduled report.
Send to email
To send the report by email after or instead of generating it in a new window, select the Send to email tab.

Select the time range of the report, then add comma separated email addresses in the Recipients field.
If you generate the report first, the column sort order and arrangement set in the Generate Report view is saved automatically and applied to emailed reports and all scheduled reports.
Click Send report to send a CSV of the current report to the email recipients.