Who should read this article: Administrators
This guide is for Salesforce administrators who require a full set of steps to configure objects in Salesforce related to integrating with third-party applications.
Introduction
Integrating Voiso and Salesforce is a straightforward process. First, install the Voiso Softphone Package from the Salesforce AppExchange, then configure an integration user, create and assign a permission set to the integration user, connect Voiso to your Salesforce org, configure and embed the Voiso softphone (Agent Panel) inside Salesforce, set up a call center in Salesforce, add the Voiso phone component to the Salesforce Utility Bar, and finally, configure the Voiso call logging and history features.
Prerequisites
Ensure that the following prerequisites are in place before beginning integration with Salesforce:
- The Salesforce CRM integration is activated for your contact center.
- Your agents and other users use Salesforce Lightning Experience.
- For users who create Dialer campaigns and import calling lists from Salesforce, ensure their account email addresses are the same in both Voiso and Salesforce.
- The edition of Salesforce organization you are using has API access available and active.
- Your administrator's Salesforce user account must have REST API Enabled permissions and Administrator privileges set.
Integration
Follow these numbered steps to set up, configure, and connect Voiso to Salesforce.
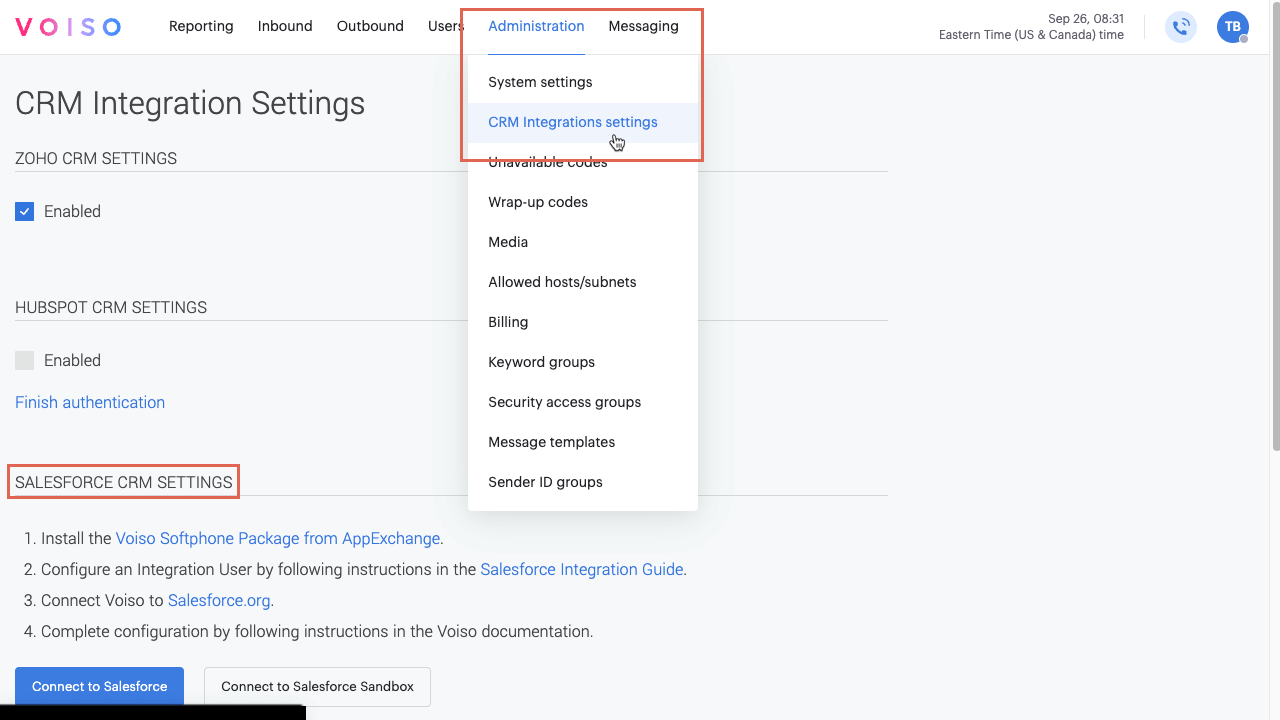
Step 1: Install the Voiso Softphone Package from AppExchange
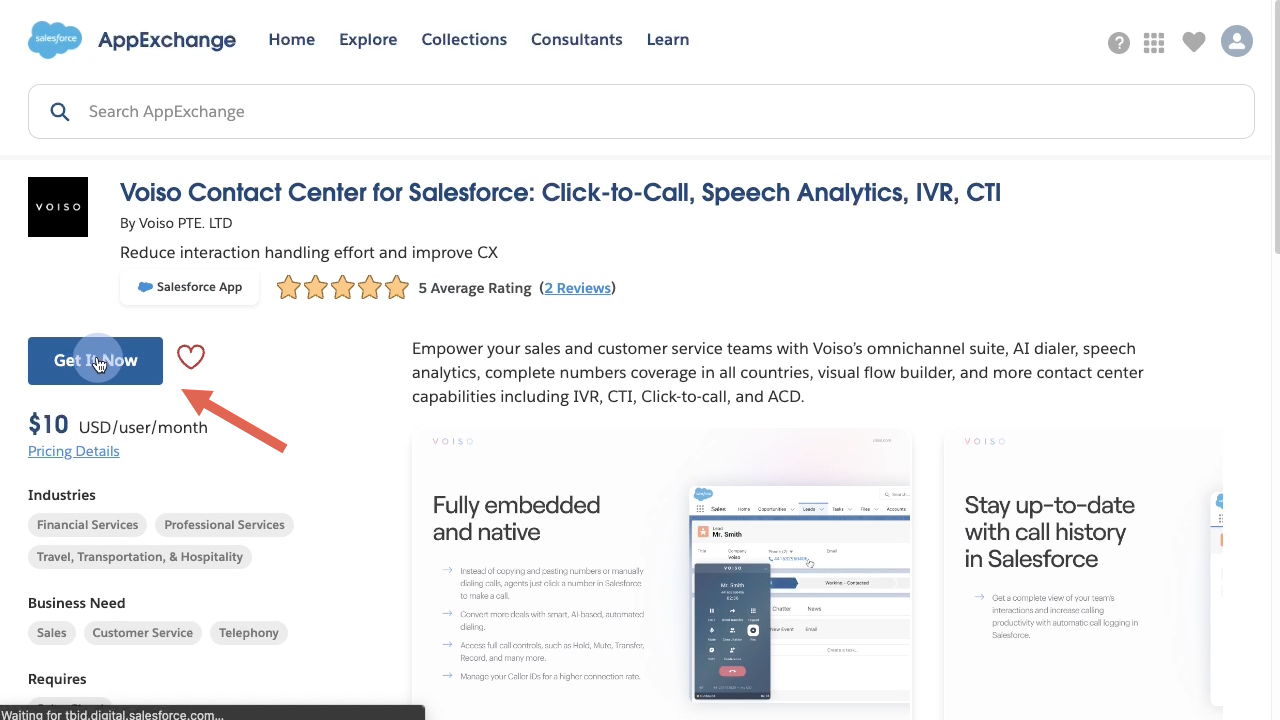
Click the link in step 1 of the Salesforce CRM settings section to open the Voiso Softphone Package page on the Salesforce AppExchange.
- Log in to Salesforce if you are not already logged in, then click Get It Now to launch the app installation process.
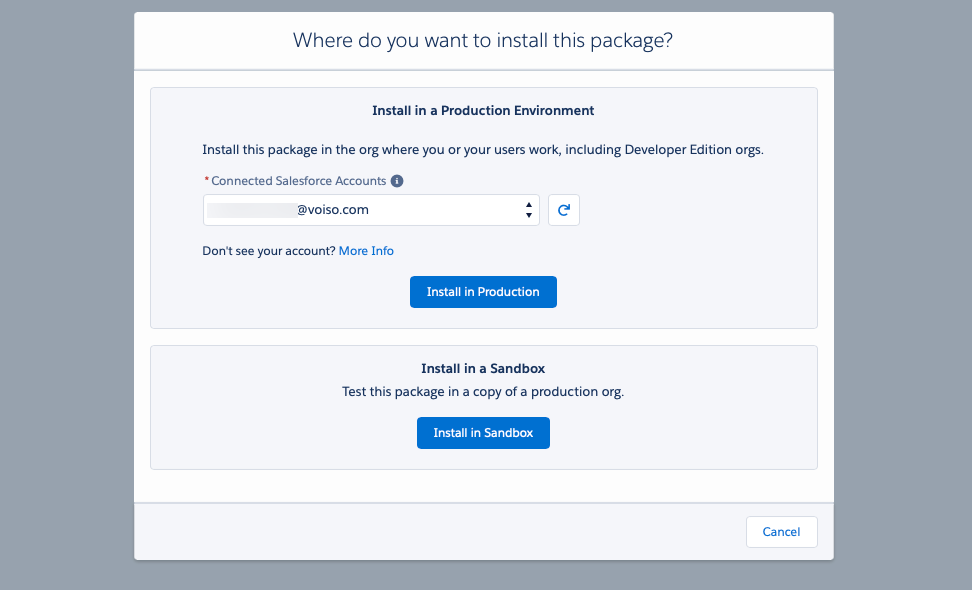
- Select the Salesforce account associated with your contact center. The application displays a list of Trailblazer accounts that have the Manage Billing permission set.
- Choose one of these options:
- Install in a Production Environment: Install the integration app in your Voiso contact center where agents can access the Salesforce integration features to handle interactions.
- Install in a Sandbox: Install the integration app in a test environment in Salesforce before exposing the Salesforce integration to your agents in a production environment.
- For installation in a production environment, select the connected Salesforce Account from the drop-down menu.
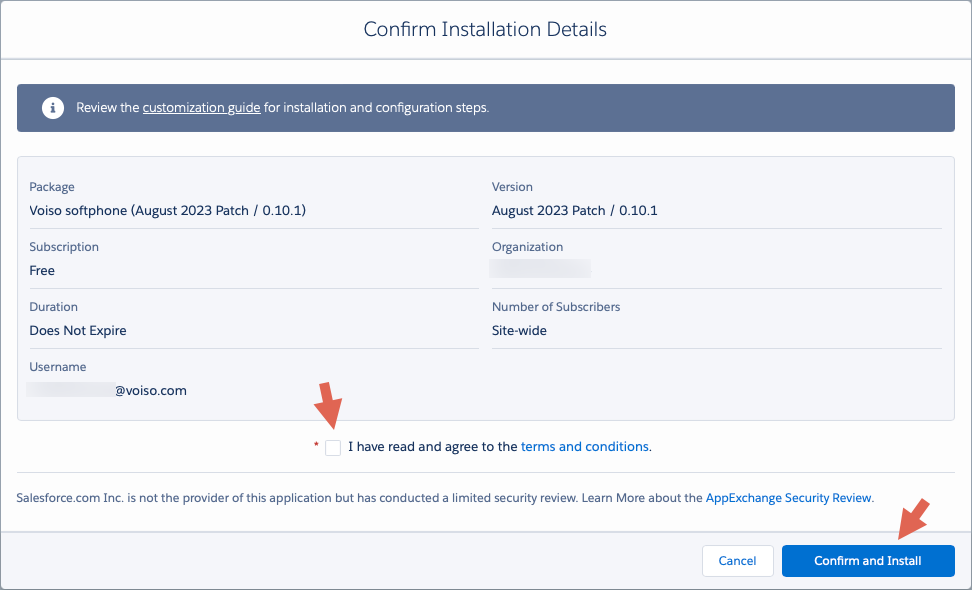
- Review and confirm the installation details.
- Voiso provides Trusted URL settings as part of the softphone package. Voiso recommends allowing your Salesforce organization to interact with URLs in Voiso during the package installation. These settings can be reconfigured later to be more restrictive if needed.
- Read and agree to the terms and conditions from Salesforce.
- Click Confirm and Install.
- Choose to install the Voiso application for Admins only, all users, or specific profiles, then click Install.
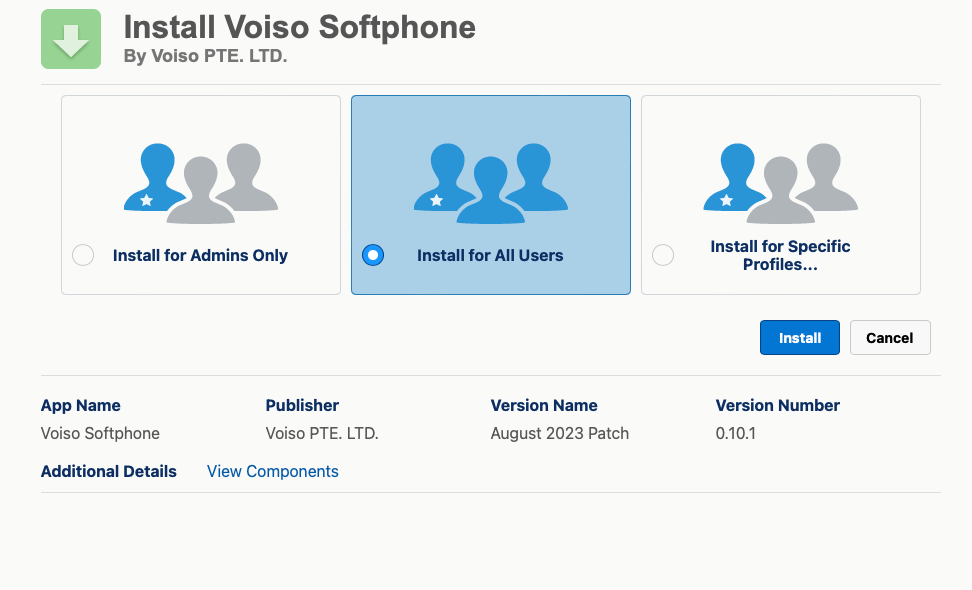
- When the Installation Complete! page is displayed, click Done.
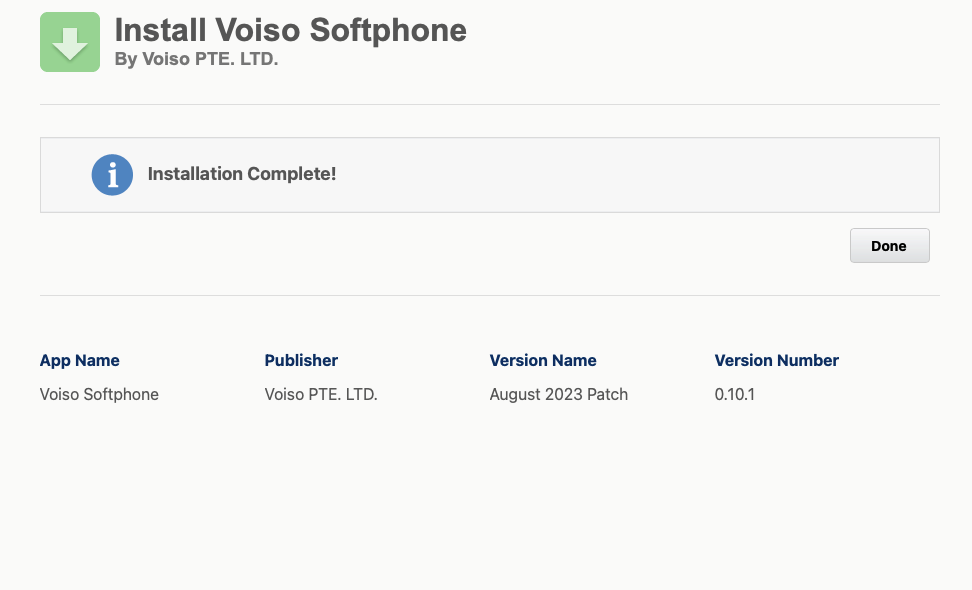
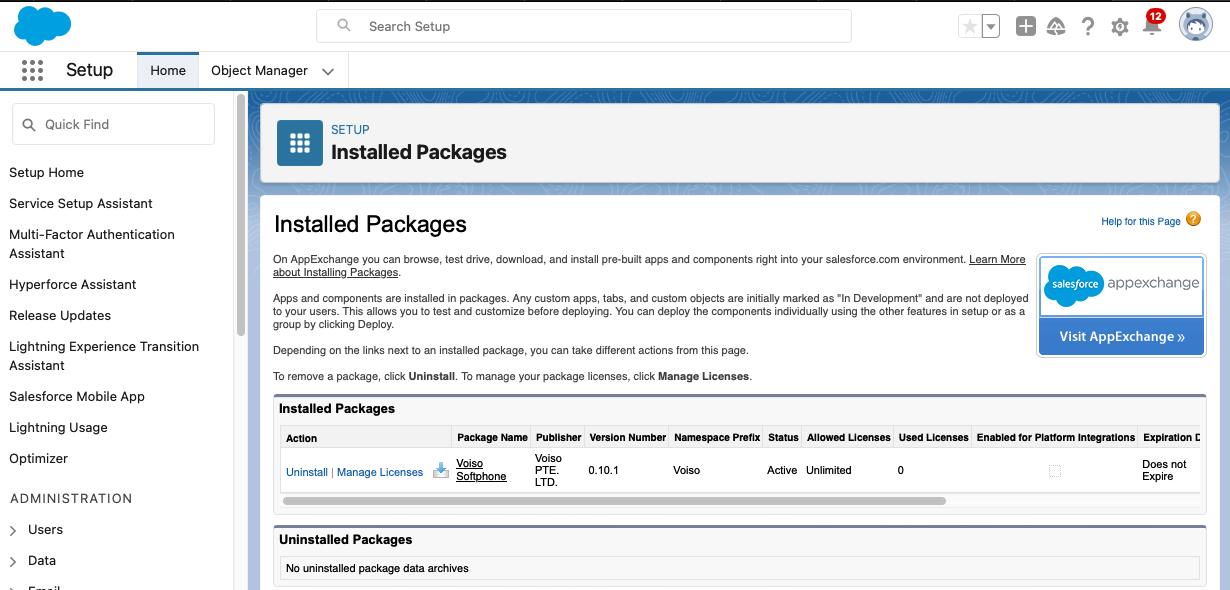
- You can manage the Voiso application in the Installed Packages page.
Step 2: Configure an Integration User
Grant the required permissions to the integration user by creating your own permission set, as recommended by Salesforce, or by modifying an existing user profile. Refer to Step 2.1) for details.
Follow these steps in Salesforce org to create a Platform Integration User:
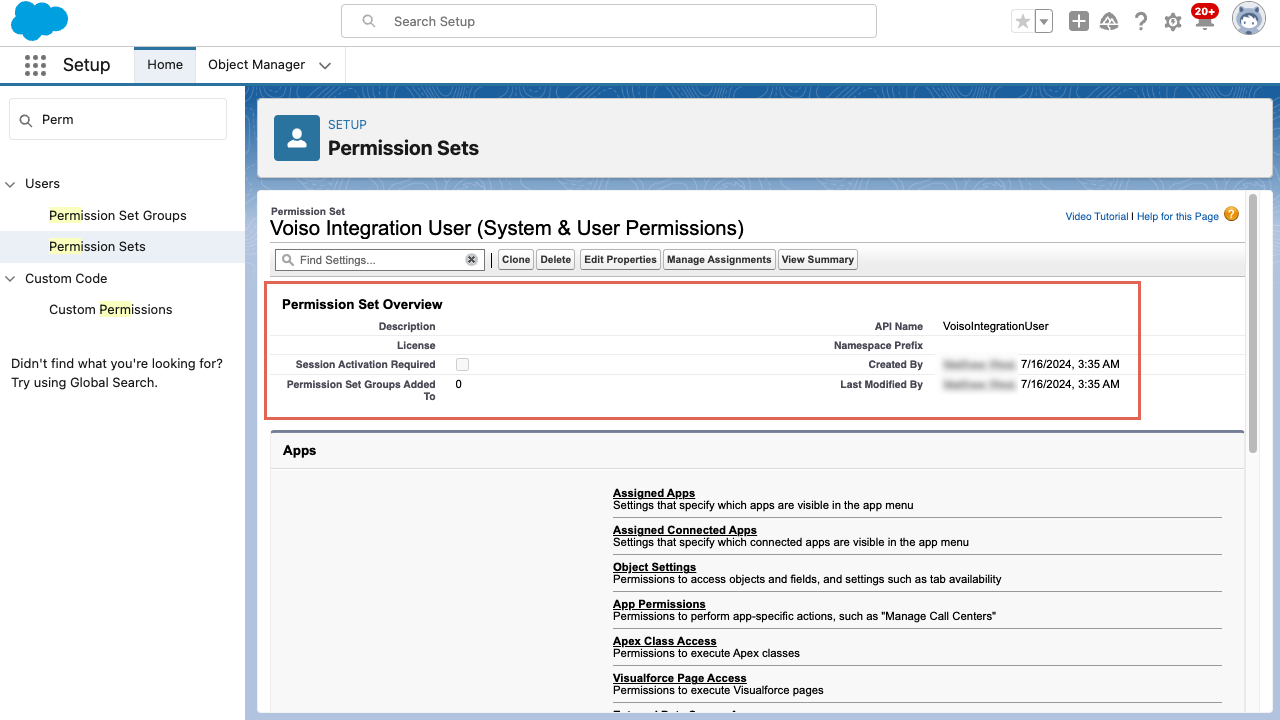
Step 2.1: Create a Permission Set
Perform the following steps:
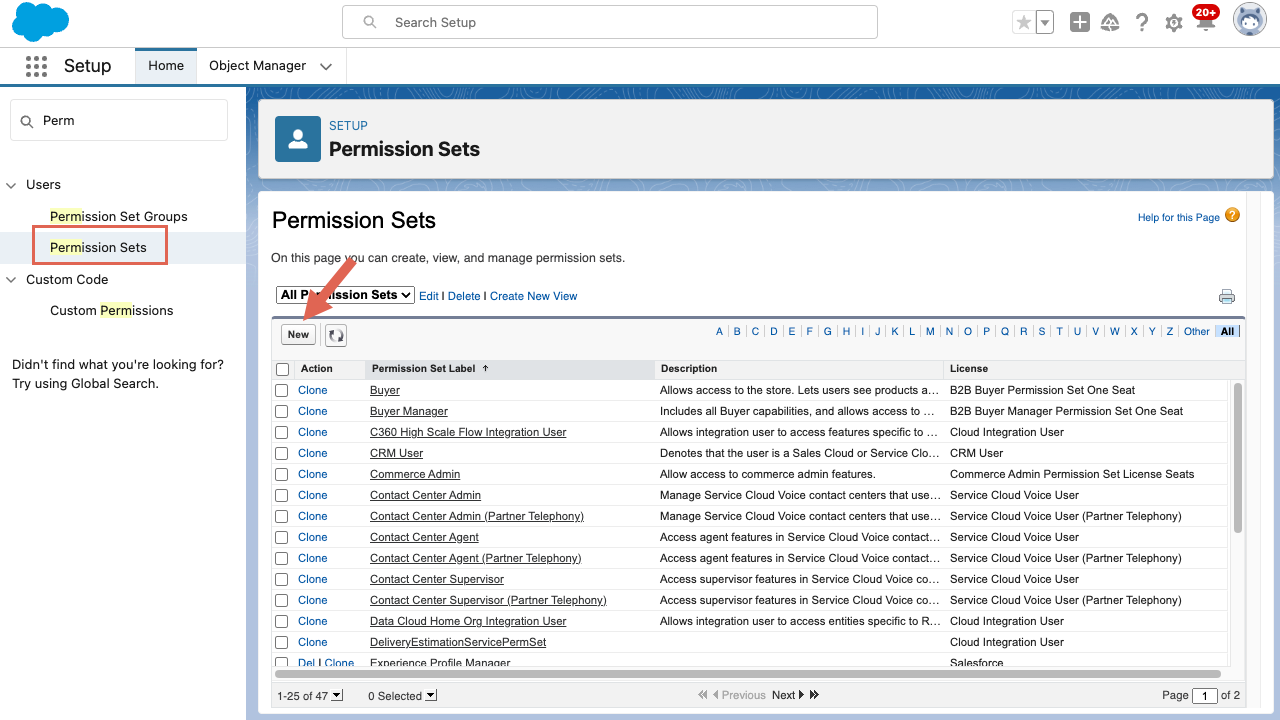
- From Setup, use the Quick Find box to search for
Permission Sets, then select Permission Sets and click - Click New.
- Enter a label, such as
{{variable.BrandName}} Integration User (System & User Permissions)and enter an API name, such as{{variable.BrandName}}IntegrationUser.
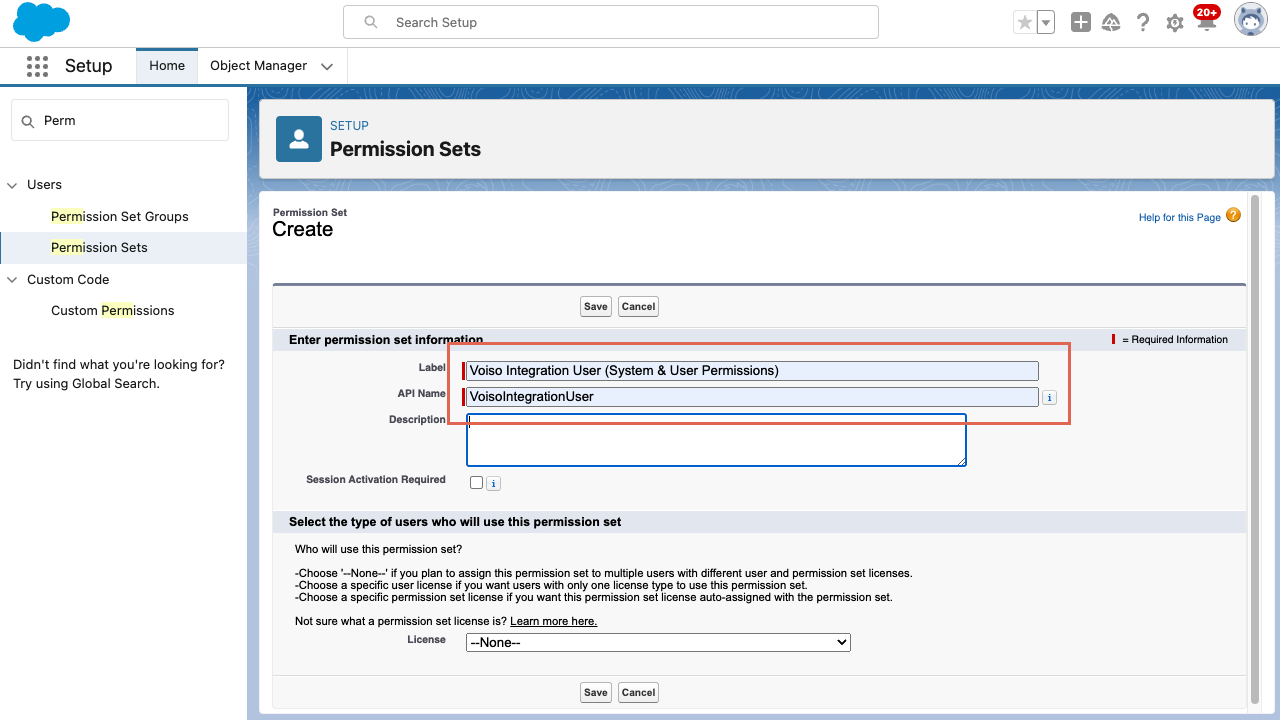
- Click Save. The system automatically redirects you to the created Permission Set overview page.
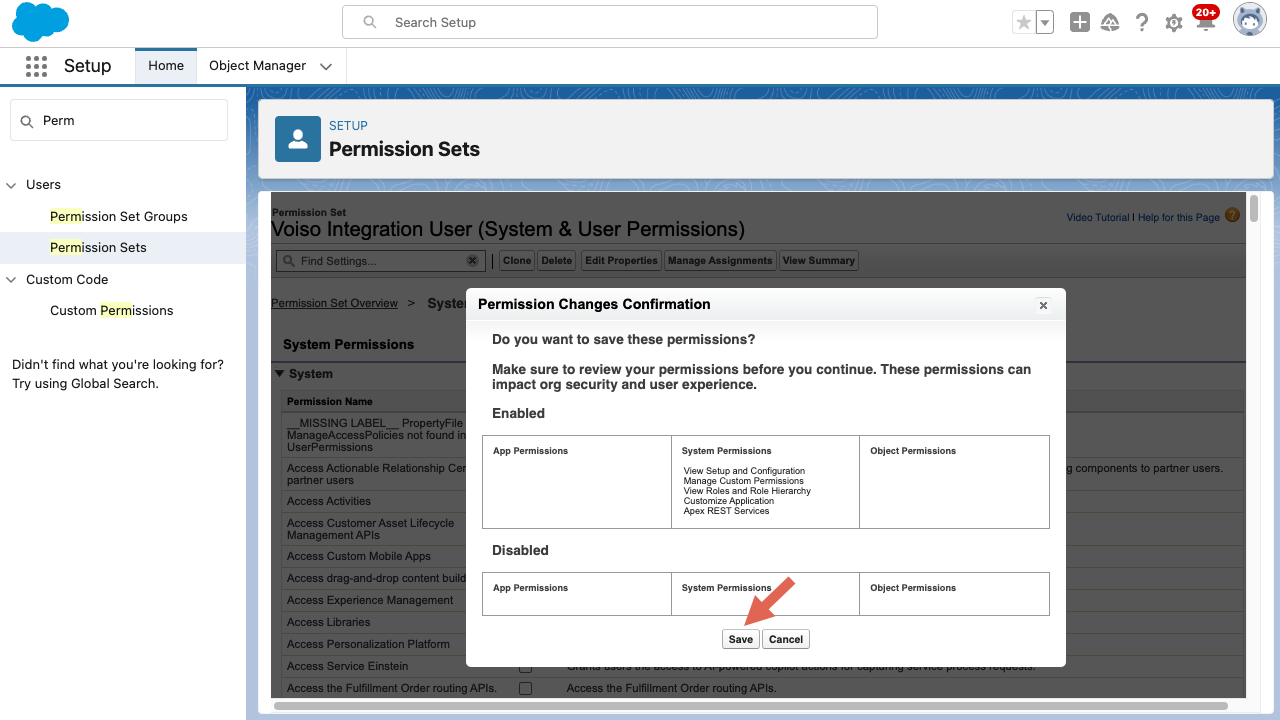
- Click System Permissions in the System section.
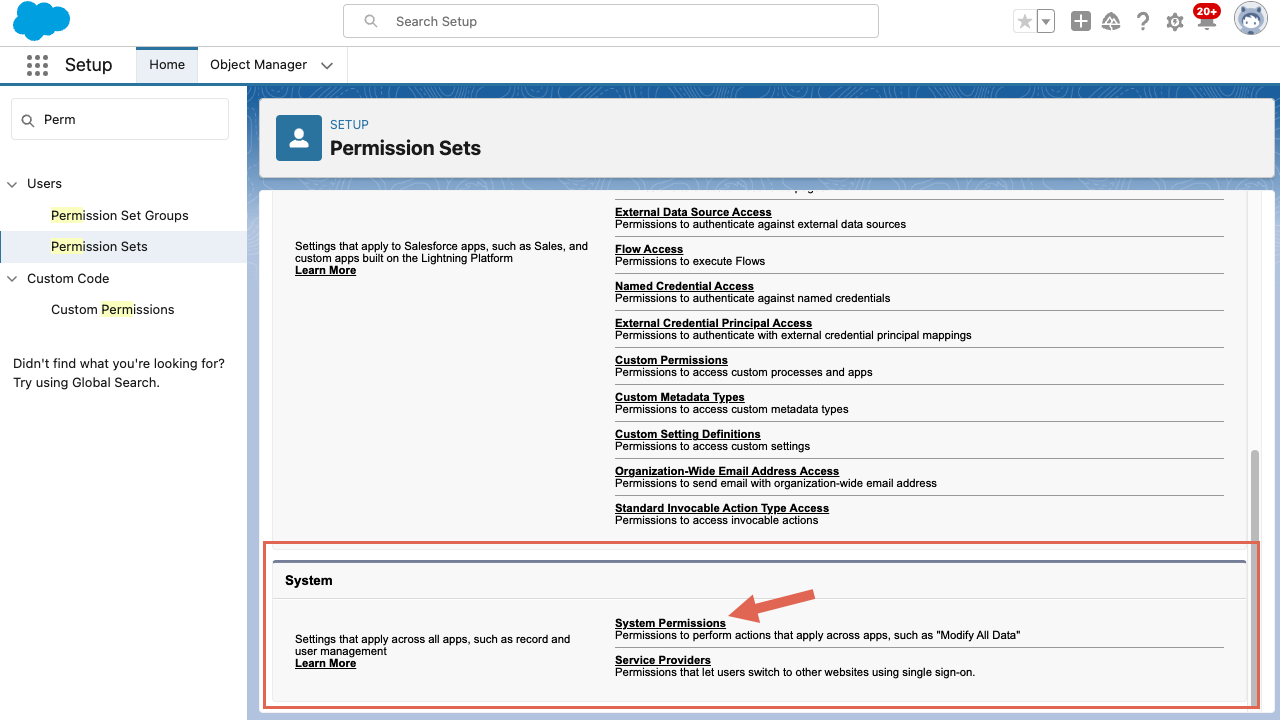
- Click Edit at the top of the page.

- Select the following options:
- Apex REST Services (Voiso uses the Apex REST Endpoints for both the Call Logging feature and authentication).
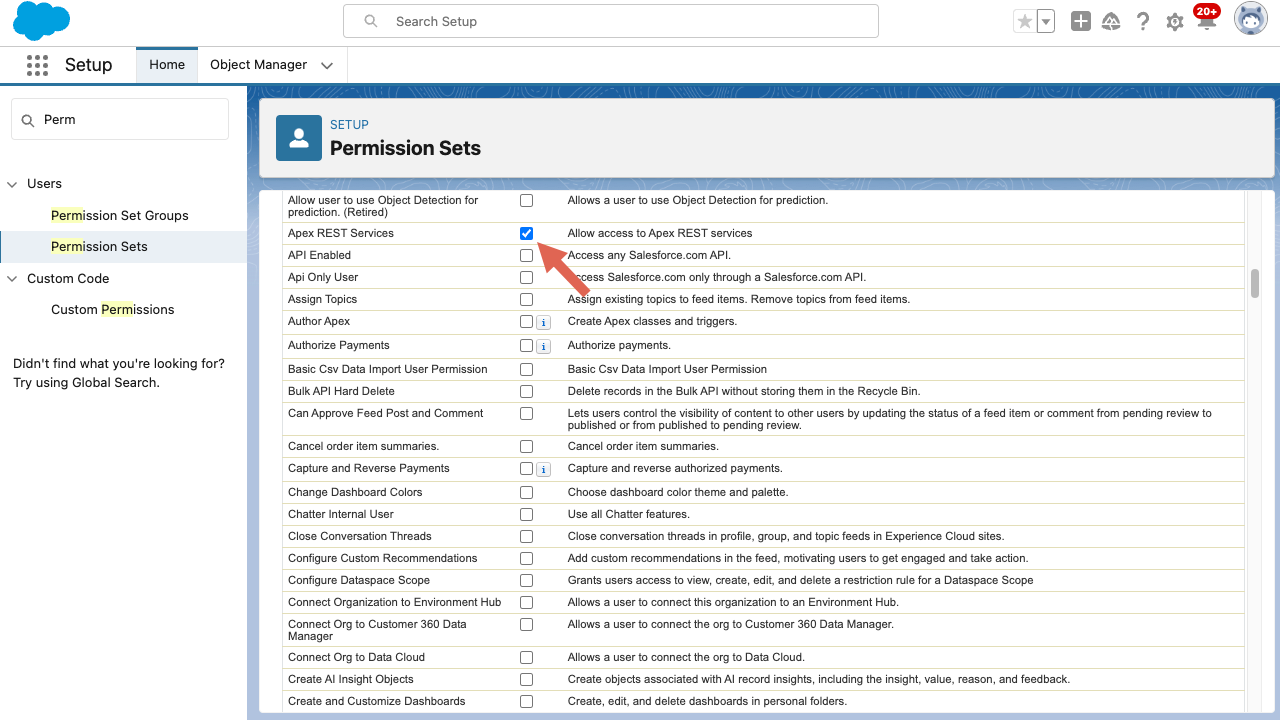
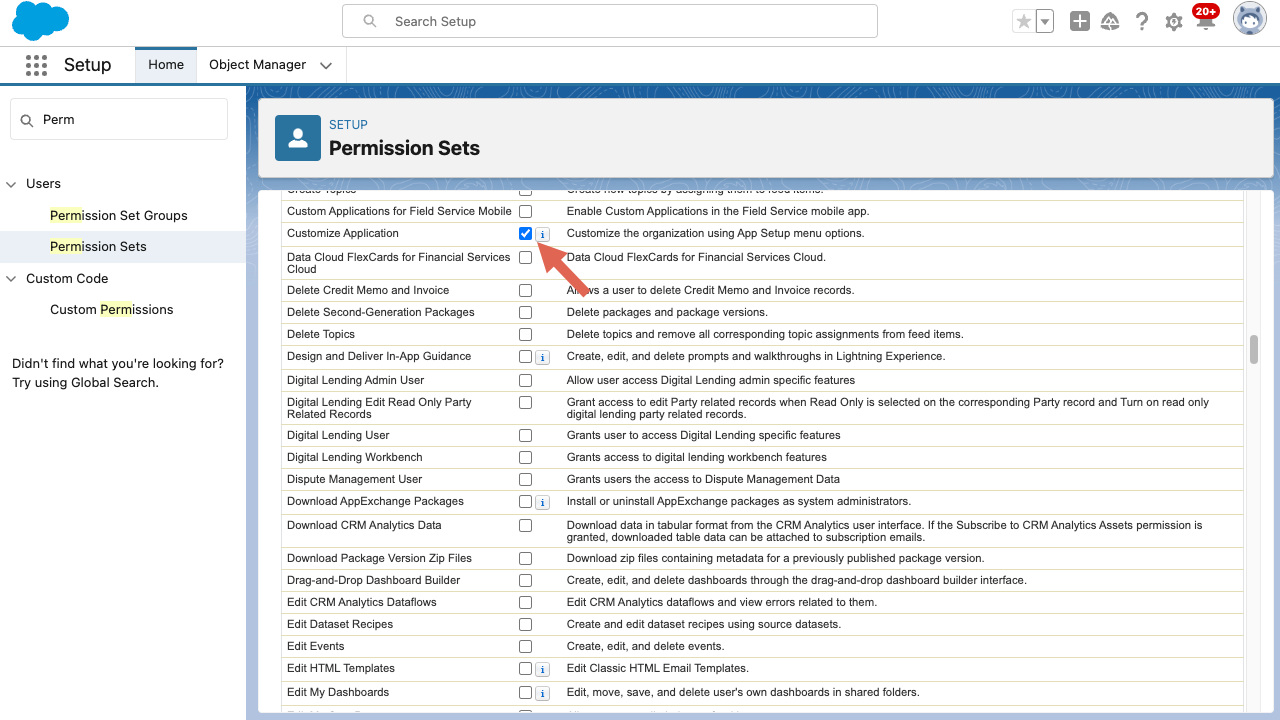
- Customize Application (Voiso uses Custom Settings to cache static Voiso call center settings in your org).
- Apex REST Services (Voiso uses the Apex REST Endpoints for both the Call Logging feature and authentication).
- Save your Permission Set.
For information about Salesforce Permission Sets, check out these articles:
- Create Permission Sets
- App and System Settings in Permission Sets
- Manage Permission Set Assignments
- Trailhead: Control Access to Objects – Create a Permission Set
Note: These links direct you to Salesforce documentation. Voiso does not control this content and cannot ensure the links will always point to the latest version.
Step 2.2: Assign the permission sets to the Integration User
Voiso provides a Voiso Integration User Permission Set that grants access to the Call History feature. In this step, assign both the provided Voiso permission set and the one you created in Step 2.1 to the Integration User.
Perform the following steps:
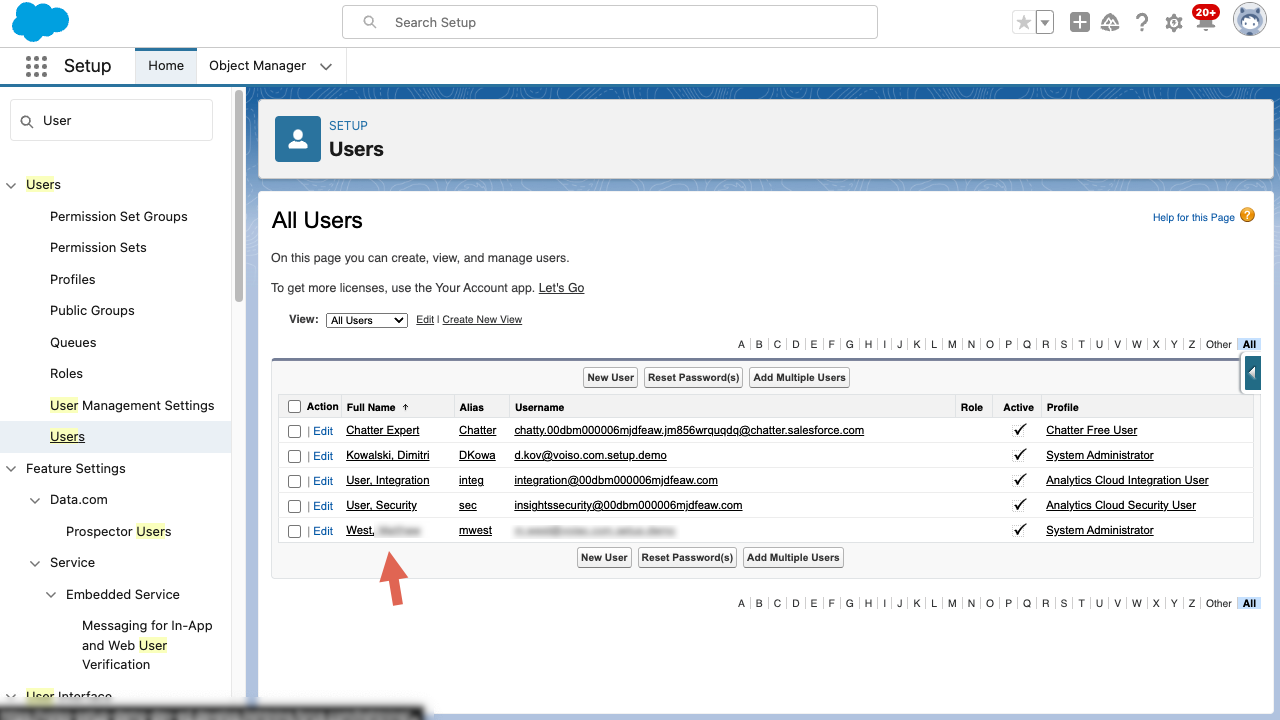
- From Setup, use the Quick Find box to search for
Users, then select Users. - In the list of users, locate your integration user, then click their name to access the User Record Details page.
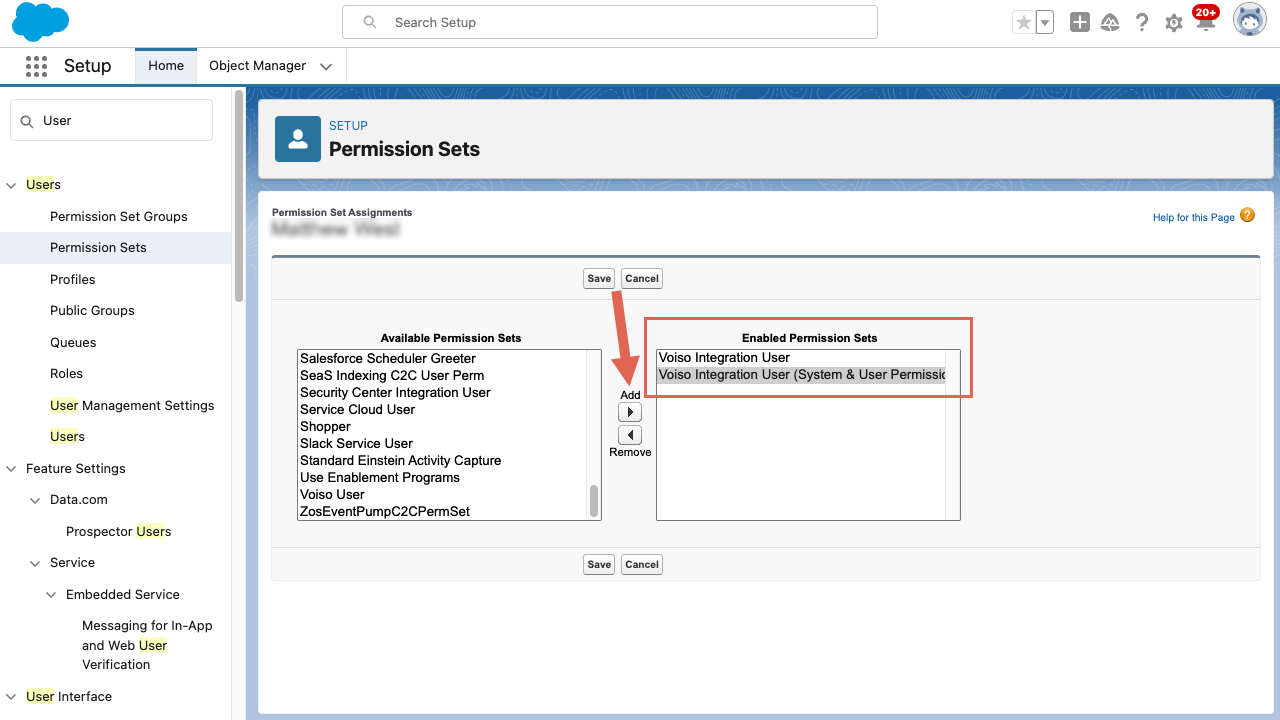
- Scroll down to the Permission Set Assignments section, and click Edit Assignments.

- In the Permission Set Assignment form, from the Available Permission Sets list, select the following Permission Sets:
- Voiso Integration User
- The custom permission set you created in Step 2.1 (for example, Voiso Integration User (System & User Permissions).
- Click Add. Verify both selected Permission Sets are in the Enabled Permission Sets column, then click Save.
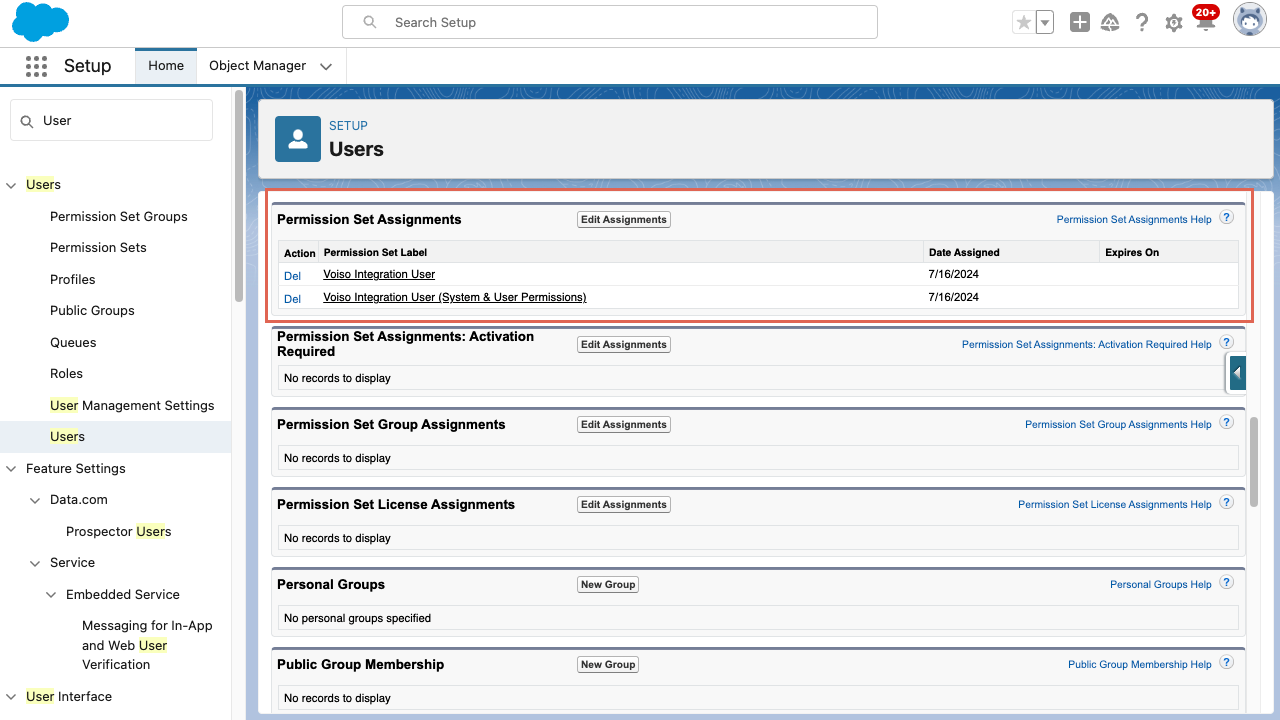
- Verify that both permissions are in the Permission Set Assignments section.
For information about Salesforce Custom Records, check out these articles:
- Trailhead: Build a Custom Record Page for Lightning Experience and Salesforce Mobile App
- Trailhead: Build a Custom Home Page for Lightning Experience
- Trailhead: Add Visibility Rules for Dynamic Pages
Note: These links direct you to Salesforce documentation. Voiso does not control this content and cannot ensure the links will always point to the latest version.
Step 3: Connect Voiso to Salesforce org
From the Voiso navigation bar, select Administration > Integrations.
Follow these steps to connect Voiso to Salesforce org:
- In the Integrations page, click Connect on the Salesforce tile.
- Review the About and Prerequisites sections and ensure all prerequisites are met in your contact center.
- Click Connect.
- In the Integration setup panel, click either Connect to Salesforce or Connect to Salesforce Sandbox, depending on your choice in step 1.
- Follow the on-screen instructions.
- When the Voiso Allow Access? page displays, click Allow to complete the connection.
The following video walks you through the integration process.
Select features
After the integration process is complete, the Settings tab is available on the Salesforce page.
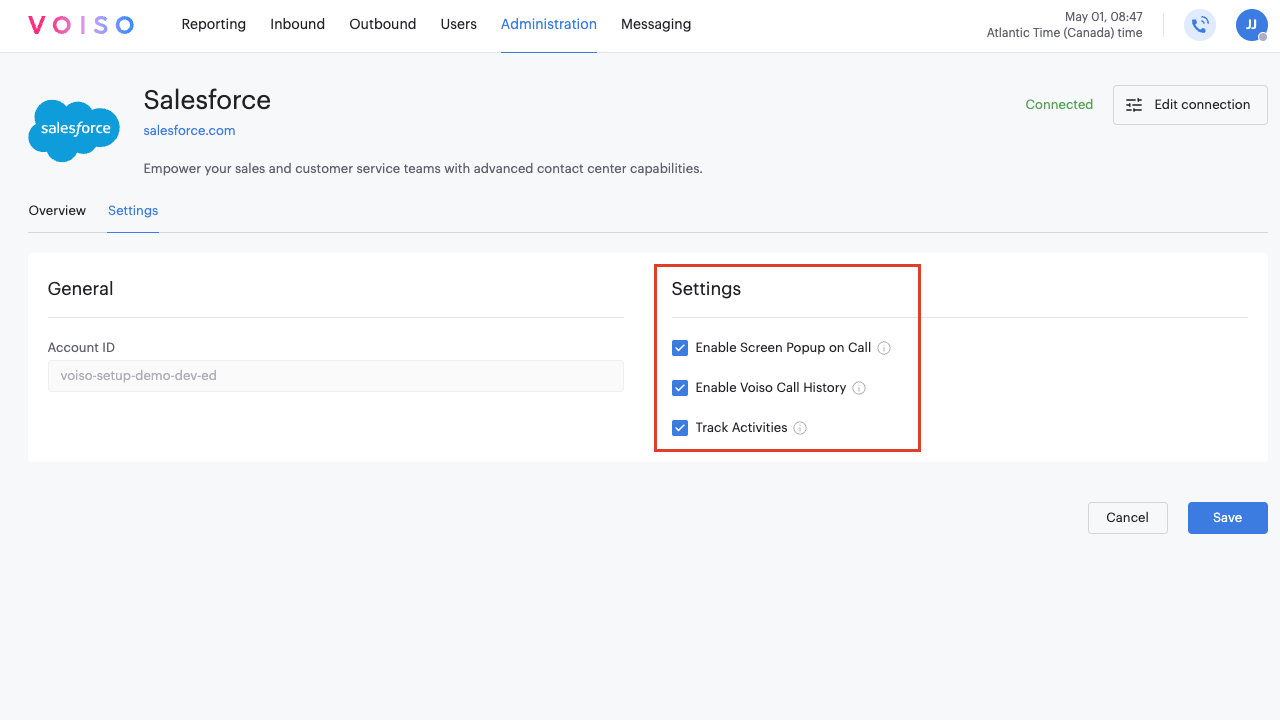
You can choose to enable or disable the following integration features in Step 4:
| Feature | Description |
|---|---|
| Enable Screen Popup on Call | When a call is routed to an agent, display the releveant Salesforce objects, such as cases and contact records. |
| Enable Voiso Call History | Automatically send call details, notes, and conversation summary to Salesforce after each call. |
| Track Activities | Add information about the call to the Activity Task in Salesforce. |
Step 4: Complete configuration
In this step you configure the embedded softphone component into Salesforce.
- First, set up a Call Center by importing a Call Center Definition file. The information in the Call Center Definition files supports the integration of Salesforce CRM Call Center with Computer Telephony Integration (CTI) vendors like Voiso.
- Then, add the Voiso softphone directly into the Salesforce Utility Bar to enable agents to handle interactions without leaving the Salesforce UI.
- Finally, configure the Voiso contact center features you want to use.
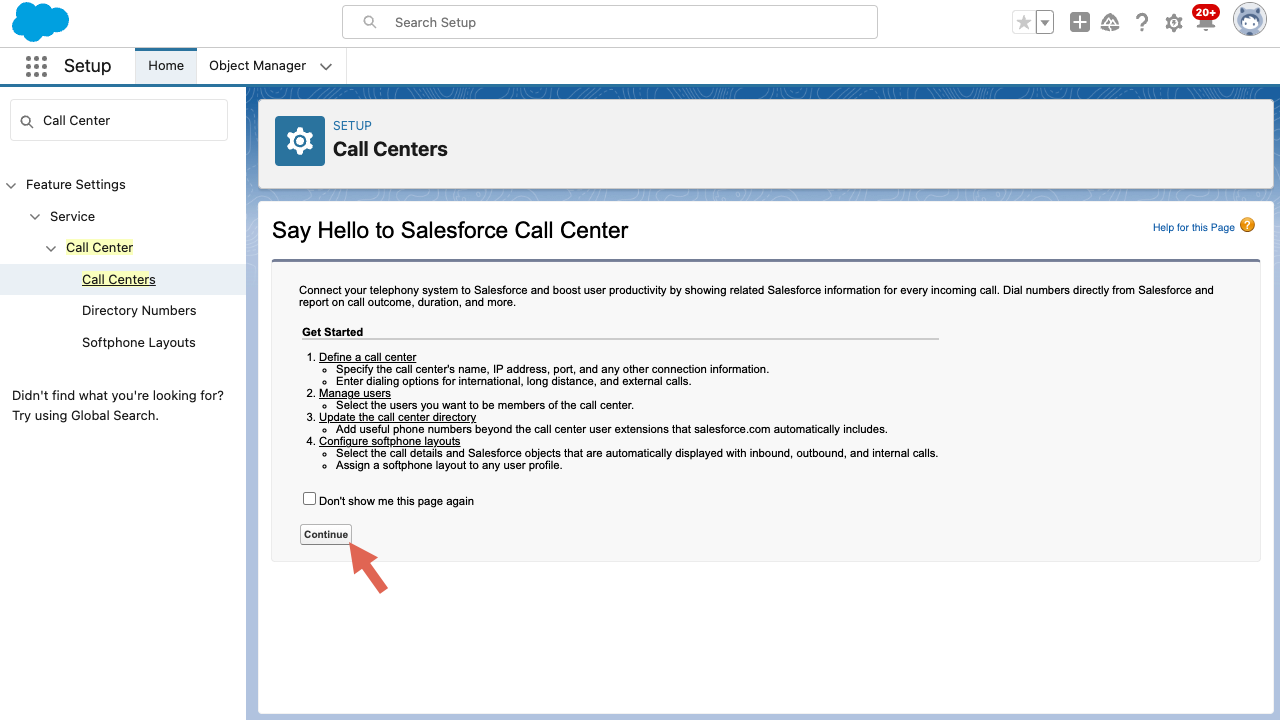
Step 4.1: Set up a call Center in Salesforce
Follow these steps to set up a call center in Salesforce Lightning:
Create a Call Center Definition file
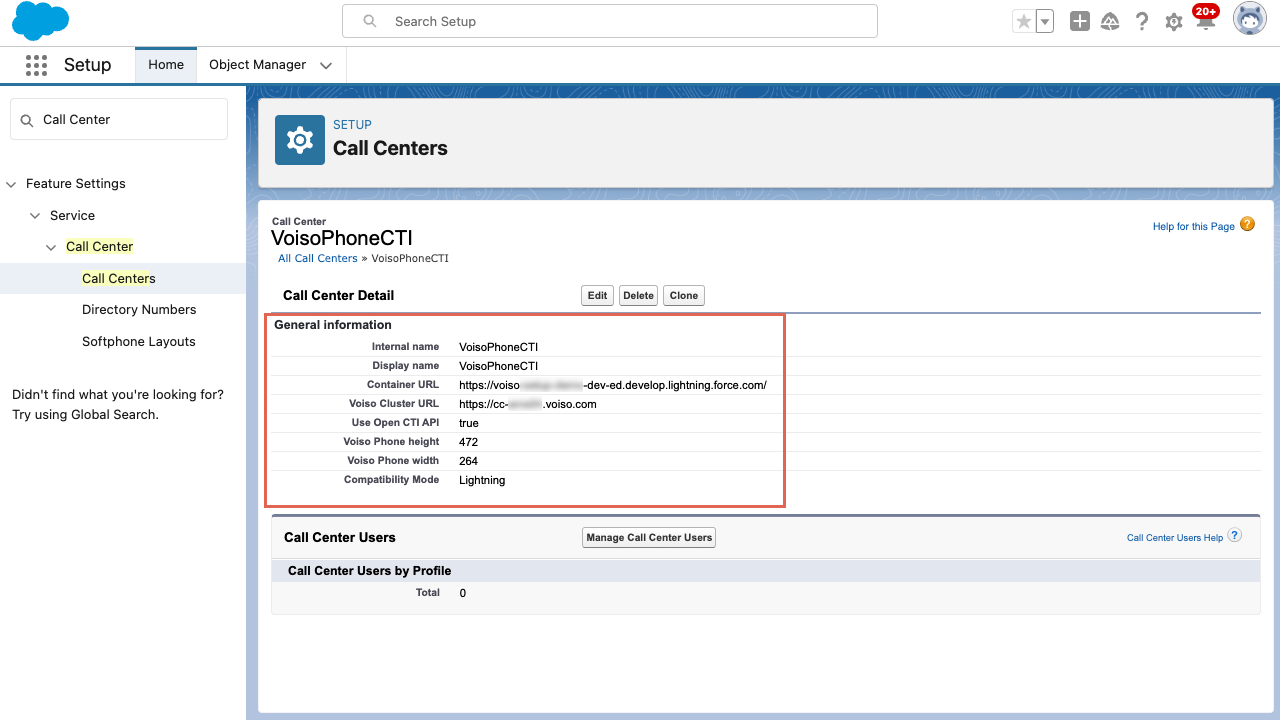
In a text editor, create a new .xml file, then paste the following contents into the file and save it with an appropriate name:
<callCenter>
    <section sortOrder="0" name="reqGeneralInfo" label="General information">
        <item sortOrder="0" name="reqInternalName" label="Internal name">VoisoPhoneCTI</item>
        <item sortOrder="1" name="reqDisplayName" label="Display name">VoisoPhoneCTI</item>
        <item sortOrder="2" name="reqAdapterUrl" label="Container URL">https://my-domain--c.container.force.com</item>
        <item sortOrder="3" name="reqVoisoClusterUrl" label="Voiso Cluster URL">https://yourcc.voiso.com</item>
        <item sortOrder="4" name="reqUseApi" label="Use Open CTI API">true</item>
        <item sortOrder="5" name="reqSoftphoneHeight" label="Voiso Phone height">472</item>
        <item sortOrder="6" name="reqSoftphoneWidth" label="Voiso Phone width">264</item>
        <item sortOrder="7" name="reqSalesforceCompatibilityMode" label="Compatibility Mode">Lightning</item>
    </section>
</callCenter>
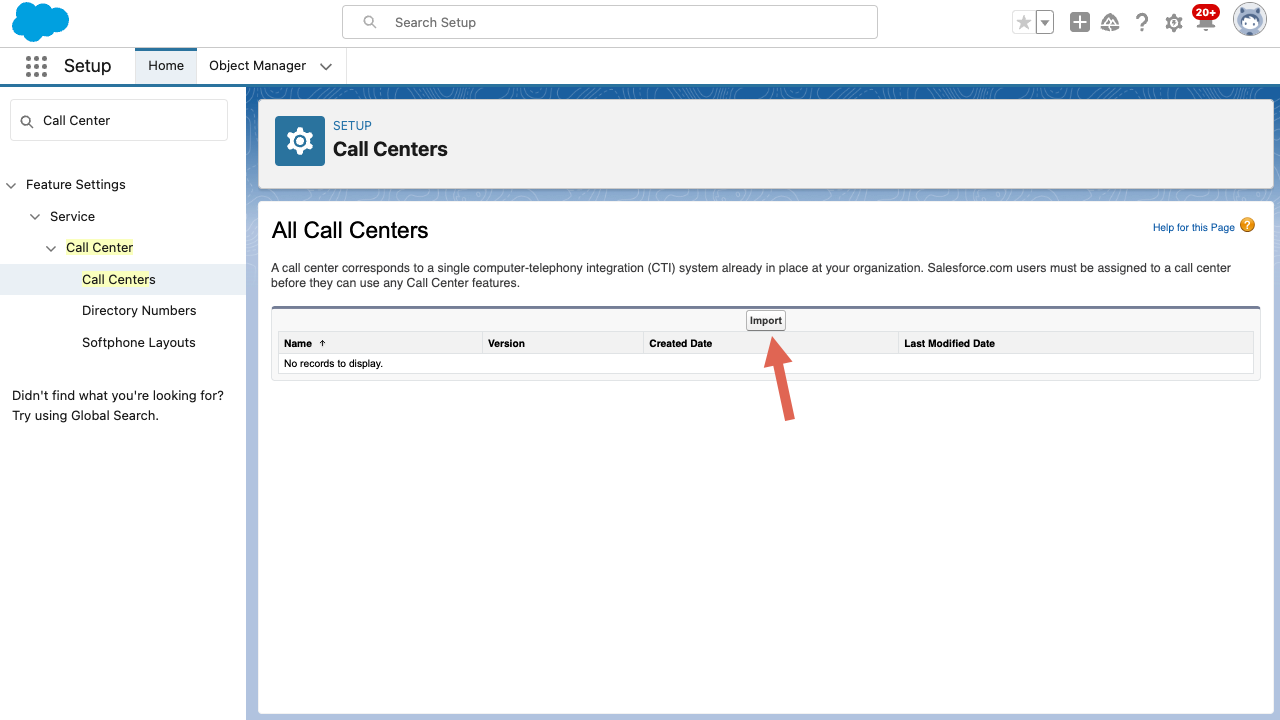
Import the Call Center Definition file into Salesforce
- Navigate to Setup.
- Use Quick Find to search for Call Center, then select Feature Settings > Service > Call Center > Call Centers.
- Click Import.
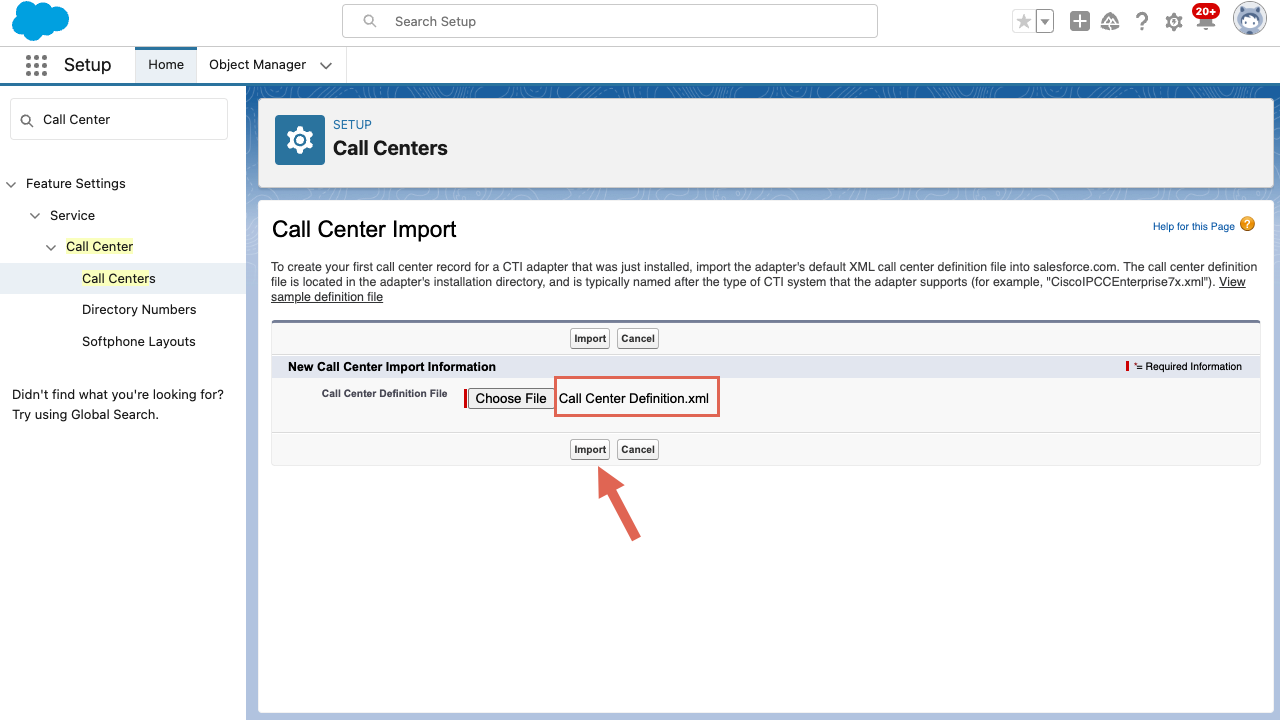
- In the Call Center Import panel, click Choose File, then select the Call Center Definition file that you created.
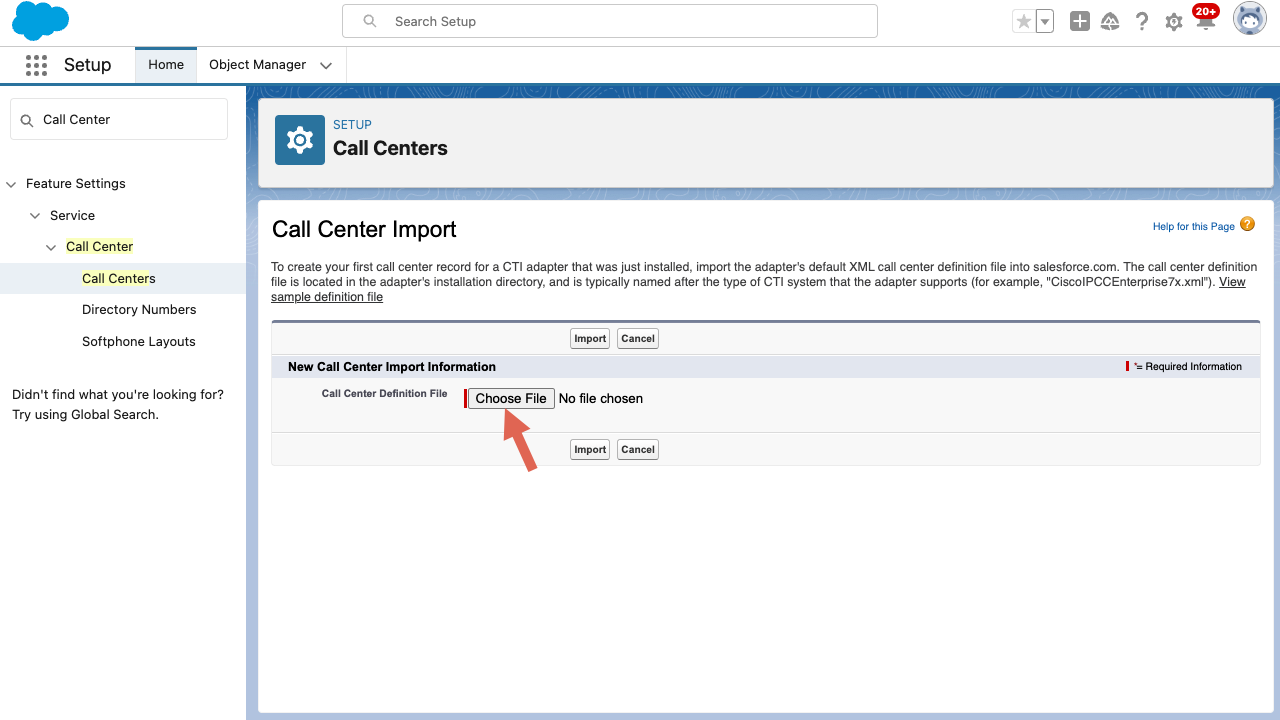
- Click Import.
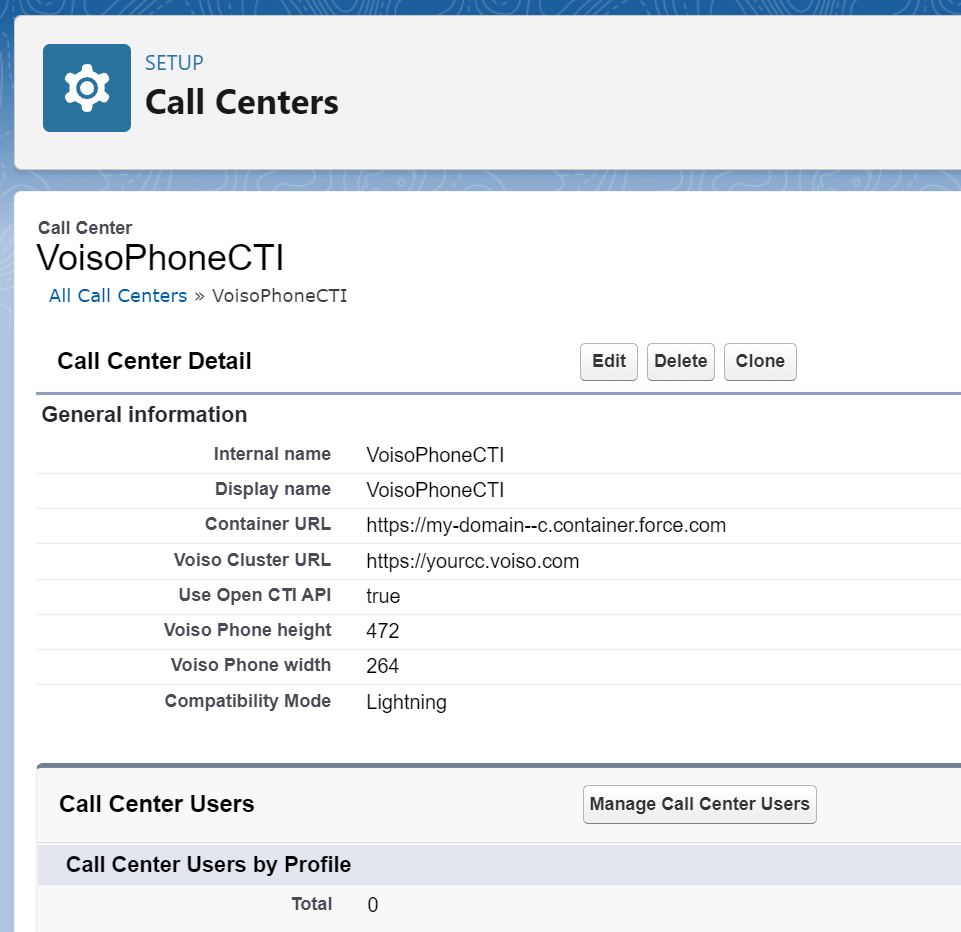
- In the Call Center Detail panel, next to your contact center, click Edit.
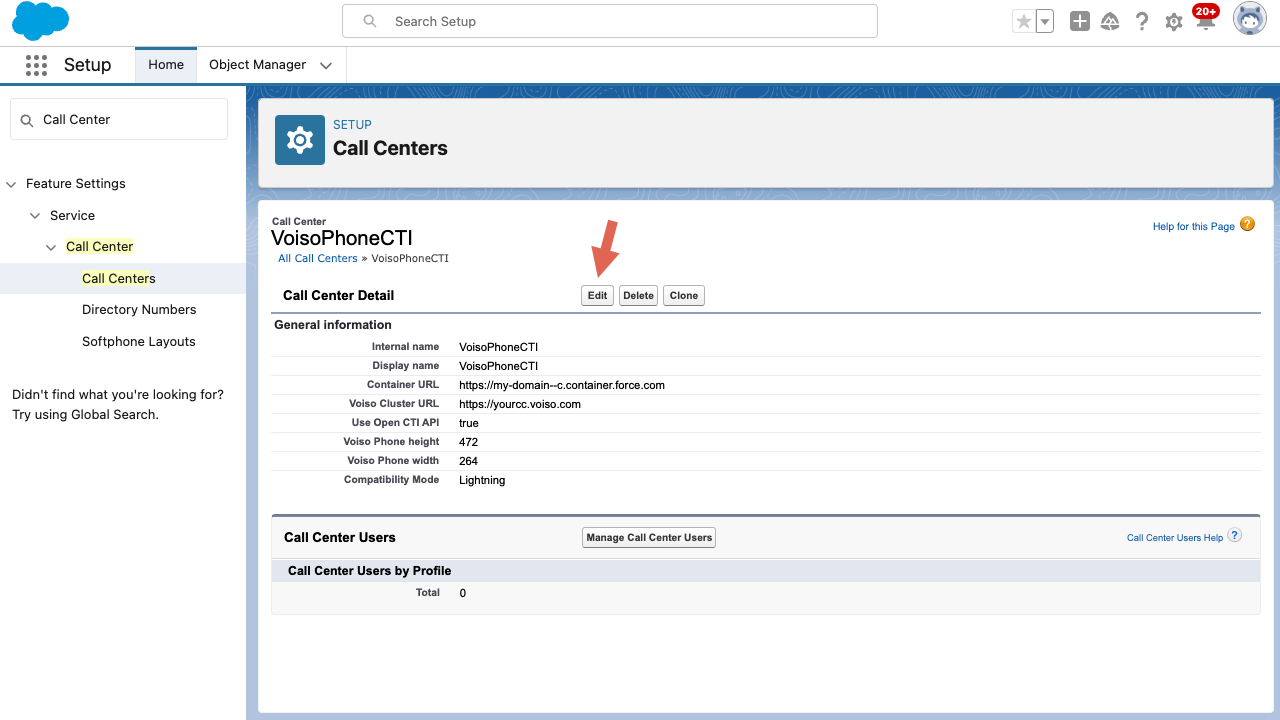
- Modify the Voiso Cluster URL by replacing https://yourcc.voiso.com with your fully qualified Cluster URL. For example, https://cluster.voiso.com
- Modify the Container URL by replacing https://my-domain--c.container.force.com with your fully qualified Container URL. For example, commerce2-dev-ed--c.develop.container.force.com
- Click Save to return to Call Center Detail panel.
- To add users, click Manage Call Center Users, then click Add More Users.

- On the Search for New Users view, specify search criteria (optional) then click Find.
- From the search results, select the users to be added, then click Add to Call Center.
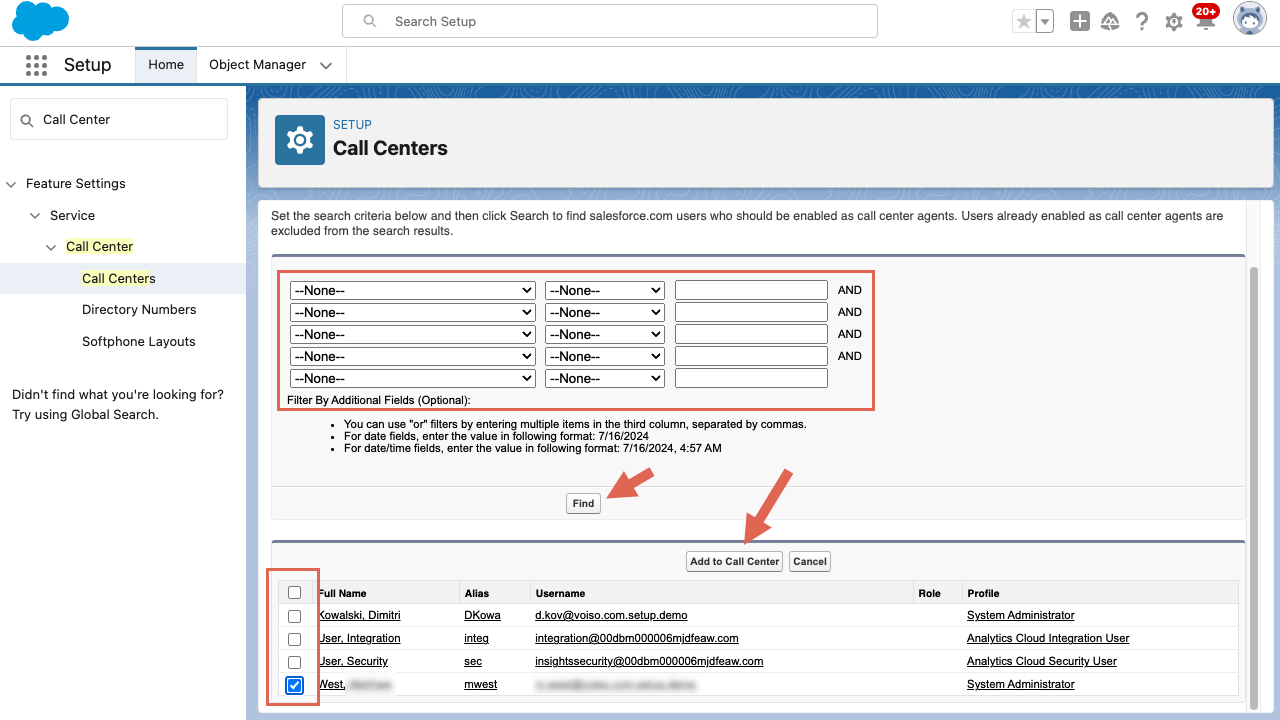
- You can manage users any time by using the Salesforce Manage Users view for your call center.

For information about Salesforce Call Centers, check out these articles:
- Create a Call Center Definition File
- Sample Call Center Definition File
- Import a Call Center Definition File
Note: These links direct you to Salesforce documentation. Voiso does not control this content and cannot ensure the links will always point to the latest version.
Step 4.2: Add the Voiso Phone component to the Utility Bar in Salesforce
The Voiso Integration app enables agents to handle interactions without leaving the Salesforce UI. Use the following procedure to add the Voiso softphone directly into the Salesforce Utility Bar:
- Navigate to Setup.
- Use Quick Find to search for Apps, then select App Manager.
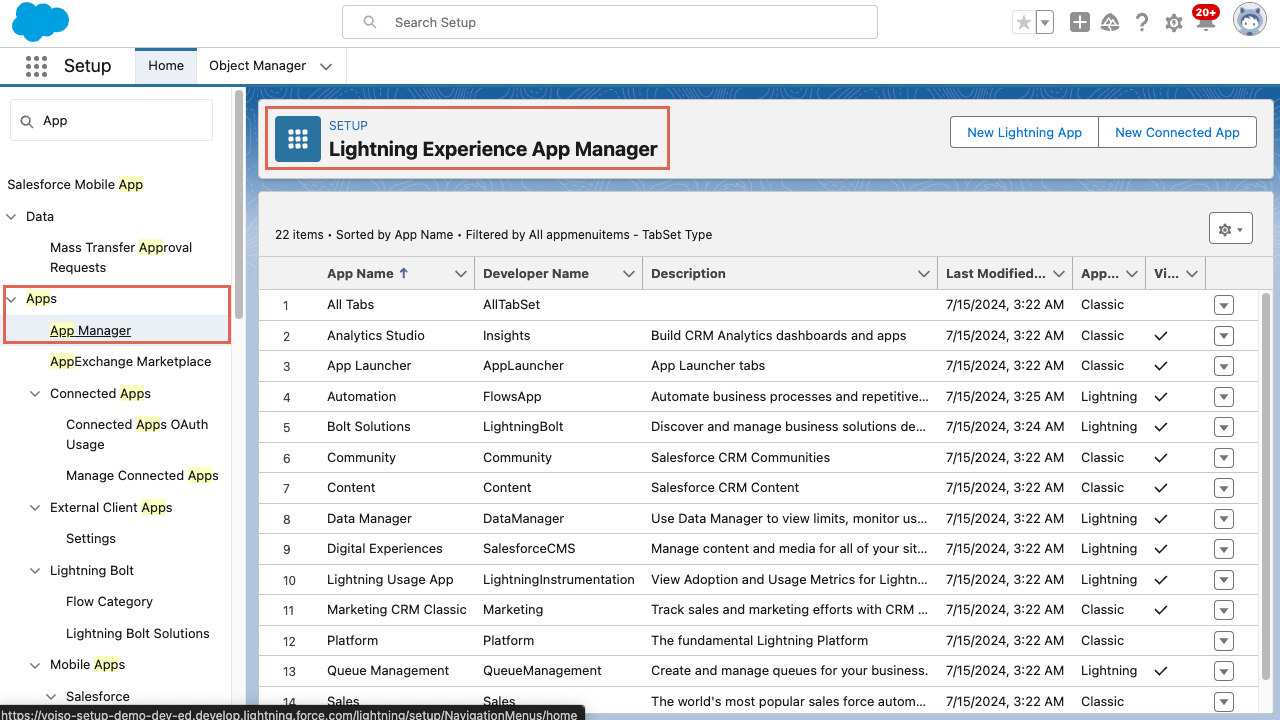
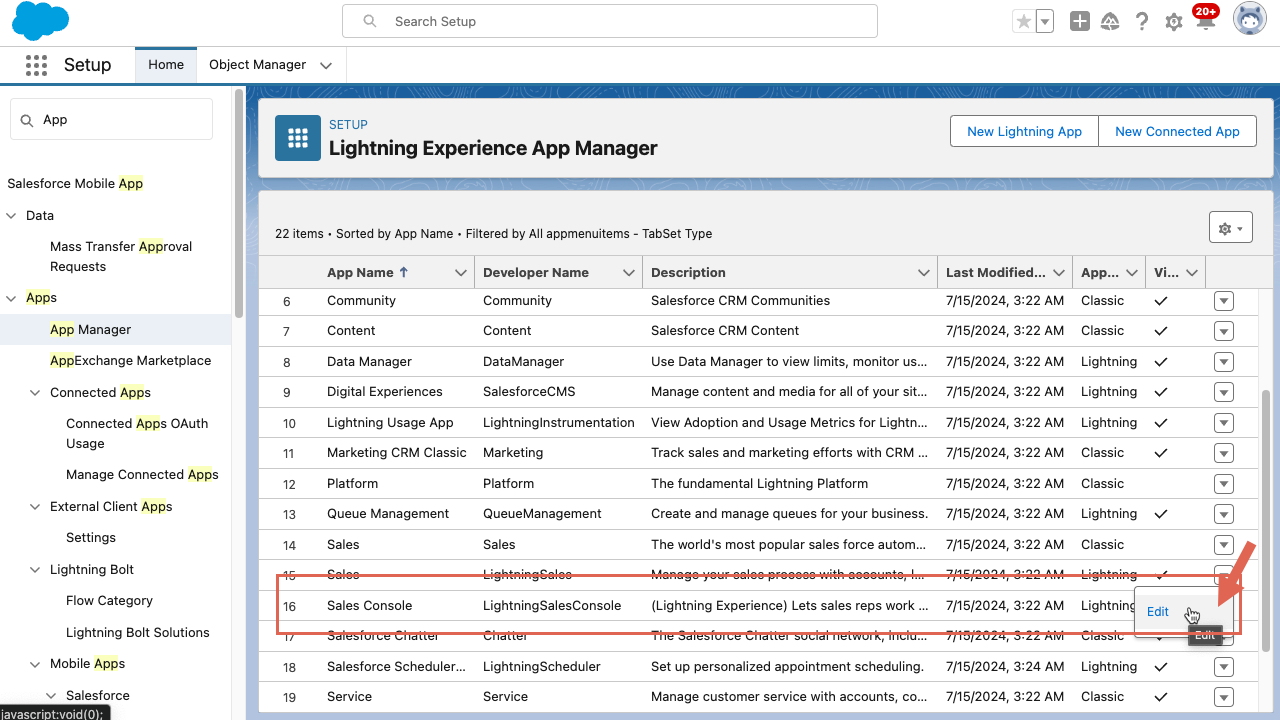
- Choose the Salesforce Lightning app to which you want to add the Voiso softphone. For example, LightningSales.
- From the menu, select Edit.
- Navigate to the Utility Items (Desktop Only) panel, then click Add Utility Item.
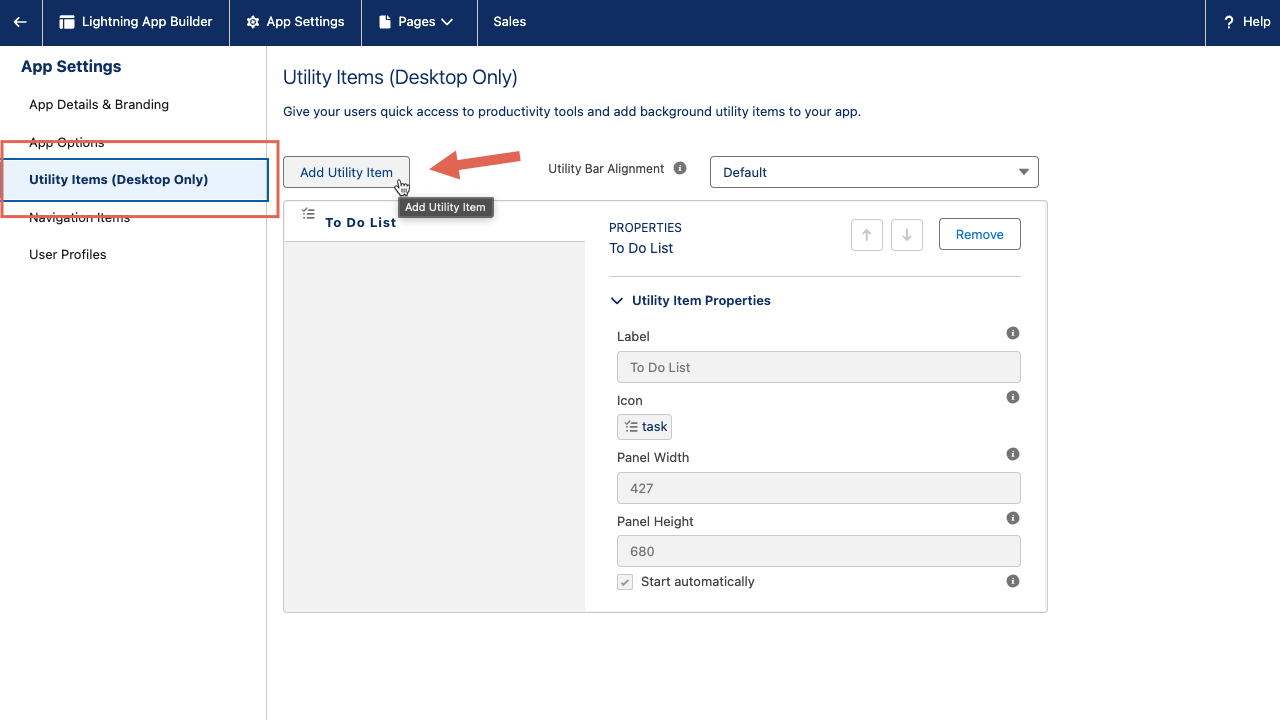
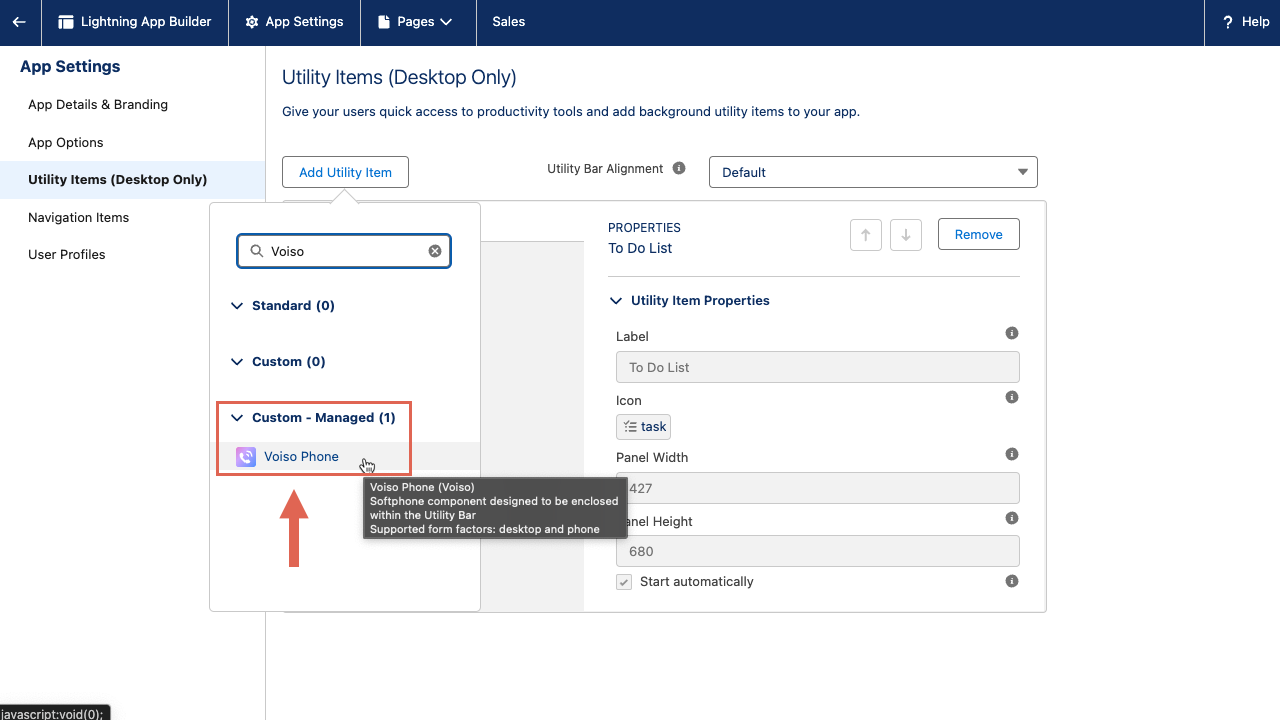
- Use Search to find the Voiso Phone in the Custom - Managed section, then select it.
- In the Voiso Phone component, specify the following settings:
- Label: Voiso Phone (or any other label you choose)
- Icon: Select a call icon of your choice (any icon is supported)
- Panel Width: 264 (264 to 360 is supported)
- Panel Height: 472 (472 to 600 is supported)
- Enable Start automatically.
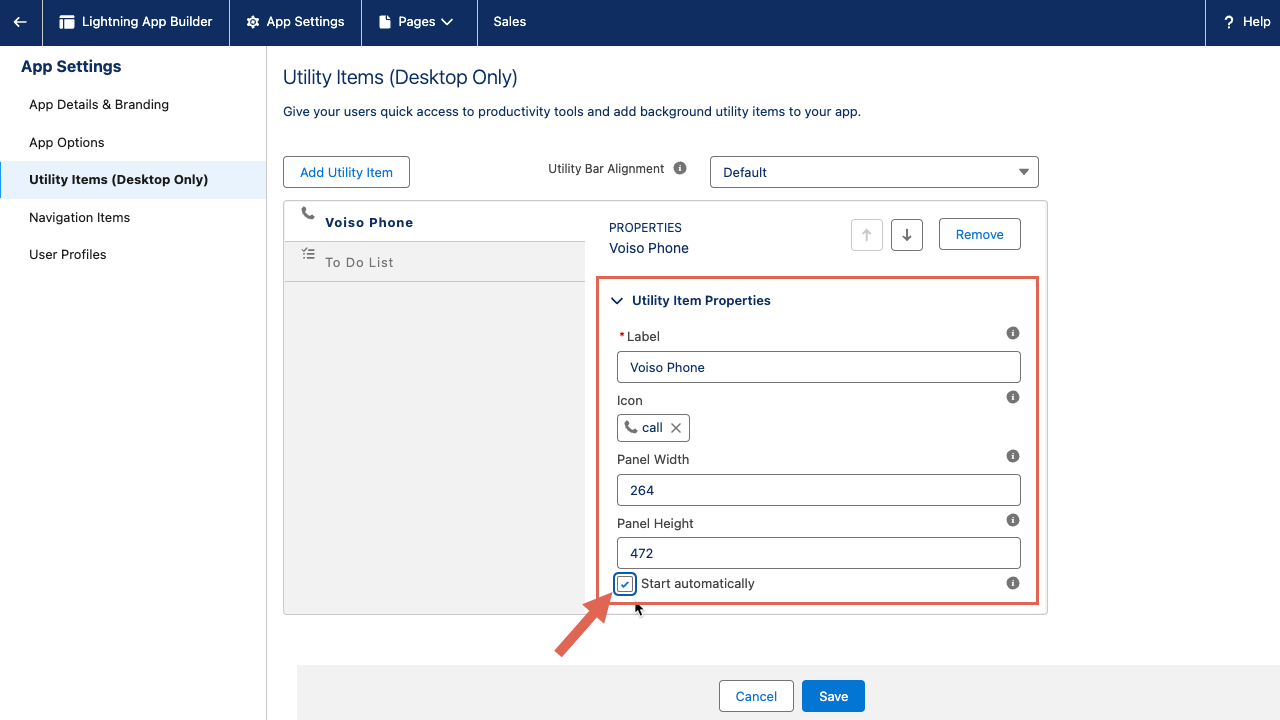
- Click Save.
For information about the Utility Bar, check out these articles:
- Get to Know the Utility Bar
- Add a Utility Bar to Lightning Apps
- Create and Edit a Custom Lightning Console App
Note: These links direct you to Salesforce documentation. Voiso does not control this content and cannot ensure the links will always point to the latest version.
Enable Screen pop
To enable screen pop for agents follow these steps:
- Navigate to Adminstration > Integrations, and select the Salesforce tile.
- Click the Settings tab.
- From the Screen popup on Call menu, select one of the following options:
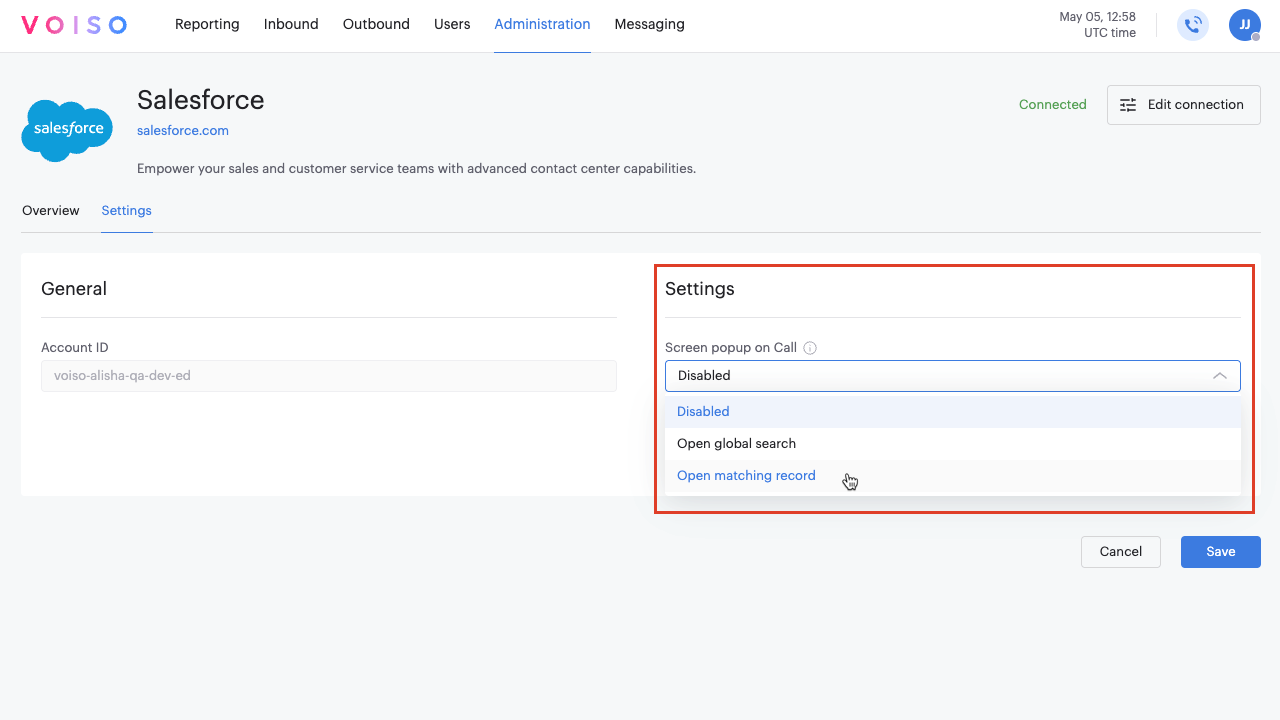
- Disabled: Screen popup is not enabled.
- Open global search: All objects related to the inbound phone number, such as Leads, Tasks, Contact record, and so on, are displayed on the Global search page. The agent selects which object or record to view.
- Open matching record: Screen-pop the exact matching record, based on the following module priority:
- Accounts
- Contacts
- Leads
- Click Save.
Enable Call History
Unlike the Track Activities feature, Call History is not associated with records by lookup relationships. Call History can be added to any Record Details page using the App Builder. The component collects and displays call history based on available phone fields, sorted by call start time.
Follow these steps to enable Call History:
- Navigate to the Salesforce application your org users use for work (for example, Sales or Service).
- Using the navigation at the top of the page or the Application menu, navigate to the Salesforce Object with the records you want to use for Click-to-Call and Call History.
- Navigate to any existing record in the selected object, such as a contact record.
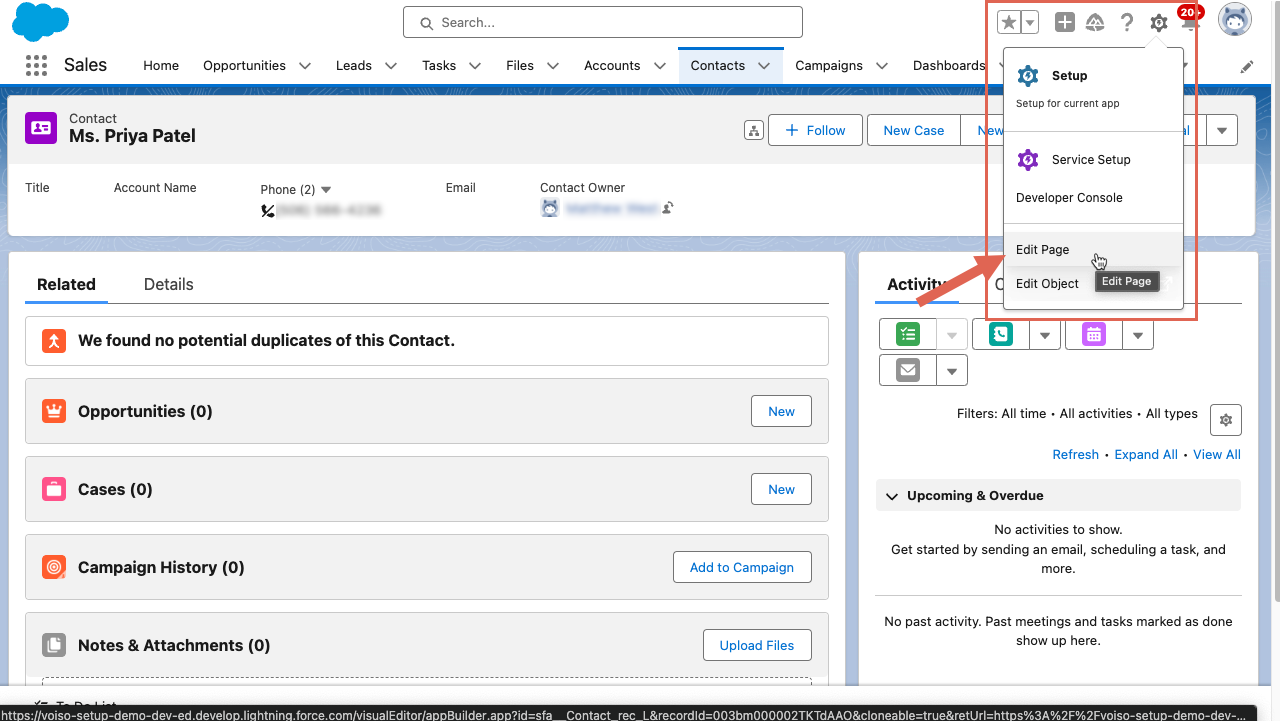
- Click the gear icon at the top right corner of the page.
- Click Edit Page on the popup box that is displayed to navigate to the Record Details page.
- To add the Voiso Call History Related List component to the page, find it in the component list on the left side menu.
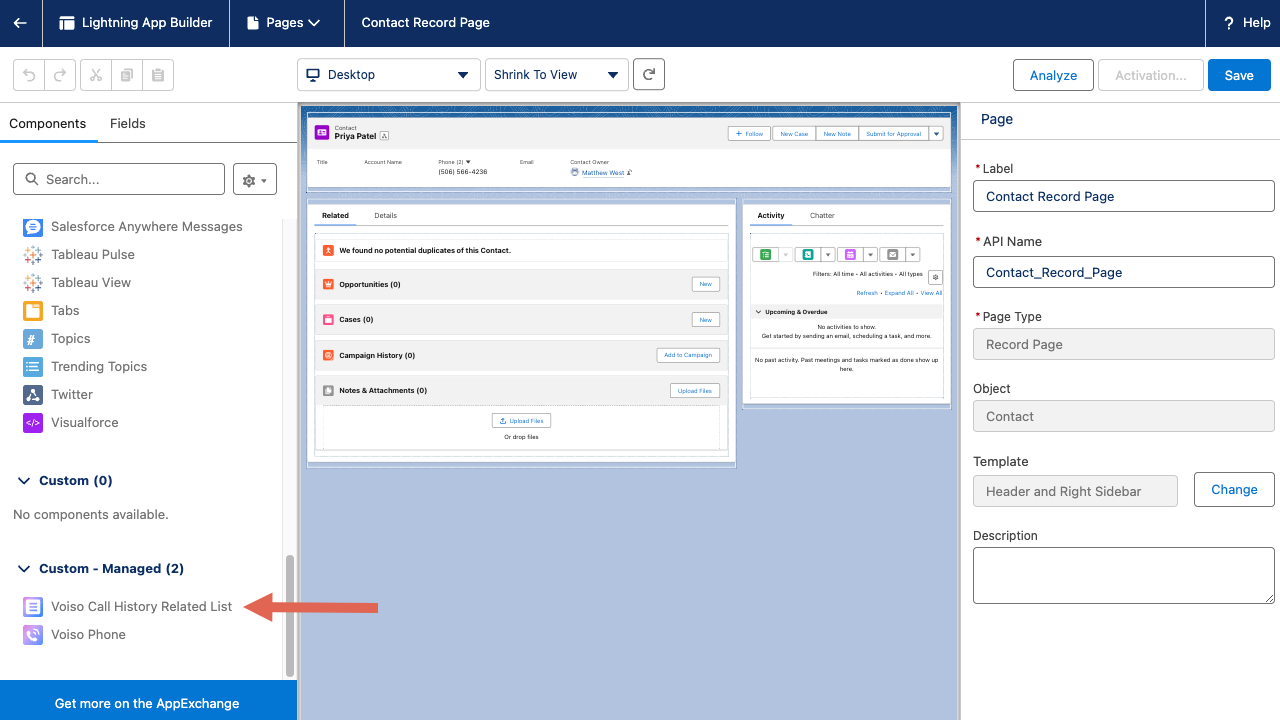
- Drag-drop it onto the page canvas. Tip: Voiso recommends experimenting with different locations on the page to find the best location for your environment. Save your change then select Activation.... Assign it as "Org Default" and make it available for "Desktop".
- Navigate to Setup by clicking the gear icon and then selecting Setup.
- In the Quick Find box, enter
Permission Sets, then select Permission Sets.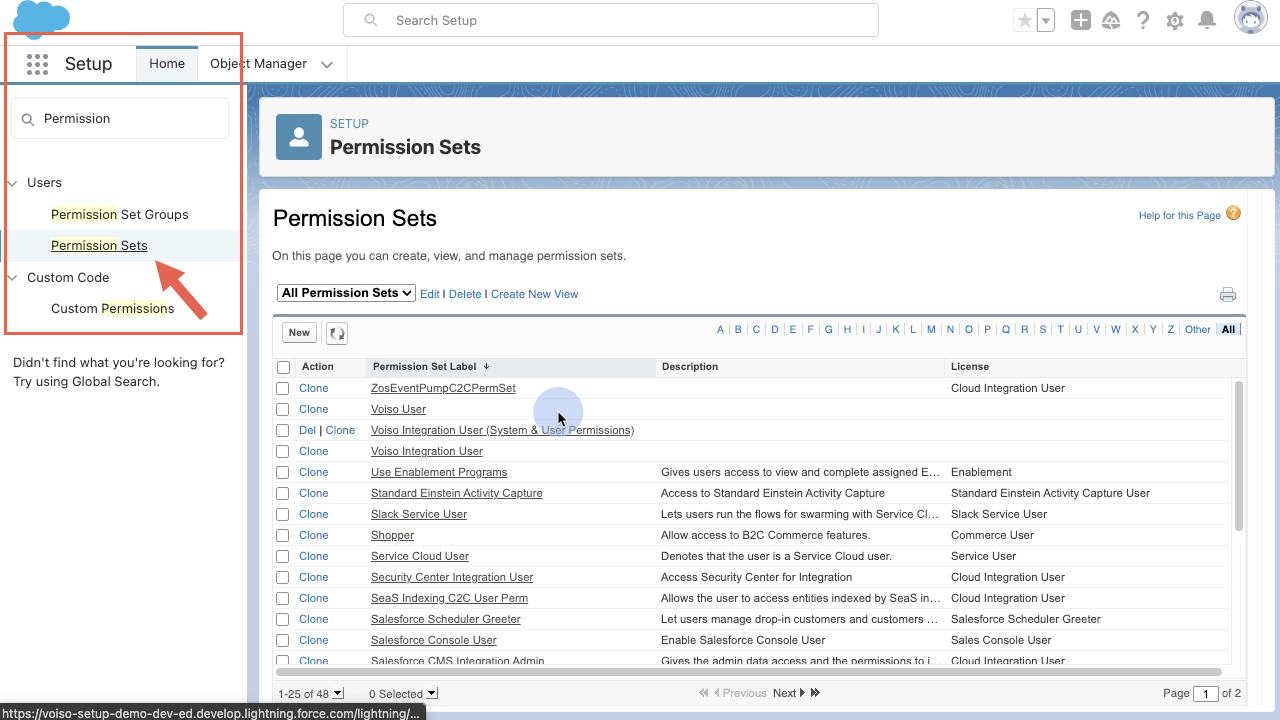
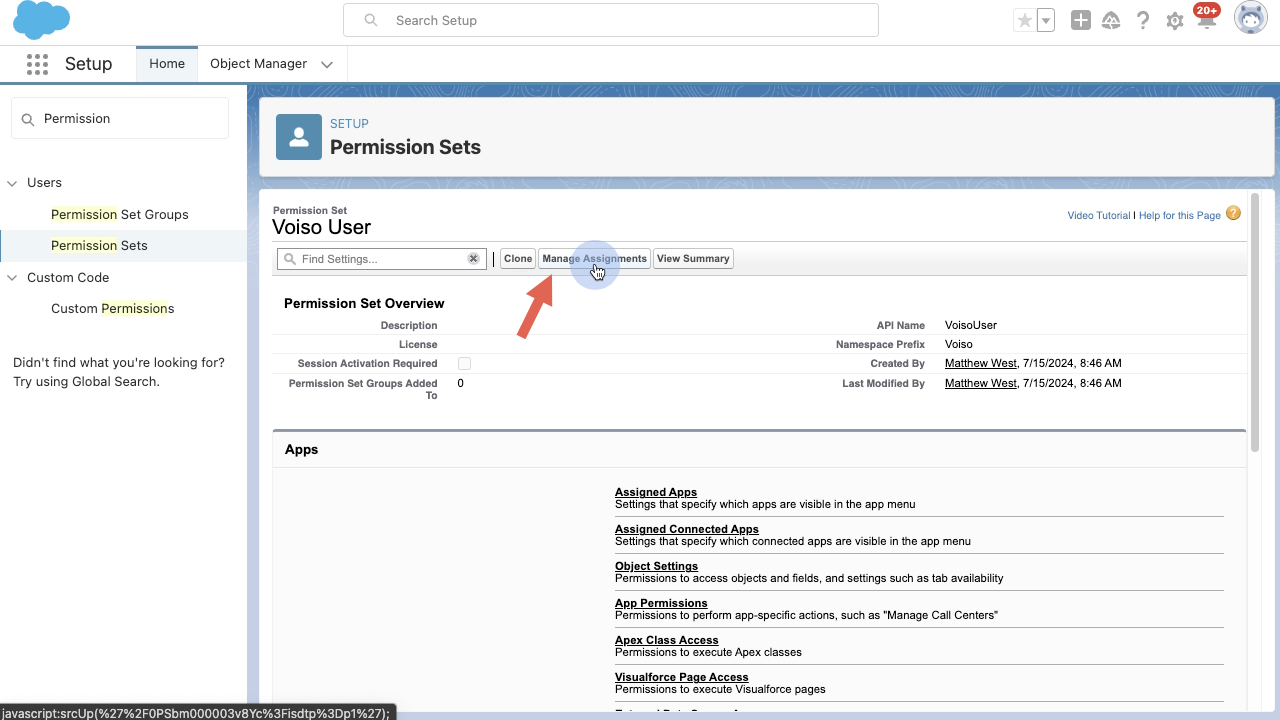
- In the Permission Sets list, find Voiso User, then navigate to it by clicking on its label.
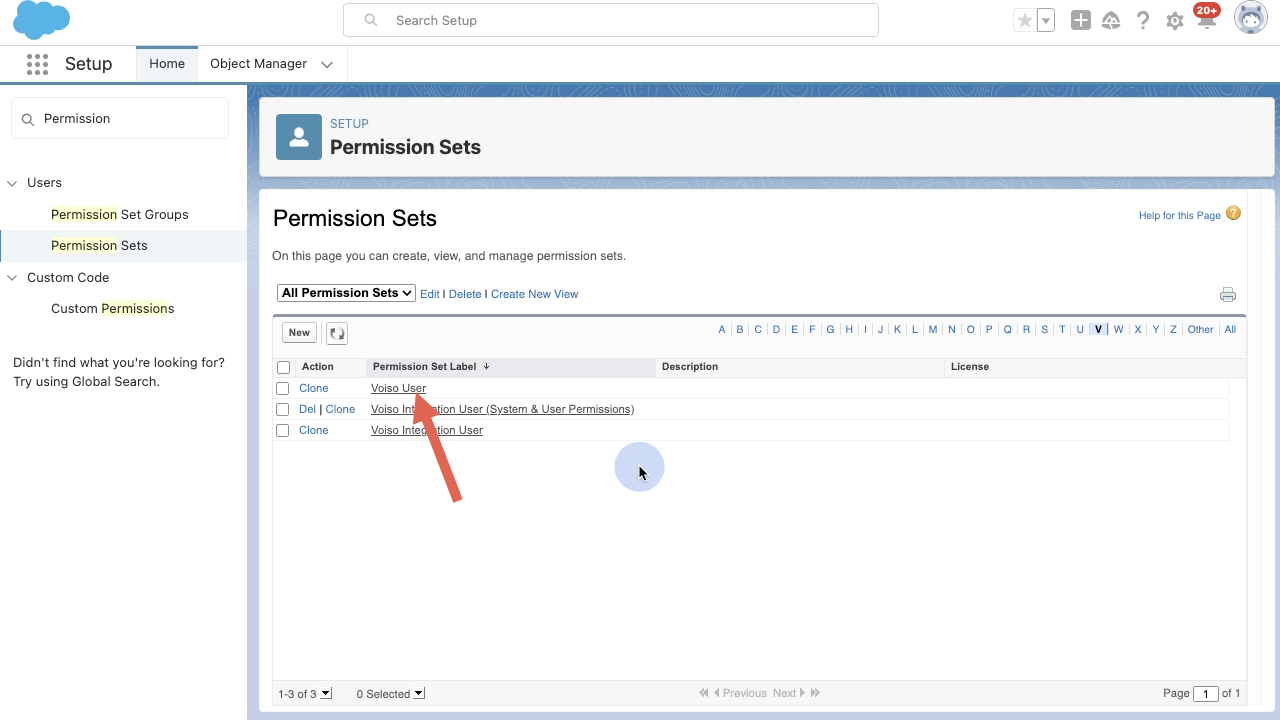
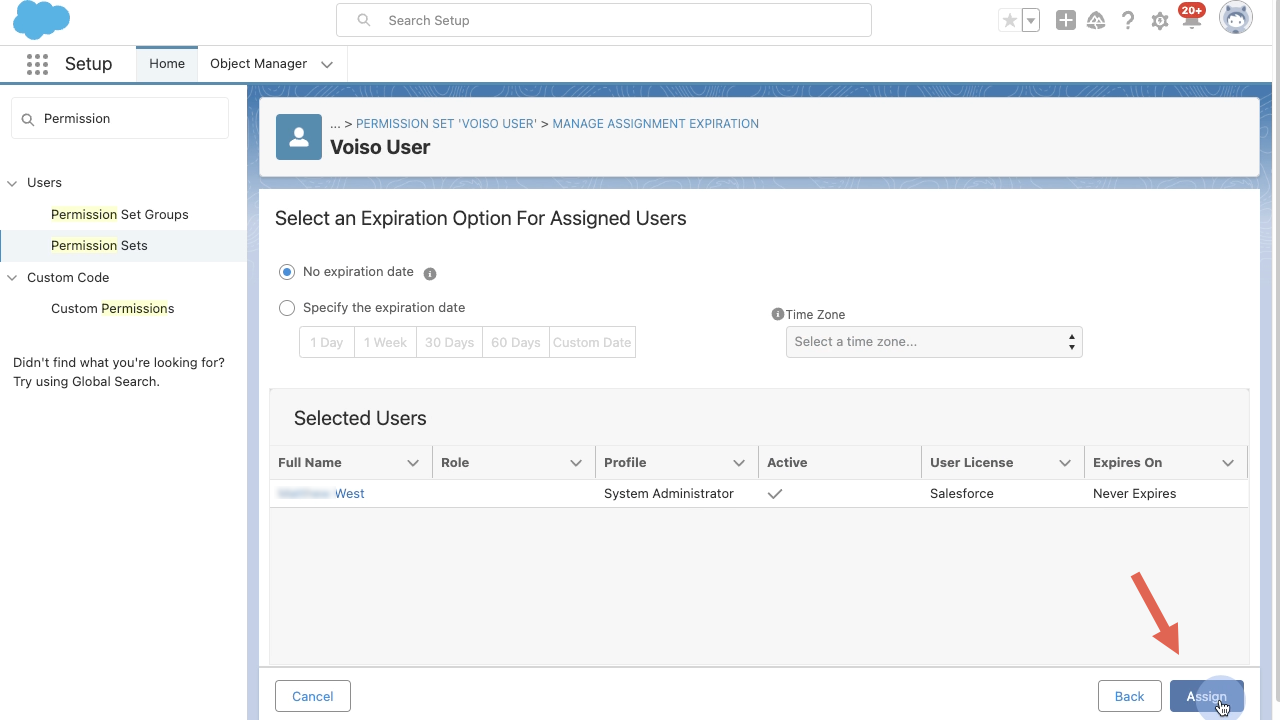
- Click Manage Assignments at the top of the page.
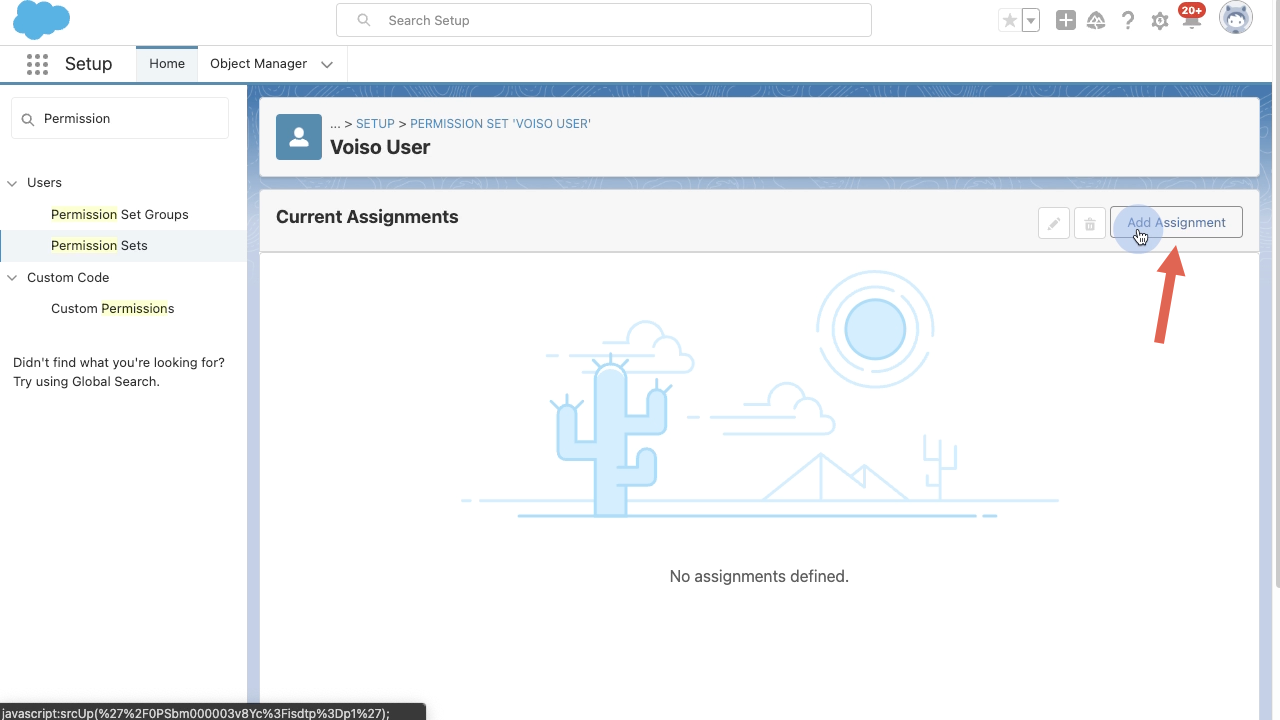
- Click Add Assignment to display a list of users to whom this set of permissions can be assigned.
- Select the users to whom you want to assign the permission set.
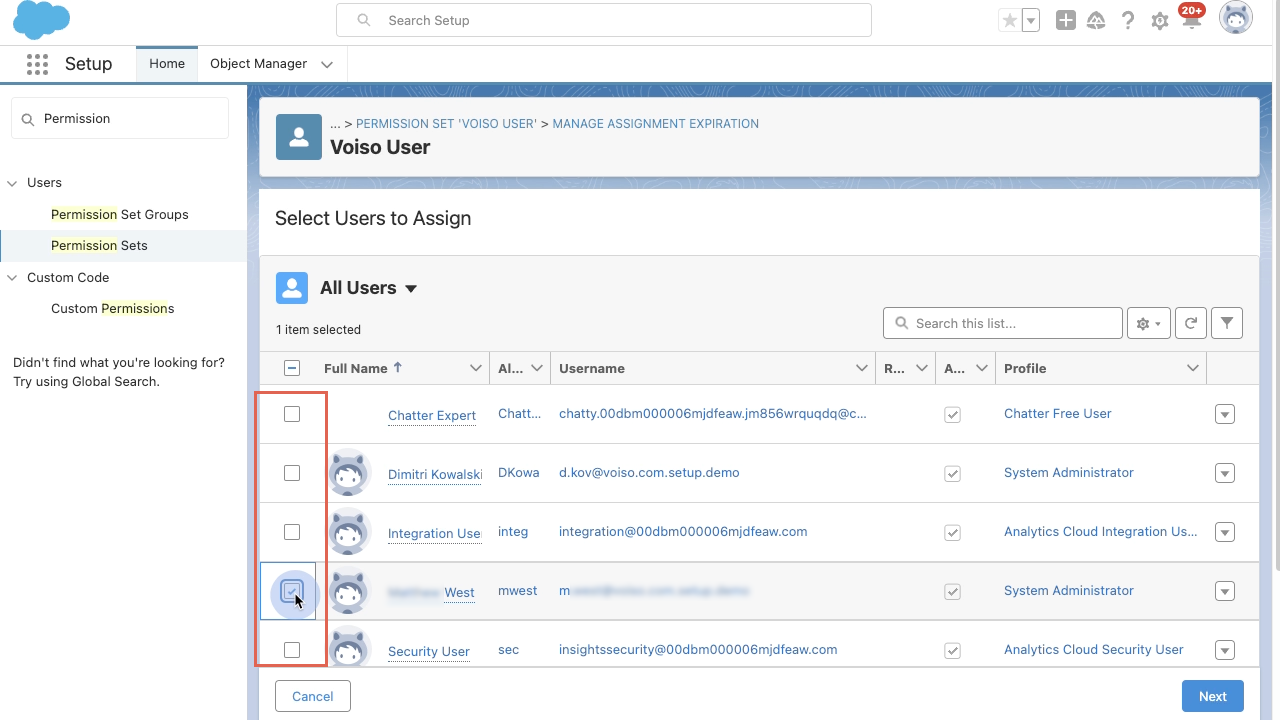
- Click Next, then click Assign.
To enable Call History, navigate to Adminstration > Integrations, and select the Salesforce tile. Click the Settings tab, select Enable Voiso Call History, then click Save.
Enable Track Activities
The Track Activities feature is enabled by default. For Activities to link to records, define which objects handle external contacts and store phone numbers. To manage this feature, navigate to Adminstration > Integrations, and select the Salesforce tile. Click the Settings tab, select or deselect Track Activities, then click Save.
Enable Click-to-call
Once you complete the following steps in the integration procedure, Click-to-call is enabled automatically after an agent logs in to the softphone:
The Click-to-Call feature can be used with standard Salesforce objects (Lead, Contact, Account, and others) and custom objects. Ensure that Track Activities is enabled for custom objects in Salesforce to link Task records correctly.