Who should read this article: Administrators
How to automatically route certain contacts directly to a target such as a queue or specific agent, by-passing the IVR.
User story
As an administrator, I want to provide priority customers with the ability to skip the IVR and go directly to their personal manager to improve their customer experience, service satisfaction, and retention rate.
I store contact information in my CRM or other data source accessible by a web service, including the phone number (ANI) for my priority clients. I want to immediately direct calls from the priority customer's phone number directly to my most experienced agents.
Use Case: Using call data to enable priority contacts to skip the IVR
The Voiso Flow Builder enables you to build a single flow that handles multiple use cases using the powerful HTTP Request and Conditions nodes.
This use case demonstrates building a flow that routes calls in three different ways:
- Skip the IVR if their caller data matches information stored in a CRM or other data source accessible through a web service
- Skip the IVR if they called a specific number
- Directs all other callers to the IVR
The following screenshot shows the sample flow described in this article.
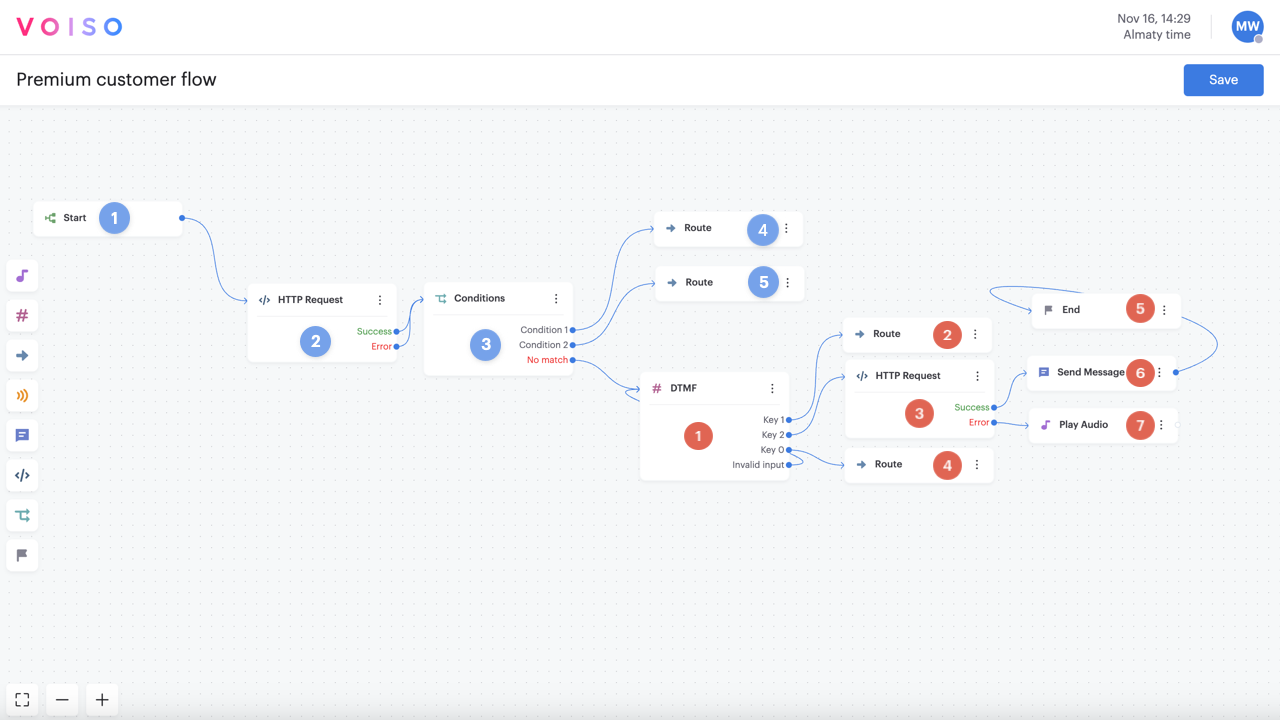
This simplified flow uses the HTTP Request and Conditions nodes to determine the identity of the caller before the call reaches the DTMF node (the IVR). The nodes are referenced in the sections below by number and color. Those numbered in blue are for skipping the IVR. Those numbered in red are part of the regular IVR call flow.
The call flow always starts at the Start node (1 blue). The Conditions node is used to decide how to route the call, either skipping the IVR or not. The Conditions node evaluates call data (system data and custom data) against a set of specified rules (a condition). It routes the call based on whether or not any of the conditions match the call data.
The following five system (global) variables are available for voice interactions:
| Variable | Description | Example |
|---|---|---|
{{start_time}} |
The time the interaction started. | 2023-08-21T04:02:18Z |
{{ani}} |
The calling number (ANI). | 443336006114 |
{{dnis}} |
The number dialed (DNIS). | 380631234567 |
{{phone_type}} |
The type of phone for the ANI. | fixed_line |
uuid |
a string containing the UUID of the interaction | 07771c38-c159-4965-a878-be0162118b2b |
Rename the node
Beginning with the September 15 - 19, 2025 release, you may name nodes in Flow Builder. Click a node in the node palette to add it to the flow. The node is added to the flow and is named Node N, where N represents the number of the node; for example, Node 6. Below the node name is the node type, such as Play Audio. Click the node to open the node configuration panel, then click the name of the node to edit it. Enter a new name, then the check mark to save your change.
Skip the IVR if caller data matches web service data
In this example, the contact center maintains a list of contacts in an on-line database or CRM.
In Flow Builder, the contact center admin adds the HTTP Request node (2 blue) immediately after the Start node (1 blue).
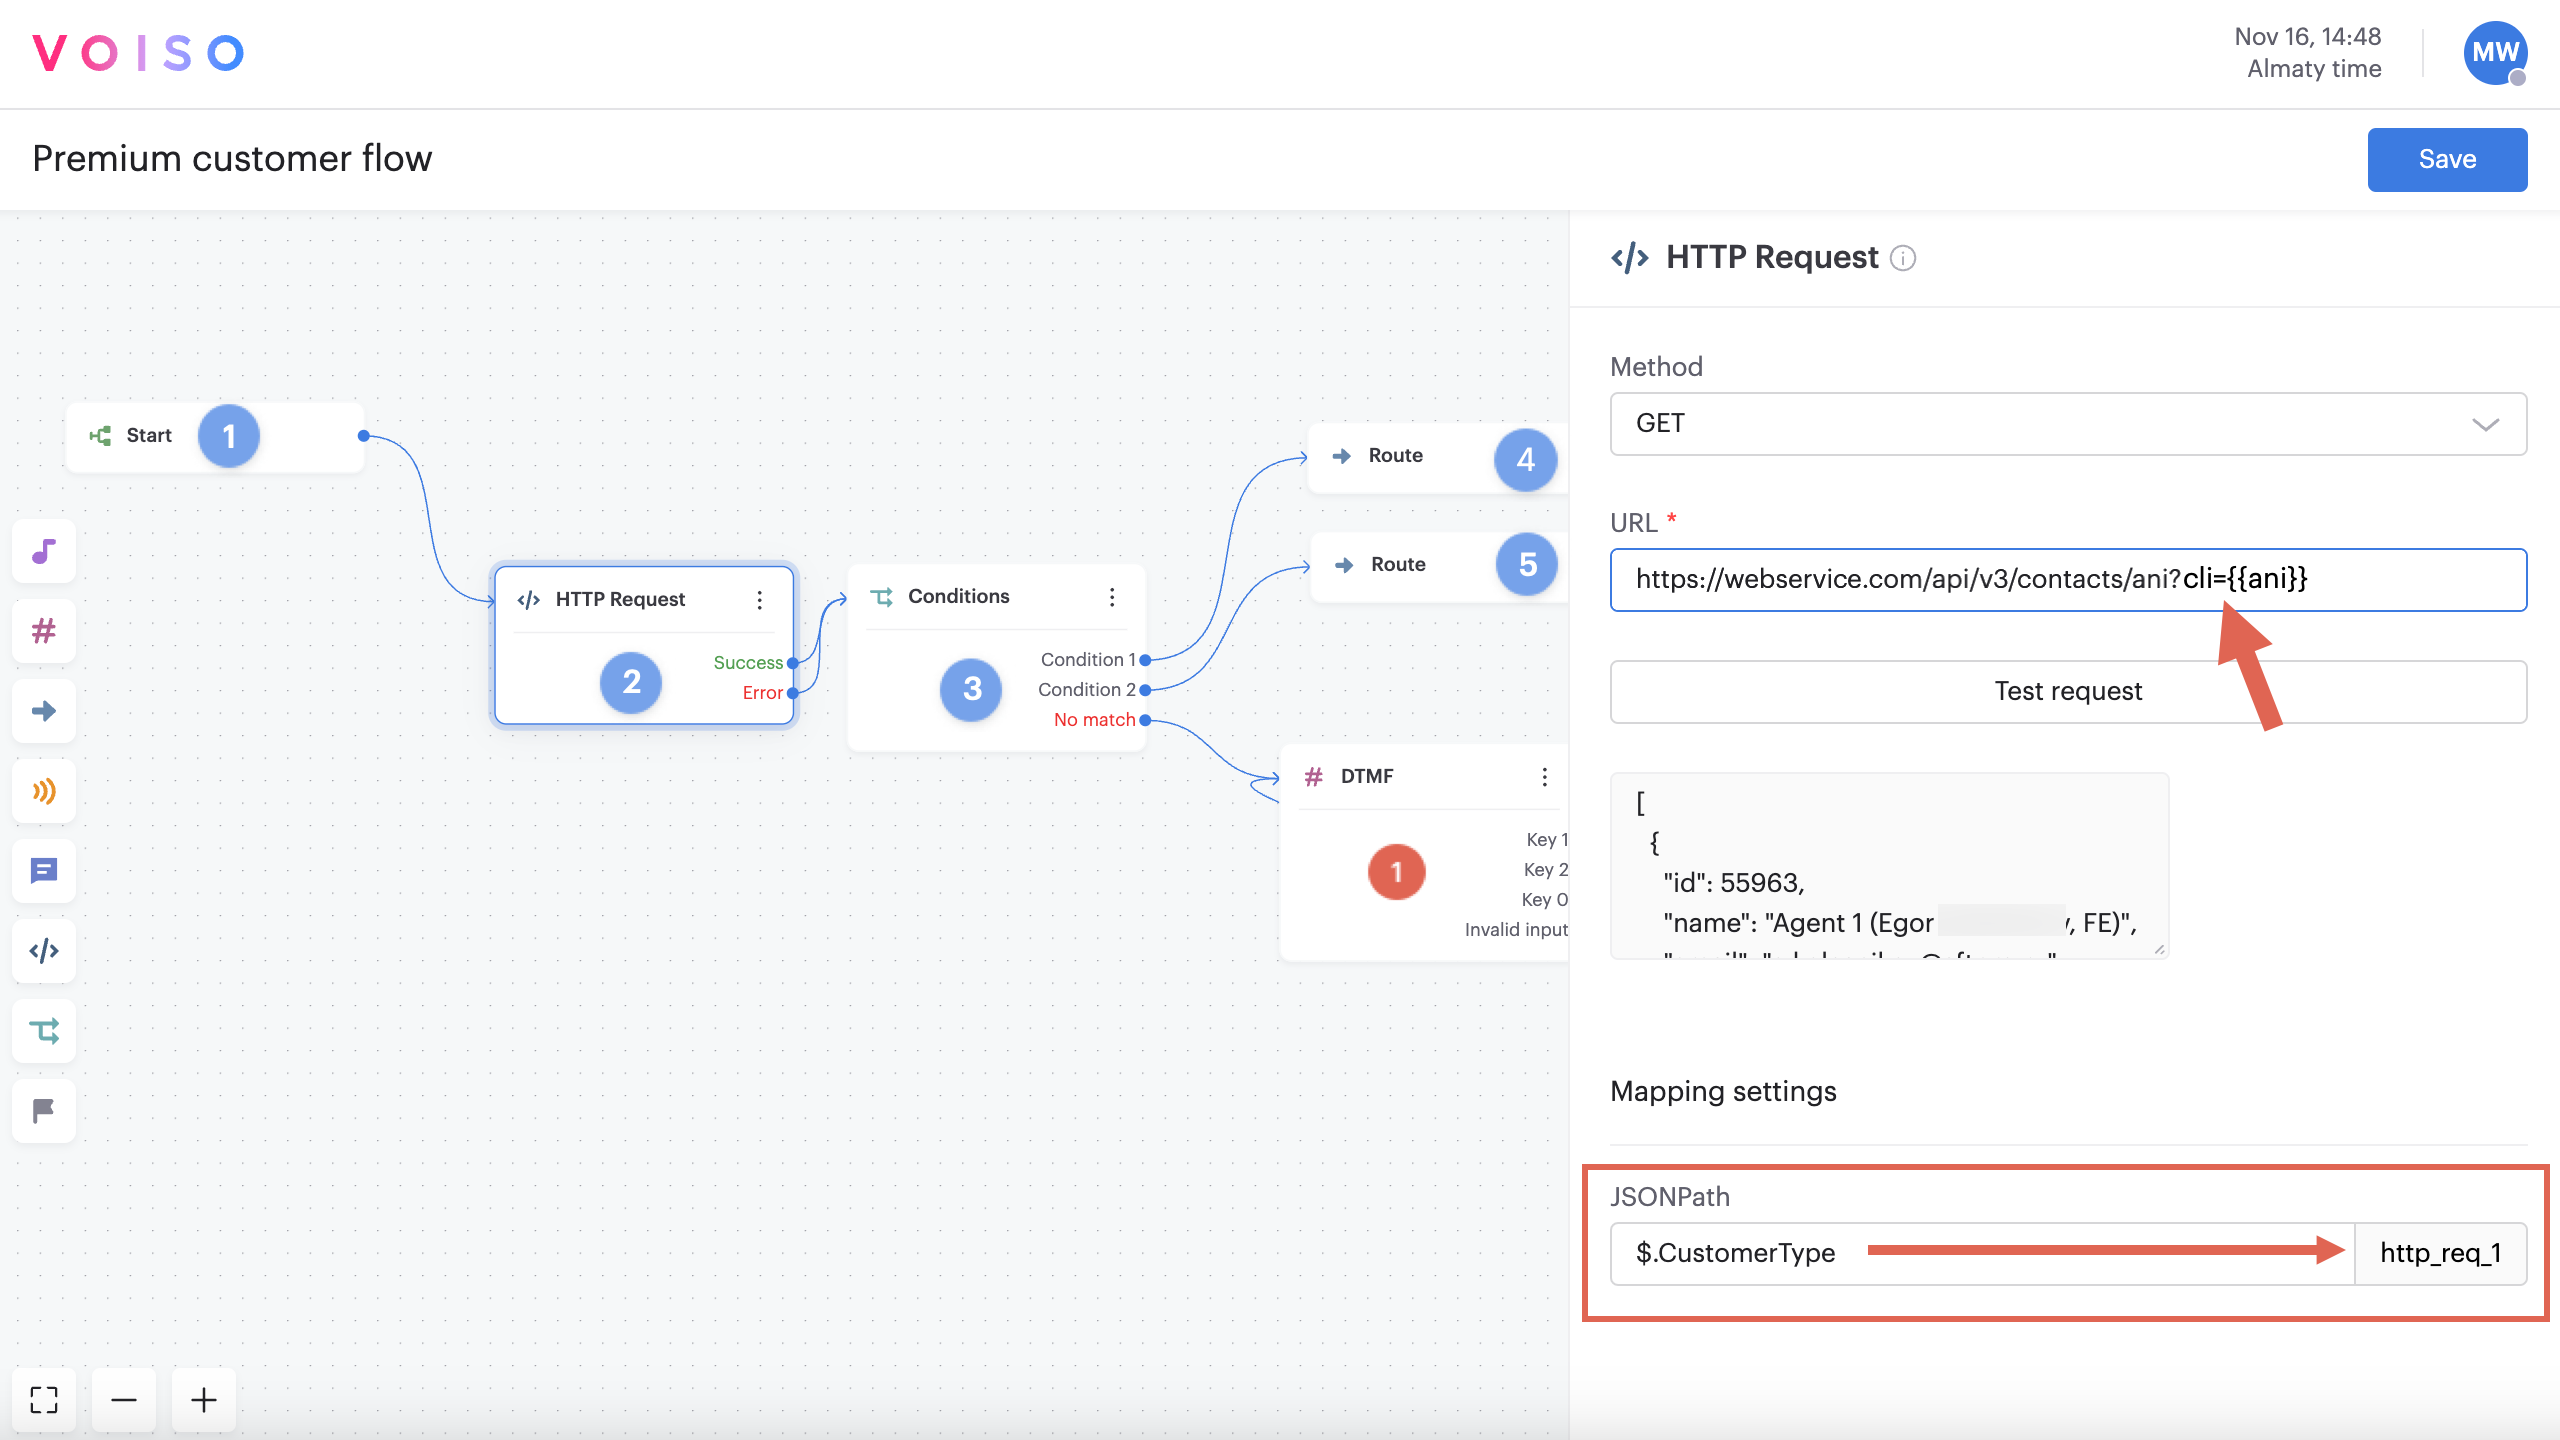
The admin clicks the HTTP Request node to configure it. The GET method is selected to retrieve information about the contact from the web service. The {{ani}} system variable is used in the request to identify the contact. The corresponding value of the CustomerType parameter is stored in the {{http_req1}} custom variable.
Whether data is successfully retrieved or not, both the Success and Error connections route to the next node in the flow. In your flow, you might choose to perform additional GET operations if the data is not successfully retrieved, or you could route directly to the IVR (1 red).
Variable value analysis
The admin next adds the Conditions node (3 blue) to the flow to determine whether the contact is a priority client or not.
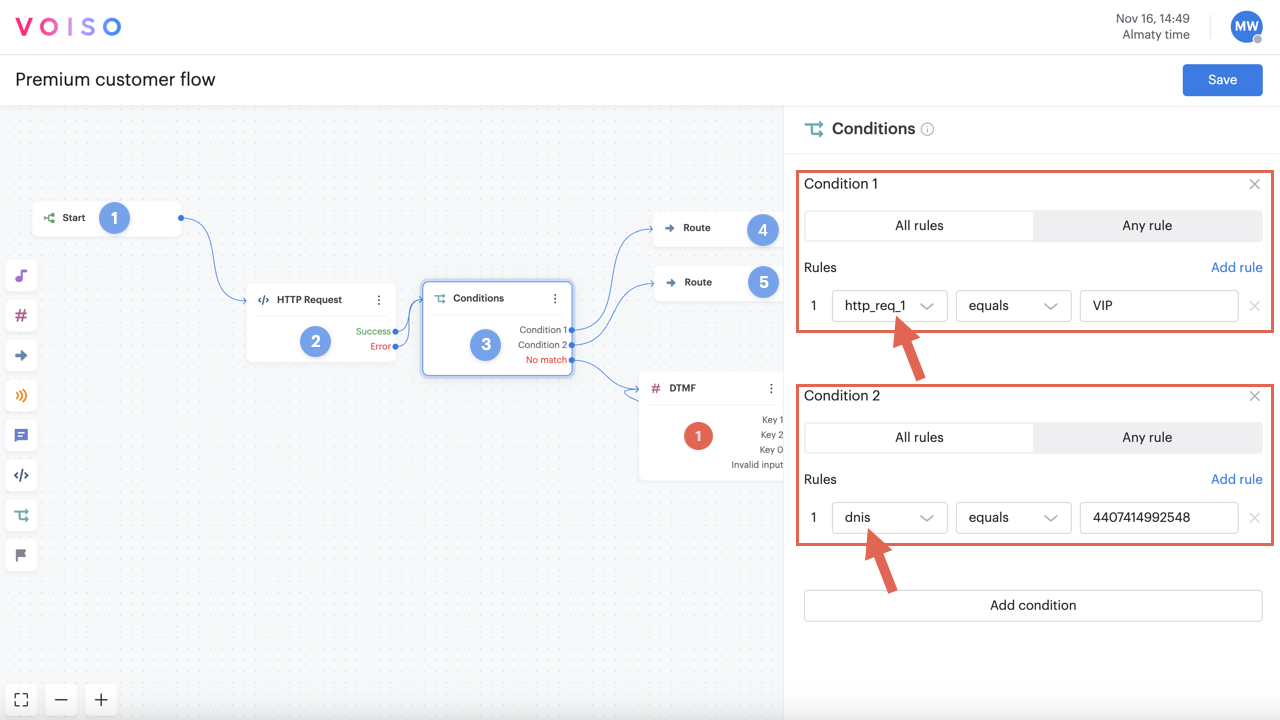
The admin clicks the Conditions node to configure it. Two conditions are added. Condition 1 tests the value of the {{http_req_1}} custom variable to see if it equals VIP.
Condition 2 is needed for the next use case, Skip the IVR if a specific number is called.
If Condition 1 is true, the call is routed directly to a Route node (4 blue), by-passing the IVR (1 red).
Routing the call to an agent

The admin clicks the Route node (4 blue) to configure it. Agent June Juliette is a specialist who handles all priority contacts. The admin selects Agent from the Route to menu and June's name from the Agent name menu. The admin could also choose to route to a queue or a PTSN (phone number).
Now all callers who are identified as priority do not have to go through the IVR to reach the specialist agent.
Skip the IVR if a specific number is called
In this example, the contact center has two phone numbers associated with their inbound call flow.
There is no limit to the number of inbound phone numbers you can associate with a flow.
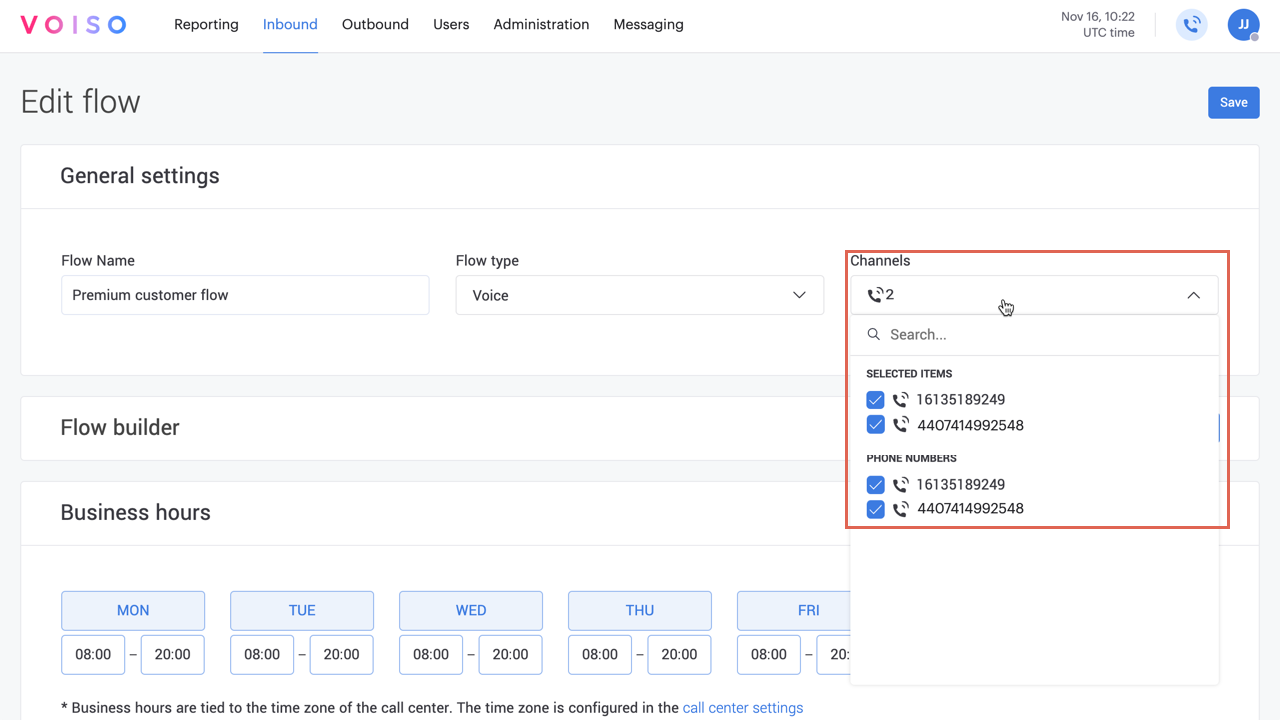
The organization provides specific numbers to their clients, dependent on their business process. The organization wants to route calls to their UK number to a specialist, while calls to their Canada number may go through the IVR. The flow also tests for VIP clients (2 blue), but this step is not necessary if you only want to direct calls based on the number the caller dials (DNIS).
Variable value analysis
The admin next adds the Conditions node (3 blue) to the flow to determine which phone number the caller dialed.
The admin clicks the Conditions node to configure it. Two conditions are added. Condition 2 tests the value of the {{dnis}} custom variable to see if it equals the UK phone number.
If Condition 2 is true, the call is routed directly to a Route node (5 blue), by-passing the IVR (1 red).
Routing the call to an agent
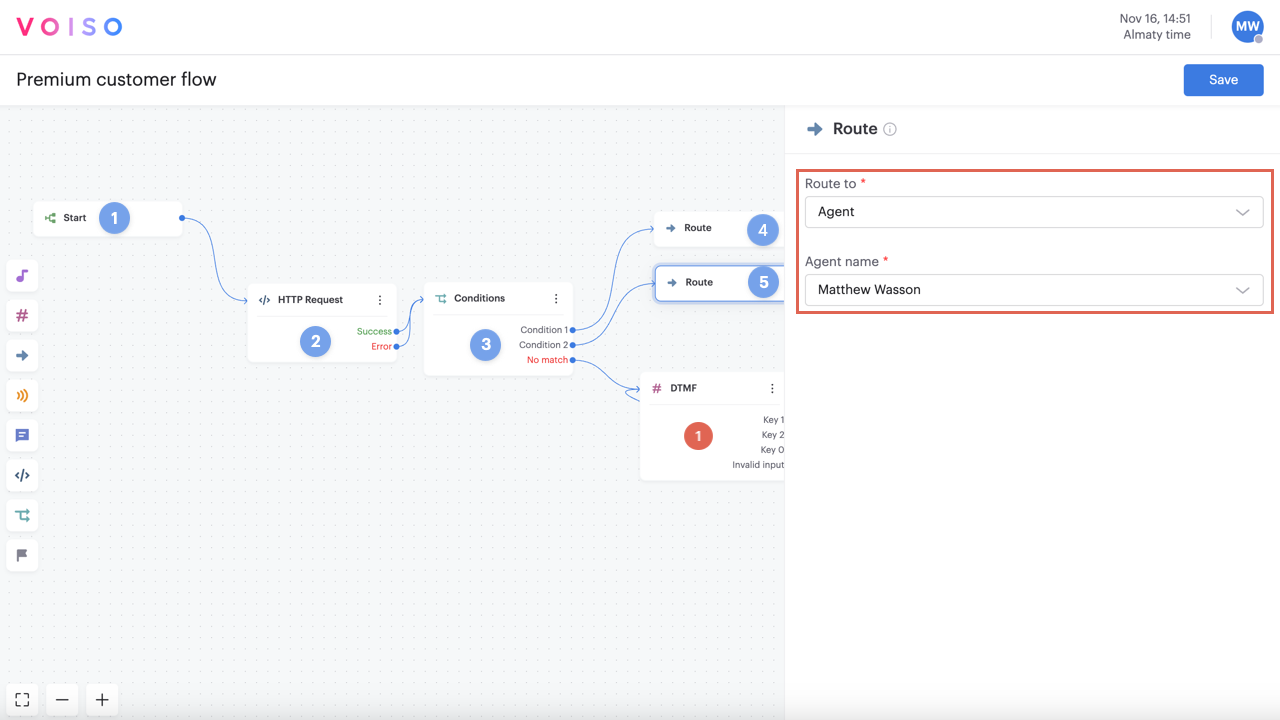
The admin clicks the Route node (5 blue) to configure it. Agent Matthew Wasson is a specialist who handles all UK contacts. The admin selects Agent from the Route to menu and Matthew's name from the Agent name menu. The admin could also choose to route to a queue or a PTSN (phone number).
Now all clients who call in on the UK number do not have to go through the IVR to reach the UK specialist.
Prep your contact center resources
First, create an inbound queue and assign agents to the queue. Next, obtain an inbound phone number for your contact center.
For more details, refer to the How to start receiving calls with Voiso article.
IVRs rely on recorded messages (media files) to explain the keypress selections available to callers.
Create a recorded message as a media file (for example, an MP3). The message can be quite simple. For example, the message could be:
Welcome to Our Organization. Press 1 to be connected to an agent, press 2 to leave a voicemail, or press any other number to hear this message again.
Upload your audio message to your contact center media collection (navigate to Administration > Media in the main navigation bar).
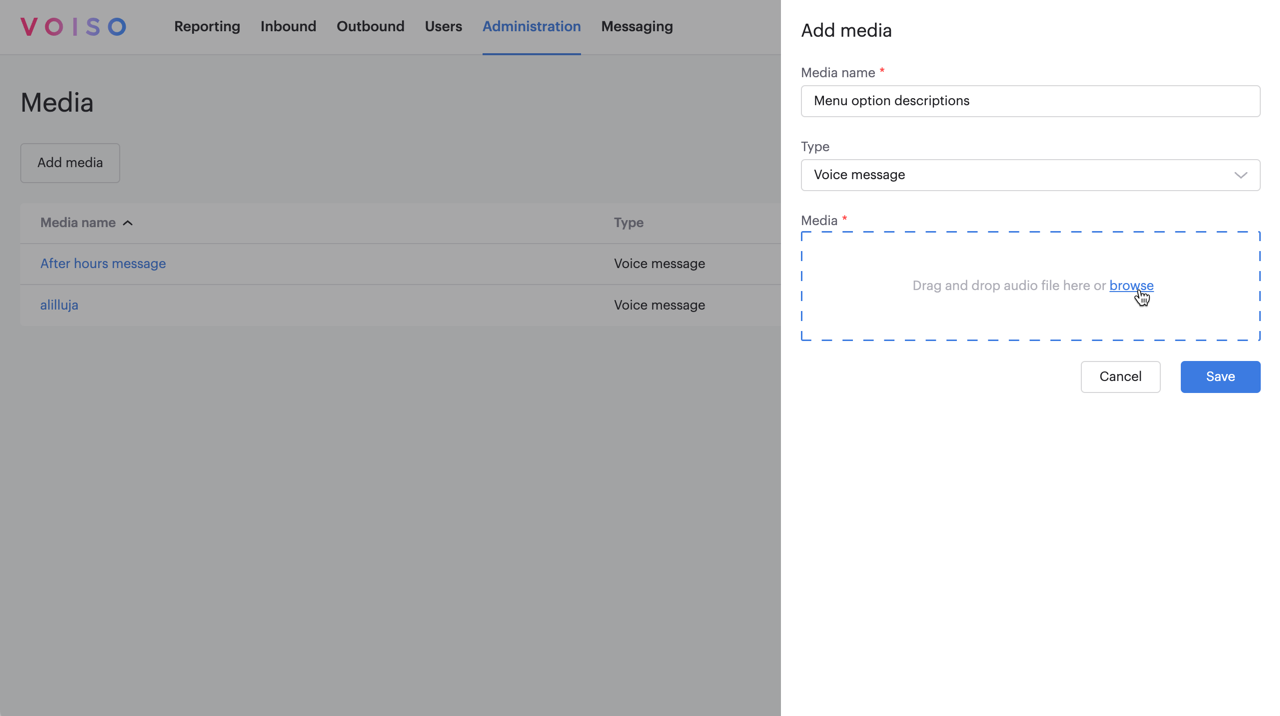
Adding media
To upload a new audio file to your media library, follow these steps:
- Click Add media.
- In the Add media panel, enter a name for the file. This name appears in the Media table and in selection menus throughout the application.
- From the Type dropdown, select the media type that matches how the audio will be used (e.g., MOH, Voice Message, or Ringtone).
- In the Media section, either drag and drop an audio file from your computer or click browse to select a file.
- Click Save to upload the file.
For supported audio formats and file size limits, refer to Supported file formats.
Direct other calls to the IVR
In this example, the contact center wants to direct all their non-VIP and UK call traffic to their IVR. The admin now sets up a simple IVR that presents callers with three choices: route to queue, get a balance, and talk to an operator.
Non-VIP and non-UK call traffic do not match either condition specified in the Conditions node (3 blue), so these calls are routed through the No match connection to the IVR, represented by the DTMF node (1 red).
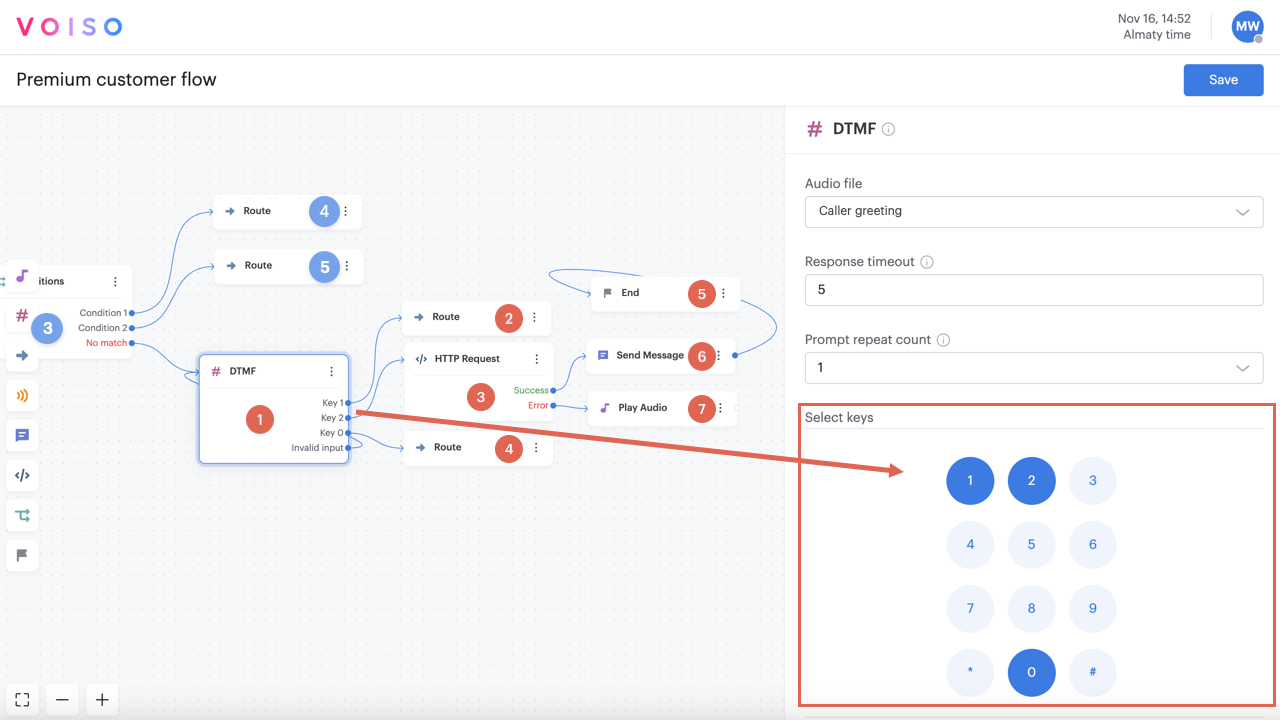
Setting up the IVR
The admin clicks the DTMF node to configure it. First, a media file is specified from the Audio file menu. The Response timeout is set to 5 seconds. If the caller does not make a selection within 5 seconds, the audio file is played again. The admin sets the Prompt repeat count to 1, meaning that the audio file will be replayed only once before the system automatically terminates the call.
Three select key options are added, 1, 2, and 0:
- 1 routes directly to a queue (2 red) for specific inquiries
- 2 routes to a balance request that uses the HTTP Request node (3 red)
- 0 routes to the operator queue (4 red) for general inquiries
- Invalid input routes back to the DTMF node where the specified audio file describing the select key options is played again.
Routing to a queue
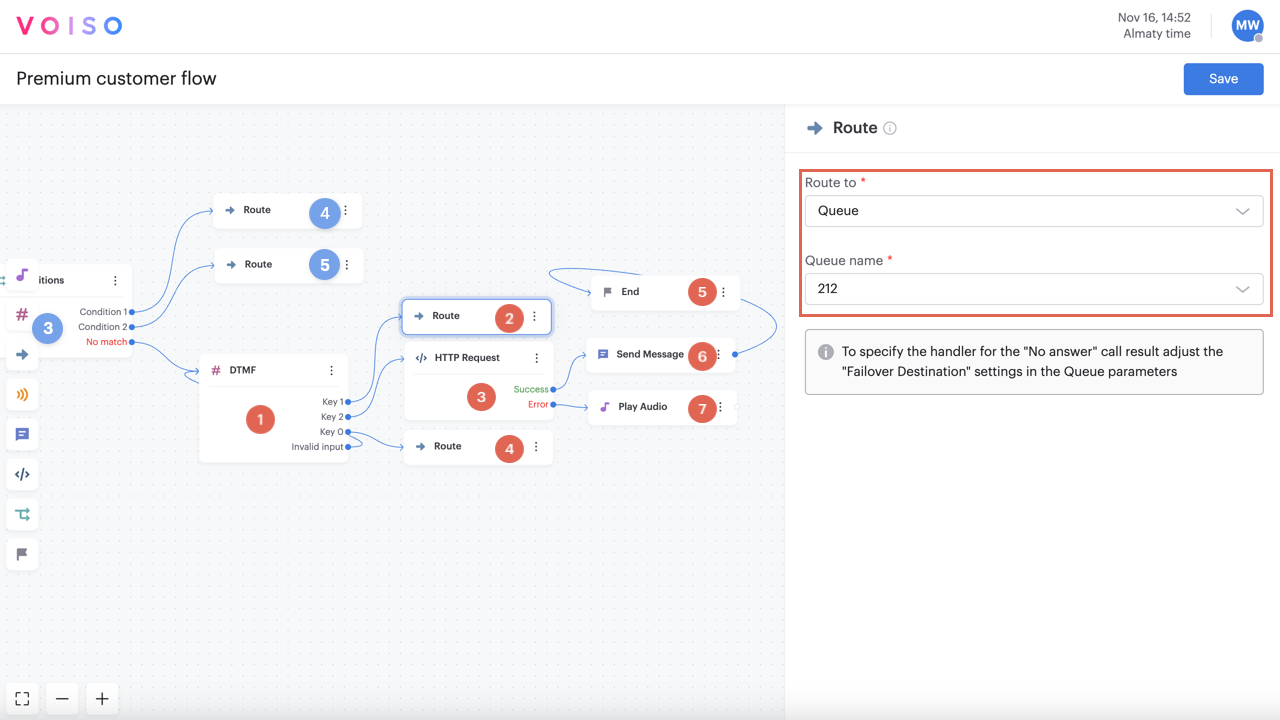
The admin clicks the Route node (2 red) to configure it. The 212 queue is where general inquiries are routed. The admin selects Queue from the Route to menu and 212 from the Queue name menu. The admin could also choose to route to an agent or a PTSN (phone number).
Getting data for a contact

The admin clicks the HTTP Request node to configure it. The GET method is selected to retrieve the contact's account balance from the web service. The {{ani}} system variable is used in the request to identify the contact. The corresponding value of the Balance parameter is stored in the {{http_req_2}} custom variable.
Sending the data to the contact by SMS
The Send Message node can be used for many different purposes, including sending data to contacts by SMS or WhatsApp. In this example, if the HTTP Request node successfully retrieves the account balance for the caller, the Send Message node is used to provide the information to the contact.
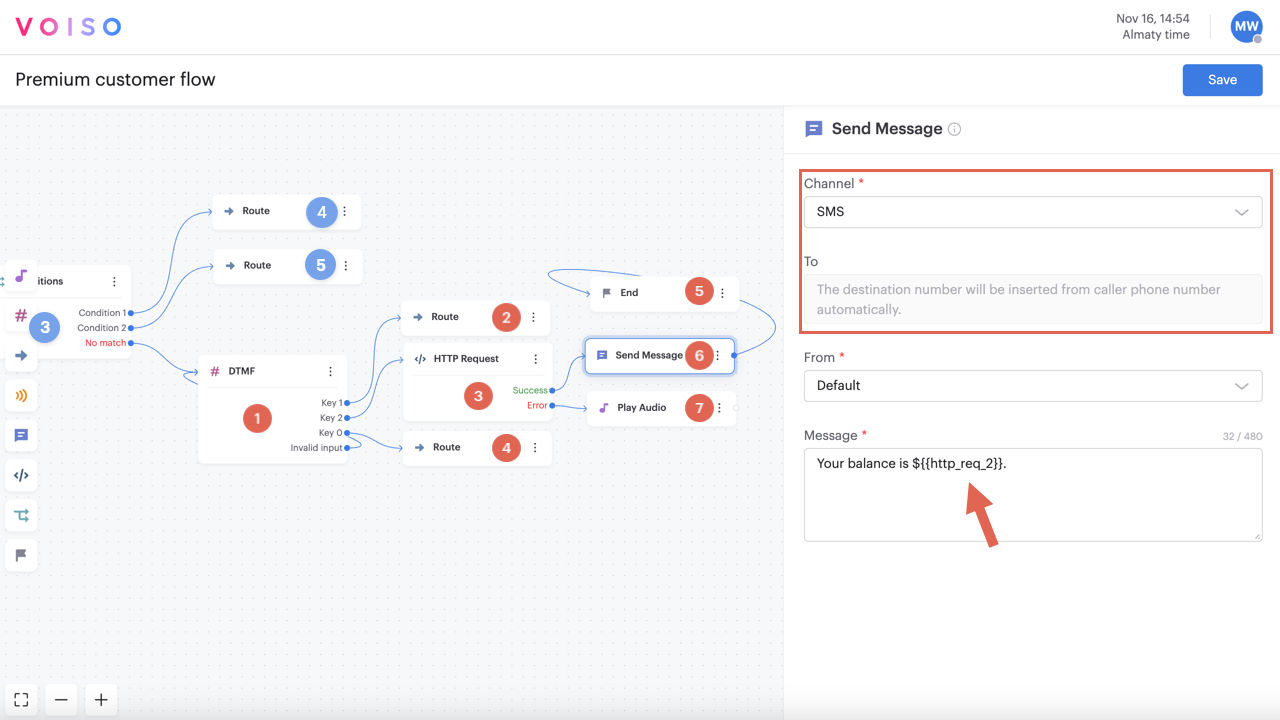
The admin clicks the Send Message node to configure it. The SMS channel is selected to send the contact their information. The message is sent automatically to the ani of the caller. The contact's account balance retrieved from the web service is stored in the {{http_req_2}} variable. The admin automatically inserts the balance into the message by specifying this variable name.
After the SMS is sent, the call ends.
The contact center now has a call flow that allows VIP callers and callers to a specific number to avoid the organization's IVR, while all other callers are automatically directed to the IVR.