Who should read this article: All users
The Omnichannel Workspace is an easy-to-use, all-in-one tool for handling digital and voice interactions.
Introduction
The Voiso Agent Workspace, or Omnichannel Workspace, lets you handle all your interactions in one place. The inbox contains all your active and initiated interactions. Click the inbox, select either the Active or Initiated tab, then click an interaction to view and manage it.
Logging in
To sign into your Voiso account, follow these steps:
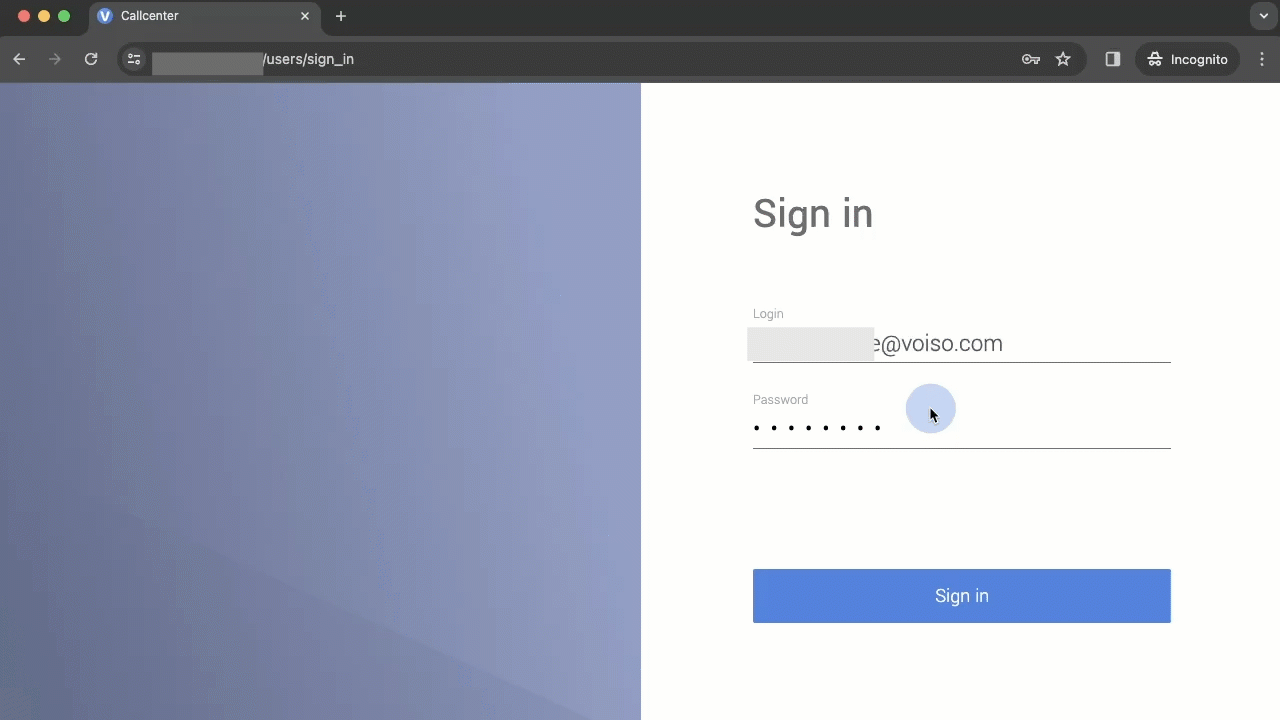
- Navigate to the web address (URL) your administrator or supervisor provided.
- On the Sign in page, enter your email address and password, then click Sign in.
Your administrator might enable account lockout. If it is enabled, you might be temporarily locked out of your account if you enter invalid credentials more than a specified number of times.
If you are locked out of your account, follow the on-screen instructions. Either wait the specified waiting period for your account to become unlocked or contact your administrator to unlock your account.
- On the Voiso contact center page, if you receive a notice that pop-ups are blocked, select Always allow pop-ups and redirects from <url>, then click Done.
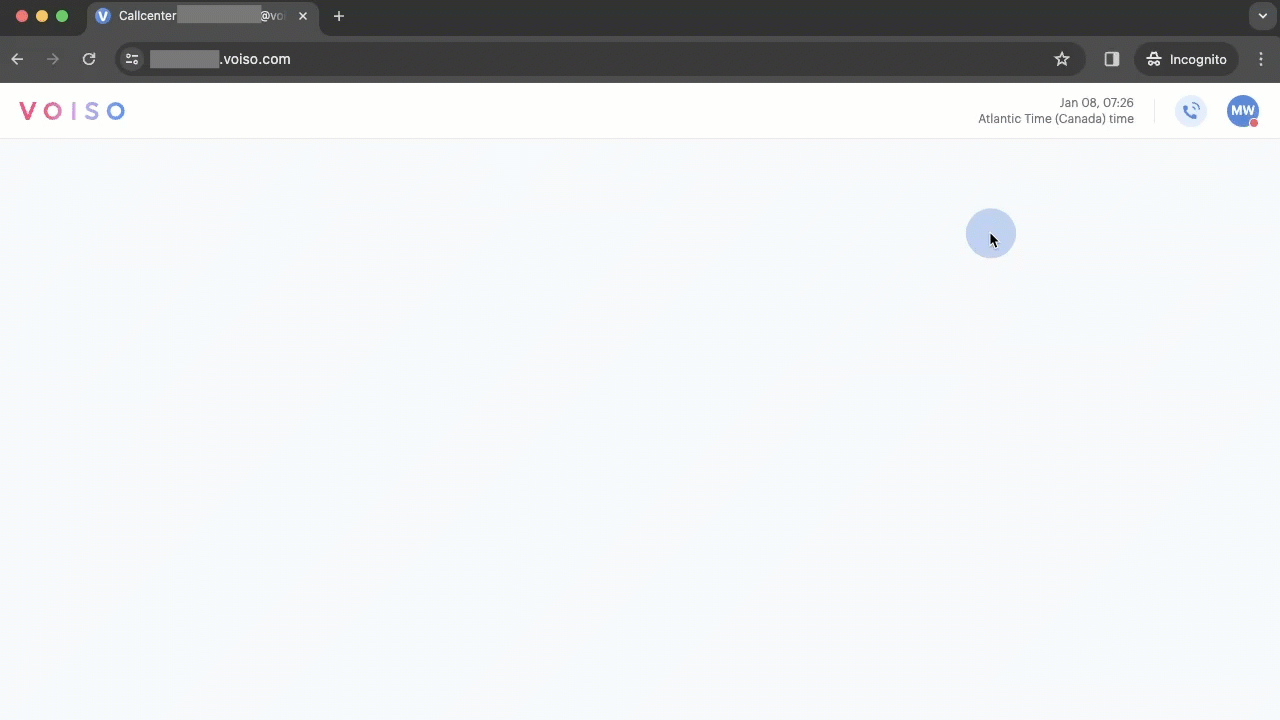
- To open the Agent Workspace, click the Agent Workspace icon in the navigation bar. The Omnichannel Workspace opens in a new tab.
- When the Agent Workspace is displayed for the first time, you are asked to allow Voiso to use your microphone. Click Allow.
- If your browser does not have permission to use your microphone, a dialog box asking for permission might be displayed. Allow your browser to use your microphone as well. You might have to enable your microphone in your browser settings.
- To change your microphone settings or choose a different microphone, click the microphone icon.
- Modify the settings, then click Done. To modify your browser's microphone settings, click Manage.
- Your workspace and softphone are now ready to use.
- Set your status to Available.
Logging out
To log out from Voiso, click the Your profile and options button in the Voiso contact center navigation bar, then click Sign out.
Agent Status
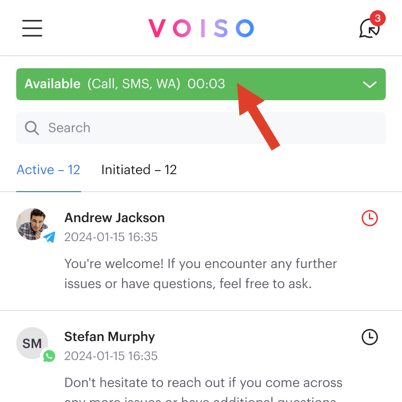
View your current availability status and the duration you've been in that status in the Status menu.
The following table describes some of the statuses that might be displayed:
| Status | Description |
|---|---|
| Available | You are available to receive interactions. You are not currently handling a call. You might be handling an active digital channels interaction. |
| Ringing | You have an active, unanswered (currently ringing) inbound voice call. |
| Inbound | You are handling an inbound voice call. |
| Outbound | You are handling an outbound voice call (a call you dialed or clicked-to-dial). |
| Dialing in | You joined a Dialer campaign, and Dialer is dialing you. |
| Dialer - Waiting | You are engaged in a Dialer campaign and are waiting for the next voice call to be connected to you. |
| Dialer - Outbound | You are handling a Dialer campaign outbound voice call. |
| Logged Off | You are logged off. |
| Unavailable | You are currently not available to handle interactions. |
| Unavailable with a reason | Your administrator creates unavailable statuses, such as Lunch, Break, Team meeting, and so on, that you can choose to register the reason you are unavailable. Your administrator might also specify a default unavailable status that displays until you set your status to Available. |
| After Call Work | After you end a voice call, you might be required to select a wrap-up code that describes the call outcome. Select the appropriate code according to your organization's business requirements. |
Service Level timers
Your contact center may operate under a Service Level Agreement (SLA), ensuring timely responses and completion of interactions within specific timeframes.
To assist you in fulfilling your organization's commitments, Voiso offers Service Level timers configured by your administrator. These timers transition through colors, shifting from green to amber and finally to red as they count down.
On the sidebar
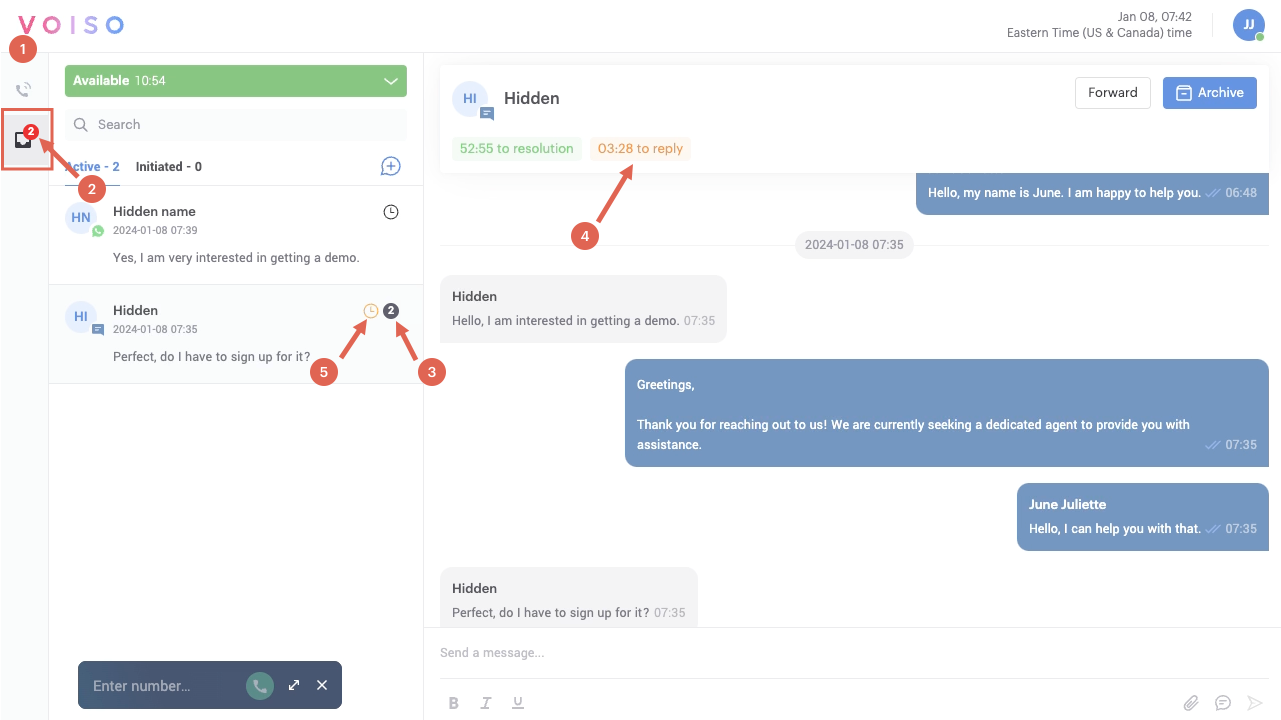
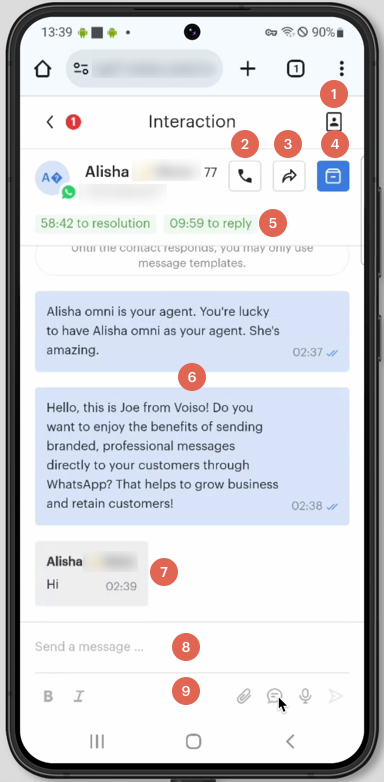
The Agent Panel and Inbox icons are displayed on the Omnichannel Workspace sidebar (1). If you have active interactions, a tag indicating the number of interactions is displayed next to the Inbox icon (2).
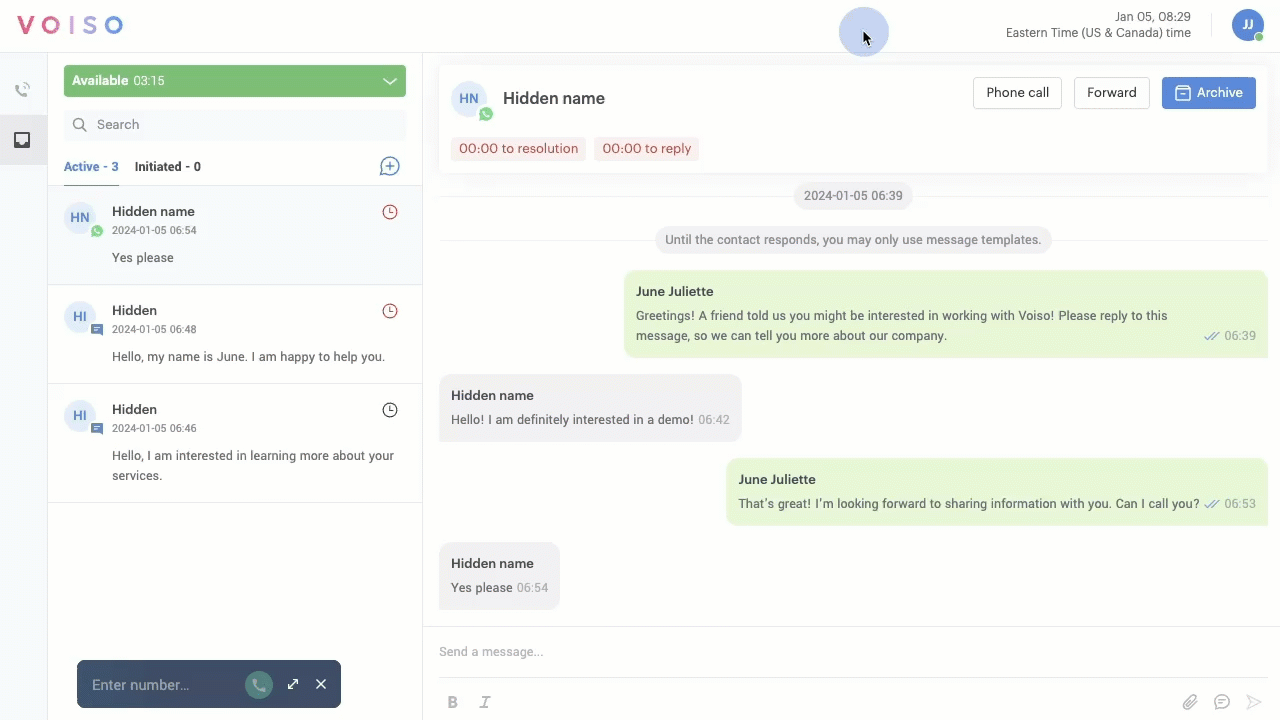
Inbox
All your omnichannel messages are found in your Inbox.
The Active tab displays a list of your active messages, with the most recently active at the top. The number of unread messages (3) is indicated on the right side of each interaction.
The Initiated tab displays a list of the messages that you initiated with a contact, with the most recently initiated at the top. When a contact responds to one of your initiated messages, the conversation is moved to the Active tab. Refer to the WhatsApp and Viber articles for information about initiating interactions.
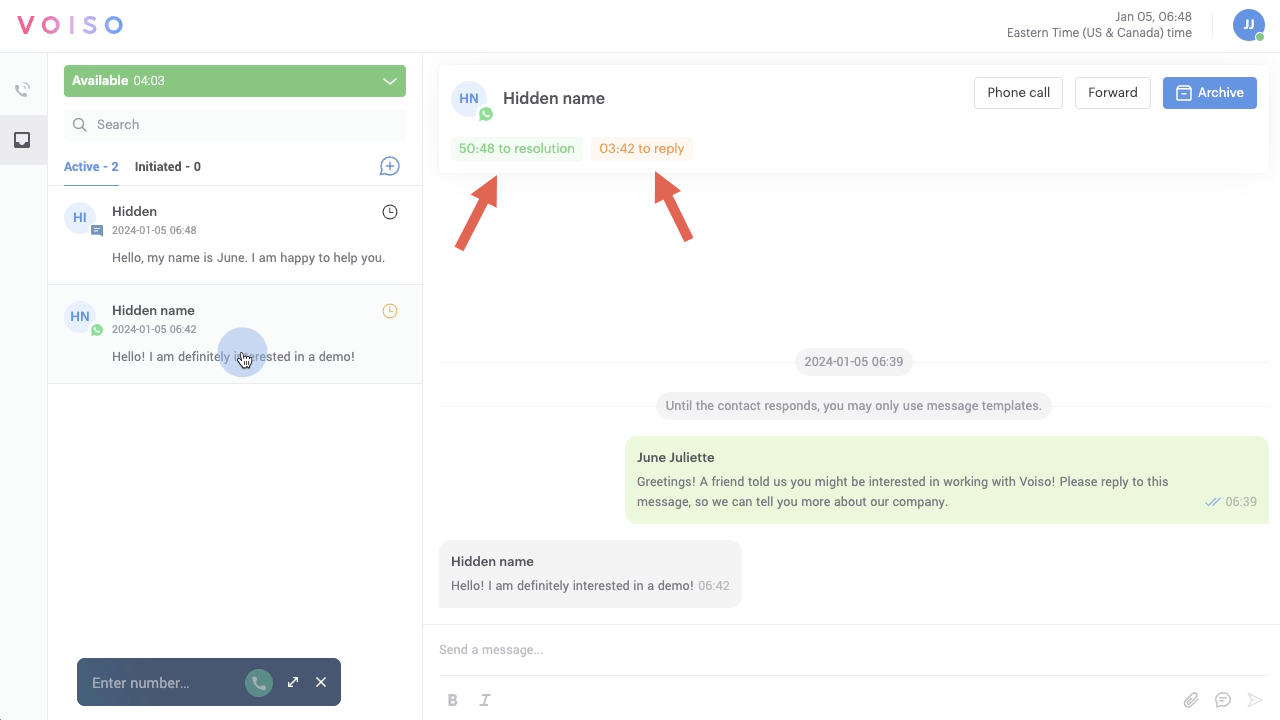
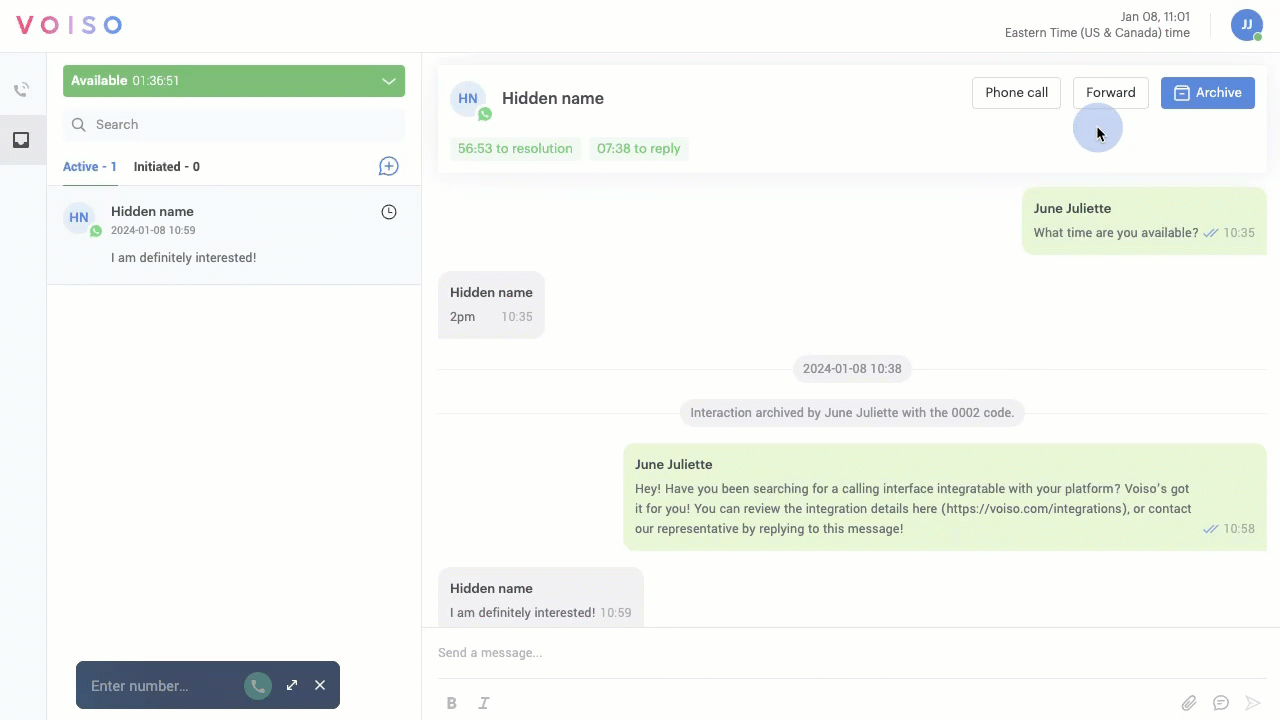
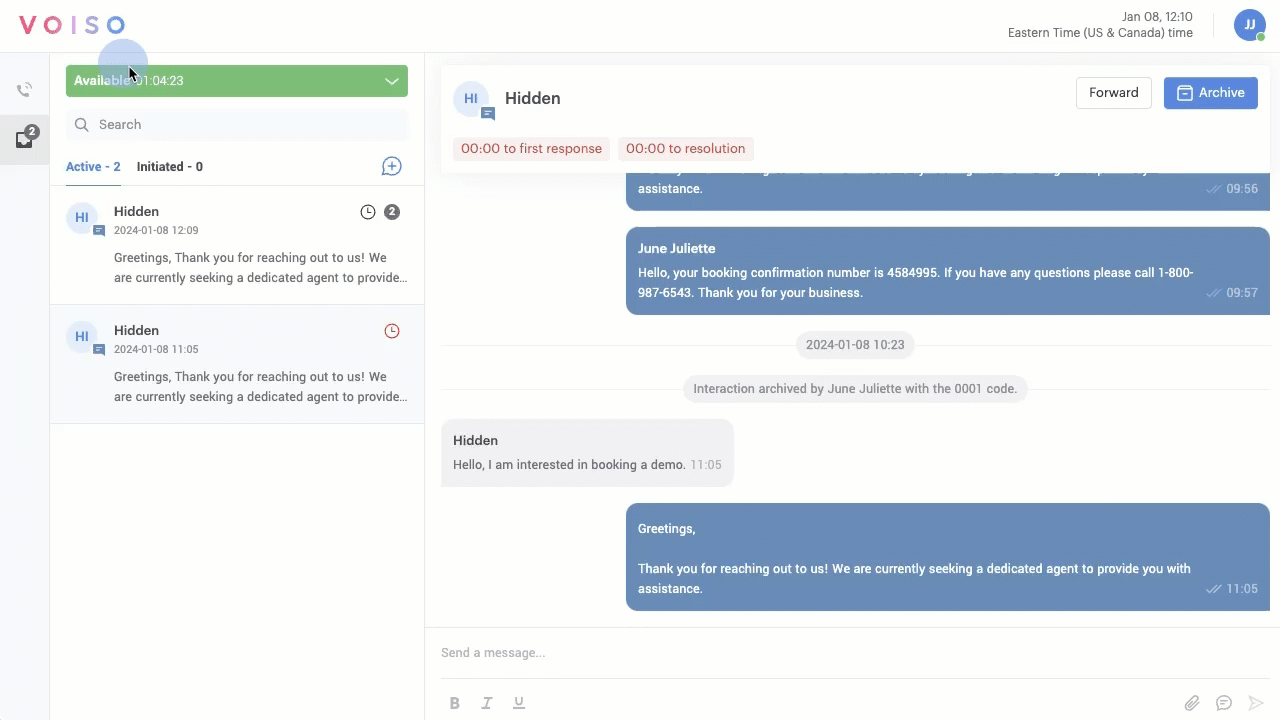
Click an interaction in either the Active or Initiated tab list to view the message transcript. Service Level timers (4) are displayed at the top of the message transcript. If the interaction is in a warning or overdue state, an amber or red clock face is displayed (5). The timers count down the maximum time allotted for each of the three Service Level indicators:
| Service Level indicator | Description |
|---|---|
| Time to first response | The maximum time allowed for a first response to an interaction. A color-coded timer progresses from green to amber to red as timeout approaches. |
| Time to reply | The maximum time allowed for a reply to each text message from a contact. A color-coded timer progresses from green to amber to red as timeout approaches. |
| Time to resolution | The maximum time you have to complete and archive an interaction. A color-coded timer progresses from green to amber to red as timeout approaches. |
Message transcript area
This area contains a transcript of active and recently completed interactions. Contact messages are on the left (1) and your messages are on the right (2). System messages and notifications are displayed in the center of the transcript (3).
Reply to message
You can reply to specific messages in the transcript of WhatsApp and Telegram interactions.
- Hover your mouse pointer next to the message to display the Reply button.
- Click the Reply button, then type your reply in the message composition field.
- Click Send. The reply with the original message quoted is displayed in the transcript area.
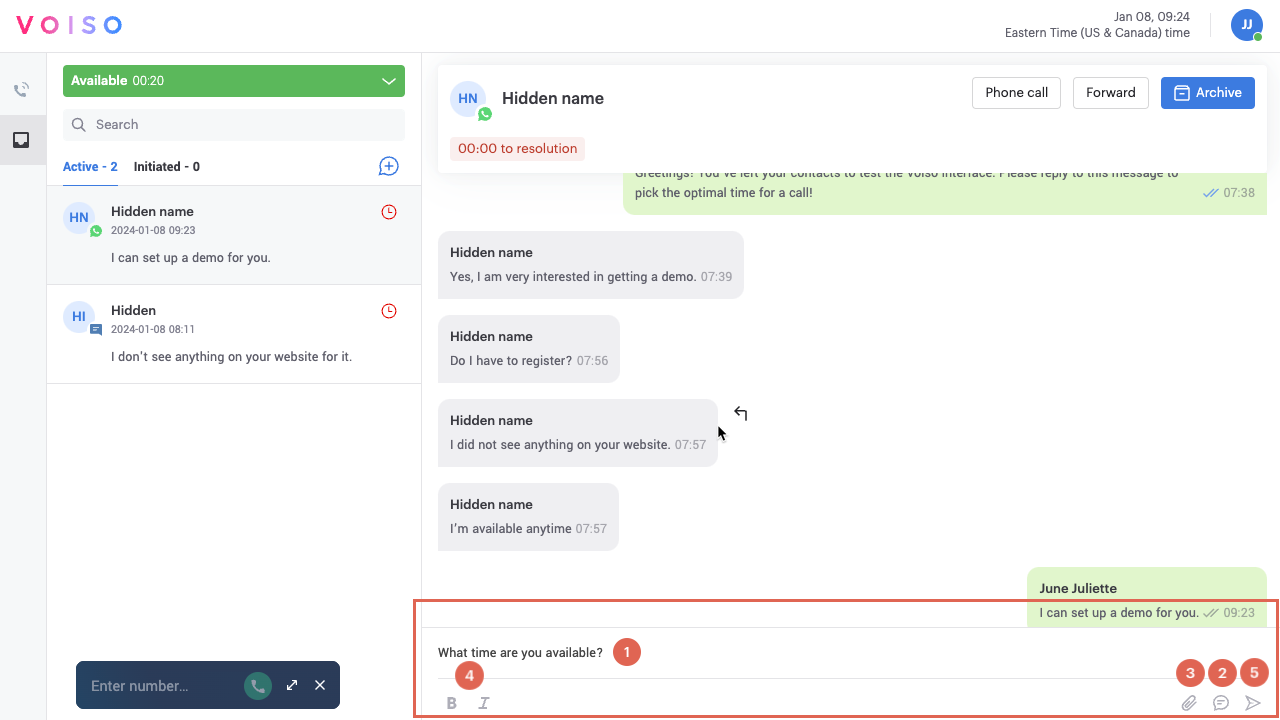
Message composition area
You can reply to messages from your contacts by writing text (1), selecting a standard response message template (2), and adding attachments (3).
Attachments
Different message channels support different attachment file types. Refer to the channel-specific articles for more details.
- Photos
- Videos
- PDFs
- Business documents
- Audio files
Write your message in the message composition area (1), format the text with bold and italic styles (4), then click Send (5) or press the Return key on your keyboard to send your message.
Some message channels enable contacts to attach certain file types to send to you. View your contact's attachments by clicking the download icon on the attachment message. Open the file on your desktop.
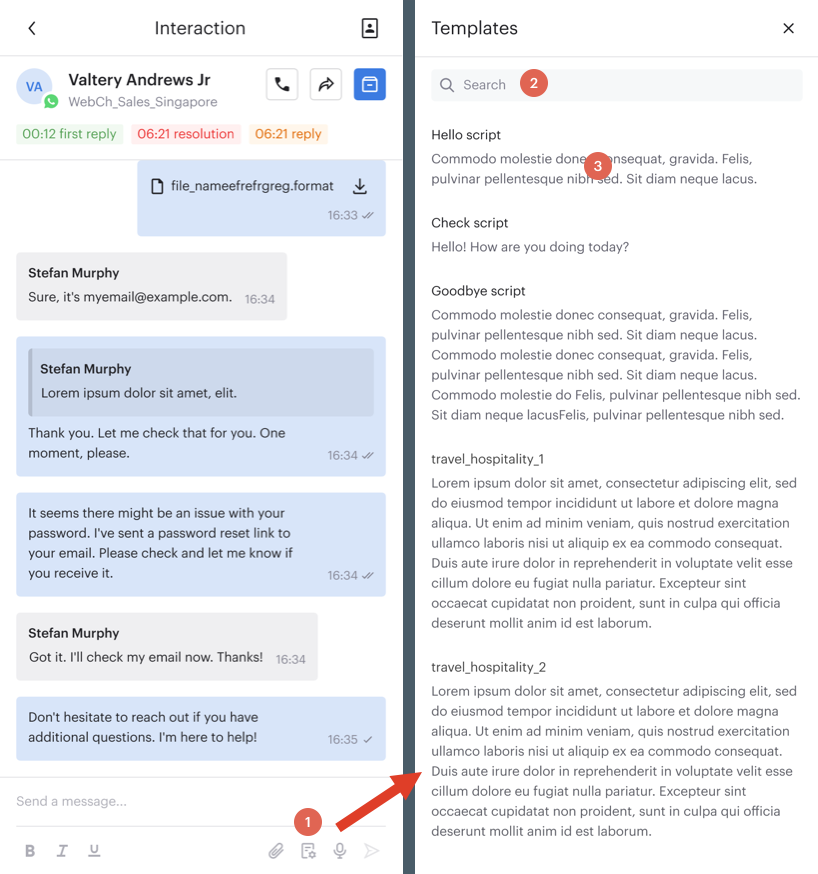
Standard response message templates
To use a standard response message template in an interaction, click the standard response message template button in the message composition area.
Click a message from the Templates panel. The standard response message is inserted into the message composition area. Review and edit the message, including adding details such as names, account numbers, and so on. Your administrator might use placeholders, such as {case number} shown in the example above. Replace the placeholder with appropriate text, then press the Return key on your keyboard or click Send.
Voice recording
You can reply to WhatsApp and Telegram interactions with voice recordings.
- To make a voice recording, first, make sure your computer's microphone is on and is enabled for your browser.
- Next, click the Record audio button in the message composition area to display the recording controls and start recording your voice. You will see Recording audio displayed next to the controls, and the recording timer starts counting up.
- Click the Pause button to pause your message. Click the Record button to resume recording your voice.
- To stop and cancel the recording, click the X.
- When you are finished recording your message, click Pause. Click Play to listen to your message.
- If you want to rerecord your message, click the X to delete the recording, then click Record audio to start again.
- When you have a recording you are satisfied with, type a message in the message composition field, then click Send.
Phone call
WhatsApp interactions are always associated with a phone number. While handling a WhatsApp interaction, you can click Phone Call to start a voice call with the WhatsApp user.
Forwarding
The Forward feature enables you to send the interaction to another agent to handle. This can be done by either forwarding the interaction to a queue for another agent to pick up, or directly to another agent.
Forward to a queue
To forward the interaction to a queue for another agent to accept, click Forward then click Queue to make the Queue tab active. Use the Search field to find the queue. Click a queue name to forward the interaction instantly.
Forward to an agent
To forward the interaction to another agent to accept, click Forward then click Agent to make the Agent tab active. Use the Search field to find the agent. Click an agent name to forward the interaction instantly. If the agent declines or ignores the interaction, it is returned to you with an error message.
Use the Capacity bar next to the agent names to determine which agents have enough capacity to handle another interaction:
- If an agent is handling less than 80% of their interaction capacity, the capacity bar is blue.
- If an agent is not handling any interactions, the capacity bar is grey.
- If an agent is handling more than 80% of their interaction capacity, the capacity bar is red.
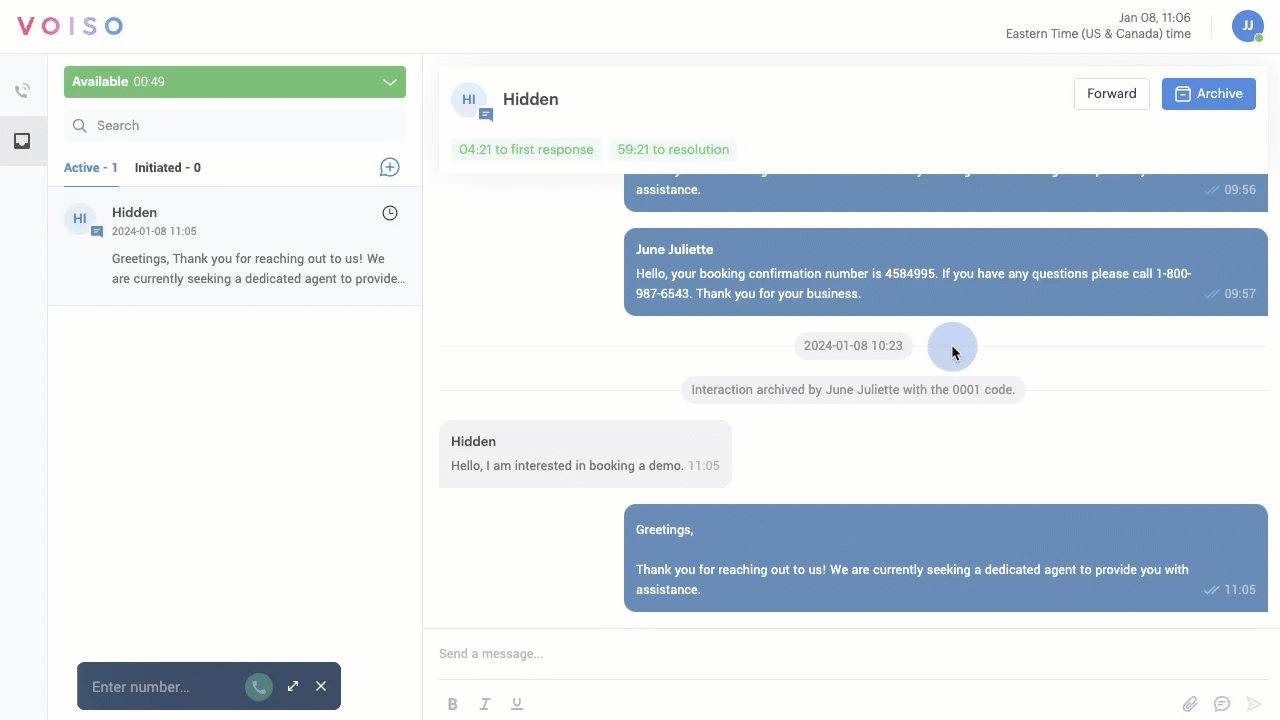
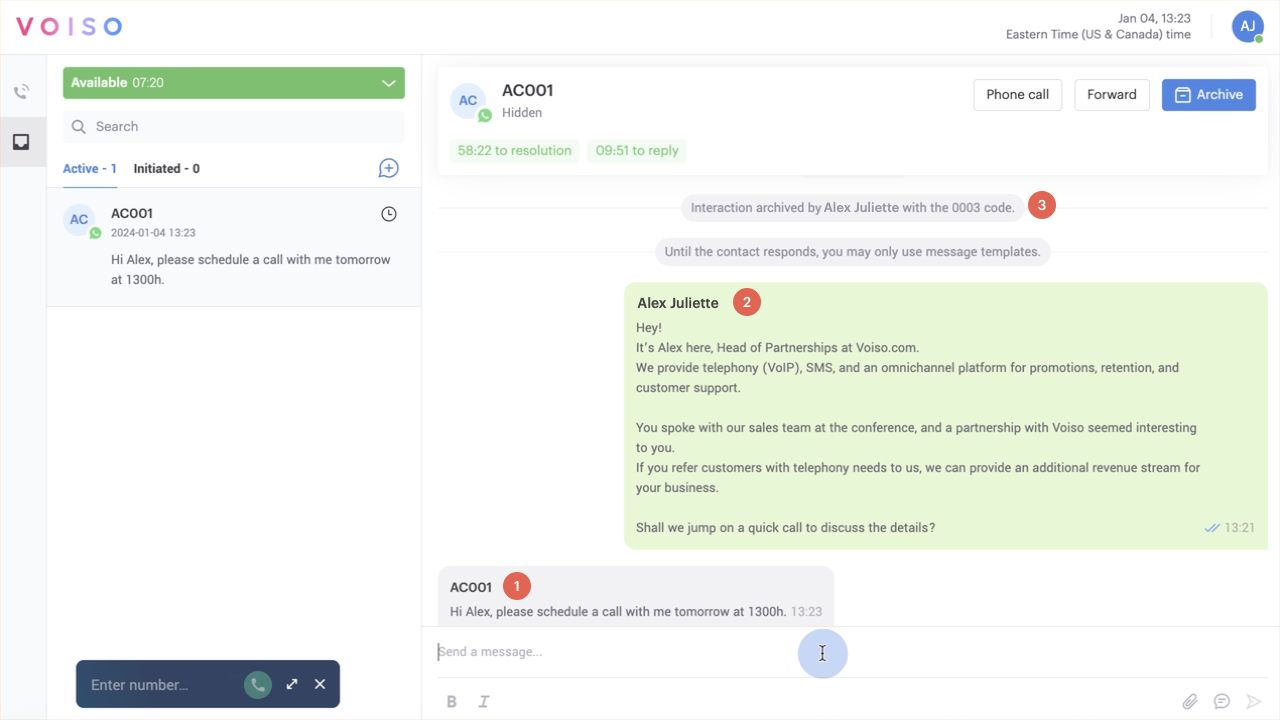
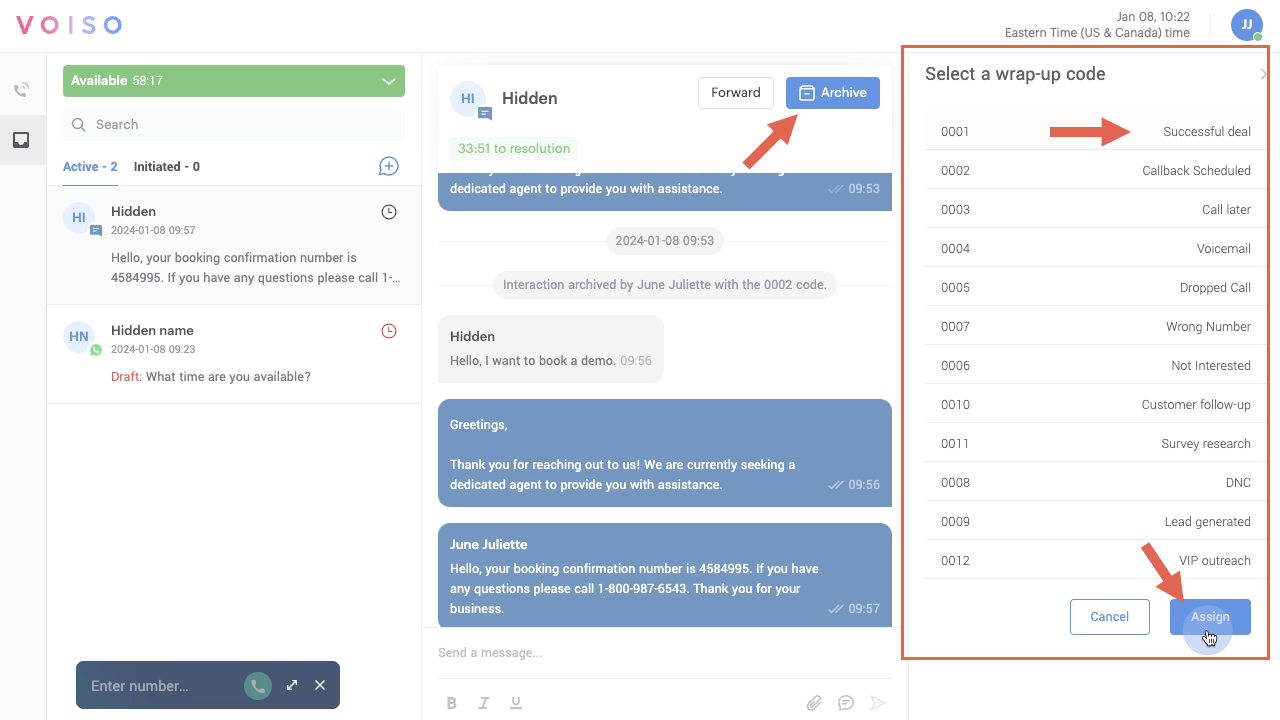
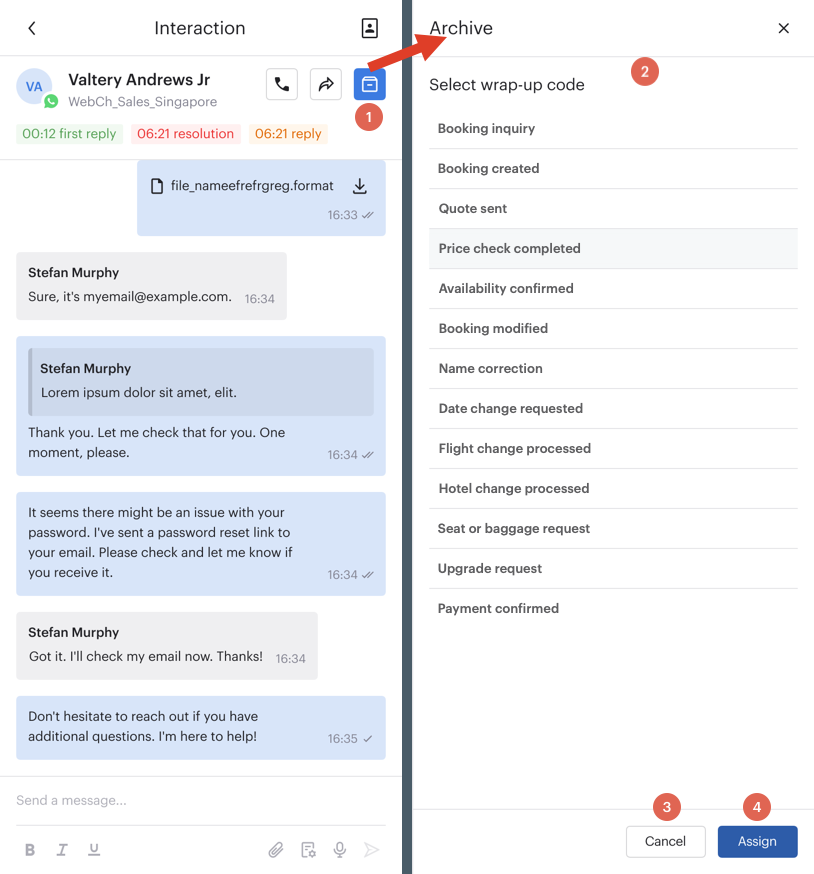
Archiving
When you have resolved the interaction, click Archive to complete the interaction. After an interaction is completed, you can no longer send messages to the contact.
Wrap-up codes
If wrap-up codes are enabled for your contact center, the Select a wrap-up code panel displays when you click Archive to complete an interaction.
Assign a wrap-up code according to your organization's business policies, then click Save (you might have to scroll down to access the Save button).
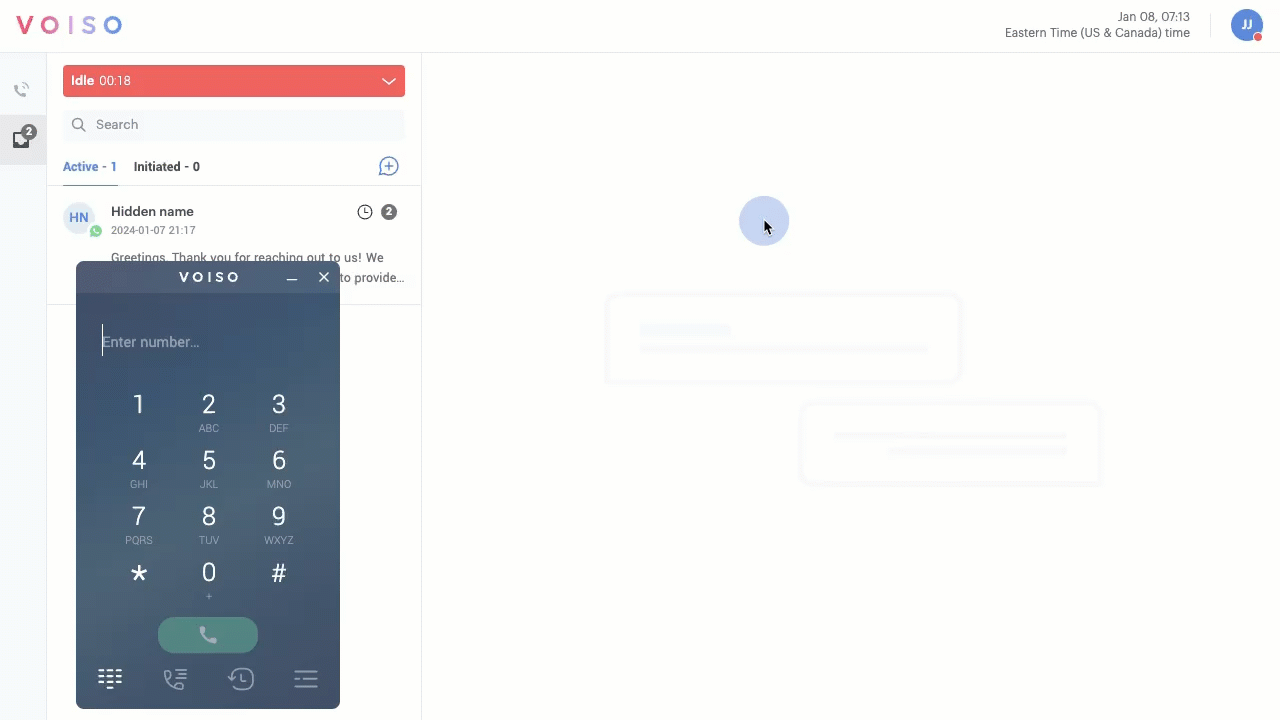
Agent Panel
The Omnichannel Workspace includes the Agent Panel to enable you to handle inbound, outbound, and Dialer phone calls.
Refer to the Agent Panel articles for information about how to use its features.
If the Agent Panel is hidden, click the Phone icon in the sidebar to display it.
Minimize or maximize the Agent Panel by clicking the expand/collapse buttons on top of the Agent Panel.
Click the X to hide the Agent Panel.
Picture-in-Picture view
Your contact center may enable the Picture-in-Picture (PiP) feature for Agent Panel. PiP allows you to open Agent Panel in a floating window that stays visible above all other applications—even when you switch windows or tabs.
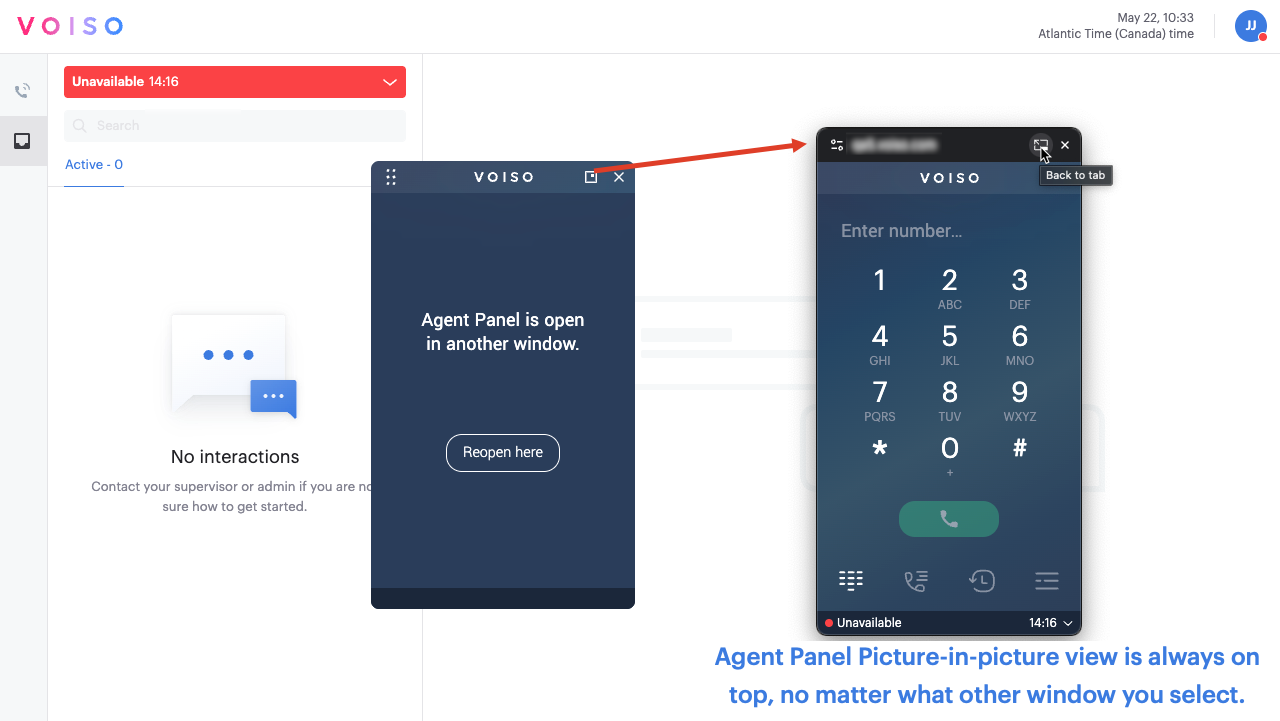
This capability enhances multitasking by keeping call-related information and controls accessible at all times.
When PiP mode is active, Agent Panel provides key advantages:
- Monitor ongoing calls while working in CRM or support tools.
- Access call controls instantly—no need to switch back to Agent Panel or the Agent Workspace.
- View caller information at a glance while using other applications.
- Use a movable softphone panel, ideal for Omnichannel Workspace users.
- Minimize the full Voiso application while keeping Agent Panel accessible at all times.
Using Picture-in-Picture mode
The Picture-in-picture (PiP) feature allows you to keep Agent Panel visible in a floating window while you work in other applications.
If PiP is available in your browser, you’ll see the Open picture-in-picture button near the top right of Agent Panel. Click it to open Agent Panel in a floating, always-on-top window.
To close PiP and return to the regular Agent Panel view, do one of the following:
- In the PiP window, click Back to tab.
- In the original Agent Panel tab, click Reopen here.
The Picture-in-picture feature is supported only in the Google Chrome browser.
Using Omnichannel Workspace on a mobile device
Omnichannel Workspace is optimized for agents who work on the go. You can sign in from your smartphone and handle the same calls and digital conversations you would on desktop, without needing a native app.
To get started, open your browser and sign in to your contact center. Then, click the Agent Workspace button to open Omnichannel Workspace. When prompted, allow notifications and microphone access to ensure you can receive alerts and handle voice calls.
For a more app-like experience, you can install Omnichannel Workspace on your device:
- On Android, open the browser menu and select Install app.
- On iPhone, tap the share icon and select Add to Home Screen.
Once installed, Omnichannel Workspace launches directly from your home screen without the browser interface.
The layout adapts to smaller screens so the most important actions stay easy to reach while you navigate between Inbox, chats, and voice. For voice calls, Agent Panel remains available as is, so you can open it when needed while continuing to manage digital interactions.
The experience is designed for use in the Chrome browser on Android and Safari on iOS, helping you stay productive wherever you are.
Signing in
Open Voiso in a browser on your smart phone. Voiso recommends that you use the Google Chrome browser on Android and Safari on iOS. Navigate to your contact center account and sign in with your email address and password or Google Workplace account.
To open the Omnichannel Agent Workspace, tap the Agent Workspace icon in the navigation bar.
Install Omnichannel Workspace on your mobile device
You can install Omnichannel Workspace on your mobile device to access it like an app, without opening your browser each time. This provides a more streamlined experience and allows you to launch the workspace directly from your home screen.
Android
- Open your browser and sign in to your contact center.
- Click the Agent Workspace button to open Omnichannel Workspace.
- Tap the browser menu (three dots).
- Select Install app.
- Tap Install to confirm.
Once installed, Omnichannel Workspace appears in your app list and on your home screen. To launch it next time, tap the app icon just like any other app.
iOS (iPhone)
- Open Safari and sign in to your contact center.
- Click the Agent Workspace button to open Omnichannel Workspace.
- Tap the Share icon.
- Select Add to Home Screen.
- Tap Add to confirm.
An icon is added to your home screen. To launch Omnichannel Workspace, tap the icon.
Moble navigation
Omnichannel Workspace functions the same on a mobile device as it does on a desktop with just a few small differences to accommodate the smaller screen size.
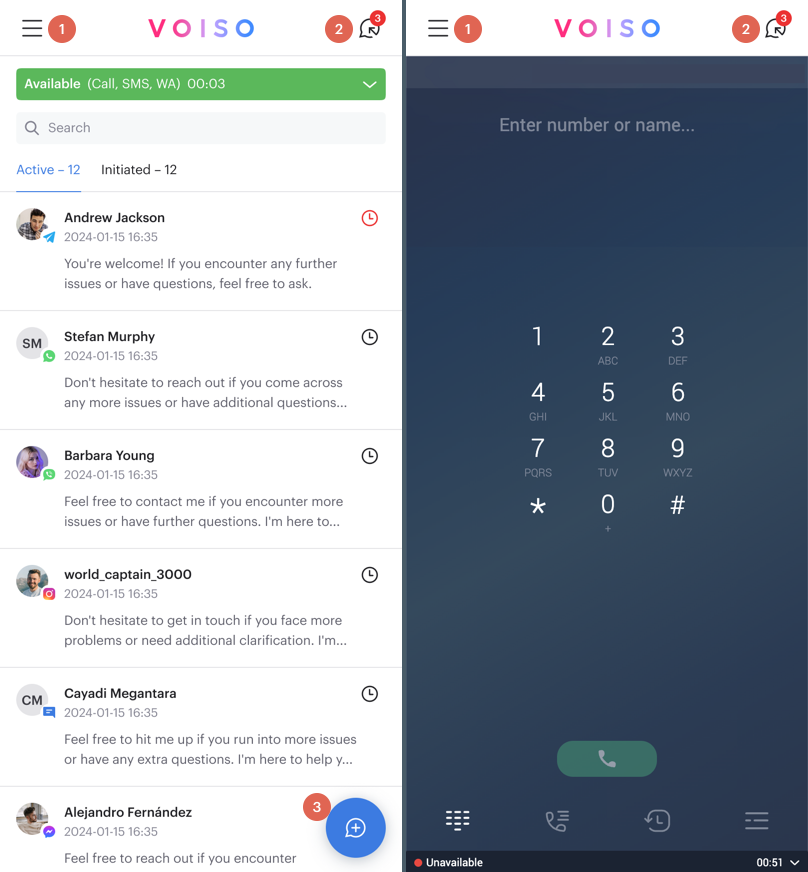
| # | Feature | Description |
|---|---|---|
| 1 | Main menu icon | Tap to display the navigation menu which includes your account information, the Agent Panel / Inbox toggle, Account settings, a link to the documentation portal, and the Sign out option. |
| 2 | Incoming interactions icon | Tap to open the Incoming interactions page. The icon includes a badge showing the number of unread interactions. |
| 3 | New interaction button | Tap to initiate a new interaction and send an interaction template to a contact. |
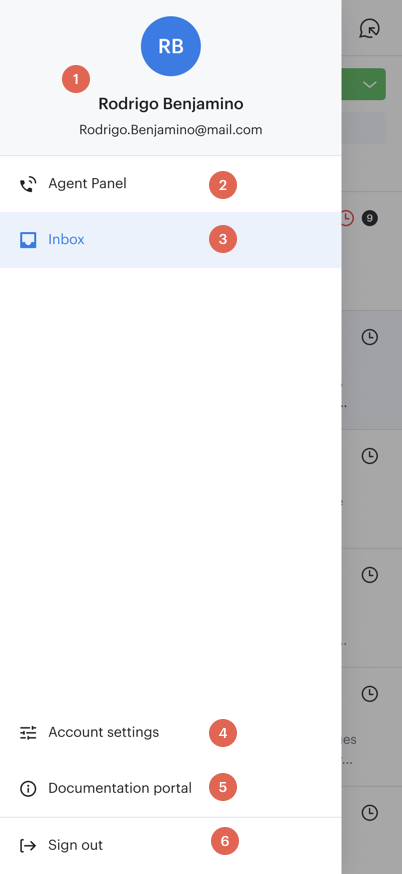
Main menu drawer
The Main menu drawer enables you to switch between digital interactions and voice interactions, access your account settings, access the Voiso documentation portal, and sign out of your account.
| # | Feature | Description |
|---|---|---|
| 1 | Account information | Your username and contact center sign-in email address. |
| 2 | Agent Panel icon | Tap to switch the view to Agent Panel for voice calls. |
| 3 | Inbox icon | Tap to switch the view to the message inbox for your active and initiated digital channels interactions. |
| 4 | Account settings | Tap to open the User Profile panel and manage your account information, interface settings, and password. |
| 5 | Documentation portal | Tap to open the Voiso documentation in a new browser tab. Scroll down on the documentation landing page and tap Agent Guide to find all the articles related to your agent role. |
| 6 | Sign out icon | Tap to sign out of your contact center account. |
Availability status
In the Inbox view, tap the Status menu to set your Agent Status.
Mobile inbox
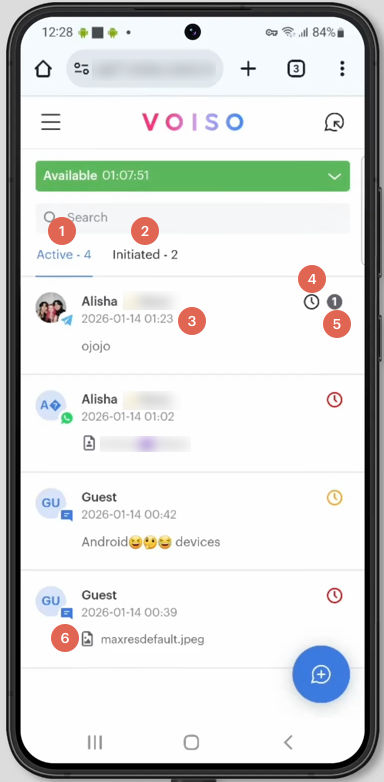
The mobile inbox works exactly the same as the inbox in the desktop view. It includes the following features:
| # | Feature | Description |
|---|---|---|
| 1 | Active interactions tab | A scrollable list of all your active contact initiated interactions. |
| 2 | Initiated tab | A scrollable list of all the active interactions you initiated. |
| 3 | Active interaction tile | Each one of the active interactions in your inbox is represented by a tile. Tap the tile to view the contents of the interaction. |
| 4 | Service Level icons | The color of the Service Level icon indicates its state. Refer to Service Level timers. |
| 5 | Unread message badge | An indicator of the number of unread messages for the interaction. Tap the message tile to read your unread messages. |
| 6 | Attachment icon | Each file type has a unique icon. Both you and the contact may attach files to an interaction. Tap the attachment to view it. |
Accepting interactions
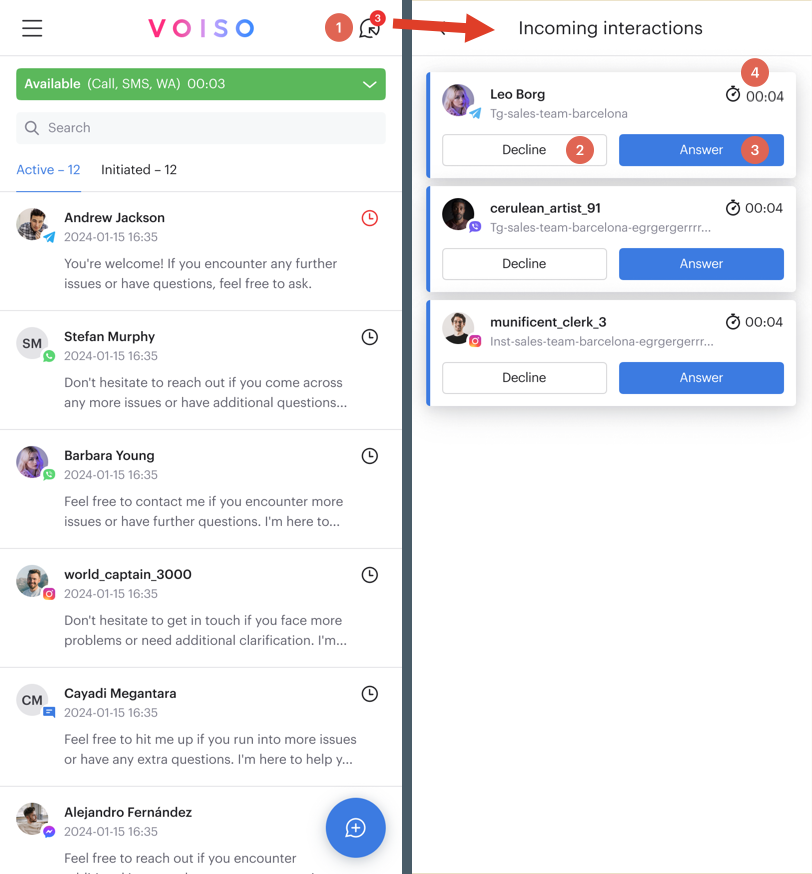
When a new interaction is routed to your account the Incoming interactions icon updates to include a badge showing the number of unread interactions.
Tap the icon (1) to display the Incoming interactions page. Unanswered interactions are displayed from most oldest to most recent. Tap Decline (2) to send the interaction back to queue or tap Answer (3) to open the interaction and handle it.
The timer display (4) indicates how long each interaction has been waiting to be handled.
Handling interactions
You can handle digital interactions on your smart phone the same way you do on desktop. Accept and interaction or tap an interaction from your Active or Initiated interactions. The following features are available in the interaction view:
| # | Feature | Description |
|---|---|---|
| 1 | Contact icon | Tap to view contact information or assign an interaction to an existing contact when multiple contacts match the same phone number. |
| 2 | Call contact button | Tap to initiate a voice call to the contact. |
| 3 | Forward button | Tap to forward the interaction to another agent or a queue. |
| 4 | Archive button | Tap to complete the interaction and archive it. |
| 5 | Service Level indicators | Refer to Service Level timers. |
| 6 | Message transcript area | Your contact's messages appear here in blue. |
| 7 | Message transcript area | Your messages, including templated replies, appear here in grey. |
| 8 | Message composition area | You can reply to messages from your contacts by writing text, selecting a standard response message template, and adding attachments. Refer to Message composition area. |
| 9 | Message composition controls | Use the controls in this area to format your message, add attachments, add templated messages, and add voice messages to send to your contact. Tap the Send icon to send your message. |
Contact information
While you are handling an active interaction, you can view contact information by tapping the Contact information icon or the contact's name. Contact information might include the source, such as an associated CRM, contact name, phone number, and other contact channels such as WhatsApp.
Active and archived interactions are displayed in the Interaction history section.
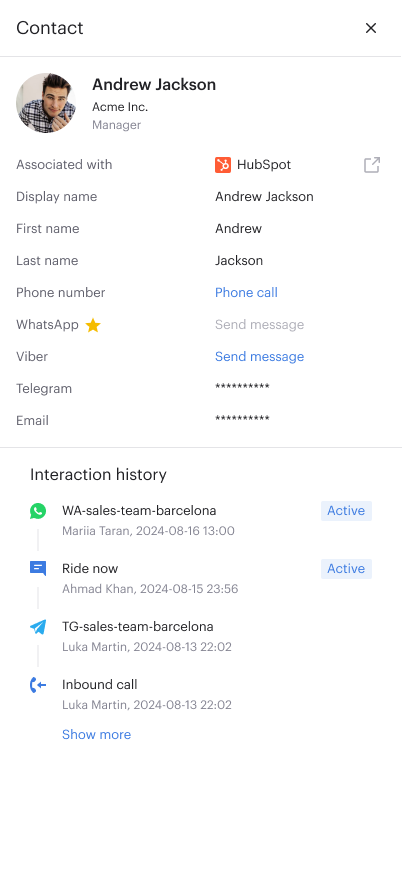
If there are multiple contacts with the same phone number, an alert is displayed. Use the Select contact menu to choose an existing contact, then tap Assign to assign the contact to an existing contact. Tap Cancel to leave the contact unassigned.
Forwarding interactions
While you are handling an active interaction, you can instantly forward the interaction to a queue or agent by tapping the Forward button and then selecting a target. Watch this video to see how it works:
Archiving interactions
When you are ready to complete an interaction, tap the Archive button (1), then in the Archive panel, select a wrap-up code (2). To keep working on the interaction, tap the Cancel button (3). To complete the interaction, tap the Assign button (4).
Using templates
To use a standard response message template in an interaction, tap the standard response message template button in the message composition area (1).
Next scroll or use Search (2) to find a message from the Templates panel.
Tap a standard response message (3) to insert it into the message composition area. Review and edit the message, including adding details such as names, account numbers, and so on. If there are placeholders, be sure to replace them with appropriate text, then tap Send.
Voice message
For WhatsApp and Telegram interactions, you can record and send voice messages to your contact. Tap the Voice message icon to start recording, tap Send when you are done. For details, refer to Voice recording.
Sending messages
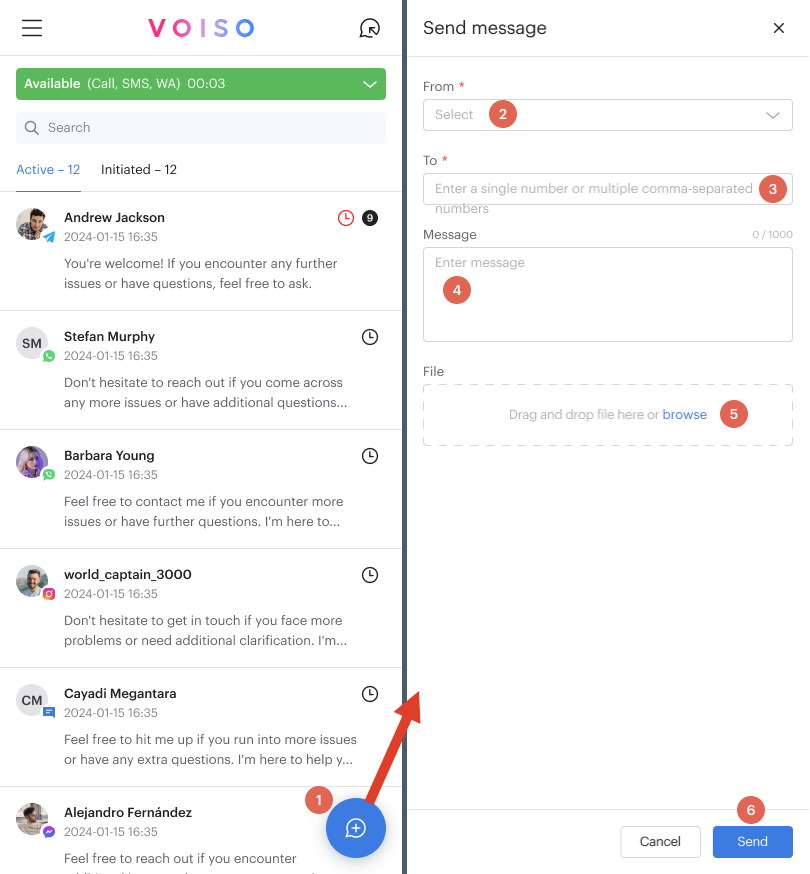
If the business initiated messages feature is enabled for your account, tap the New interaction button (1) to open the Send message page, select a name from the From menu (2), enter one or more phone numbers in the To field (*3), enter your message in the Message field (4), optionally browse and attach files in the File area (5), then tap Send (6) to send the message.
For more details about sending messages, refer to Business initiated messages.
Agent Panel
Agent Panel in the mobile Omnichannel Workspace works the same way as it does on desktop. You still have access to the full set of call features, including answering inbound calls, making outbound calls, using the dialpad, and managing active calls. The main difference is how you move between voice and digital work on a smaller screen.
You can switch between Inbox and Agent Panel at any time using the Main menu drawer. Tap the Main menu icon to open the drawer, then select Inbox to return to digital conversations or Agent Panel to manage voice calls. This makes it easy to move back and forth during your shift, depending on what you need to handle next.
When a call is active or incoming, you can also use the voice call banner at the top of the Inbox to jump straight into call handling. Tap the banner to open Agent Panel and access the full call controls. If you are already in Agent Panel and want to return to Omnichannel Workspace, tap the Main menu icon again and select Inbox.
You can accept a call or return it to the queue from either place. If you are in the Inbox, use the call banner to accept the call or send it back to the queue. If you are in Agent Panel, you can do the same actions from the call controls there, along with everything else you need to manage the call.
Watch this video to see call handling in action: