Who should read this article: Agents
How to use Agent Panel to make an outgoing phone call.
Introduction
The Agent Panel is a small browser-based WebRTC Softphone application that enables you to make and receive phone calls on your computer. It uses the device, usually a headset, that you have set up as your computer's microphone and speakers.
Review the Getting started article for information about how to log into Agent Panel and enable your microphone and speakers.
The Agent Panel provides call controls on the Call screen, such as a dial pad, call/end, hold, transfer, consultation, conference, mute/unmute, and call recording start/pause/stop, that enable you to handle inbound and outgoing phone calls.
Caller IDs
If your account can make direct dial or click-to-call outbound calls, Voiso sends a Caller ID with each outbound call. This is the number the contact sees on their phone.
The Caller ID you use depends on how your contact center is set up. In the sections below, you will learn which Caller ID applies to you, and what to expect when you place outbound calls.
Caller IDs identify your contact center to the contact when you place an outbound call. They help contacts recognize the call and decide whether to answer. They also provide a trusted number the contact can call back if they miss you. In many regions, Caller IDs are also required for compliance and carrier requirements, which helps ensure outbound calls connect reliably and display correctly on the contact’s phone.
My organization uses a default Caller ID
Your organization has a default Caller ID. This is the phone number shown to contacts for outbound calls when no more specific Caller ID rules apply.
The default Caller ID is typically used when:
- You are not using a Caller ID group option from Agent Panel for this call.
- The number you dial does not match an automatic Caller ID rule set up by your contact center.
- You do not have a personal Caller ID assigned to your user account.
During an automatic outbound campaign, the campaign settings can override your usual Caller ID behavior.
I have my own Caller ID
Some agents have a personal Caller ID. This is a dedicated phone number assigned to your user account and used when you place outbound calls.
Personal Caller IDs are typically used for agents who manage specific customer portfolios or handle their own callbacks. When you call with your personal Caller ID, contacts can recognize the number as associated with you.
In many contact centers, inbound calls to a personal Caller ID are routed back to the assigned agent, so callbacks can reach the right person.
Your personal Caller ID is used only when no Caller ID group rule applies to the number you dial. If your contact center uses automatic Caller ID rules for certain number ranges or destinations, those rules can take priority for those calls.
I have a Caller ID group option in Agent Panel
You might be assigned to one or more teams in your contact center. Your administrator can make Caller ID group options available to your team. A Caller ID group is a set of outbound numbers that can be used for outbound calls.
When you select a Caller ID group option in Agent Panel, you are choosing a dialing code option for outbound calling. Depending on how your contact center is set up, you might:
- Select the Caller ID group option in Agent Panel before you place the call.
- Dial a short dialing code, provided by your administrator or supervisor, before the destination number.
When this option is used, Voiso displays one of the numbers from that Caller ID group to the contact. The dialing code is removed from what you see in your call history and from what is recorded in Call Detail Records.
Select Default in Agent Panel when you no longer need a specific Caller ID group option. This returns you to automatic Caller ID selection based on the number you dial.
Confirm with your administrator or supervisor about when to use a dialing code, which code to use, and whether you should select a Caller ID group option in Agent Panel before dialing.
I am part of an outbound calling campaign
When you place calls as part of an automatic outbound campaign, the Caller ID is typically defined by the campaign settings. If no Caller IDs are defined for the campaign, your contact center default Caller ID is used.
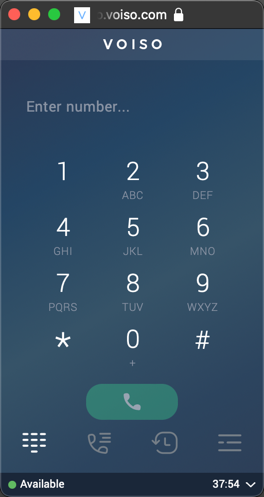
Dialing a call
To dial a call, enter the phone number in the Enter number field. You can enter the phone number using your computer keyboard, by pasting a number from your computer clipboard, or by clicking the numbers on the Agent Panel dial pad.
Ask your supervisor or administrator if your contact center uses dialing codes for outbound calls, and when you should select a Caller ID group option in Agent Panel.
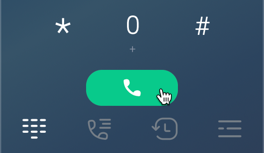
To connect the call, click the Call button.
When your contact answers the phone, the Call screen is displayed. The Call screen includes all the functions you need to handle the call. You hear the caller in your headset and can speak to them through your microphone.

When you have finished the call, click End to hang up the call. If the contact hangs up their phone, the call automatically ends.
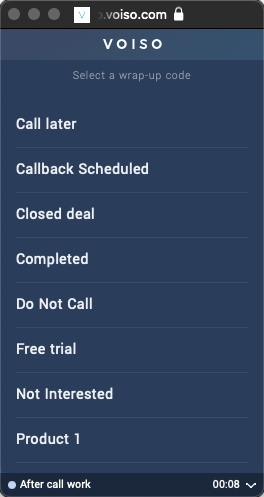
After call work
After your call ends, the Agent Panel displays the Wrap-up code screen. Your status is changed to After call work. Your organization defines the call wrap-up codes that appear in this view. Select the appropriate code according to your organization's business requirements.
Call screen
The Call screen is displayed in the Agent Panel when you are handling a call. It includes call controls and status information. The Call screen includes the following features and controls:
The controls that are displayed are set up by your administrator, so you might not see all the call controls described in the following table.

| Feature | Description | |
|---|---|---|
| 1 | Contact information | The name or ID of the contact and their phone number, along with the elapsed time of the call. |
| 2 | Call controls | Buttons enabling you to manage the call. |
| Hold | Place the call on hold so that you and the contact cannot hear one another. For some features such as Consultation, the call is placed on hold automatically. | |
| Blind transfer | Immediately transfer to a number you dial a call without knowing if the call will be answered. | |
| Keypad | Enter numbers using the dial pad to send DTMF. This is commonly used to navigate phone system menus. | |
| Mute | Mute your microphone so that the contact cannot hear you. | |
| Consultation | Speak to another employee about a contact’s case, without the contact hearing the conversation, and transfer the call when necessary. | |
| Conference | Invite another party to join an active call, enabling all parties to hear and speak to one another. | |
| Record | Start, pause, and stop recording a call (this feature is not available in all contact centers). | |
| Audio settings | Select which connected devices to use for microphone and speaker. | |
| SMS | Send an SMS to the contact during the call. | |
| Notes | Add notes about a call during a call or during after call work. Call notes are saved in the call history. | |
| 3 | End | Button to hang up the call |
| 4 | Volume control | Call volume control for your headset. Click it to mute the caller. Hover your mouse pointer to display the volume control slider. |
| 5 | CID | The Caller ID (CID) that is displayed to the contact on their phone |
| 6 | Status | Your current availability status and how long you have been in that status. When you are on an outgoing call, your status is Outbound. |
| 7 | Status menu | You cannot change your status while you are handling a call |
HLR Lookup
Voiso's HLR Lookup, sometimes called Mobile Number Lookup, is a service that allows agents to validate a contact's phone number in real-time. Using the HLR Lookup feature, an agent can determine whether the contact is available to take a call.
Your contact center agents use the Voiso Agent Panel to perform an HLR Lookup request.
- In the Agent Panel home screen, click the Call history button to display the Call history screen.
- On the Call history screen, find the number of the contact to be called.
- Click the kebab menu to display the Call details screen.
- To make the HLR Lookup request, click the HLR Lookup button.
- The HLR Lookup result is displayed next to the number. You can now decide whether to make the call or not.
| HLR Lookup result | Description |
|---|---|
| Available | The number is active and can be called. |
| Absent | The number is inactive and should not be called. |
| Unavailable in country | HLR Lookup is unavailable in the country where the number is located. |
| Is a landline number | The number is a landline, not a mobile number. HLR Lookup does not support landlines. |
For details about the HLR Lookup feature, refer to Phone number validation – HLR Lookup.