Who should read this article: Administrators
Enable your agents using Bitrix24 to call contacts using click-to-call.
Introduction
Voiso integrates with the Bitrix24 CRM to enable agents to use the Voiso click-to-call feature in the Bitrix24 CRM to initiate and handle calls.
Features
The Voiso Integration app for Bitrix24 enables the following CRM features:
| Feature | Description |
|---|---|
| Click-to-call | Agents initiate calls in Bitrix24 by clicking the Call icon instead of manually dialing the number |
| Calling List Import | Voiso pulls selected contact phone numbers directly from the Bitrix24 contact list for Dialer campaigns |
| Screen Pop | The contact record is automatically displayed in Bitrix24 when an agent handles a call in Voiso |
| Call History | Call outcome logging and call details are automatically transmitted to the Bitrix24 database after a call and are available from the Call Details table |
Click-to-call
The Voiso Bitrix24 CRM integration allows agents to call leads or customers from Bitrix24 CRM by clicking a phone number or the Call button on pages like Lead information, About contact, Company, or Deal.
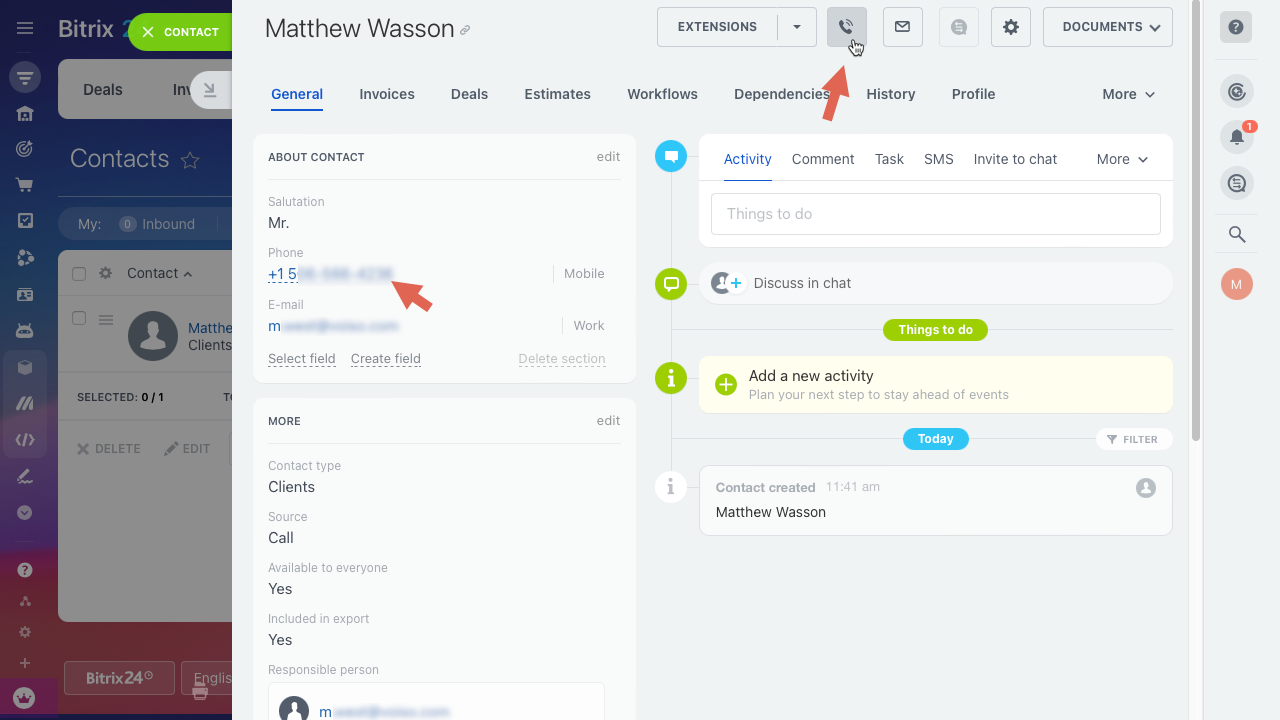
To use the click-to-call feature, agents must sign in to both Bitrix24 CRM and Voiso and start the Agent Panel or Omnichannel Workspace.
When an agent initiates a call from the Bitrix24 CRM, Voiso receives a request containing the number to call and the Bitrix user ID. The ID must match the value in the Bitrix24 User ID field in the user's settings.
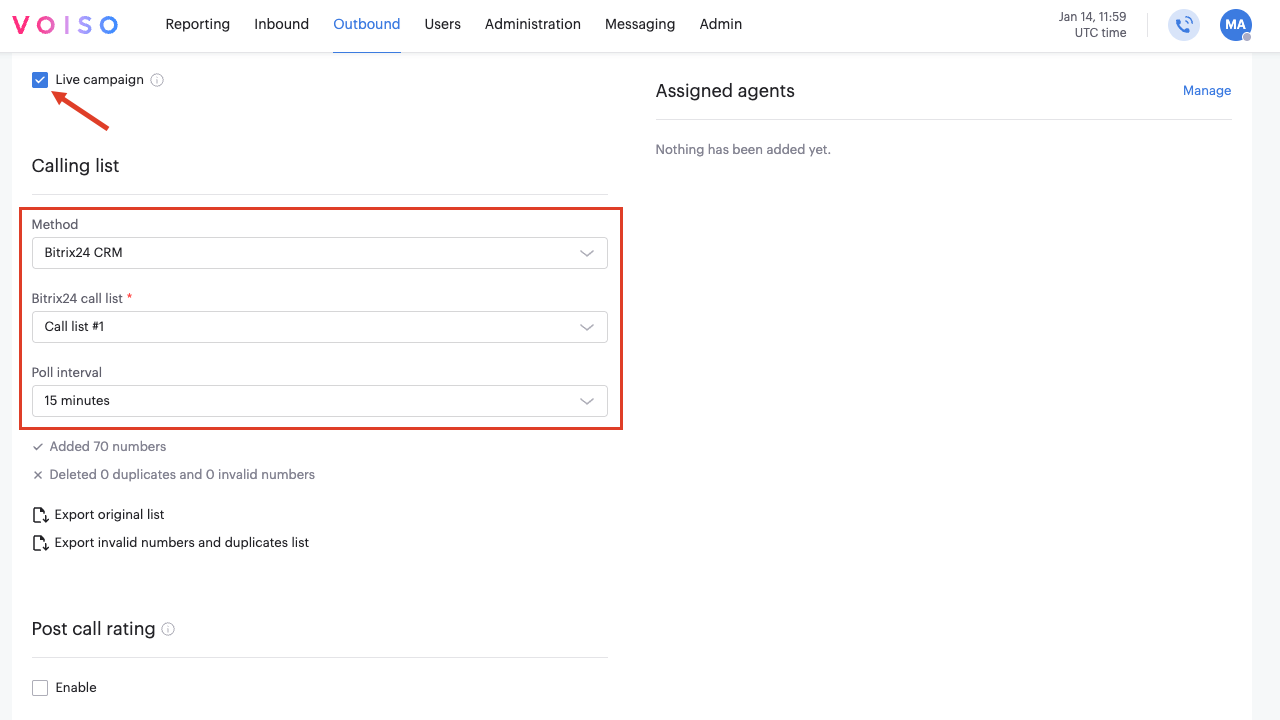
Calling List Import
Bitrix24 Calling List integration lets you build dialer calling lists directly from your Bitrix24 CRM contacts and leads, then import them into Voiso for outbound campaigns. This streamlines campaign setup by eliminating manual CSV exports and ensuring agents always dial the most up-to-date records. Use the integration to support faster list creation, cleaner contact data, and more efficient outbound dialing workflows.
Screen Pop
When a call is connected, Voiso can automatically open the matching Bitrix24 record in the agent’s browser. This gives the agent immediate context for the conversation without needing to search in Bitrix24.
Screen pops support these call types:
- Inbound calls
- Manual outbound calls, including click to call
- Dialer calls
- Callback calls
Record matching and priority:
- The record opens when the call is answered.
- If more than one Bitrix24 entity uses the same phone number, Voiso follows the same priority order used during lead import:
- Contact
- Company
- Lead
Call event linking:
- Voiso creates the Bitrix24 call activity for the same entity that was opened for the agent, so the screen pop and the logged activity stay consistent.
Transfer and routing support:
- Screen pops are also shown after consult transfers and blind transfers.
- Screen pops are also shown when a call is delivered to an agent through a Route to agent node in Flow Builder.
Call History
Voiso can automatically log calls to Bitrix24 so call activity appears in the relevant Bitrix24 timelines and activity lists. This includes inbound calls and outbound calls made through manual dialing, dialer, and callbacks. Refer to Settings below.
Logged information includes:
- Start time
- Duration
- Agent
- Call direction and call type
- Call status, based on the mapped outcome
- Any selected outcome or disposition
Integration
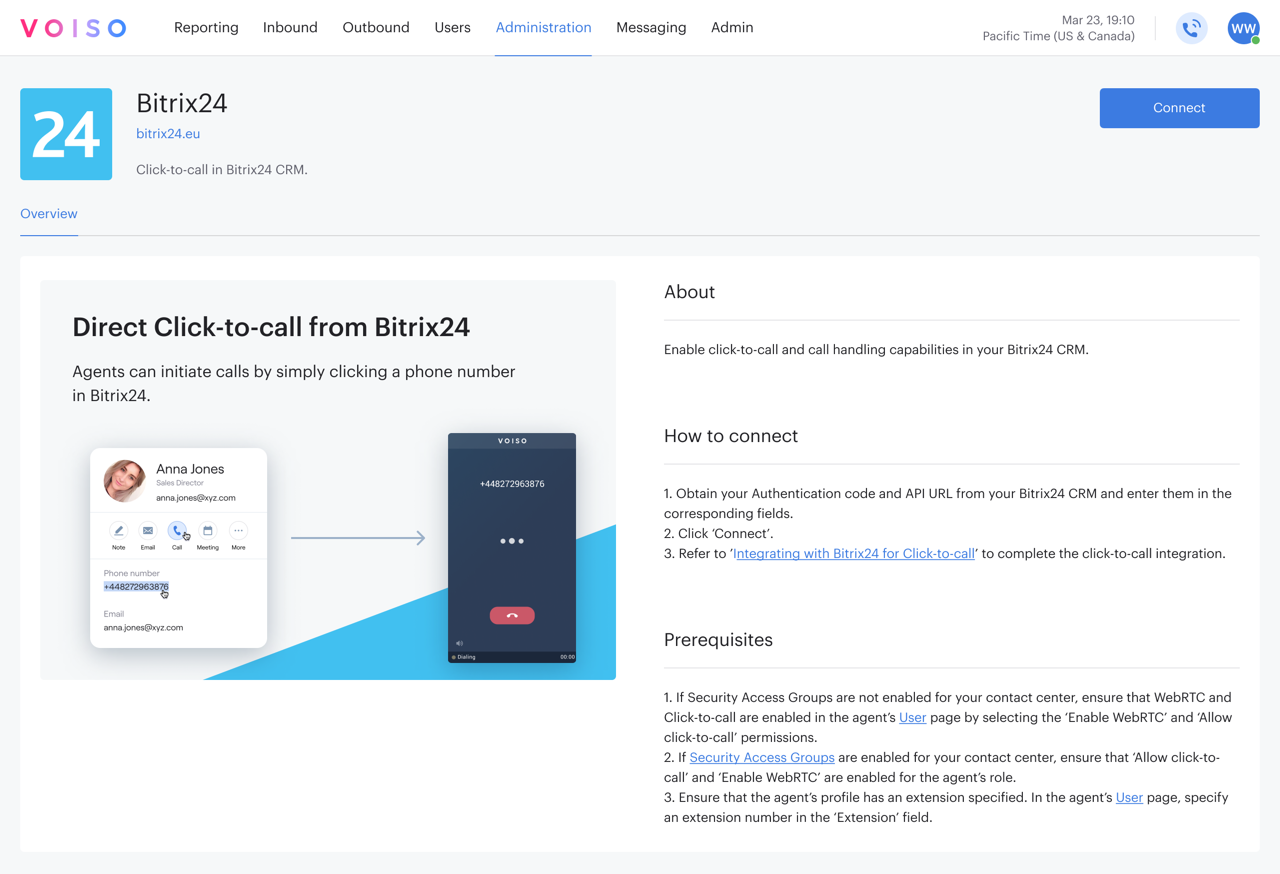
To integrate Voiso with Bitrix24, navigate to Administration > Integrations, then click the Bitrix24 tile.
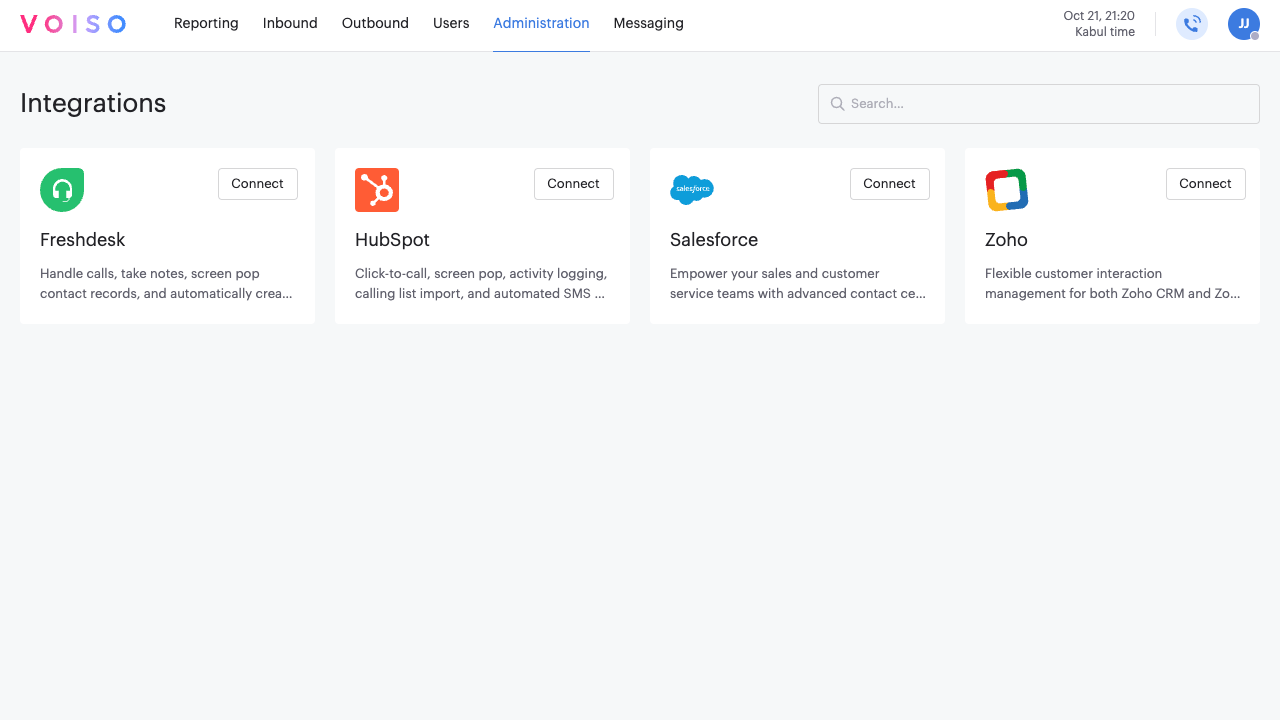
The Bitrix24 page provides information about the Bitrix24 integration, instructions for connecting the integration, and a list of prerequisites you should have in place before clicking Connect.
Managing your integration
To manage an existing Bitrix24 integration, navigate to Administration > Integrations, then click the Bitrix24 tile.
On the Bitrix24 integration page, you can reconnect an integration that has lost connection or disconnect a connected integration.
Click the Edit connection button and selected either Reconnect or Disconnect.
Reconnecting an integration
To reconnect an integration that has been disconnected, either manually or as the result of an error, or to modify the connection, click Edit connection, then select Reconnect.
Follow the on-screen instructions to connect your integration.
Disconnecting an integration
To disconnect an integration, click Edit connection, then select Disconnect.
In the Disconnect integration panel, click Disconnect to remove the integration from your contact center.
Settings
The Bitrix24 page Settings tab enables you to enable available features.
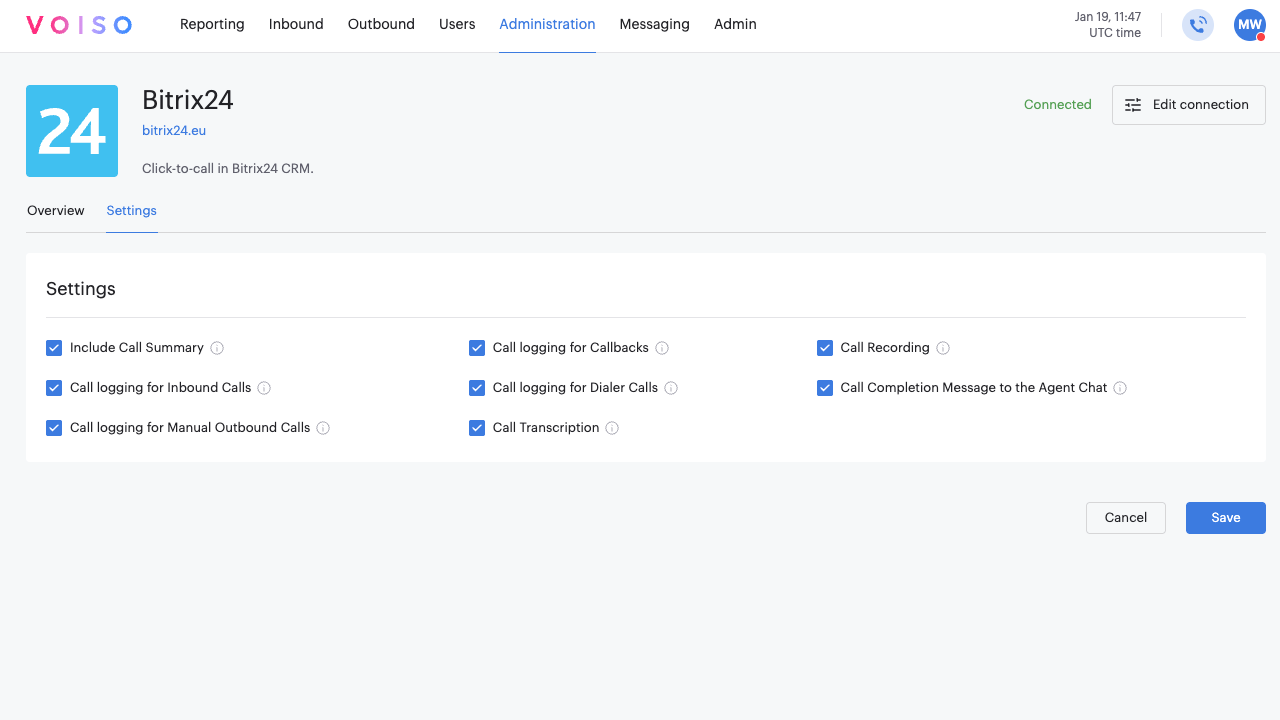
Settings
This section enables you to enable the following features:
- Include call summary: This feature highlights important points and key topics of voice interactions. If Speech Analytics is enabled in your contact center, select the Include call summary option to include a summary of the call transcript in the call history.
- Call logging for Inbound Calls: Automatically creates Bitrix24 call logs for all inbound calls that are answered, missed, answered by voicemail, or abandoned.
- Call logging for Manual Outbound Calls: Automatically creates Bitrix24 call logs for all manual outbound and click-to-call calls.
- Call logging for Callbacks: Automatically creates Bitrix24 call logs for all queue callbacks and scheduled callbacks.
- Call logging for Dialer: Automatically creates Bitrix24 call logs for all dialer calls.
- Call Transcription: Automatically create Bitrix24 call transcriptions for all call types.
- Call Recording: Automatically create a call recording in the Bitrix24 call record.
- Call Completion Message to the Agent Chat: Automatically send a call completion message to the agent's Bitrix24 activity chat.
Setting up users
When the Bitrix24 CRM integration is enabled, the Bitrix24 User ID field is added to the Voiso User page. Add the user's Bitrix24 user ID to the field and save the page to enable the agent to make calls from Bitrix24 CRM.
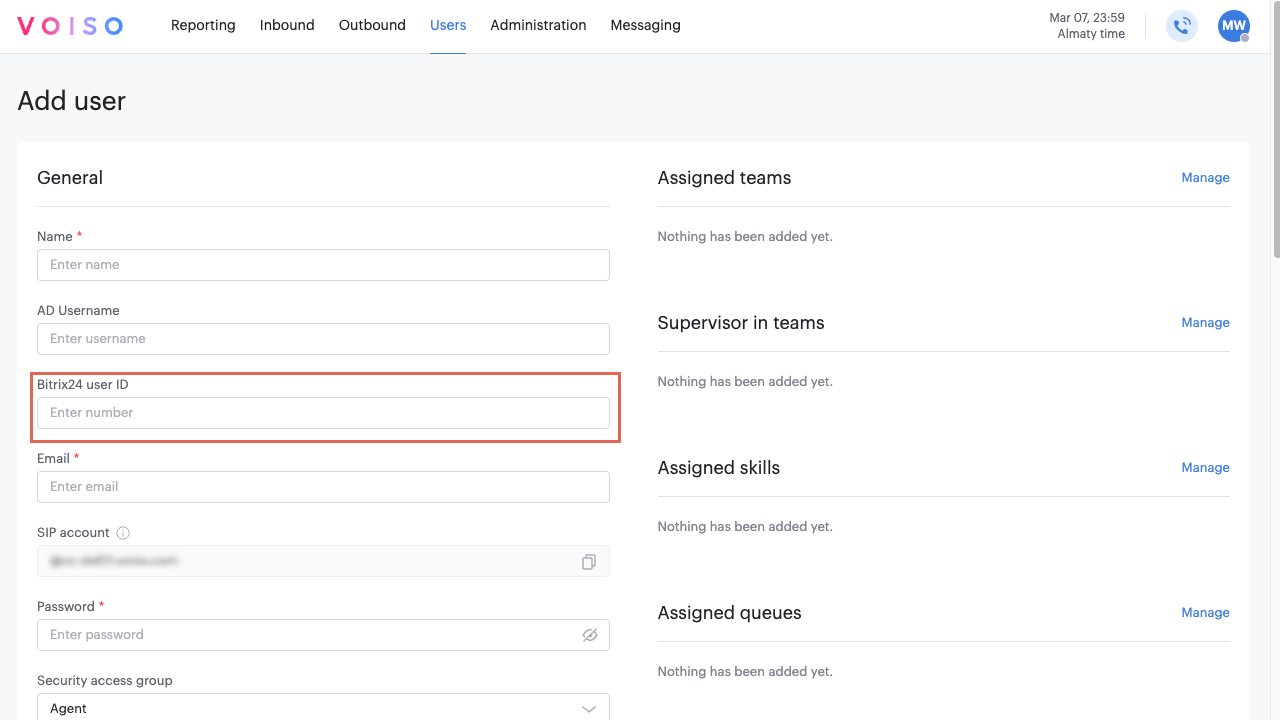
Users must also have an extension and email address configured that matches the email address of the agent in Bitrix24 CRM.
When an agent clicks a phone number in Bitrix24 CRM, Voiso checks the agent's ID against the ID configured in the Voiso user's settings. If the ID does not match or is not configured, Voiso requests the Bitrix24 CRM agent's email address. If the email address in Bitrix24 CRM matches the email address in Voiso, Voiso automatically adds the Bitrix24 ID to the user's settings page.
Setting up Bitrix24 for Click-to-call
To enable click-to-call between Bitrix24 and Voiso, you create outbound and inbound webhooks in Bitrix24 and connect them to your Voiso contact center. The setup includes configuring webhook permissions, copying the generated tokens and URLs, and completing the integration from the Administration > Integrations page in Voiso. Finally, you configure Bitrix24 telephony settings to use the Voiso webhook for outbound calls.
- Open your Bitrix CRM and select Developer resources from the lefthand navigation menu.
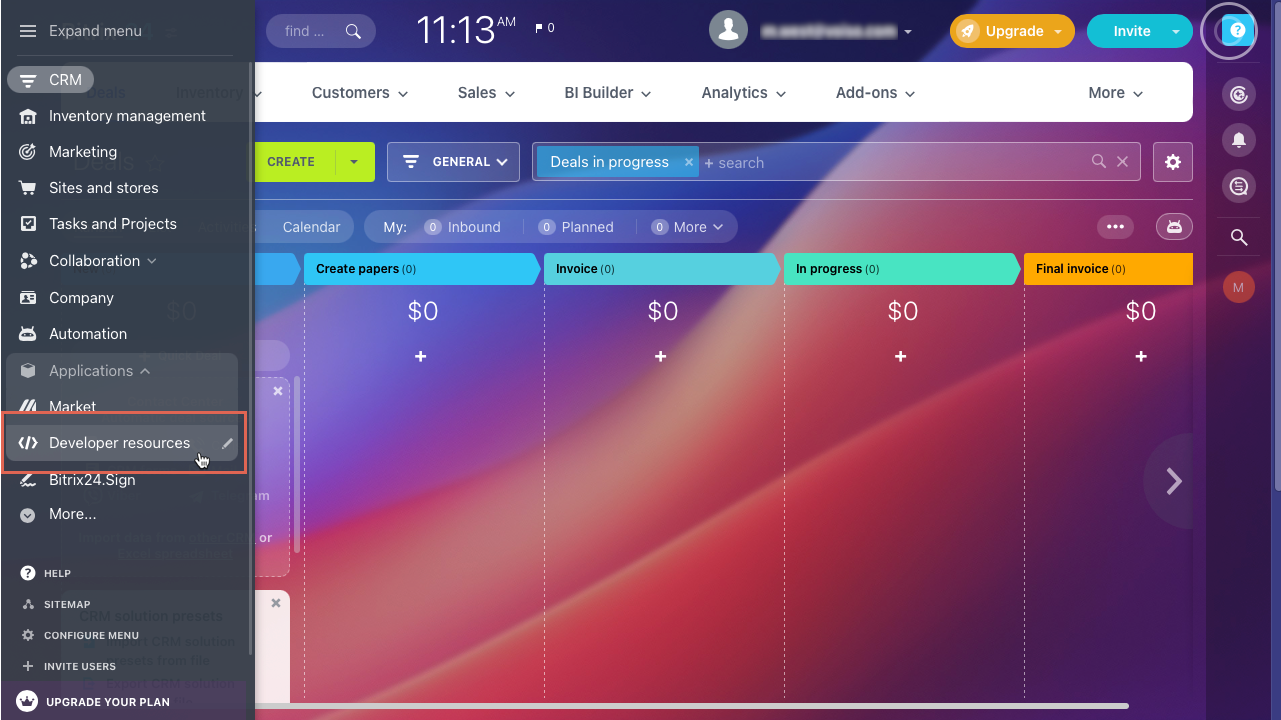
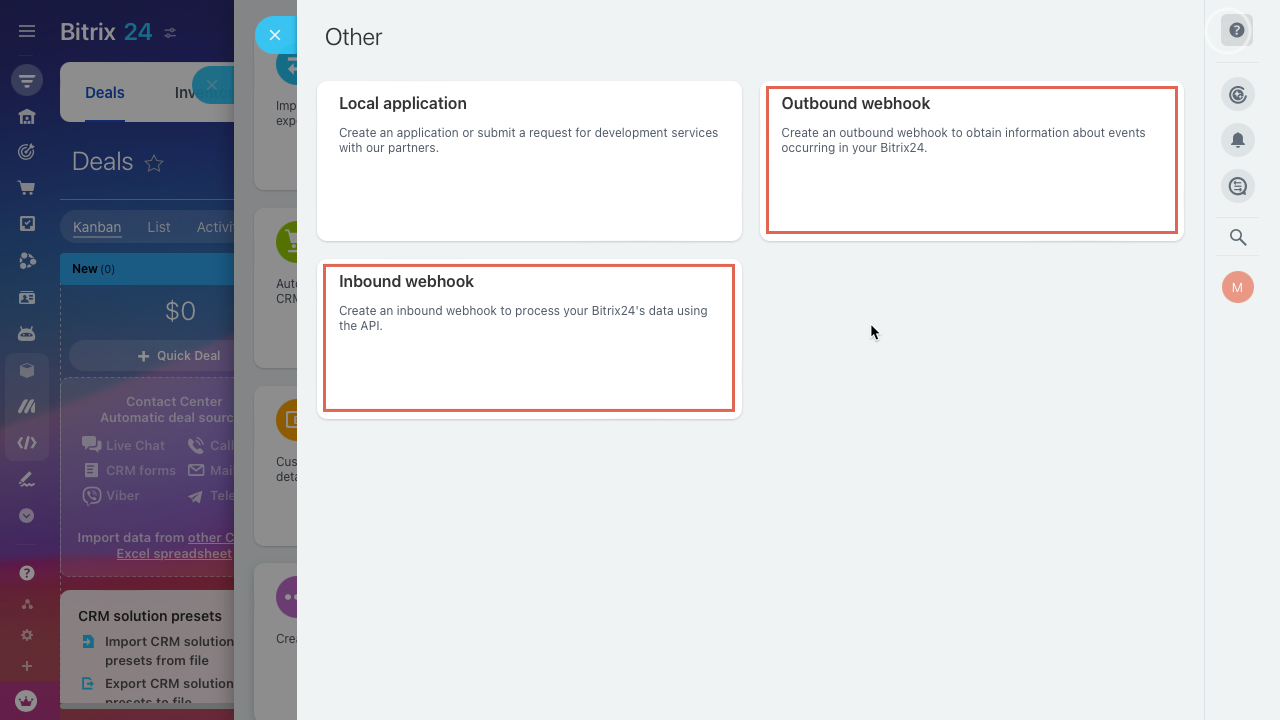
- On the Developer resources page, select Other to create two webhooks.
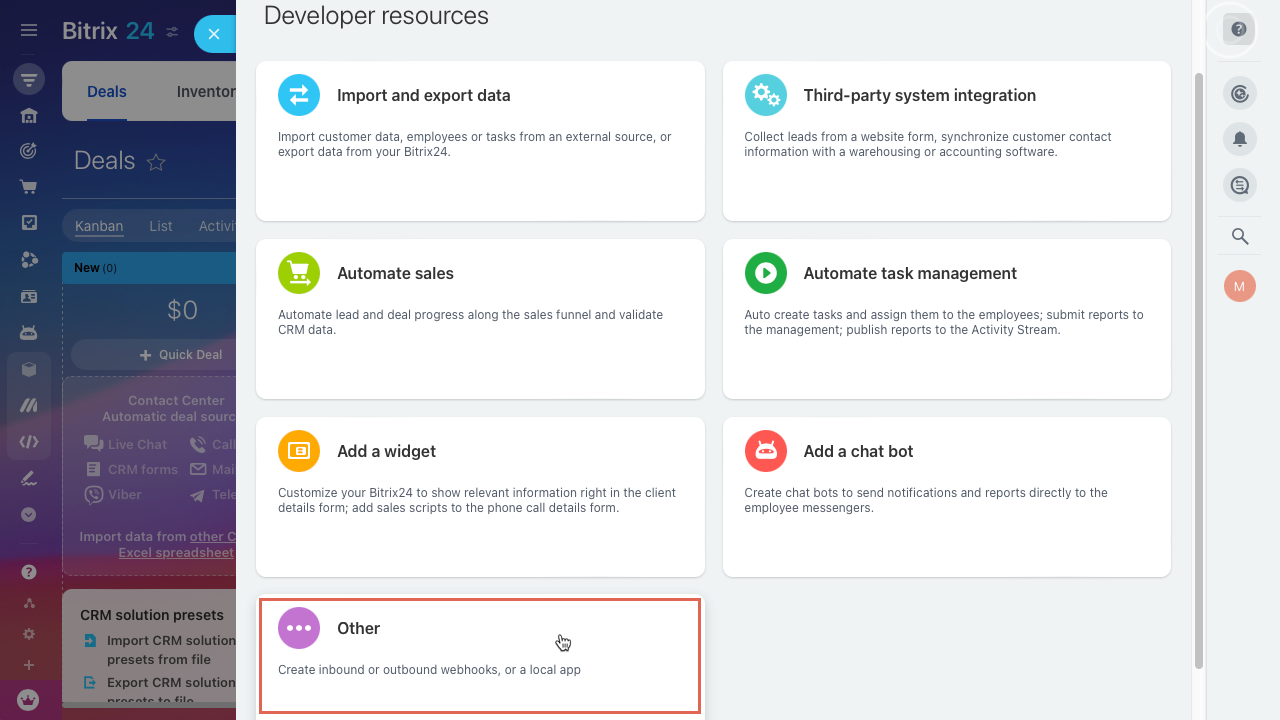
- On the Other page, click Outbound webhook.
- Specify a name for the webhook that suits your business practices.
- The Your handler URL, specify the link to your contact center cluster. For example:
https://{cluster_id}.voiso.com/api/v2/bitrix/click2call - In the Events field, select External phone call start (ONEXTERNALCALLSTART), then click Save.
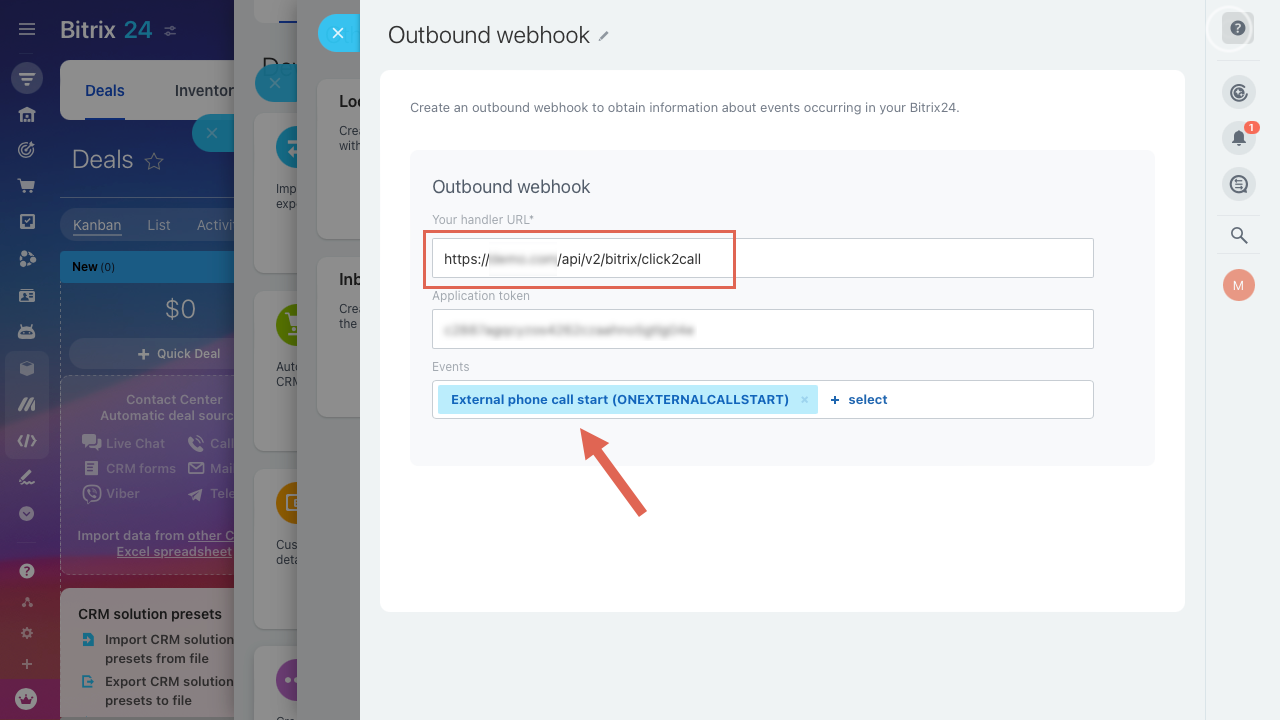
- After the page refreshes, copy the content of the Application token field.
A new token is generated when you save the webhook. You must use the Application token that is generated after you save.
- In your Voiso contact center, navigate to Administration > Integrations and click the Bitrix24 tile and follow the on-screen instructions. Refer to /v1/docs/crm-bitrix24#integration.
- In Bitrix24, return to the Other page, then click Inbound webhook.
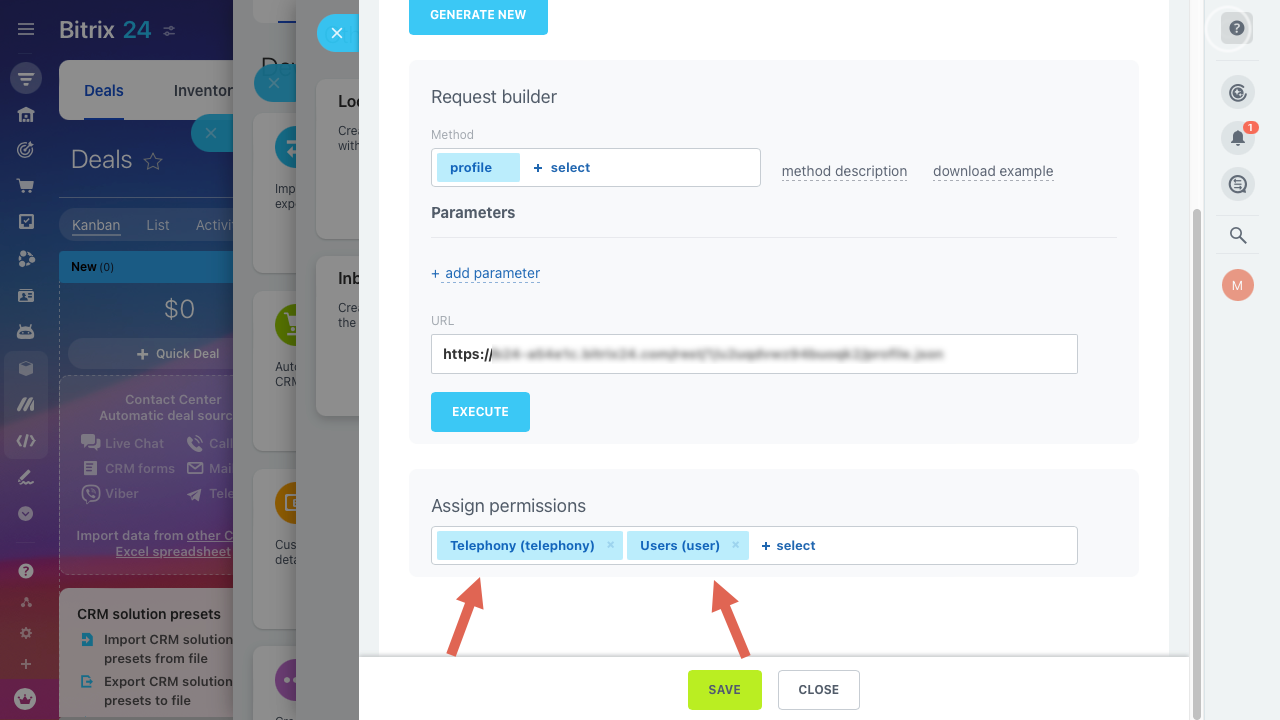
- In the Assign permissions section, select the following permissions then click Save:
- Telephony (telephony)
- Users (user)
- CRM (crm)
- Copy the address from the URL field on the Inbound webhook page.
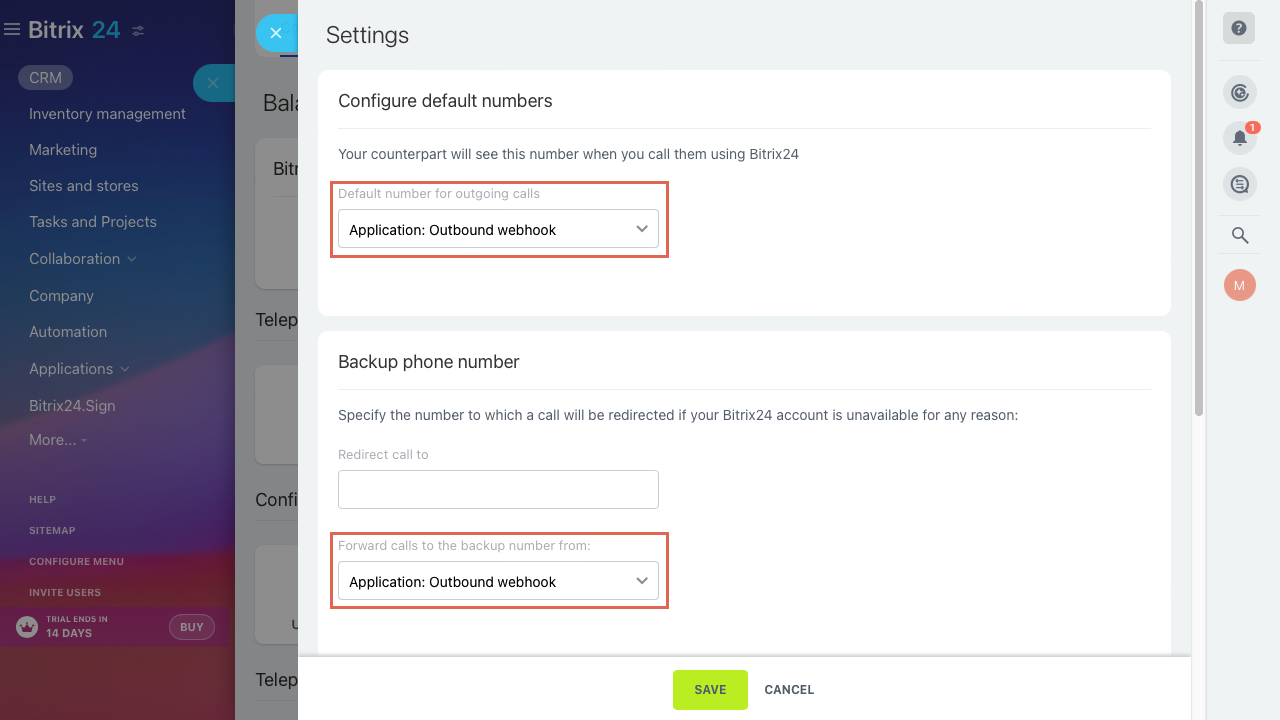
- Return to Bitrix CRM and select Telephony from the lefthand navigation menu.
- Click Configure telephony, the select Telephony settings.
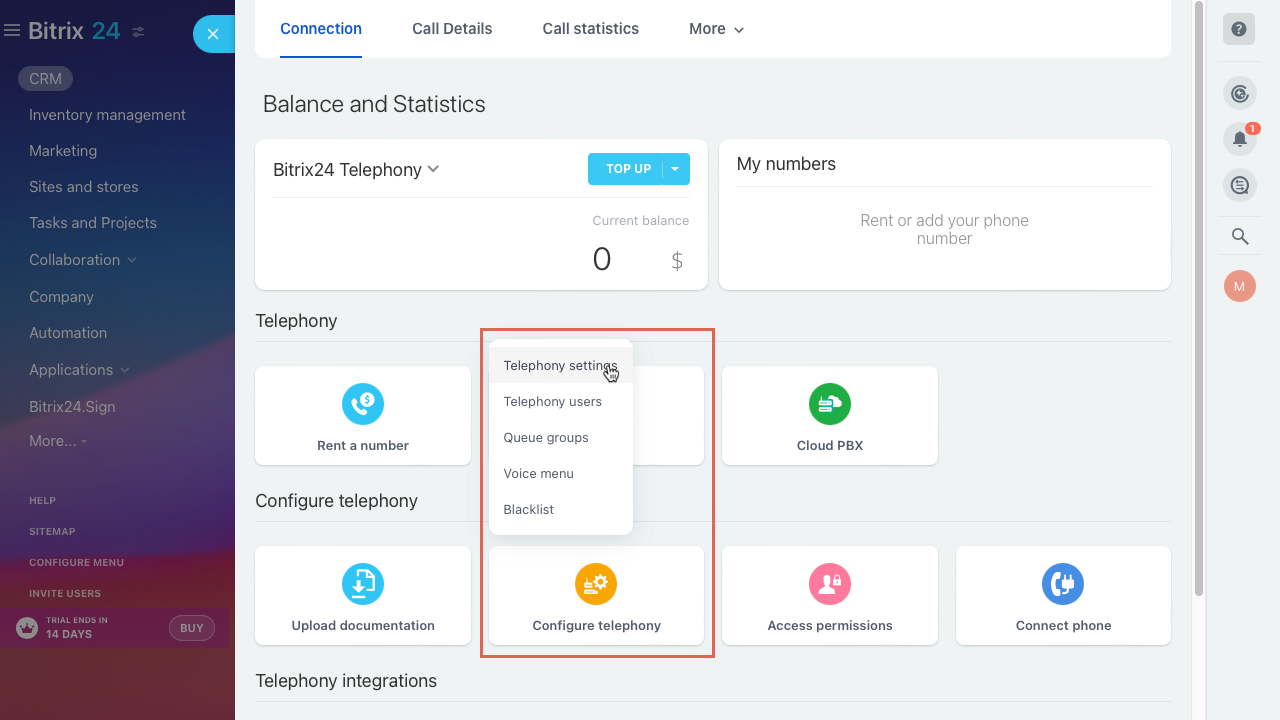
- On the Settings page, select your outbound webhook from the Default number for outgoing calls and, optionally, Forward calls to the backup number from: menus, then click Save.
Setting up Bitrix24 for Calling List Import
To set up the Bitrix24 Calling List integration, generate the required webhook credentials in Bitrix24 and copy the token and URL values. Then open Administration > Integrations in Voiso, select Bitrix24, and enter the Bitrix24 details to authorize the connection. Once enabled, you can import Bitrix24 contacts and leads as calling lists for outbound campaigns.
Prerequisites
- Your Bitrix24 plan must include webhooks.
- The Bitrix24 user who creates the webhook must have CRM access to the records you want to import (for example, Contacts or Leads). Bitrix24 webhook calls run with the permissions of the user who created the webhook.
Create an inbound webhook
- In Bitrix24, go to Developer resources.
- Open the Integrations tab.
- Select Incoming webhook.
- Select Webhook to call REST API.
- Give the webhook a name (for example, “Voiso calling list import”).
- In Assign permissions, enable CRM (crm).
- Save the webhook.
Copy the webhook URL for Voiso
After you save, Bitrix24 generates a webhook URL. Keep the secret key confidential.
The URL format looks like this:
https://<yourportal>.bitrix24.com/rest/<user_id>/<secret_key>/
If an administrator edits a webhook created by another user, Bitrix24 resets the secret key and the administrator becomes the webhook owner. If Voiso stops importing unexpectedly, re copy the updated webhook URL into Voiso.
Supported entities for Bitrix24 calling list import
Voiso can import calling lists created in Bitrix24 based on these entities:
- Lead
- Contact
- Campaign
- Deal
- Estimate