Who should read this article: Administrators
The HTTP Request node enables two-way data exchange between a flow and an external web service, using GET requests with header parameters to retrieve data or POST requests with a defined request body to send data, with JSON responses that can be mapped to custom variables.
Introduction
The HTTP Request node enables data exchange between a flow and an external web service. Use it to perform GET operations to retrieve data based on key–value pairs in the request header, or POST operations to send data defined in a request body. Both request types can use system and custom variables, and any responses can be mapped to custom variables for use later in the flow.
Use GET requests to retrieve data from an external service without changing any information on the server.
Use POST requests to send data to a server, such as submitting form data or updating records, when the operation modifies stored information.
You can chain HTTP requests together. Use the request response to retrieve data from an endpoint and pass the data as a custom variable to the next node, such as another HTTP Request node or a Send Message node.
Connections
The HTTP Request node supports unlimited input connections and up to 2 output connections.
The HTTP Request node requires at least one input connection and one output connection from either the Done or Error connection.
Use Case: Self-service contact center
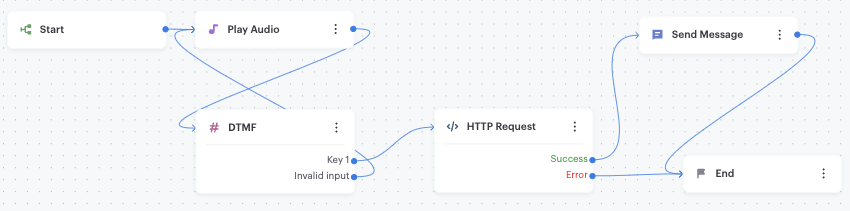
You can use the HTTP Request node to build a self-service IVR for your contact center. For example, you can use a GET request to obtain various data from one or more web services, then pass the data as variables to the Send Message node to create an SMS or WhatsApp message and send it to the caller.
Use Case: Third-party system notification
The HTTP Request node can be used to collect caller information, such as the ANI (Caller ID) at the start of a flow and, using the POST method, send it to a third-party application, such as a CRM, which can then screen pop the contact's record.
Use Case: Website authorization
While a contact is browsing your website, you can present them with a phone number to call to verify their identity. When the call enters the flow, you can obtain the ANI and compare it with a phone number stored in your contact list for the person.
Using the HTTP Request node
To add an HTTP Request node to your interaction flow, click the HTTP Request icon:

The HTTP Request node allows an unlimited number of input connections and up to two output connections.
To make an input connection, drag a link to the HTTP Request node from any node supporting an output connection. To make an output connection, drag a link from the HTTP Request node to any node supporting an input connection.

You may have an unlimited number of HTTP Request nodes in a call flow; however, the total number of HTTP requests that may be executed during a call flow is 100.
The HTTP Request node has two output connections: Success and Failure. At least one of these connections must be set. These connections represent one of the two possible outcomes for the node when an HTTP request is made to a web service URL.
Success
If the URL is accessible and the request receives a response with a 2xx status code and a variable, if any, is successfully mapped, the flow is routed to the Success connection.
Failure
If the URL is not accessible, does not respond within 5 seconds, or returns a non-2xx status code, the flow is routed to the Failure connection.
Variables
The HTTP Request node supports system and custom variables that you can use when building requests and when passing data to the next node.
System variables
The following five system (global) variables are available for voice interactions:
| Variable | Description | Example |
|---|---|---|
{{start_time}} |
The time the interaction started. | 2023-08-21T04:02:18Z |
{{ani}} |
The calling number (ANI). | 443336006114 |
{{dnis}} |
The number dialed (DNIS). | 380631234567 |
{{phone_type}} |
The type of phone for the ANI. | fixed_line |
uuid |
a string containing the UUID of the interaction | 07771c38-c159-4965-a878-be0162118b2b |
Custom variables
You can include dynamic content in your HTTP requests by using custom variables in the URL, Headers, or Body fields. Click { } to open the Variables menu, or manually enter a variable by typing its name in double braces, for example {{variableName}}.
You can use a variable to hold a complete, correctly formatted URL or combine text and variables to build the URL dynamically.
Examples of using variables in the URL field:
GET {{balanceURL}}— wherebalanceURLcontains a complete URL such ashttps://mybankingservice.com/checkbalance?q=39ryw7ehttps://mybankingservice.com/checkbalance?q={{balanceVariable}}https://mybankingservice.com/{{customerRequest}}?q={{customerVariable}}https://{{serviceBaseURL}}/{{service}}?q={{customerVariable}}
When you use GET requests, variables are typically placed in the URL or Headers to define search parameters or authentication keys.
When you use POST requests, variables are usually included in the Body to send data to the web service—for example, customer IDs, form inputs, or status updates.
The HTTP Request node also allows you to define custom variables that store data returned in a JSON response. You can extract values from the response by entering a JSONPath expression.
Custom variables make it possible to reuse response data elsewhere in the flow. For example, consider this response:
{
  "contact": {
    "name": "Richard Sanchez",
    "age": 30
  }
}
To extract the "name" value, specify the following JSONPath expression:
$.contact.name
In this case, the value of the custom string variable {{customerName}} becomes Richard Sanchez.
The JSONPath field supports up to 128 characters.
Passing data to other nodes
You can reference the custom variable from an HTTP Request node in the following nodes:
- Other HTTP Request nodes
- Send Message node
- Conditions node
- Route node
- Message node
Send messages
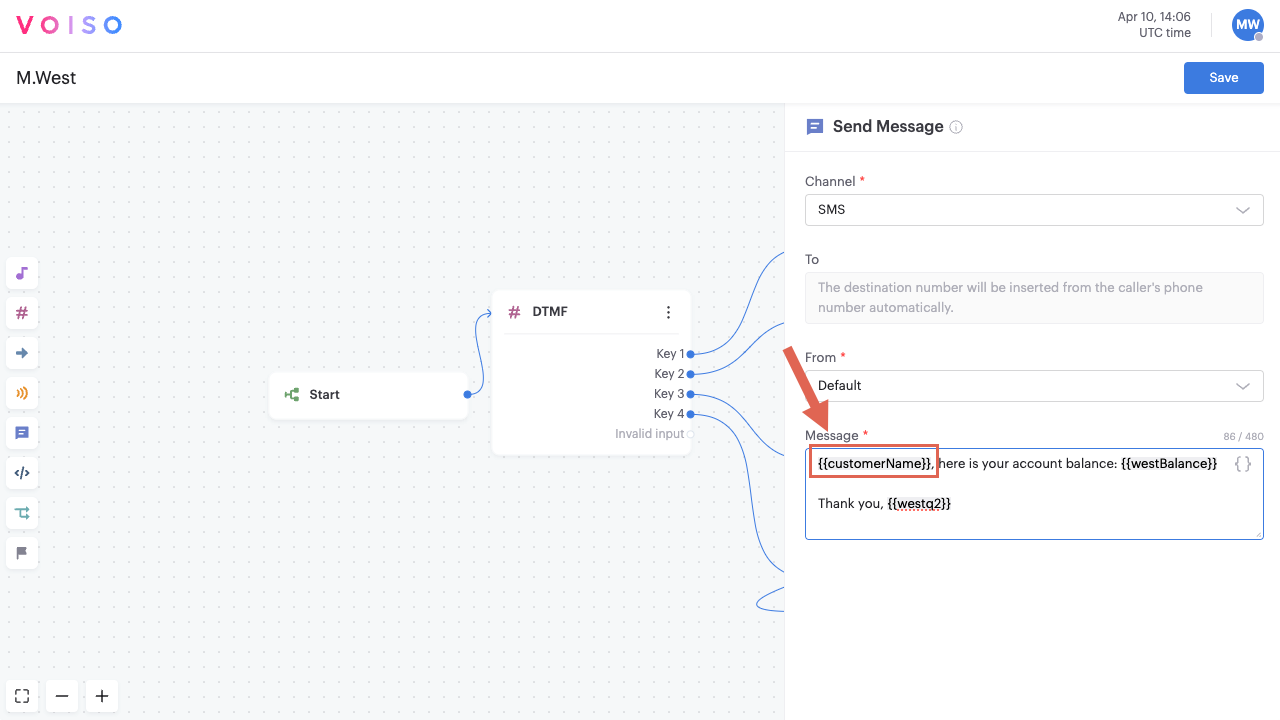
For example, the value for customerName from the previous example can be passed to a Send Message node and used to populate a message with the contact name. Enter {{customerName}} in the body of a message. When the message is sent to the contact, the value stored in customerName is inserted into the message.
Conditions
Refer to the Introduction in the Conditions node article.
Authentication
The HTTP Request node supports both URL and basic (key-value) request authentication.
URL credentials
Some services require only an API key or username and password as part of the request URL for authentication. To authenticate using an API key or username and password in the URL, include it in the request parameters like the following examples.
Including sensitive information like usernames, passwords, or API keys directly in the URL is not recommended due to security concerns. Instead, consider using HTTP headers for authentication when possible.
API key
GET https://api.example.com/v1/data?api_key=123456789abcdef
Username and password
GET https://username:password@api.example.com/v1/data
Basic authentication
Basic Authentication is a simple authentication scheme built into the HTTP protocol. It lets you send a username and password encoded in Base64 or other authentication key as part of the HTTP request headers.
The HTTP Request node Header section enables you to include basic authentication into your HTTP requests. In the Header section, specify a key-value pair where the key is Authorization and the value is Basic followed by your secret authorization key value. For example:
Authorization: Basic dXNlcjpwYXNz

To ensure that your authorization is transmitted securely, make sure your URL uses the HTTPS protocol instead of HTTP.
Configuring the HTTP Request node
To configure an HTTP Request node in your interaction flow, click the HTTP Request node to display the HTTP Request node panel.
Rename the node
Beginning with the September 15 - 19, 2025 release, you may name nodes in Flow Builder. Click a node in the node palette to add it to the flow. The node is added to the flow and is named Node N, where N represents the number of the node; for example, Node 6. Below the node name is the node type, such as Play Audio. Click the node to open the node configuration panel, then click the name of the node to edit it. Enter a new name, then the check mark to save your change.
Method
The HTTP Request node supports two methods, GET and POST. Different configuration options are available, depending on which method you select from the Method menu.
GET Request
To configure a GET request, select GET from the Method menu.
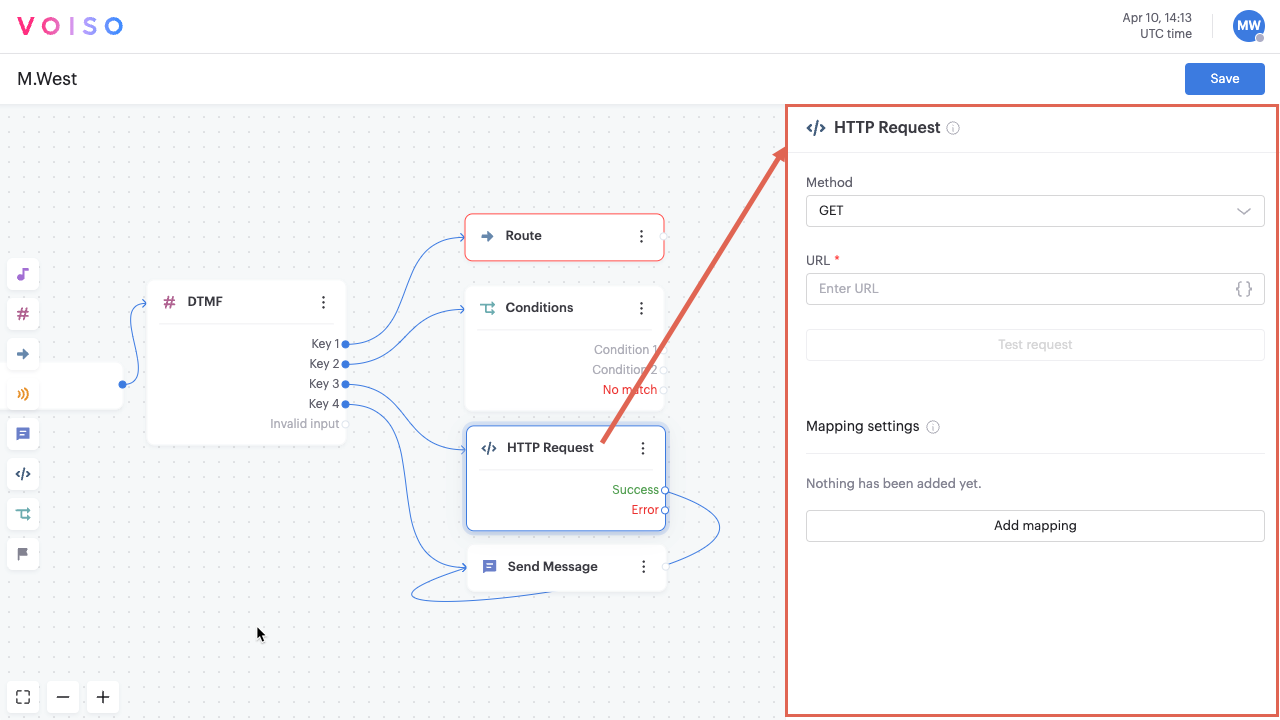
URL
Enter the URL of the web service to which you are going to send the request. The URL can include system and custom variables.
Headers
Specify one or more HTTP headers for your request. Headers provide essential information such as content type, authorization, and other metadata needed by the remote endpoint to process the request correctly. Each header includes a key-value pair. For example: "Content-type":"application/json".
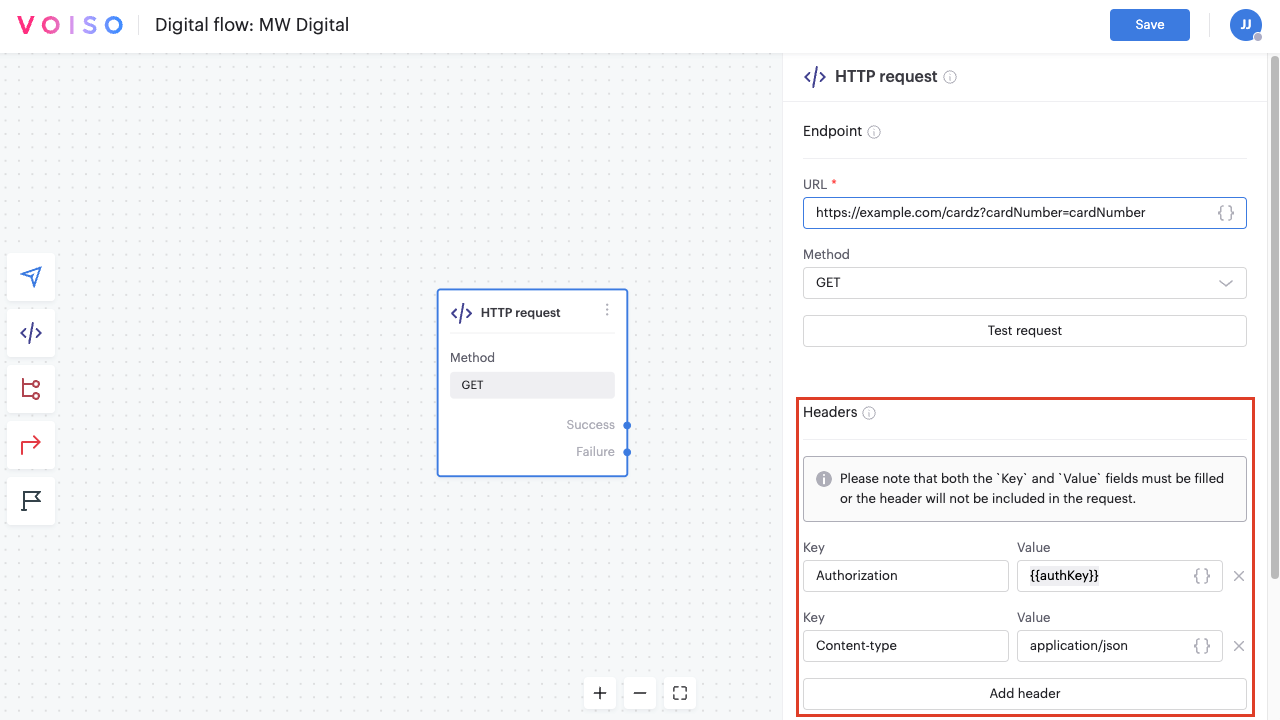
For each header that you create, you must specify both a key name and a value.
You can use a header to include basic authentication in your request.
In the Key field, specify the name of the request key. All standard JSON keys are supported along with your custom keys.
In the Value field, specify a value for the key. Variables are supported for values so that you can include data from other flow nodes in your request.
You can add up to 10 headers. Click Add header to add a header to the request.
To remove a header, click the X next to it.
Test request
When you enter a URL in the URL field, the Test Request button becomes available. Click the button to verify the URL and see a preview of the response.
If the request fails, the Test request field displays [].
If the request is successful, a JSON response is displayed. For example:
{
  "account": 54321000
  "balance": 684415.39
}
Mapping settings
In the Mapping settings section, select a value from the response to assign to a custom variable that you define or specify.
After clicking Test Request, the configuration panel automatically parses the response and lists available JSON keys in the JSONPath drop-down menu. You can either select a key from the menu to populate the JSONPath field automatically, or manually enter an expression using the format $.<key> if you prefer.
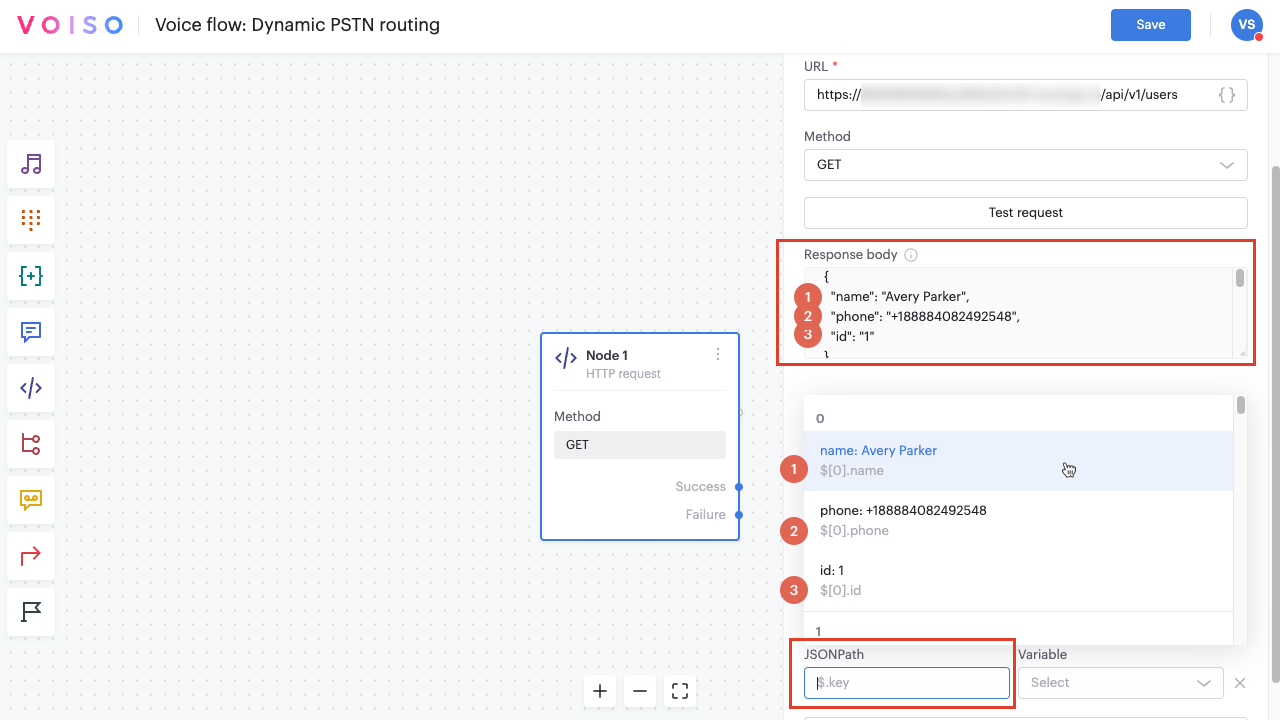
In the Variable field, select the name of a custom variable, or create a new custom variable, to which the value of the JSON key will be assigned.
Use the value of the custom variable in other nodes, such as another HTTP Request or Send Message. For more information about using variables with the HTTP Request node, refer to Using the HTTP Request node above.
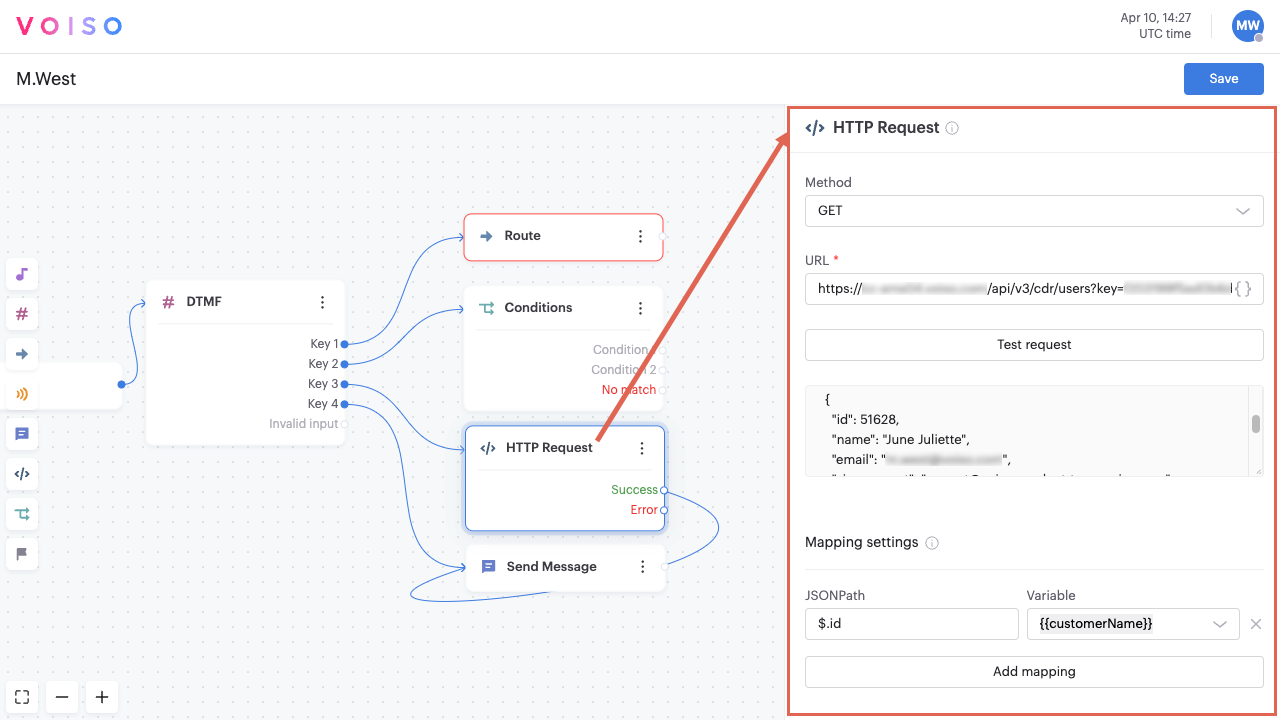
In the following example, the value for the id parameter—representing the contact’s ID number—is assigned to the customerID variable.
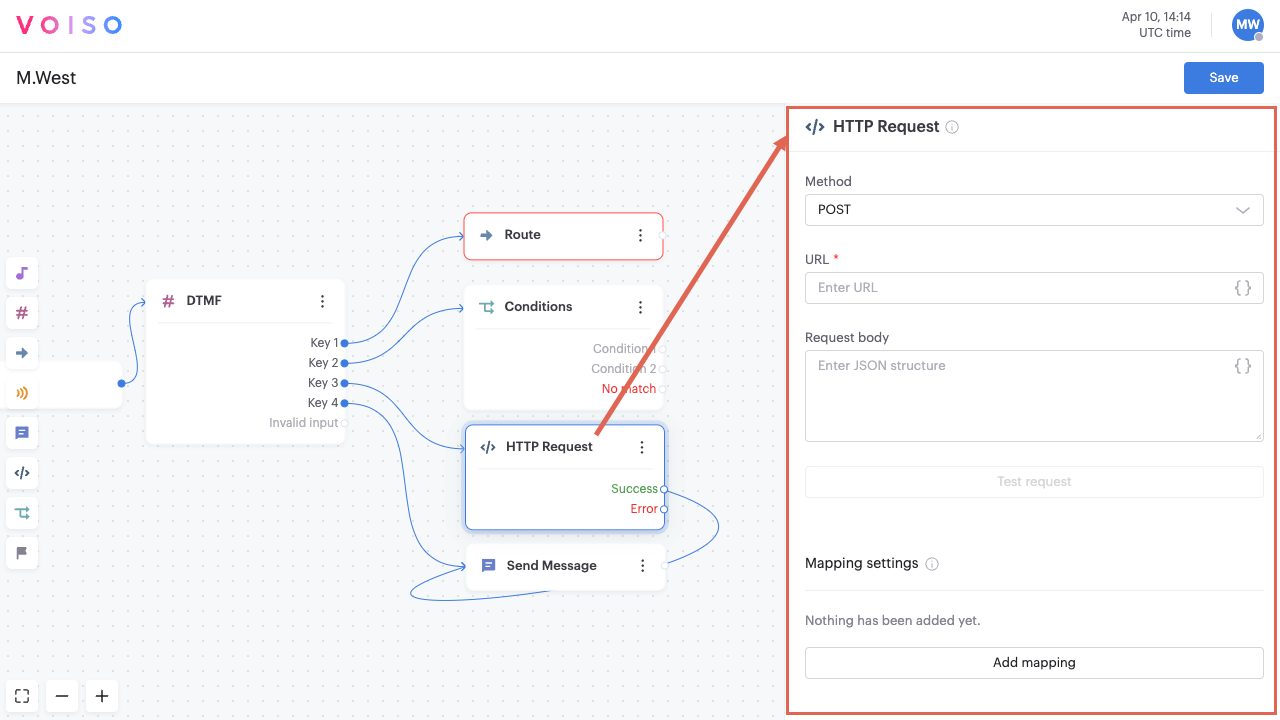
POST Request
To configure a POST request, select POST from the Method menu.
URL
Enter the URL of the web service to which you are going to send the request. The request URL can include variables.
Request body
Enter the body of the request as a JSON object. The request can include system and custom variables, including custom variables from other HTTP Request nodes. Click "{ }" to display the Variables menu or manually enter a variable by typing its name enclosed in double brace brackets like this: {{variableName}}. This example uses the {{ani}} system variable and the {{contactID}} custom variable:
{
  "contacts": [
    {
      "phoneNumber": "{{ani}}",
      "contactID": "{{contactID}}",
      "contactSource": "",
      "contactURL": "",
      "priority": ""
    }
  ]
}
Headers
Specify one or more HTTP headers for your request. Headers provide essential information such as content type, authorization, and other metadata needed by the remote endpoint to process the request correctly. Each header includes a key-value pair. For example: "Content-type":"application/json".
For each header that you create, you must specify both a key name and a value.
You can use a header to include basic authentication in your request.
In the Key field, specify the name of the request key. All standard JSON keys are supported along with your custom keys.
In the Value field, specify a value for the key. Variables are supported for values so that you can include data from other flow nodes in your request.
You can add up to 10 headers. Click Add header to add a header to the request.
To remove a header, click the X next to it.
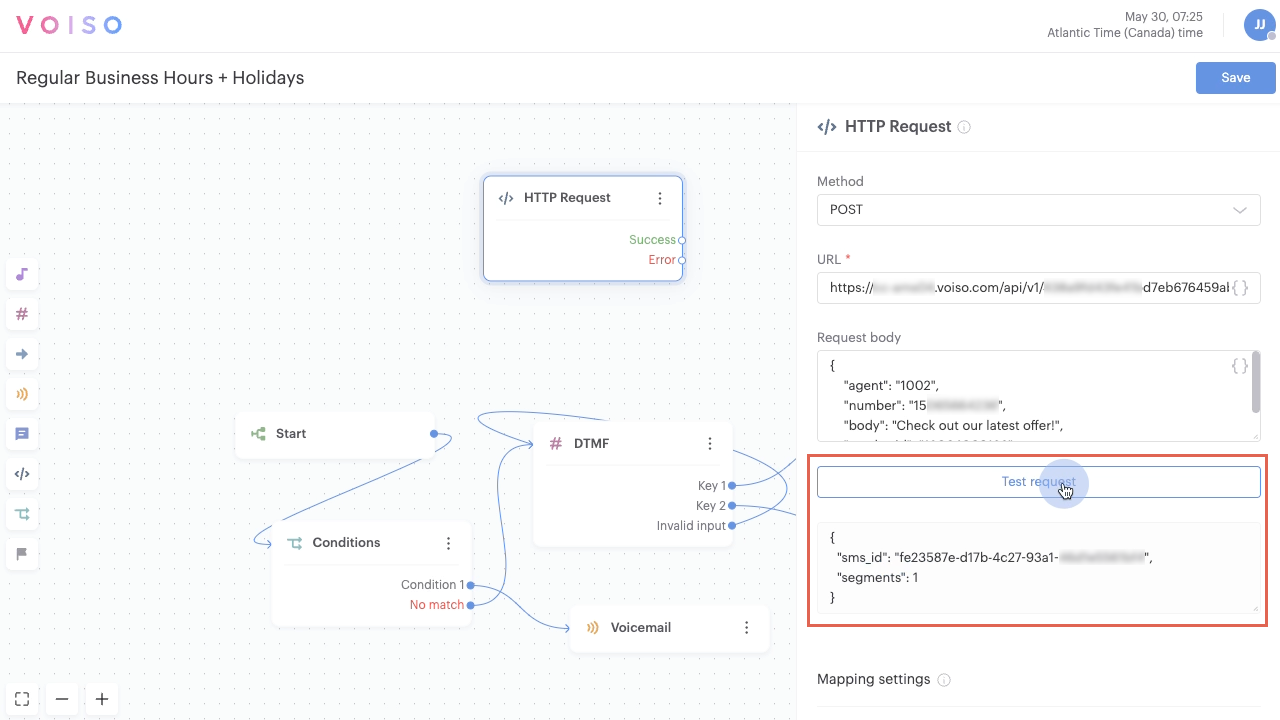
Test request
When you enter the request body, the Test Request button becomes available. Click the button to verify the URL and request and see a preview of the response.
To test a request with a variable, enter a test value instead of the variable name. Once the request returns the expected result, replace the test value with the variable. For example, use a phone number value to test the {{ani}} variable.
If the request fails, the Test request field displays [].
If the request is successful, the expected response is displayed in the Test request field.
Mapping settings
In the Mapping settings section, select a value from the response to assign to a custom variable that you define or specify.
After clicking Test Request, the configuration panel automatically parses the response and lists all available JSON keys in the JSONPath drop-down menu. You can select a key from the menu to populate the JSONPath field automatically, or manually enter an expression in the format $.<key> if you prefer.
In the Variable field, select an existing custom variable, or create a new custom variable, to which the value of the JSON key will be assigned.
For POST requests, this feature allows you to confirm and map the data returned by the web service (for example, a newly created record ID, confirmation number, or status message) without manually entering the JSON path.
Use the value of the custom variable in other nodes, such as another HTTP Request or Send Message. For more information about using variables with the HTTP Request node, refer to Using the HTTP Request node above.