Who should read this article: Administrators
Workflow builder enables the design, configuration, and management of sophisticated workflows by linking pre-defined node objects in a simple to use interactive visual editor.
Introduction
The Voiso Workflow builder enables you to define a large variety of advanced, time-based call-handling rules using a sophisticated yet simple visual editor.
Tip
For some simple use cases for creating workflows, refer to Call workflows guide.
Workflow builder user experience
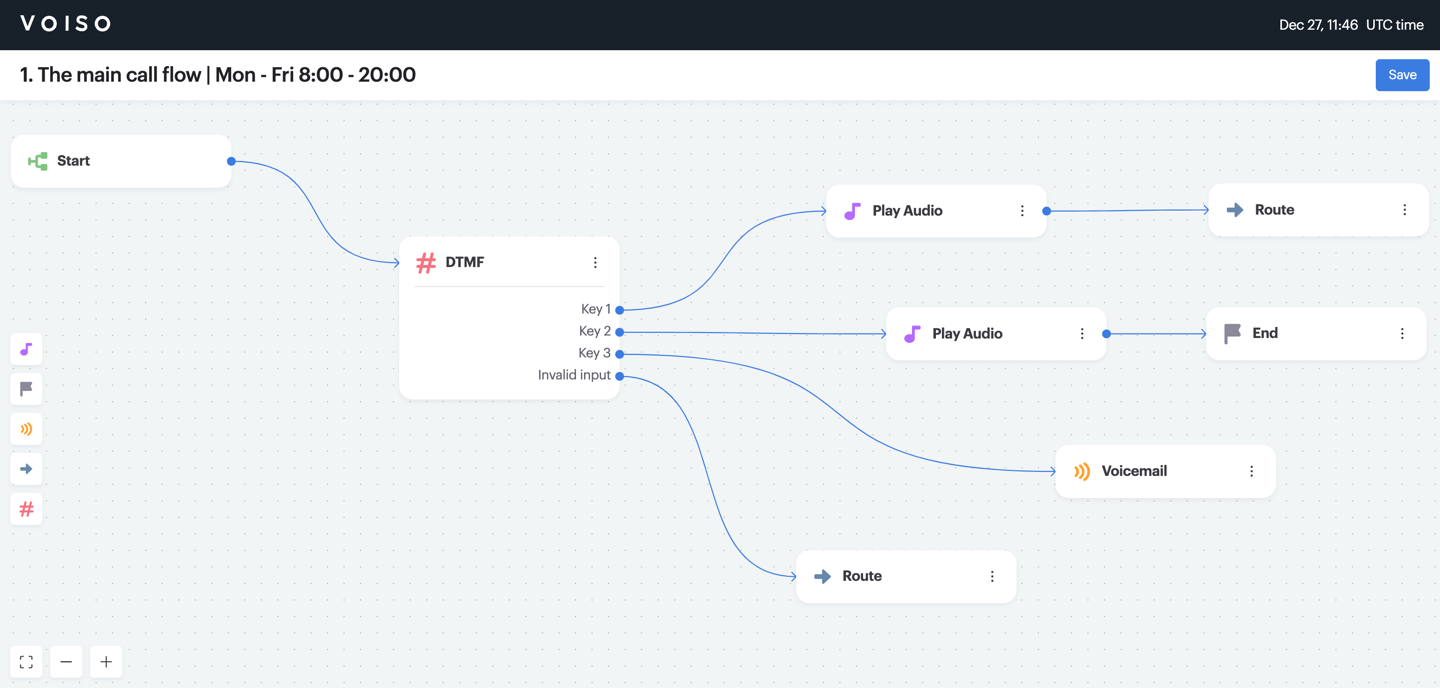
Workflow builder is a visual editor that uses different types of nodes that you configure and link together. Drag-and-drop nodes from the Node palette, click to configure the node behavior, drag links to other nodes, and save your workflow.
Important
The Workflow builder palette uses different nodes for Inbound call and Digital workflows. The examples below show the Inbound call workflow palette.
To open Workflow builder, go to Automation > Workflow studio and click Launch Workflow builder (the launch icon) on a row of the Workflows list, or click Launch Workflow builder on the Edit workflow page.

When a new workflow is opened, the status Not configured is displayed next to the name of the workflow. The status changes to Configured after you construct a complete workflow that ends with one of the following nodes:

Navigating the canvas
It’s easy to find your way around the Workflow builder canvas, select nodes, zoom in and out, and delete nodes. Watch this video for a quick demonstration.
Here’s a summary:
Action | How to |
|---|---|
Panning | Left-click + drag the canvas. |
Select a node | Left-click. This usually opens the configuration panel for the node. |
Select multiple nodes | Shift + left-click, then drag a selection box. |
Select multiple nodes | Shift + left-click on individual nodes, one at a time. |
Zoom with trackpad | Pinch gestures, in and out. |
Zoom with mouse | Turn the mouse wheel. |
Deleting nodes with keyboard | Select or multi-select nodes, then press Delete. |
Deleting nodes with mouse | Left-click the kabob menu, then select Delete. |
Working with nodes
Click a node in the Node palette to add a node of that type to the workflow. Drag the node into position.

Drag a link from the right side of a node to the left side of another node to connect one step to the next. Some nodes have only a single input connection while others allow multiple links. Some nodes have only a single output connection while others allow multiple links.

To move a node, left-click it and drag it. To select multiple nodes, left-click and drag a selection box around the nodes and then drag them together.

To pan the canvas, right-click and drag the canvas. Use the zoom out, zoom in, and center view buttons to change the zoom and positioning of the canvas.

Important
Some nodes support custom and system variables to enable you to customize and automate routing and data retrieval. Refer to Variable management for more information.
The Start node has no input connection and only a single output connection. The Voicemail, Route, and End nodes have no output connection.
Tip
In the DTMF node, specify an audio message file that describes the key selections available in the DTMF node so that contacts can make a key selection without having to listen to the entire audio message first.
The Inbound call and Digital workflow palettes use different nodes. Refer to these articles for an overview of each node by workflow type:
Each node, except the Start node, includes a kebab menu with the following options:

Clone: create a copy of the node, including all configuration settings
Delete: remove the node from the workflow
Rename the node
Beginning with the September 15 - 19, 2025 release, you may name nodes in Flow Builder. Click a node in the node palette to add it to the flow. The node is added to the flow and is named Node N, where N represents the number of the node; for example, Node 6. Below the node name is the node type, such as Play Audio. Click the node to open the node configuration panel, then click the name of the node to edit it. Enter a new name, then the check mark to save your change.