Who should read this article: Administrators
Purchase and manage numbers for your contact center.
Introduction
Voiso enables you to manage your existing numbers, purchase new numbers globally, and add third-party numbers into your Voiso contact center.
To display the Numbers page, from the Voiso navigation bar, select Inbound > Numbers. The Numbers page contains three main functionality areas:
Numbers
Buy numbers
Add numbers (single or bulk)
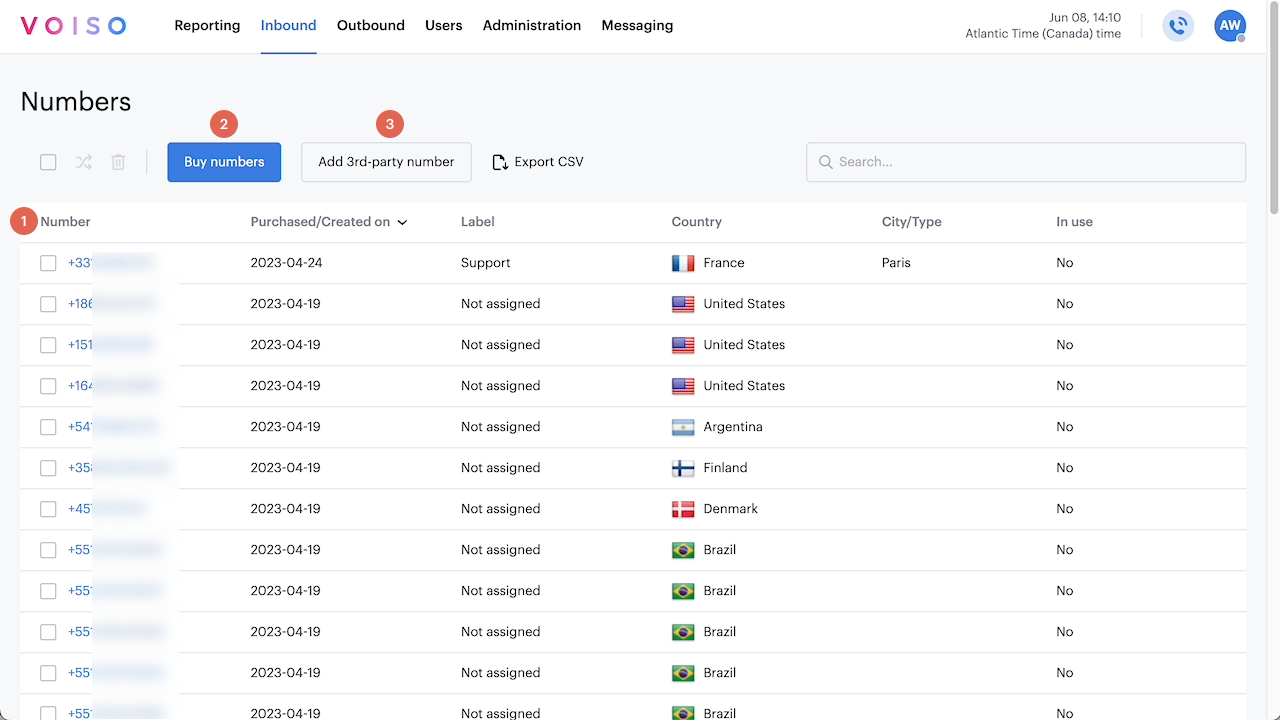
Numbers
The Numbers page allows you to view and manage your numbers. The table includes the following columns:
| Column | Description |
|---|---|
| Number | The phone number in E.164 format. |
| Added on | The date that the number was added to your contact center. |
| Label | A label that you specify by editing the details of the number. If you do not provide a label, then Not assigned is displayed. |
| Country | The name and flag of the country to which the number belongs. |
| City / Type | The phone number type: Geographic, National, Toll-free, Shared-cost, Mobile, and others. If the number type is Geographic, then the locality to which it belongs is displayed – for example, Los Angeles, CA. |
| In use | Indicates whether the number is assigned to a flow, Caller ID, or CID group. Numbers that have been automatically replaced by the ASR performance optimization feature will have a warning icon next to them so you know they are no longer in use as a Caller ID in Dialer campaigns and Caller ID groups for manual and click-to-call dialing. |
| Action icons | Click an icon to add the number to a CID group, add the number to a flow, or delete the number. |
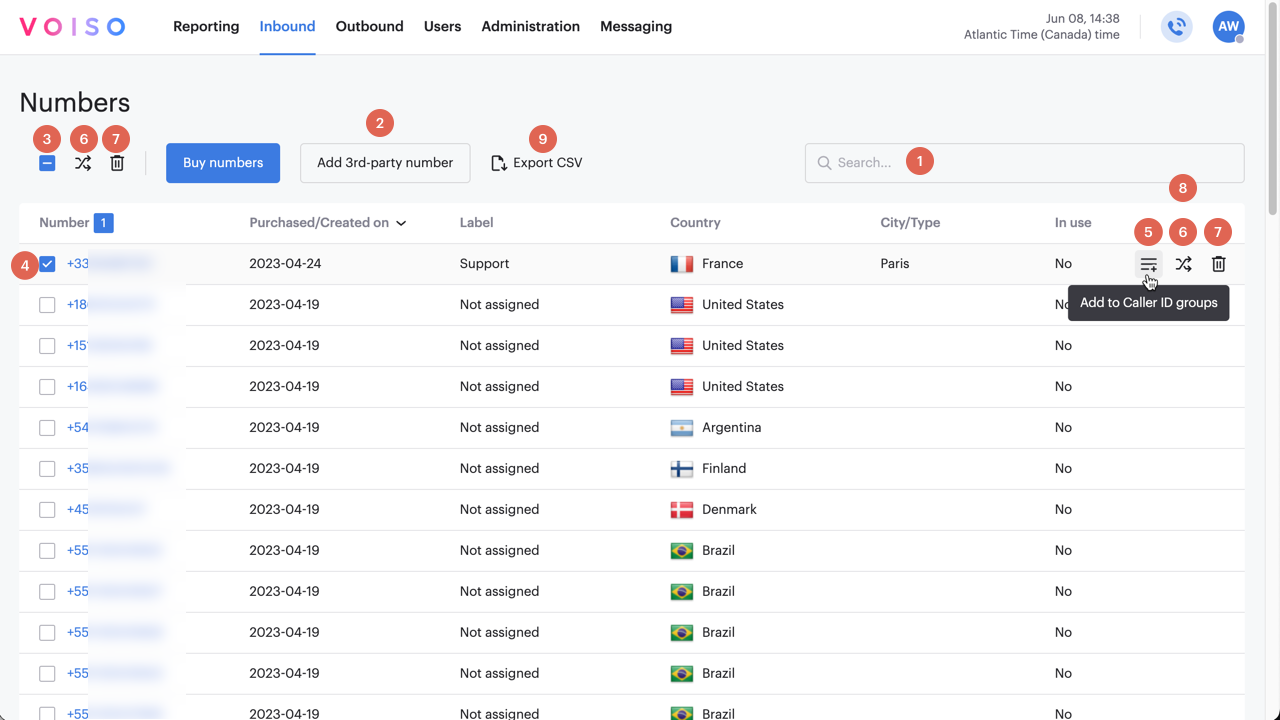
The functions available on the Numbers page are described in the following sections (1-9).
The Buy numbers feature is described in the next section.
- Search
- Add numbers
- Select all
- Number details
- Add to CID group
- Add to flow
- Delete number
- Action menu
- Export selected numbers to CSV
- Select status or statuses
Automatic number replacement
Numbers that have been replaced or require replacement due to the number exceeding the Max dialing attempts and Replacement interval defined in System settings are marked with yellow alert icons.
Numbers with a yellow alert icon have been replaced and are no longer in use as a Caller ID. When there are no condidate replacement numbers remaining in your inventory, the number requiring replacement is marked with a red alert icon.
Refer to ASR performance optimization for more information about this feature.
Restricted numbers
In some countries and regions, telecom regulations require extra verification before certain phone numbers may be used. When you purchase a number that is classified as restricted, the provider must review and approve supporting documents before Voiso can activate the number for Caller ID or inbound calling.
Because this approval happens outside of Voiso, restricted numbers may not work immediately after purchase. Voiso shows a red restricted indicator on the Numbers page to let you know that the number is awaiting document submission or validation. Once the provider approves the documents, Voiso automatically enables the number for use.

Contact your Voiso account manager or support@voiso.com for help with submitting documents.
Restricted status depends on local jurisdiction and number type. Approval time varies by provider and country.
1. Search
To search through all of your numbers to find a specific number or set of numbers, enter at least two digits in the Search field. The search results include all numbers that contain the number string you entered.
You can search by the following parameters:
| Parameter | Description |
|---|---|
| Country | The name of the country to which the number belongs. |
| Type | The phone number type: Geographic, National, Toll-free, Shared-cost, Mobile, and others. If the number type is Geographic, then the locality to which it belongs is displayed – for example, Los Angeles, CA. |
| Label | User defined labels when the number is purchased. |
Sort the results by In use to find numbers with Yes. Click an in-use number to determine whether it is assigned to a User as the default Caller ID, in a flow as an entry point, or is in an outbound Caller ID (CID) group.
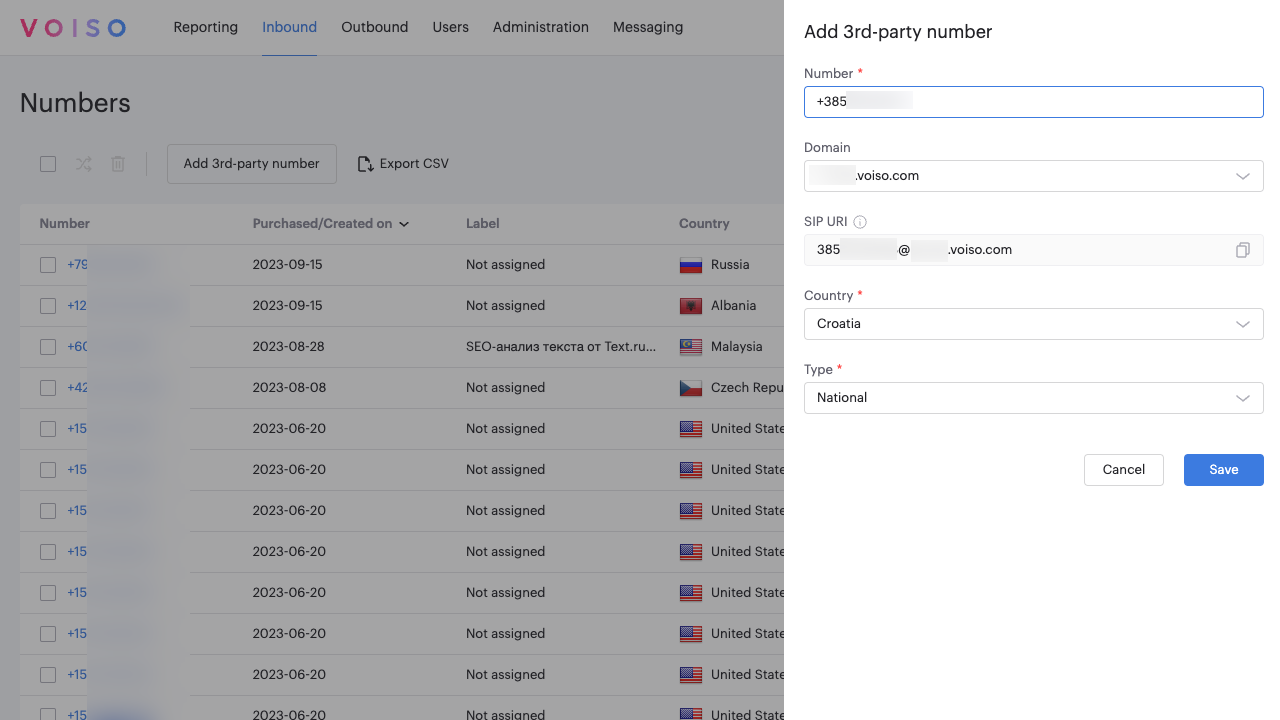
2. Add numbers
To use your own numbers in your Voiso contact center, click Add numbers to display the Add numbers panel.
Select the method that you want to use:
Add a single number method
To add a single number, select Add a single number in the Method section.
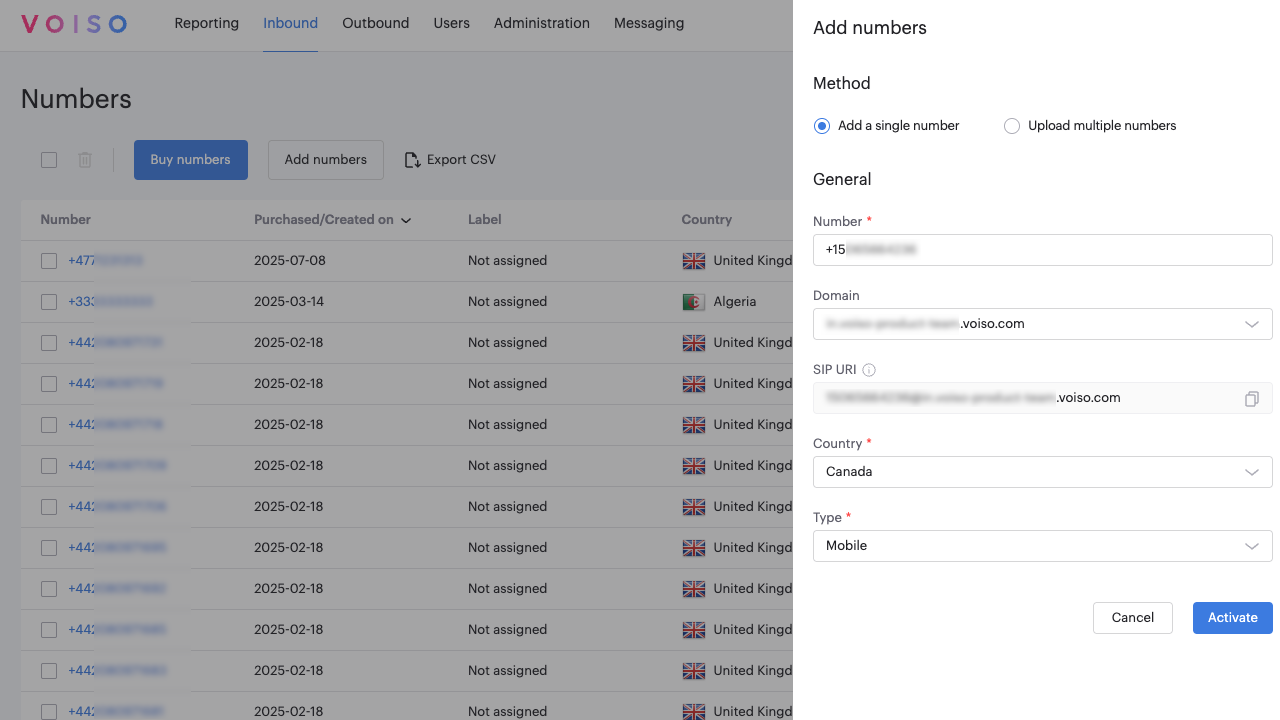
Enter the information about the number in the following fields in the General section.
| Field | Description |
|---|---|
| Number | Enter the phone number in E.164 format |
| Domain | Select one of the domains specified for your contact center from the Domain menu. |
| SIP URI | The Uniform Resource Identifier (URI). This value is automatically generated by Voiso and cannot be modified. The SIP URI can be used on your side for call redirection. |
| Country | The name and flag of the country to which the number belongs. |
| Type | The phone number type: Geographic, National, Toll-free, Shared-cost, Mobile, and others. If the number type is Geographic, then the locality to which it belongs is displayed – for example, Los Angeles, CA. |
The cost for the numbers is provided in the Pricing section.
Depending on your role or security access group settings, pricing information may or may not be displayed.
Click Activate to add the number to your contact center.
Add multiple numbers method
To add multiple numbers in bulk, select Add multiple numbers in the Method section.
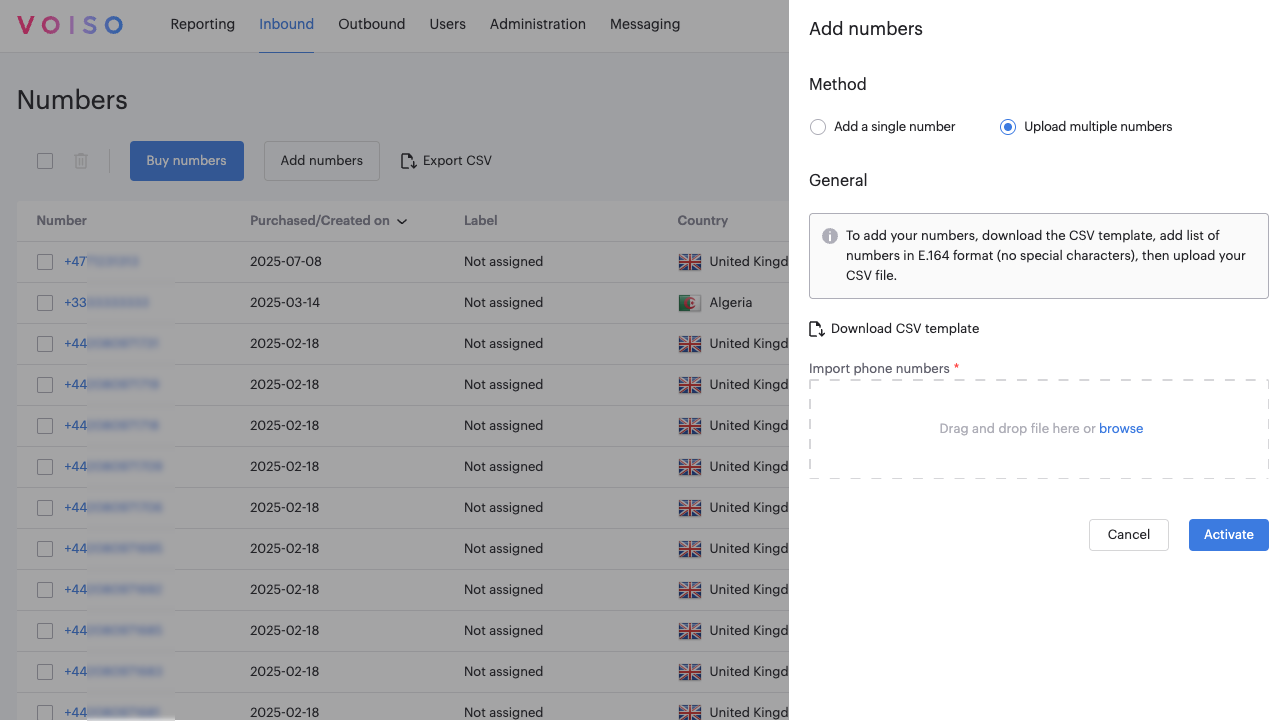
Next, click Download the CSV template to obtain a template file for entering number information in the correct format for Voiso.
The numbers must be in E.164 format with no special characters.
Add your numbers to the CSV file, then drag and drop or browse to the file in the Import phone numbers field.
Voiso analyzes the contents of the file and provides you with a count of the valid, duplicate, and invalid numbers.
You can fix the invalid numbers and reupload the CSV file. To learn which numbers are duplicates or invalid, click Export invalid and duplicate numbers list.
Review the list and update your original CSV file. Then, click the 'X' next to the uploaded file to remove it. Drag and drop or browse to the modified file in the Import phone numbers field to upload it.
The cost for the numbers is provided in the Pricing section.
Depending on your role or security access group settings, pricing information may or may not be displayed.
Click Activate to add the numbers to your contact center.
3. Select all
To perform bulk operations on all of your numbers, select this check box. To perform operations on one or more numbers, select them individually from the table.
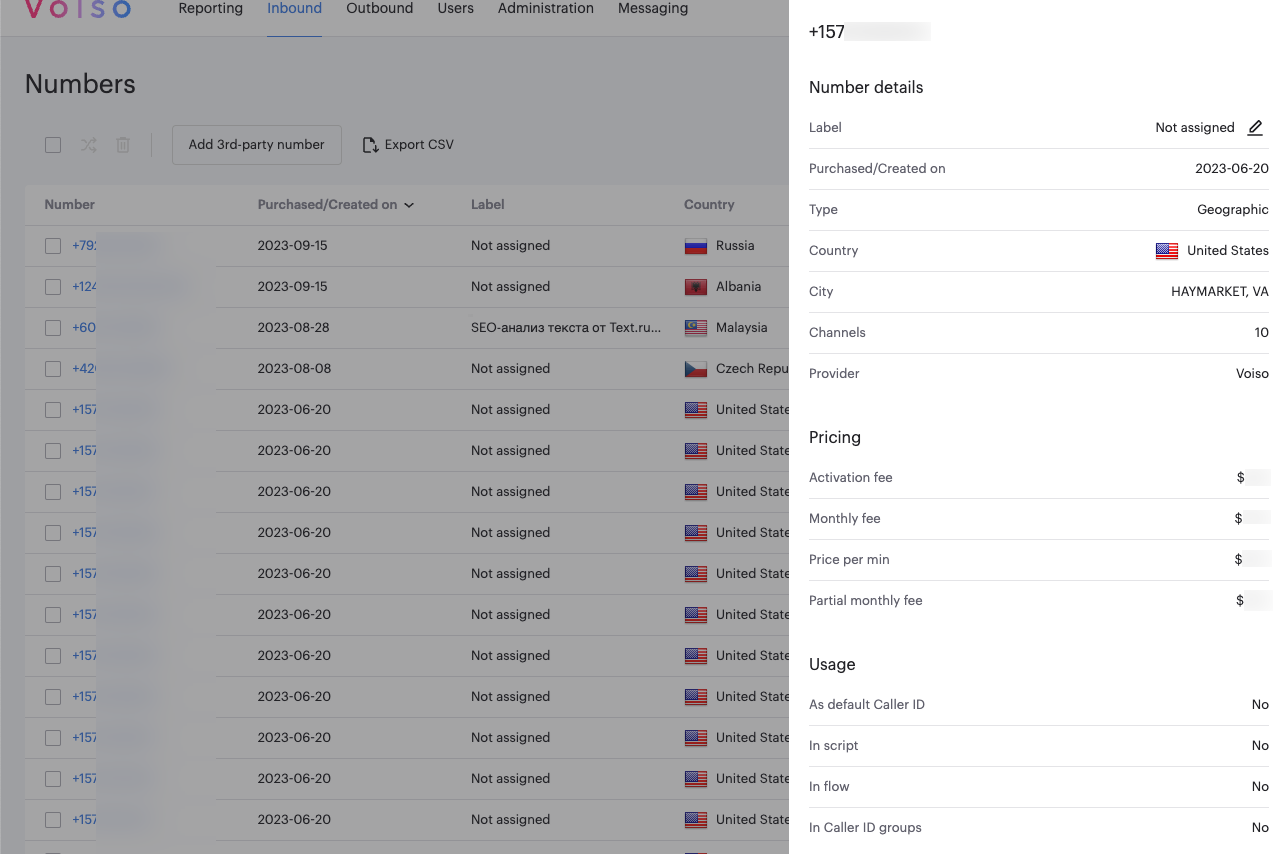
4. Number details
You can review the details of any number in the table. Click a row in the Numbers table to display the Number details panel, which contains the following information about each number:
| Parameter | Description |
|---|---|
| Label | Click the Label field to assign or edit an alpha-numeric tag for the number in the Add label panel. Enter a new label or select an existing label from the menu, then click Save. |
| Date purchased | The date the number was purchased from Voiso or a third-party number was added. |
| Type | The phone number type: Geographic, National, Toll-free, Shared-cost, Mobile, and others. |
| Country | the country to which the number belongs |
| City | If the number type is Geographic, then the city or locality to which it belongs is displayed – for example, Los Angeles, CA. |
| Channels | The number of simultaneous calls that the number can handle. |
| Provider | Voiso or third-party is displayed. |
| Activation fee | The cost to activate the number for your contact center |
| Monthly fee | The cost each month to use the number. |
| Price per min | The cost for each minute that the number is used on a call. |
| Auto-replaced on | The date that the number exceeded the Caller ID usage thresholds set on the System settings page and was automatically replaced with a number with the same country prefix are no longer being used as a Caller ID in a Caller ID group or in a Dialer Caller ID set. |
| As default Caller ID | The number is assigned to a User as the default Caller ID. |
| In flow | The number is used in a flow as an entry point. |
| In CID group | The number is used in an outbound Caller ID (CID) group. |
| In Dialer campaigns | The number is used in one or more outbound Dialer campaigns. The campaign names appear to the right. Clicking a campaign name displays the Edit Dialer campaign page for the campaign. |
Click an assigned flow or Caller ID group to link to the corresponding Edit flow page or Edit Caller ID group page in your contact center.
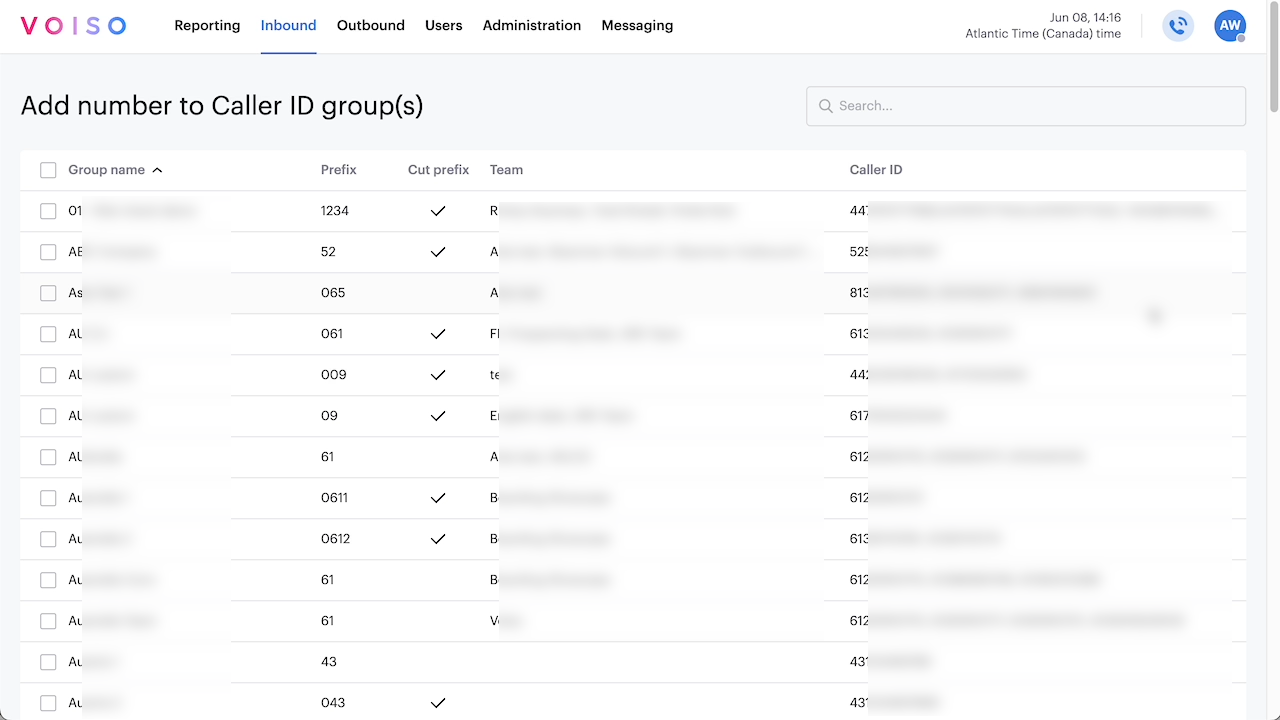
5. Add to Caller ID groups
For outbound calls from your contact center, you can add a number to one or more CID groups .
Select a number, click the Add to CID groups icon on the right of the number row to display the CID groups page which contains a table listing your CID groups.
To assign a number to a CID group, select one or more CID groups in the table, then click Add to Caller ID group(s).
To remove a number or numbers from a CID group, navigate to Outbound > Caller ID groups and remove the number using the Edit Caller ID group page.
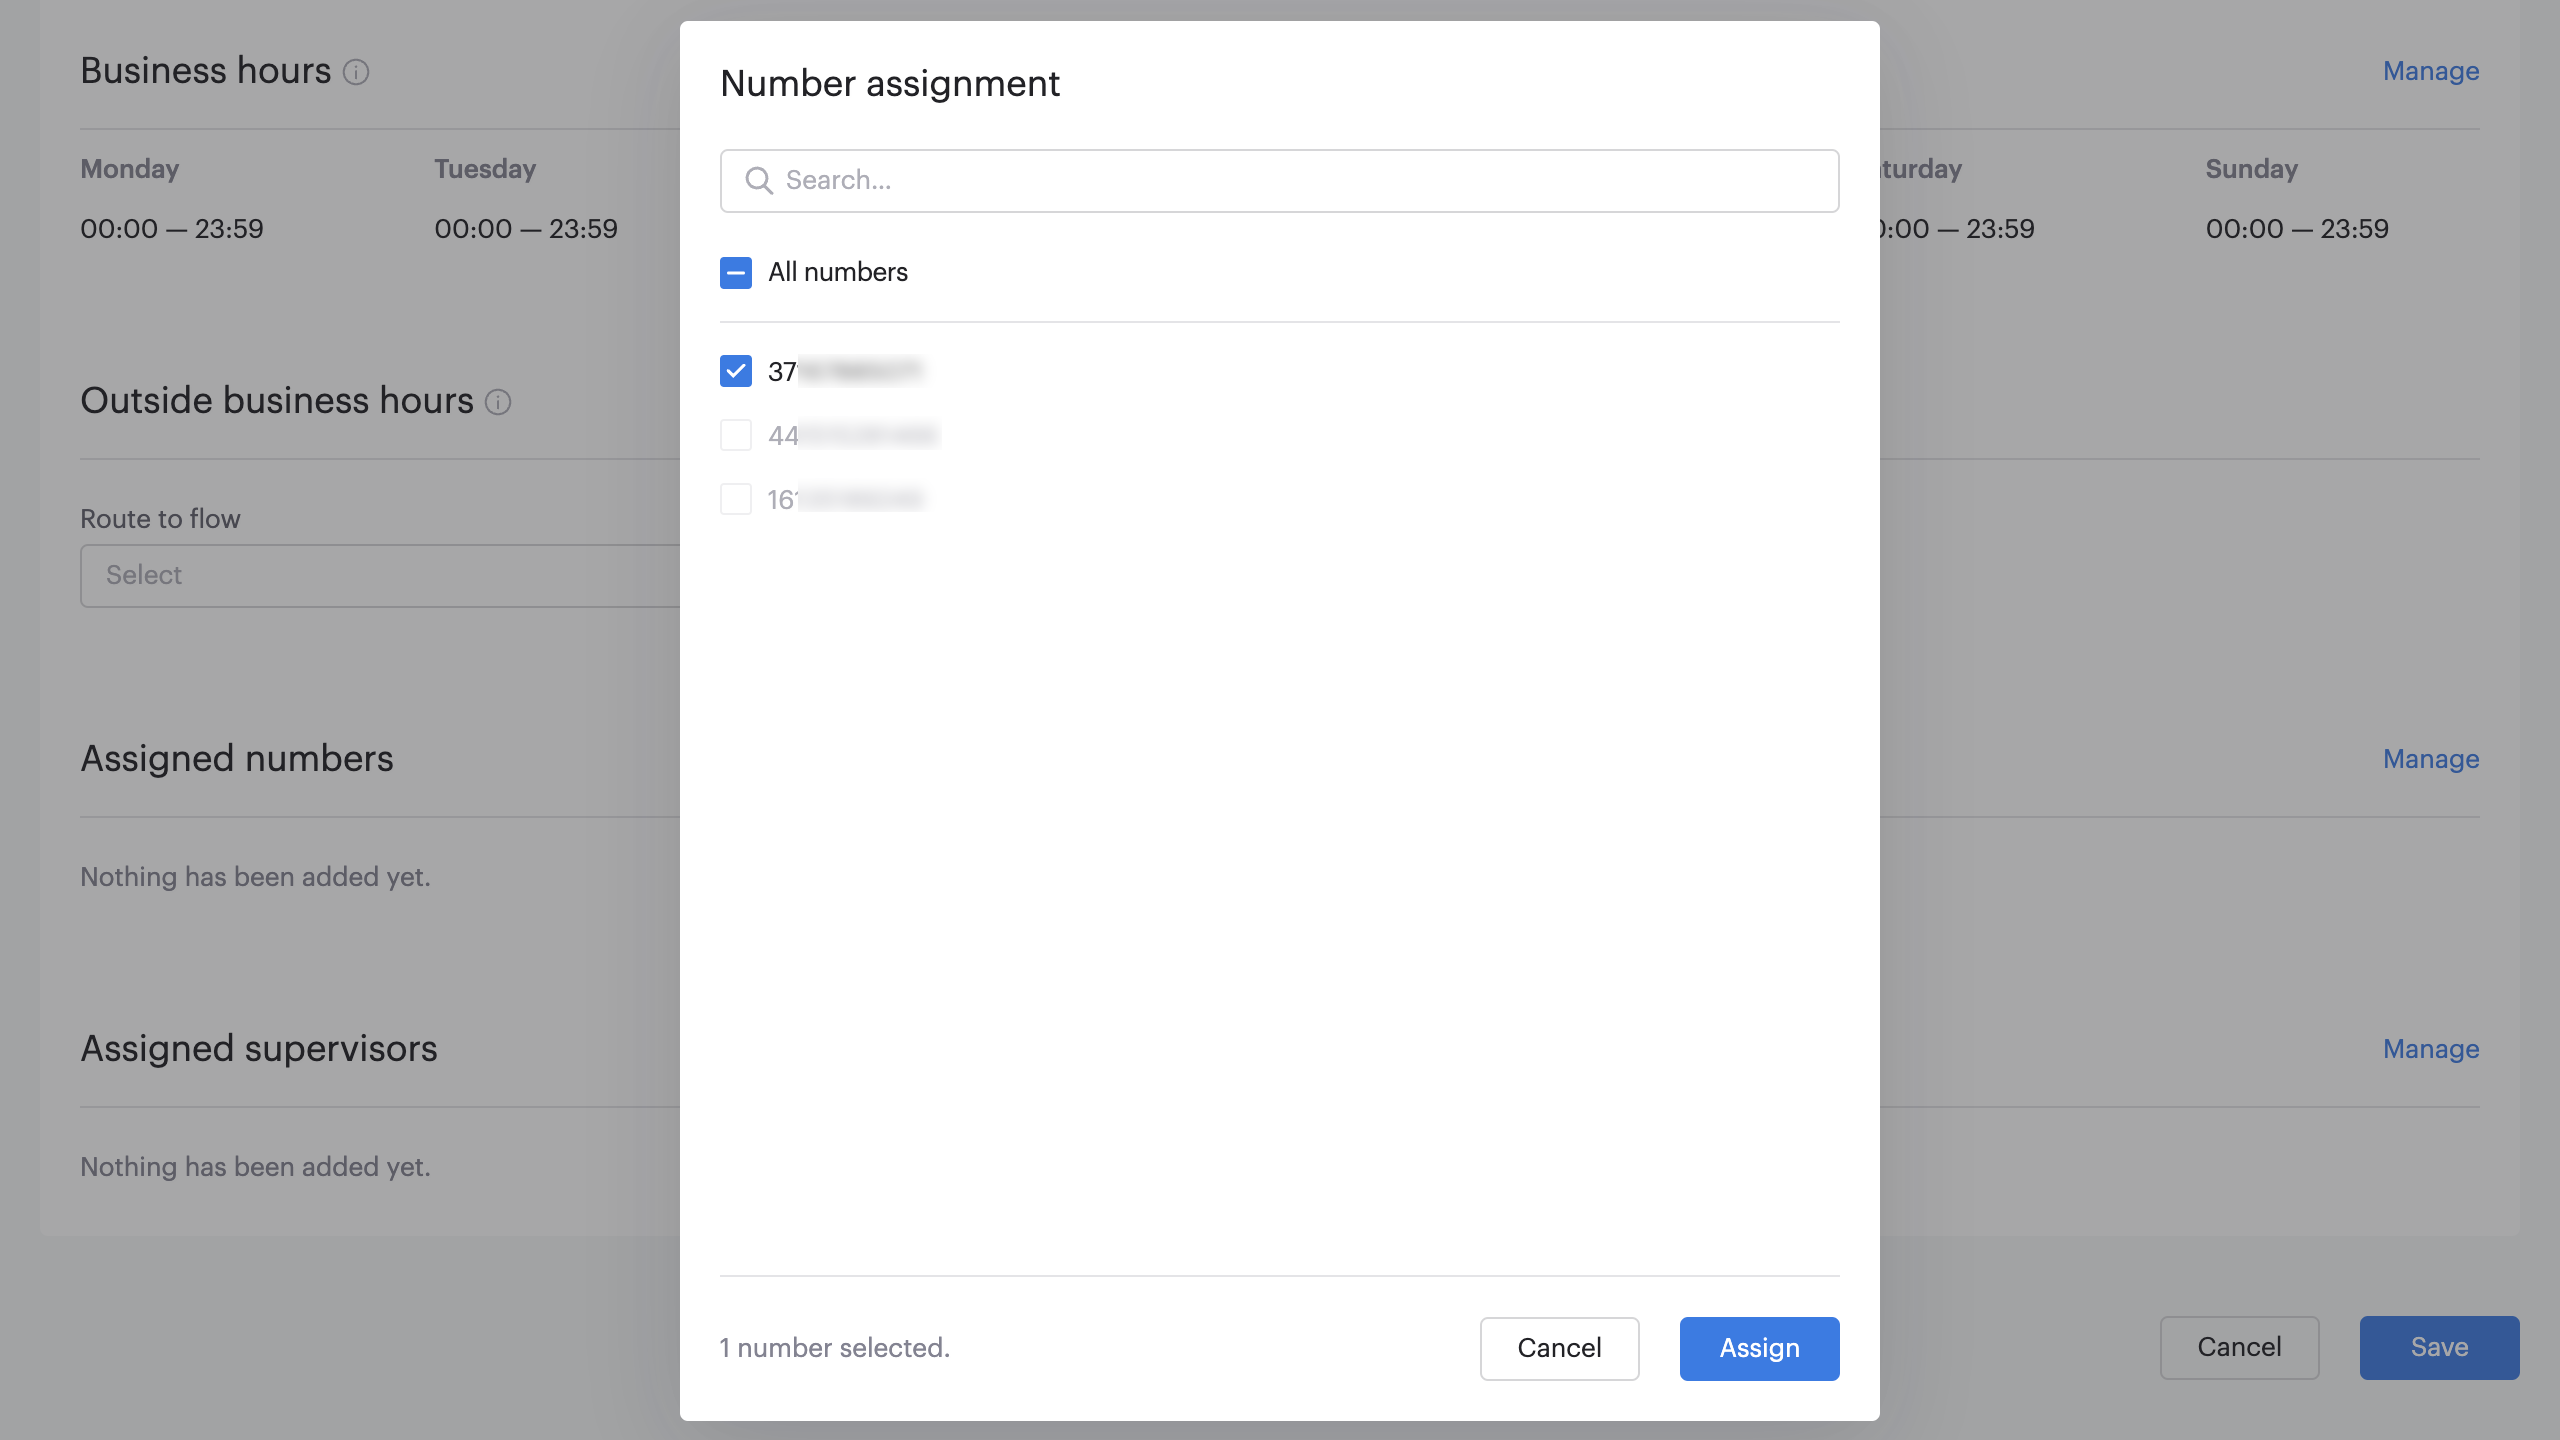
6. Add to flow
Numbers can be added to a flow.
- Navigate to Inbound > Flows, then either click Add flow to create a new flow or click the name of an existing flow.
- On the Add flow or Edit flow page, scroll down to the Assigned numbers section.
- Click Manage to open the Number assignment panel.
- Select or deselect numbers, then click Assign.
7. Delete number
You can delete one or more numbers from the Numbers page.
Select one or more numbers, then click the Delete icon at the top of the table. For a single number, click the Delete icon on the right of the number row.
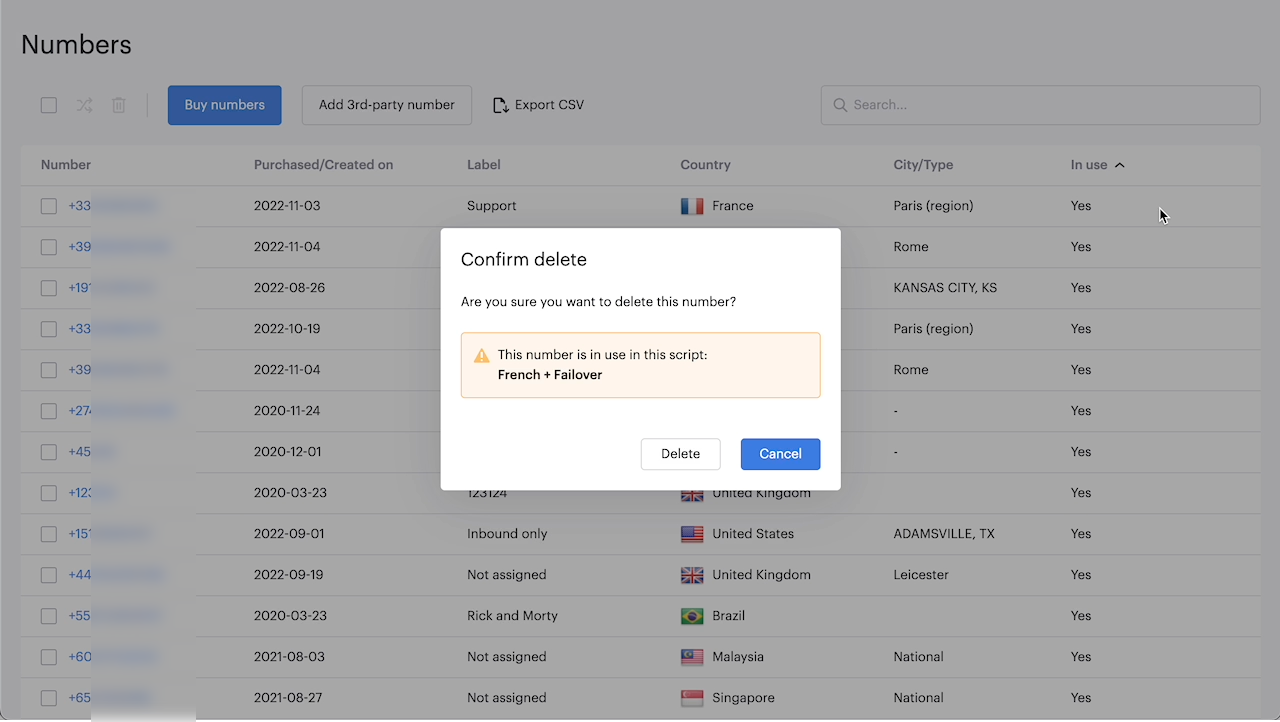
A warning panel is displayed to enable you to confirm whether you want to delete the number or numbers.
If you try to delete numbers that are in use in a flow, CID group, or user default Caller ID, a confirmation panel or error message is displayed showing you where the number or numbers are in use. If you click Delete, the number is removed from your Numbers list and from anywhere that it is used.
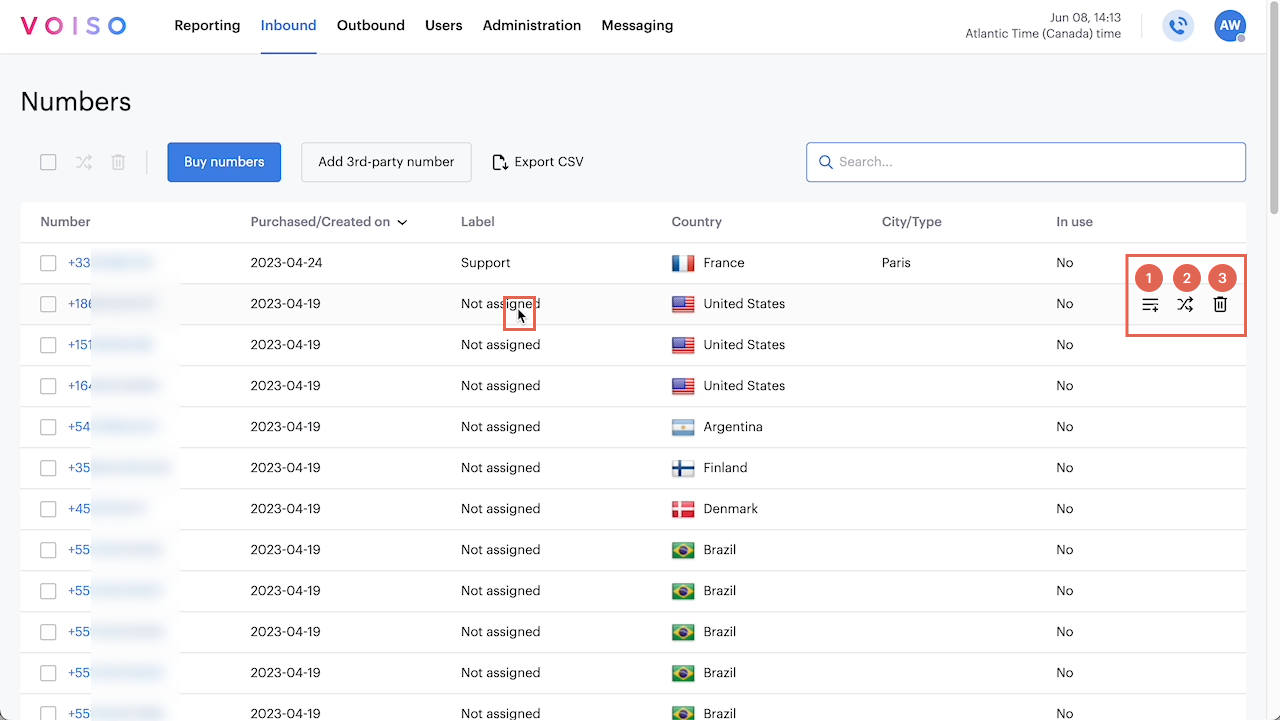
8. Row actions
Each number row in the Numbers table includes a set of action icons on the right side. The action icons enable you to specify one of the following actions to be performed on the number:
- Add to Caller ID groups (1)
- Add to flow (2)
- Delete (3)
9. Export CSV
You can export a CSV file of all or a subset of your numbers. The numbers in the CSV file are sorted in the order you display in the Numbers page.
To export all numbers, clear the search field, then click Export CSV.
To export a subset of your numbers, use the search to display only the numbers to be exported, then click Export CSV.
If your subset of numbers requires more than a single page to be displayed in the Numbers page, the numbers from all pages are exported.
The CSV formatted file is downloaded to your computer.
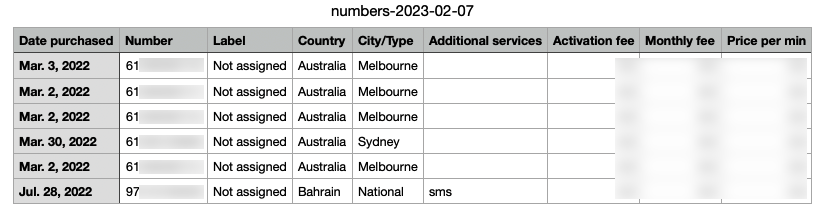
The file includes the following columns of data for each number:
- Date purchased
- Number
- Label
- Country
- City/Type
- Additional services
- Activation fee
- Monthly fee
- Price per min
10. Select status or statuses
Use the Select status or statuses menu to filter the view of the Numbers table to display only numbers that have a specific status. Use it to identify numbers that are "first use" or numbers affected by the ASR performance optimization feature.
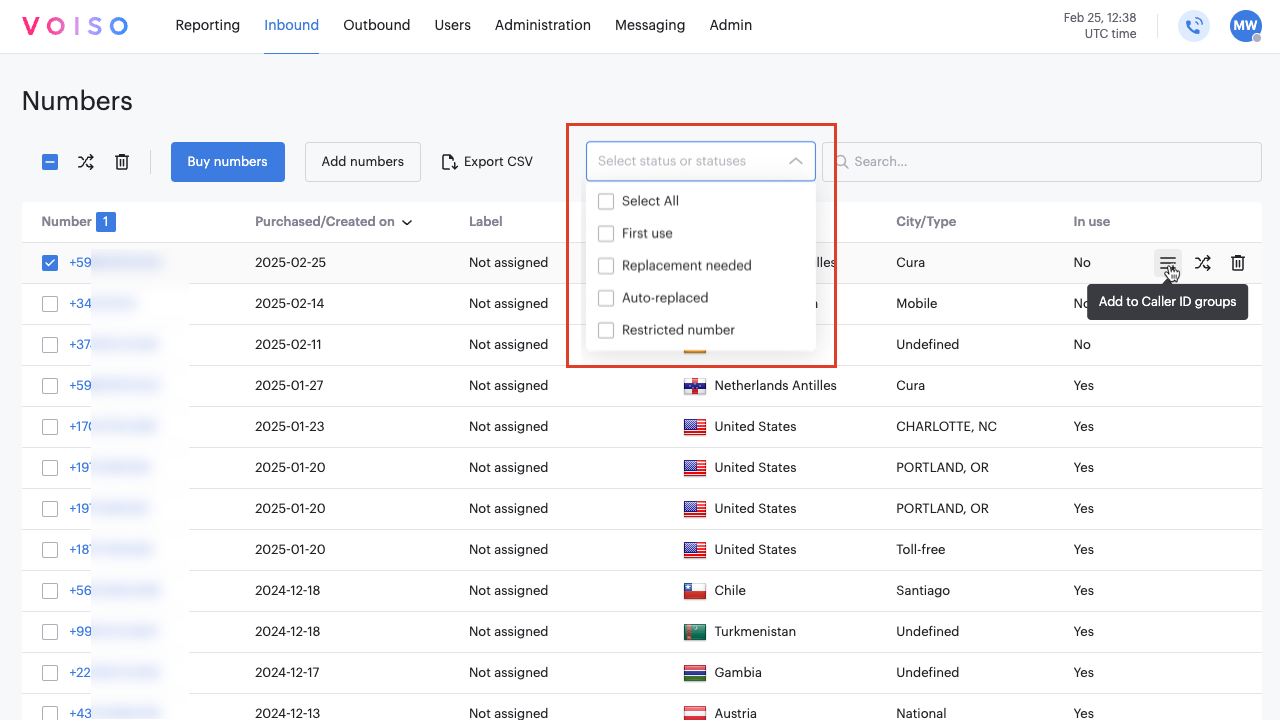
| Status | Description |
|---|---|
| Select all | View all status filters. |
| First use | View only numbers that were offered for sale for the first time. |
| Replacement needed | View only numbers that have exceeded the Max dialing attempts and Replacement interval limits defined in System settings, but there are no numbers available in your inventory to replace them. |
| Auto-replaced | View only numbers that have exceeded the Max dialing attempts and Replacement interval limits defined in System settings and have been replaced by another number. They are no longer being used as a Caller ID. |
| Restricted number | Some numbers are restricted in certain jurisdictions until your contact center provides the papers verifying status as a real legal entity as part of a compliance check. |
Buy Numbers
Contact your Voiso account manager or support team about extending numbers and countries that are available for you to buy from the Buy numbers page.
To buy new numbers for your contact center, from the Voiso navigation bar, navigate to Inbound > Numbers, then click Buy numbers.
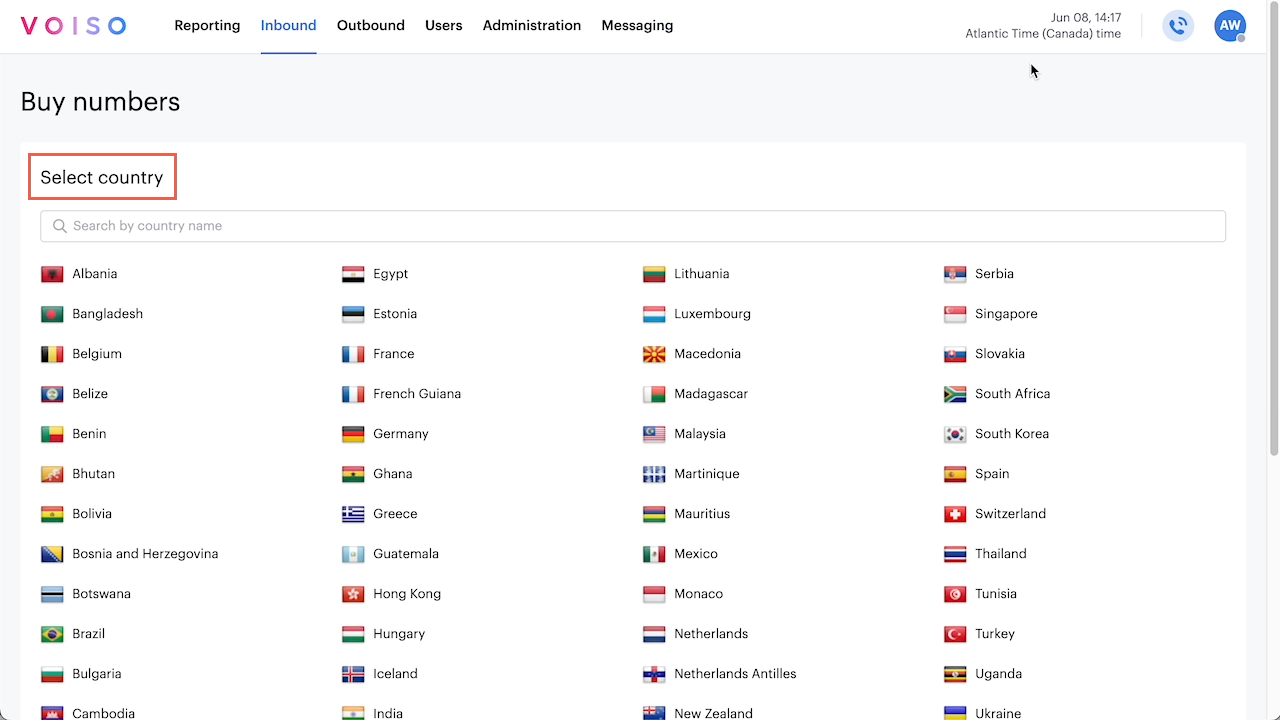
Buy numbers page
When you click Buy numbers, the Buy numbers page is displayed. The Select country panel contains an alphabetically sorted list of the countries that are available for your contact center.
If you need to add more countries to the Country page, click Contact us at the bottom of the page or contact your Voiso account manager or support team directly.
To begin the purchase process, select a country for which you want to buy numbers.
Different options are displayed after you select a country, depending on the availability of numbers within that country and the types of numbers that are available for your contact center.
The following tabs might be displayed after you select a country:
| Number Type | Description |
|---|---|
| Geographic | A city, state, or region within the selected country. |
| National | A country-wide number. |
| Toll-free | A toll-free phone number, or freephone number in some countries, is billed to you rather than the calling party. Toll-free numbers enable contacts to call you without incurring long-distance phone charges. Toll-free numbers begin with a special dialing prefix, such as 800. |
| Mobile | A mobile phone number. |
| Shared-cost | A shared-cost number is partially billed to you and partially to the contact, enabling the contact to make a call to another country, but pay only the maximum rate for calls within their country. |
Buying numbers for a country
After selecting a country, click the tab with the number type in that country that you need, then select a phone number from the list of numbers.
The following section demonstrates selecting a Geographic number. The process is similar for other number types.
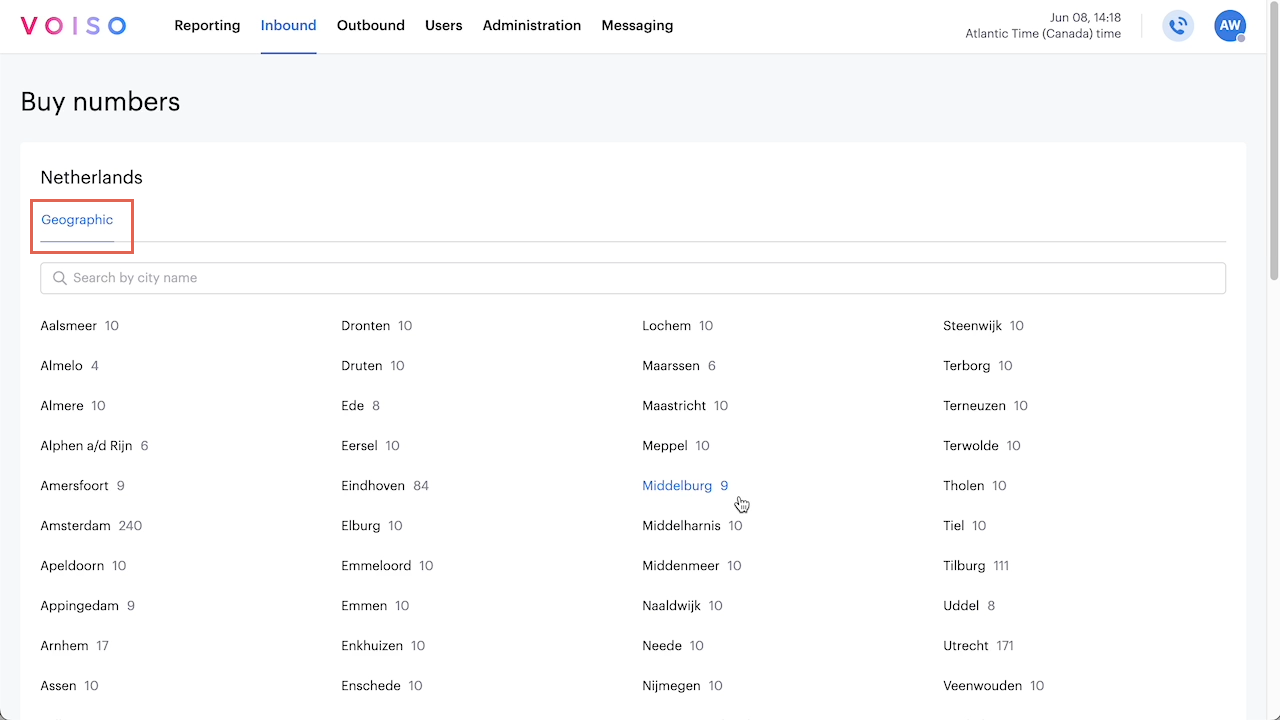
Geographic number type example
After selecting a country, in the Geographic number type panel, select a geographic region, such as a city. In the screenshot for the Netherlands, several cities and regions are listed. Next to each city or region name is the number of phone numbers available to buy for the geographic region. Use the Search field to find a specific city or region.
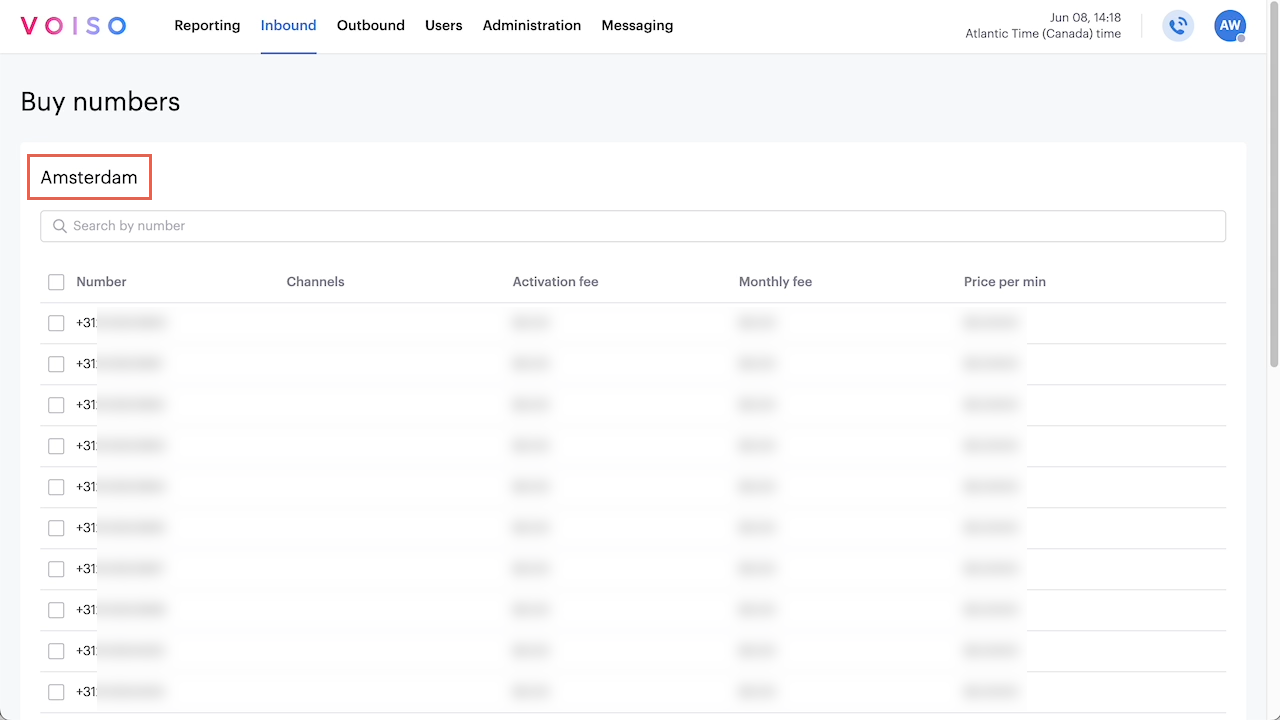
If the city of Amsterdam is selected, a table of phone numbers is displayed, along with their activation fee, monthly fee, and price per minute.
Use the Search field to look for a specific number string. When you select one or more numbers, the activation, current month, and monthly fees for the numbers are totaled at the bottom of the page.
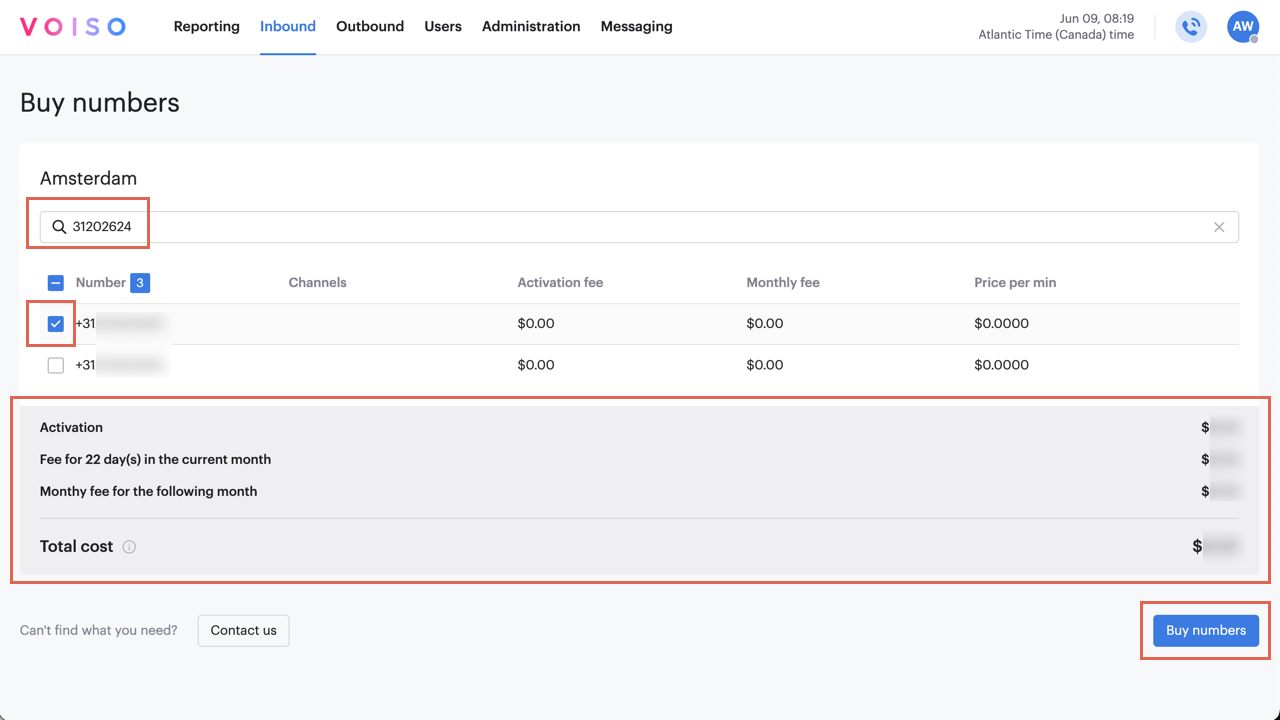
Click Buy numbers and follow the on-screen instructions to complete payment and add the numbers to your Numbers page.
The numbers do not appear immediately in the Numbers page. You have to wait a few minutes for them to be processed and assigned to your contact center.
Minimum service term
Some numbers available to buy have a minimum service commitment (for example, 6 months). Some minimum service commitment numbers include an early return fee equal to the remaining months of the term because Voiso must pay the carrier for the full term. Minimum service term numbers are clearly indicated in a transparent and understandable format whether you are browsing, purchasing, managing, or returning numbers.
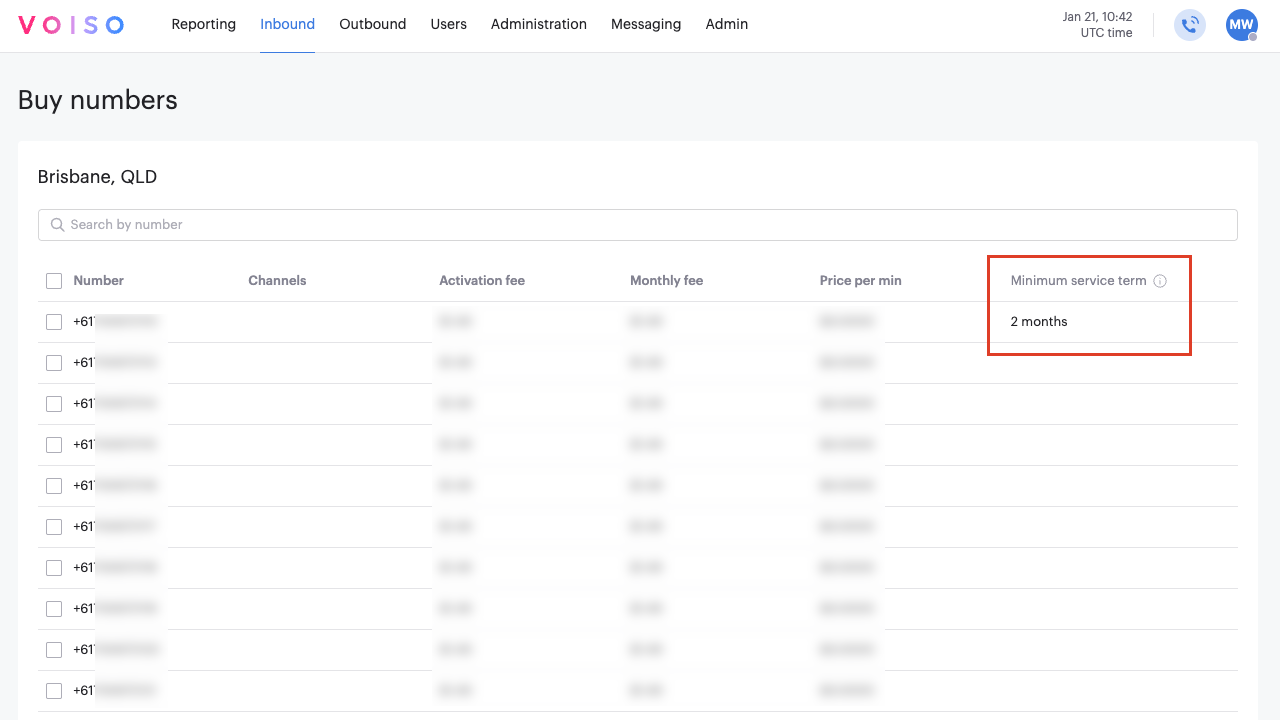
Browsing minimum service term numbers
When you are using the Buy numbers view to browse available numbers, numbers with a minimum service term include the number of months that must be purchased for the number in the Minimum service term column. Returning (deleting) these numbers prior to the end of the service term will result in your account being immediately charged for the balance of the term.
Purchase confirmation
If you select a number for purchase that has a minimum service term, after you click Buy numbers, a confirmation dialog box is displayed to you asking you to confirm that you understand the terms of the purchase of a minimum service term number. Click the checkbox to indicate that you agree to the service terms, then click Buy numbers to proceed with the transaction.
If you do not wish to purchase the minimum service term number, click Cancel to be returned to the Buy numbers page and deselect the numbers that have a minimum service term before proceeding with your purchase of other numbers.
Reviewing your purchased numbers
The Numbers page allows you to filter your numbers by their status, including numbers that have a minimum service term. Click the Select status or statuses menu, then select the Minimum service term option.
Click a number to view its properties in the number details panel. You can view how many months remain in your service term in the Pricing section. Numbers with a remaining service term will indicate the number of months remaining. When the term is complete, the minimum service term is no longer displayed.
Early return (deleting a number)
If you delete a minimum service term number before the end of the term, the following confirmation message is displayed:
This number has a minimum service term. If you delete it now, your account will be charged immediately for the remaining months:
$x.xx
Click Delete to return the number or Cancel to keep using the number.
Post term return (deleting a number)
If you delete a minimum service term number after the end of the term, the number is returned with no additional fee applied.