Who should read this article: Administrators
The Voice Dialer automates outbound calling campaigns and enables you to either import your calling list or integrate it with your CRM.
Introduction
The Voiso Dialer automates outbound voice campaigns by connecting available agents to contacts from a prepared calling list. You can supply this list by uploading a CSV or XLSX file, integrating with your CRM, or using an API. This article walks you through the steps to create and configure a new Dialer campaign using Voiso's flexible campaign setup interface.
Before getting started, make sure your contact center meets the prerequisites and review the options for importing contact lists, assigning agents, and managing campaign behavior. For a guided example, refer to the How to run a Dialer campaign series.
Prerequisites
Before creating a new outbound Dialer Campaign, make sure the following requirements are met:
-
Decide how you will supply the calling list:
-
Confirm that agents are available to handle calls during the local time of the contacts being called.
-
Ensure that appropriate Caller IDs are available for the geographic regions targeted by your campaign.
Adding a new campaign
There are two ways to add a new outbound Dialer campaign. The first is to create one from scratch by clicking Add campaign from the Campaigns page. The second is to clone an existing campaign.
To clone a campaign, in the Campaigns page hover your mouse pointer over the campaign to be cloned, then click the Clone button on the far right side. A copy of the selected campaign parameters is displayed in the Edit campaign page. Follow the steps for adding a campaign to edit the parameters of the cloned campaign.
Add/Edit campaign page
Use the Add campaign or Edit campaign page to specify the parameters of your outbound Dialer campaign. The page is divided into the following sections:
To delete a campaign that is in the Draft status, open the campaign in the Edit campaign page, then click Delete campaign.
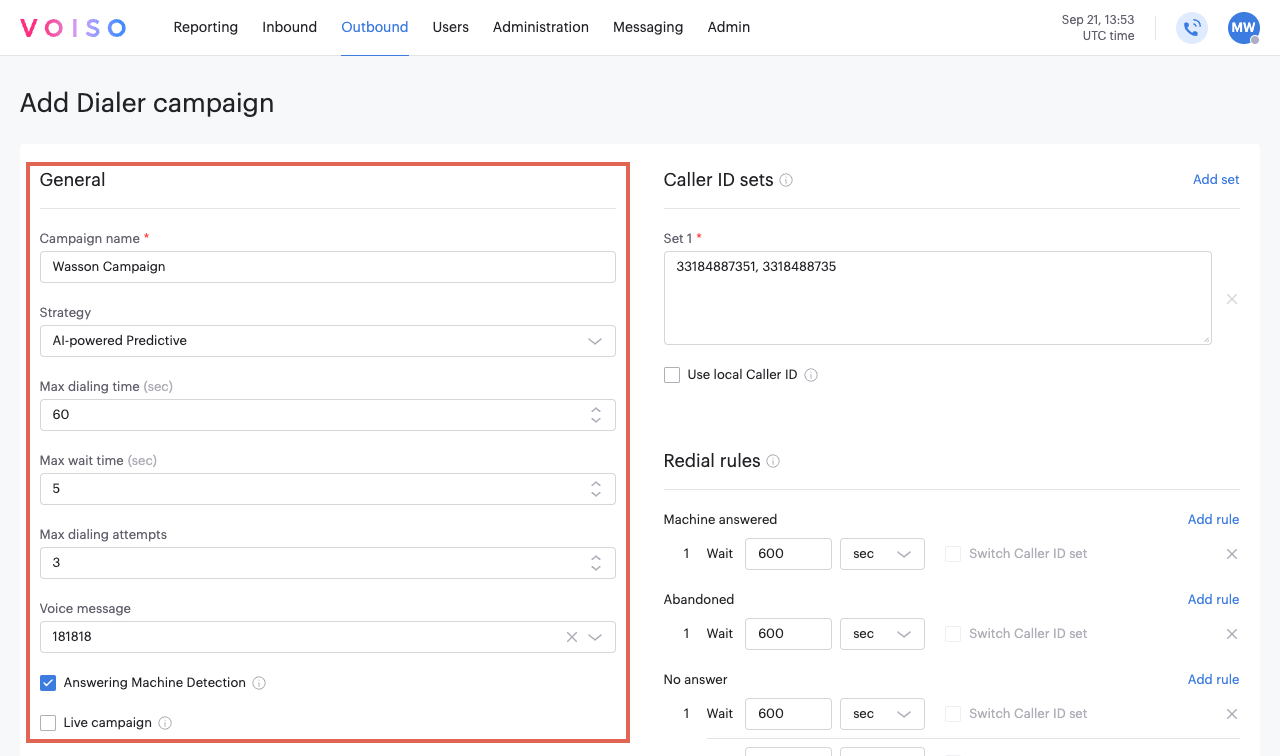
General
Use the General section to define the name and dialing parameters of your campaign. The General section includes the following parameters:
The old Predictive dialing strategy is no longer supported. Please use the AI-powered Predictive strategy instead.
| Parameter | Description |
|---|---|
| Campaign name | A unique name identifying your campaign. |
| Strategy | Choose between Progressive (Progressive Dialer) and AI-powered Predictive (Predictive Dialer). Refer to Part 2: Dialer campaigns for information about campaign strategies. |
| Dial level | (Progressive only) A multiplier for the number of active agents to determine the number of calls dialed simultaneously. |
| Dial level override / Active agents threshold / Override value | (Progressive only) A throttle for the number of calls dialed simultaneously. If the number of active agents falls below a specified threshold, the overridde dial level is applied. Applies only when Enabled is selected. |
| Max dial time | Specify how long the system should wait for a contact to answer the call or other response. |
| Max wait time | Specify how long you are willing to let a contact wait after they pick up a call for an agent to answer the call if all agents are busy. |
| Max dial attempts | Specify the number of calls that may be made to an individual contact number if they aren’t responding. |
| Voice message | Specify a media file, of type Voice Message, that is played to a contact who answers a call. Note: For messages played to agents when a Dialer call connects, set the Notification sound on Dialer connection option on the Contact Center tab in System Settings; see Contact Center tab. |
| Answering Machine Detection | Answering Machine Detection (AMD) analyzes answered Dialer campaign calls to determine whether they are answered by a person or an answering machine. Note: AMD is required for AI-powered predictive dialing campaigns. Refer to Part 2: Dialer campaigns for information about campaign strategies. |
| Leave Voice message on Voicemail | Instead of ending the call, you have the option to specify a pre-recorded voice message that is automatically played when the system detects that Voicemail has started recording a message. |
| Live campaign | Allow the campaign to run endlessly while it periodically retrieves new leads from a CRM or obtains leads through an API. Live campaigns may be stopped manually on the Campaign page or be deselecting Live campaign. |
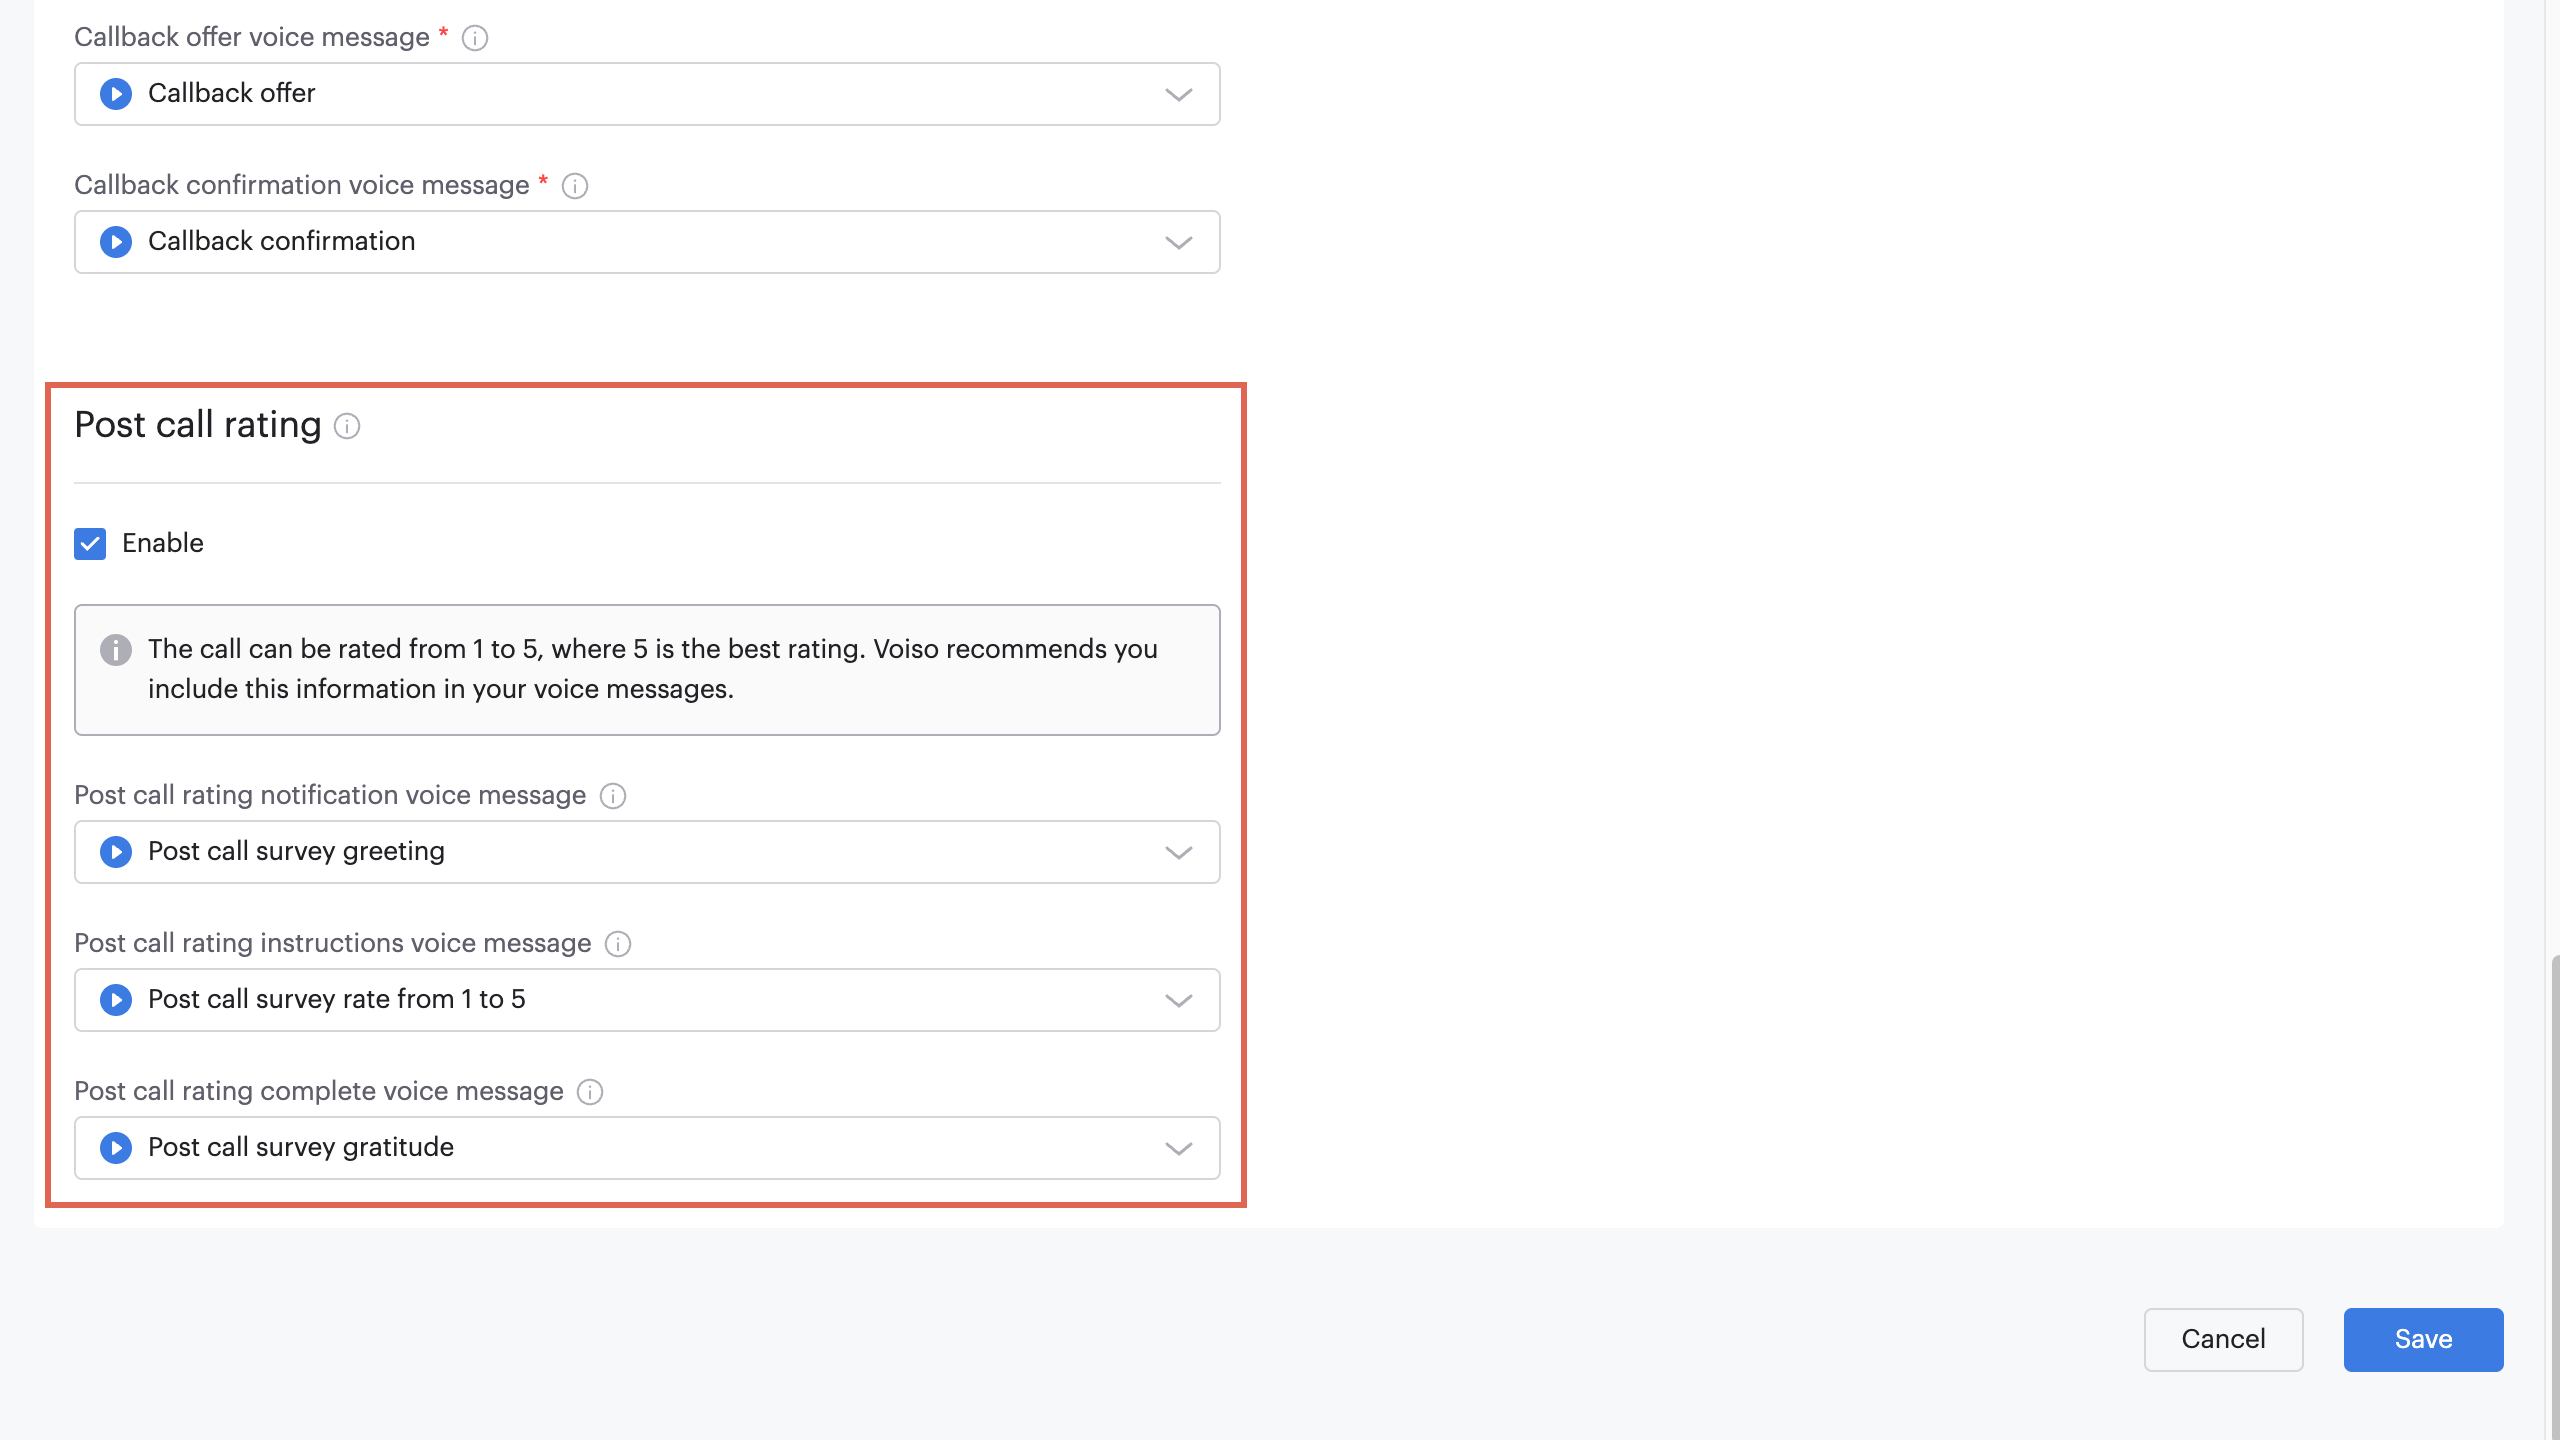
| Post call rating | Allow contacts to provide feedback about an outbound Dialer campaign call by asking them to participate in a survey. The Post Call Rating feature must be enabled for your contact center to see this option. |
Answering Machine Detection
Answering Machine Detection (AMD) analyzes the first 3.5 seconds of a call to determine if it is answered by a person or a machine. Thanks to AMD, calls answered by machines are disconnected automatically, ensuring agents only handle live calls.
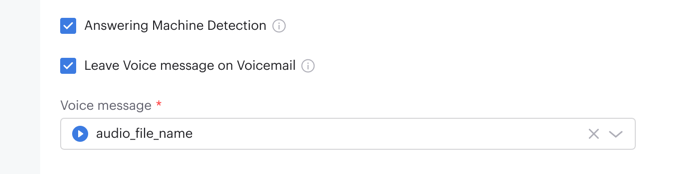
Instead of ending the call, you have the option to specify a pre-recorded voice message that is automatically played when the system detects that Voicemail has started recording a message.
Post call rating
Three menu options display when post call rating is enabled:
| Parameter | Description |
|---|---|
| Post call rating notification voice message | The greeting message that plays when a contact answers a call during a Dialer campaign. Select the default greeting message, Post call survey greeting, or choose another voice message from your media library. The default message is: "Please rate our service after the call". If you leave the field blank, no message will be played for this stage – instead, you might want to have your agent request that the contact participate in the survey. |
| Post call rating instructions voice message | The reminder message that plays when the agent ends the call. Select the default post call message, Post call survey rate from 1 to 5, or choose another voice message from your media library. The default message is: "Please rate your experience with our company on a scale of 1 to 5, where 1 is poor and 5 is outstanding." If you leave the field blank, no message will be played for this stage – instead, you might want to have your agent request that the contact participate in the survey. |
| Post call rating complete voice message | The "thank you" message that plays after the contact makes a selection. Select the default thank you message, Post call survey gratitude, or choose another voice message from your media library. The default message is: "Thank you for participating in our survey." If you leave the field blank, no message will be played for this stage and the system automatically ends the call. |
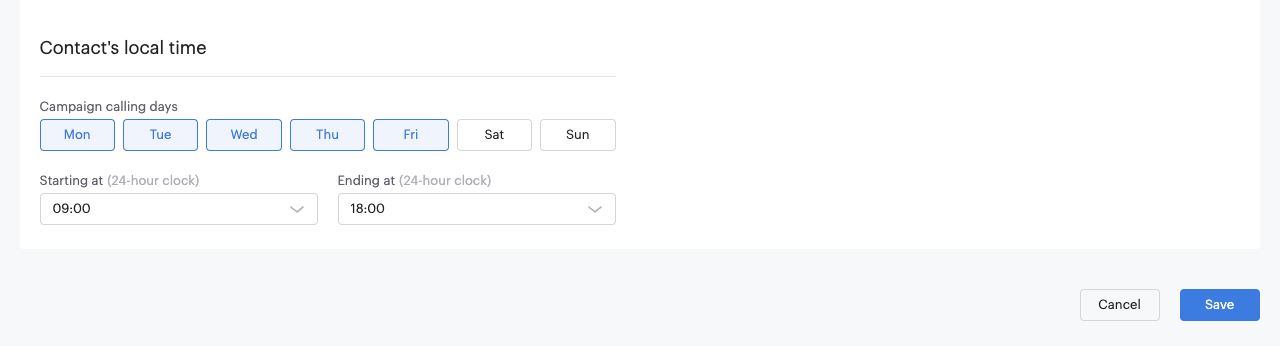
Contact's local time
Use the Contact's local time feature to specify when each contact in the campaign may be called. Voiso knows the locale of each phone number in the campaign and ensures that contacts are called only during the days and times that you select. This feature ensures that contacts are not called at hours that are inconvenient, such as during the night, at dinner time, and so on. This feature also helps you to remain compliant with local regulations.
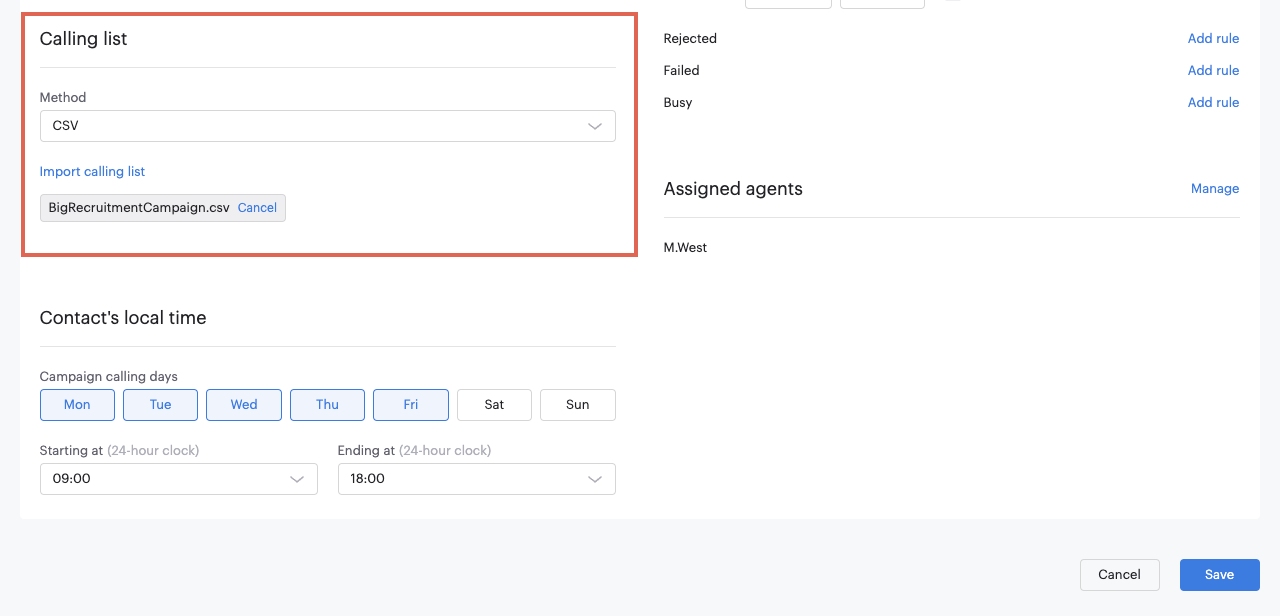
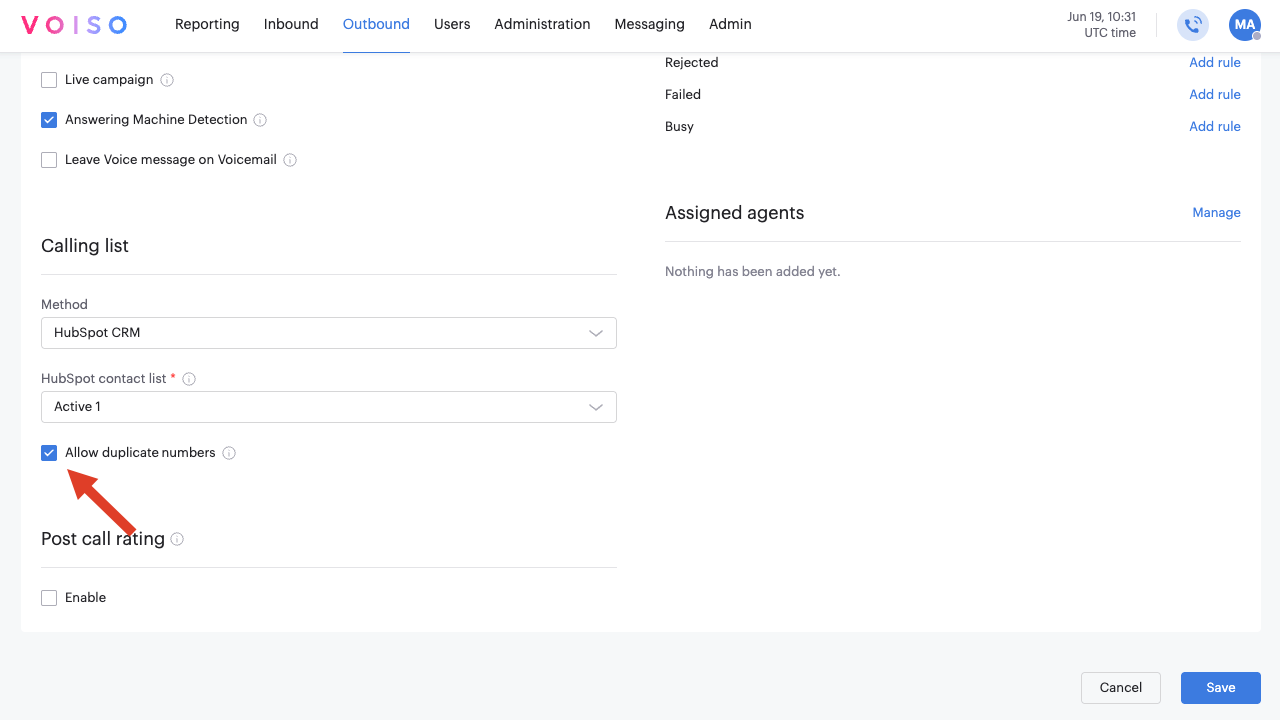
Calling list
There are three methods for importing the list of contacts and phone numbers into your campaign: File import (CSV, XLSX), CRM, and API.
Allow duplicate numbers
By default, Dialer removes duplicate phone numbers from imported calling lists. Enable Allow duplicate numbers to preserve duplicate entries and treat each occurrence as a separate lead. This is useful when the same phone number may be associated with different lead sources, marketing campaigns, customer records, or follow-up attempts that need to be processed independently.
Live campaigns
If you select Live campaign from the General section, and the dialing order feature is enabled for your contact center, the Enable Dialing order option is displayed. Select this option to specify the order in which numbers should be dialed during the campaign.
Selecting a dialing order overrides the priority assigned to individual numbers.
The Dialing order option gives you more control over how Live campaigns process newly added numbers. You can choose one of two dialing modes for that campaign:
- First in, first dialed: the campaign works through numbers in the order they were added, ensuring the oldest numbers are dialed first.
- Last in, first dialed: the Dialer always prioritizes the most recently added numbers.
File import
The file import method enables you to import one or more CSV or XLSX (Microsoft Excel) files containing columns of contact information for contacts to be called during the campaign.
Depending on your goals, Voiso supports files with different columns of data. For example, only phone numbers, phone numbers with a URL, or phone numbers with name and source.
Work with your Voiso account manager to configure the most appropriate file format for your business.
To use a calling list file for your calling list, in the Calling list section, select File import from the Method menu, then click Import calling list. Navigate to the calling list file or files on your computer, then click Upload.
You may select multiple files for import. They must each have a unique file name and have the same column heads and formatting.
Voiso processes the file(s) to check for invalid and duplicate numbers, and to ensure that the format of the file matches the format configured for your contact center.
Refer to Running a campaign for more information about using a calling list file for your Dialer campaign calling list.
CRM
Voiso supports many different CRM services. You can use the Voiso CRM integration feature to access your CRM database to provide a calling list for your Dialer campaign.
| Integration | Click-to-call | Screen pop | Calling list import | Call history |
|---|---|---|---|---|
| Bitrix24 | ✔ |
✔ |
✔ |
✔ |
| Falcon | ✔ |
✔ |
✔ |
✔ |
| Fintech | ✔ |
✖ |
✖ |
✖ |
| Freshdesk | ✔ |
✖ |
✖ |
✖ |
| Hubspot | ✔ |
✔ |
✔ |
✔ |
| Leverate | ✔ |
✖ |
✔ |
✖ |
| Panda | ✔ |
✔ |
✔ |
✔ |
| Salesforce | ✔ |
✔ |
✔ |
✔ |
| Zenoti | ✔ |
✔ |
✔ |
✔ |
| Zoho CRM | ✔ |
✔ |
✔ |
✔ |
| Zoho Desk | ✔ |
✔ |
✖ |
✔ |
To use a CRM to provide your calling list, in the Calling list section, select the name of your CRM from the Method menu. Depending on which CRM integration you use, different options become available.
For some CRM integrations, you choose the name of a campaign that you have created in your CRM. Refer to Running a CRM campaign and CRM integration overview for information about CRM generated calling lists.
API
Refer to the Voiso v4 API for information about the available endpoints for creating campaigns and adding leads.
Contact sources and countries
After the calling list is processed, the Contact sources and countries section is added to your campaign. You can use this section to omit calling certain sources or destinations from the campaign.
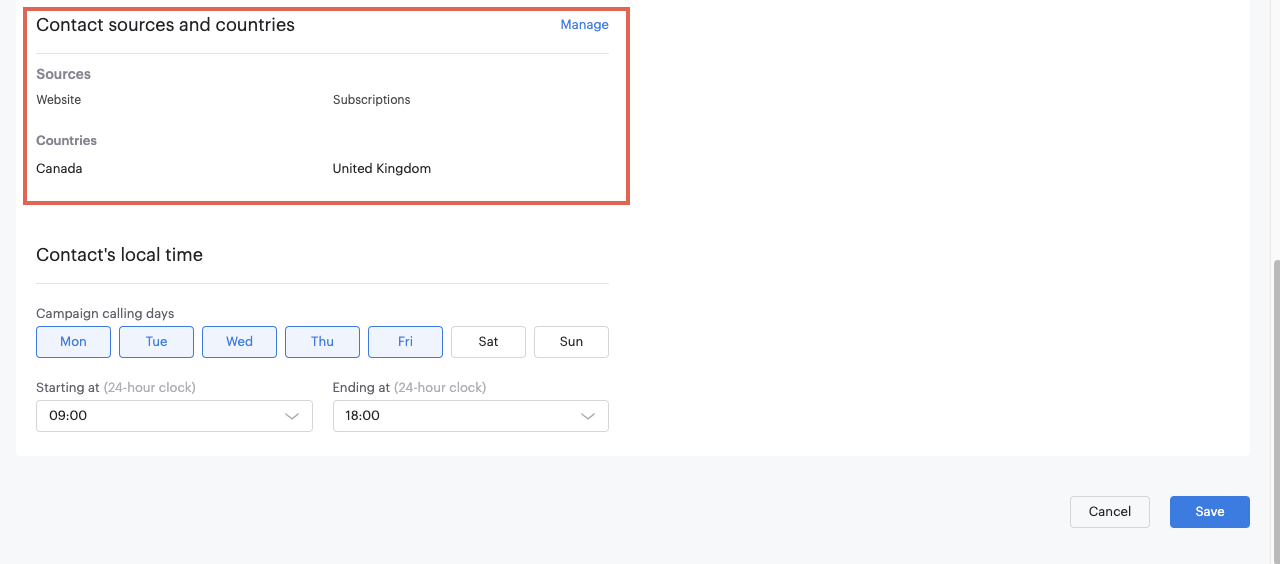
Click Manage to display the Contact sources and countries assignment panel. Select countries or sources to include them in the campaign, or deselect countries or sources to exclude them from the campaign.
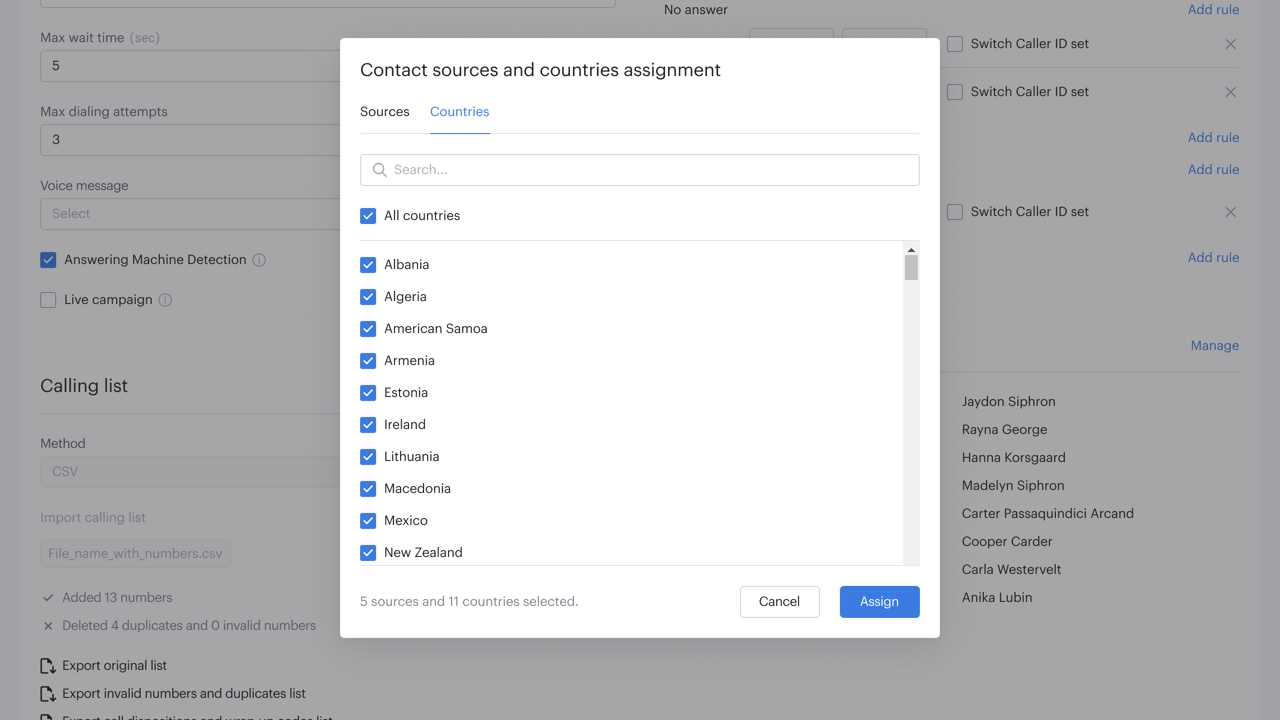
Sources are available only for certain CSV formats. Contact your Voiso account manager if you want to use contact sources in your CSV calling list.
Caller ID sets
Every campaign must include at least one number from which your contacts will be called. Specify one or more Caller IDs in the Set 1 field. You can enter multiple numbers separated by commas or on separate lines.
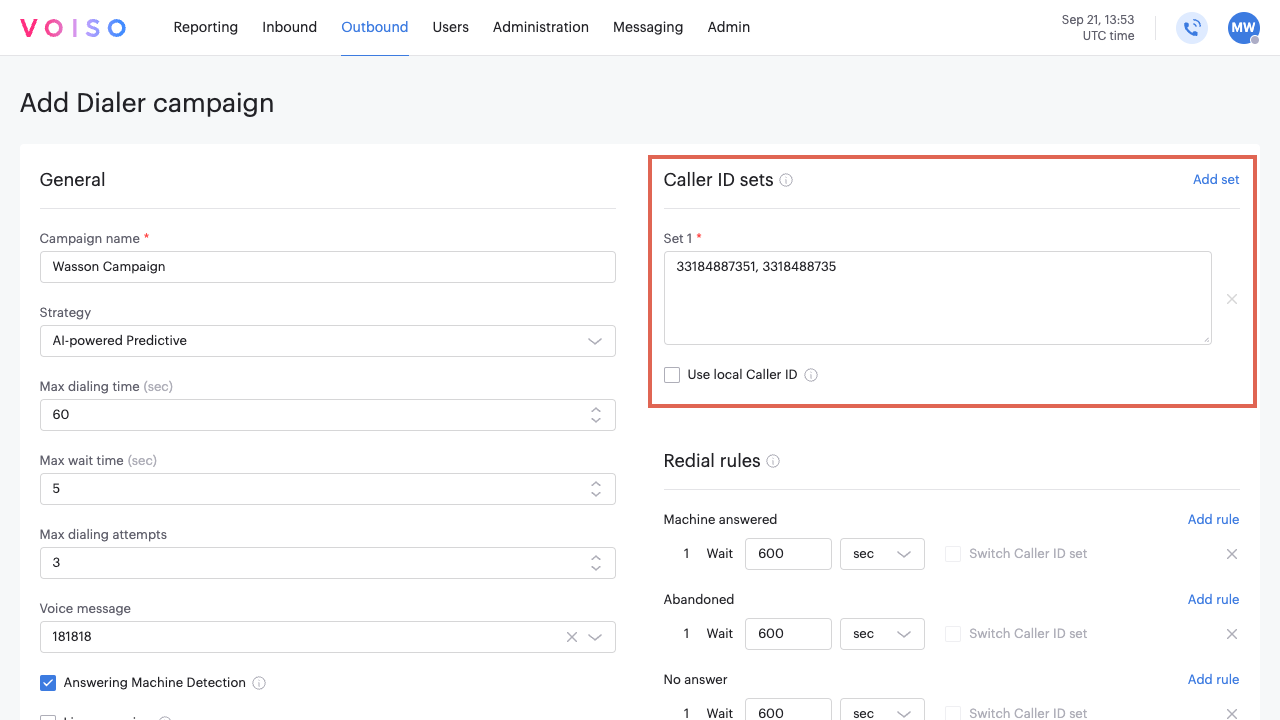
Most campaigns include multiple groups of Caller IDs, known as Caller ID sets. Numbers in each set are used in rotation for outbound calls. You can run several campaigns simultaneously and assign either the same or different Caller IDs to each one.
Add multiple sets so that a different selection of Caller IDs can be used for redials (callbacks).
To add another Caller ID set, click Add set. A text field labeled Set 2 appears. Each additional set is numbered sequentially (Set 3, Set 4, Set 5, and so on).
Numbers in use
When you assign numbers to a Dialer campaign, Voiso tracks whether those numbers are already part of your contact center inventory. This ensures that active numbers are properly linked to campaigns and helps prevent accidental reuse or deletion. Here's how it works:
- If you enter numbers in a Set field that are already purchased or added on the Numbers page, the number’s details panel will display a link indicating that it is in use in an active campaign. From the details panel, you can navigate directly to the Dialer campaign pages where the number is assigned.
- If you enter numbers in a Set field that are not yet purchased or added on the Numbers page, they will not automatically appear in your numbers list. However, if you later purchase or add the number, it will automatically be linked to the campaign while it remains active.
- If you attempt to delete a number from the Numbers page that is currently in use in a campaign, a warning dialog box is displayed, prompting you to confirm the removal. When a campaign ends, the link between the number and the campaign is automatically removed.
Local Caller ID
If your campaign targets multiple countries or regions, you can assign Caller IDs that match each contact’s location. Select Use local Caller ID to assign Caller IDs based on the call destination. If you add multiple numbers for the same country or region, they are used in rotation. If no local numbers exist for a destination, one of the other numbers in the list is used at random.
For example, in a European campaign:
- Calls to Germany cycle through the German Caller IDs.
- Calls to France cycle through the French Caller IDs.
- Calls to Italy progress through all available numbers if no Italian Caller ID is assigned.
Use separate Caller IDs for campaigns instead of reusing numbers assigned to manually dialed calls.
ASR performance optimization
If the ASR performance optimization feature is enabled in System settings, the ASR performance optimization option is enabled by default for all new campaigns.
When the feature is enabled for a Dialer campaign, Caller IDs in the Dialer campaign are monitored by the ASR performance optimization feature based on the Max dialing attempts and Replacement interval defined in System settings. When a threshold is reached, the number is automatically replaced in all associated campaigns and Caller ID groups.
Refer to ASR performance optimization for more information about this feature.
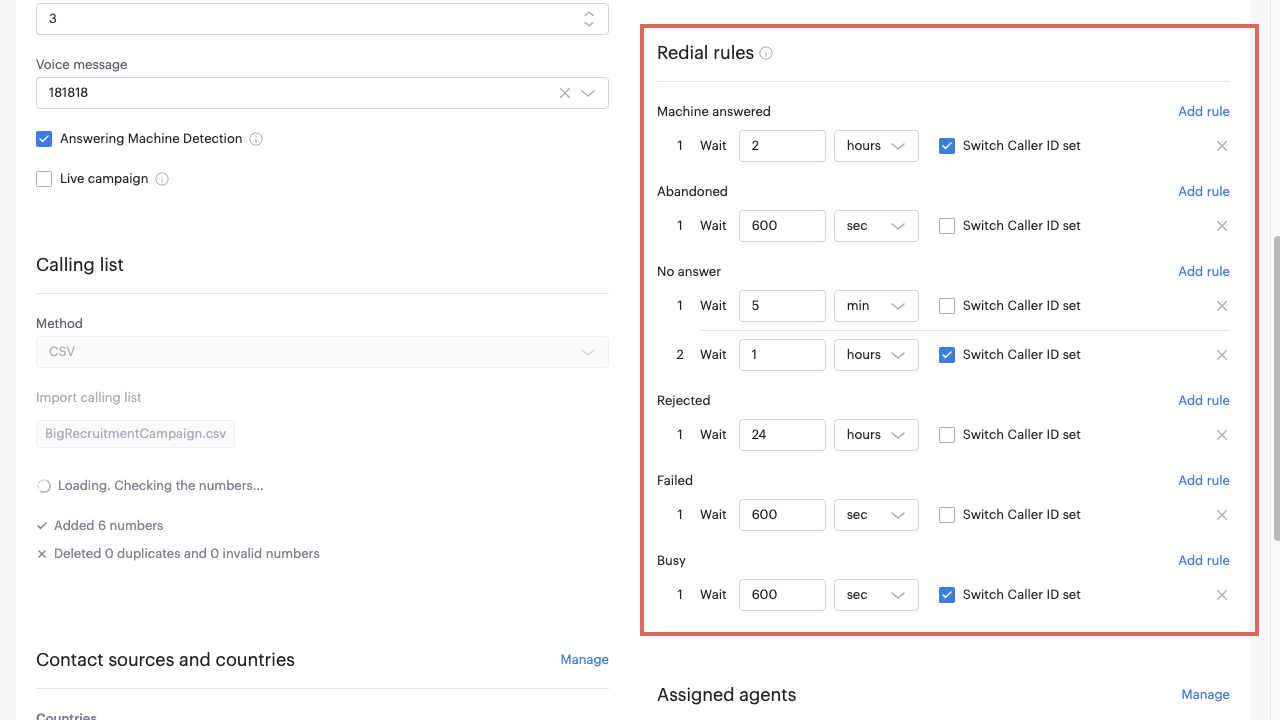
Follow-up rules
Follow-up rules let you define what happens when a contact cannot be reached on the first attempt. You can configure a sequence of actions—such as waiting and redialing or sending a WhatsApp message—to improve contact rates and continue the conversation through additional channels.
The total number of call attempts is constrained by the Max Dial Attempts setting.
Follow-up mode
The Follow-up mode lets you specify how priority is assigned to numbers to be redialed during follow-up dialing. Select of of the following follow-up modes to determine redial priority:
- Timer — the default behavior. Redialing strictly follows the configured delay timer rules.
- Lowest attempt — respects the delay timer rules but prioritizes numbers with the fewest dial attempts.
How Lowest attempt works
The Lowest attempt option prioritizes contacts with the fewest dial attempts in the campaign. Instead of progressing independently, contacts are selected based on their current attempt count, ensuring that those with fewer attempts are retried first.
This approach creates a more balanced distribution of retries across the contact pool. The dialer works through contacts in stages, gradually increasing attempt counts so that all contacts are retried more evenly over time, rather than allowing individual contacts to advance ahead of others.
Redial delay timers are still fully respected in this mode. A contact is only eligible for redial once its configured delay has passed. Among all eligible contacts, the dialer selects the one with the lowest attempt count. If multiple contacts share the same lowest count, the existing campaign order is used to determine which contact is dialed next.
Add rule
You can specify follow-up rules for the following scenarios:
| Scenario | Description |
|---|---|
| Machine answered | The call was answered by an answering machine. This rule is only available if Answering Machine Detection (AMD) is enabled for the campaign. |
| Abandoned | The call was answered by a person, but no agents were available, and either the person hung up or the call was terminated by the system. |
| No answer | The call was not answered. |
| Rejected | The call was rejected by the carrier, the contact, or due to technical issues. |
| Failed | The call did not go through. |
| Busy | The contact was on another call or was in Do Not Disturb mode. |
For each rule, click Add Rule and choose an action from the dropdown menu:
- Redial: Set a delay before redialing the same contact.
- Send WhatsApp: Send a templated WhatsApp message as a follow-up. This action is available only if your contact center has the WhatsApp follow-up rules in dialer feature enabled.
You can create follow-up sequences that combine WhatsApp messages and redial attempts. For example, you can send a WhatsApp message after the first attempt, wait a few minutes, then try calling again.
Machine answered rule
When the maximum number of attempts is reached for any individual rule, the system no longer attempts to redial the number. However, if a number is first answered by a machine, then later there was no answer, and finally it was busy, that count as three redial attempts, so the system keeps redialing until either Max Dial Attempts is reached or all the attempts specified by an individual rule are completed.
Redial follow-up action
The Redial action enables you to set a delay before redialing the same contact. You can add multiple wait actions with different intervals. The wait interval is the number of seconds, minutes, or hours to wait until a redial attempt should be made for each scenario type. For example, you might want to wait longer if there is no answer than if the line was busy.
Send WhatsApp follow-up action
For more information about sending WhatsApp messages as part of a Dialer campaign, refer to Automating WhatsApp messaging in a campaign.
When you select Send WhatsApp, the following fields appear:
- Select channel: Choose the WhatsApp profile to send the message from.
- Select template: Select a pre-approved WhatsApp message template.
After the WhatsApp message is sent, the interaction automatically transitions to the Archived state.
Caller IDs
To avoid multiple calls from the same Caller ID, select Switch Caller ID set next to the rule. If Use local Caller ID is enabled, the new group inherits this rule.
Assigned agents
Agents handle the calls made to contacts in an outbound Dialer campaign. Agents are Users with WebRTC Softphone or Hardware Phone configured for their account.

To assign agents to a campaign, scroll to the Assigned agents section, then click Manage to display the Agent assignment panel.
Voiso provides a lot of flexibility for adding agents to campaigns. You can add them either as part of a team or individually. You can also choose to add all teams or all agents. If you select a team, you can choose to remove agents from the campaign without removing them from the team by expanding the entry for the team and deselecting one or more team members.
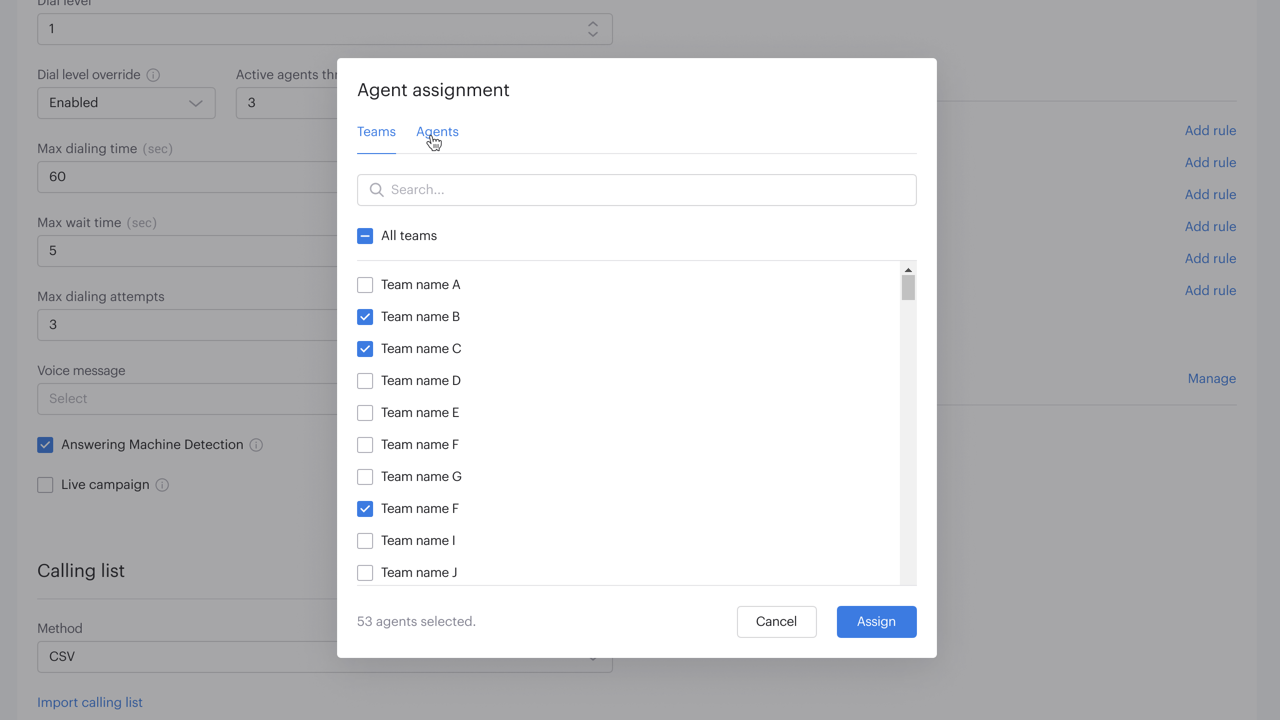
To add all teams, select the Teams tab, then click All teams. To add individual teams, select the team name.
To add all agents, select the Agents tab, then click All agents. To add individual agents, select the agent's name. To remove one or more agents from the campaign when all agents are selected, deselect the agent.
You can run multiple campaigns simultaneously; however, a specific agent can participate in only one campaign at a time. Agents can choose which campaign to join from those that they are assigned to by using Join a campaign in the Agent Panel.