Who should read this article: Administrators, Supervisors
This is part 2 of the How to run a Dialer campaign use case.
Here are the basic steps to follow to set up and run a dialer campaign:
- Access the Dialer campaigns page from the Outbound menu and add a new campaign.
- Provide basic campaign details including a unique name, the preferred dialing strategy, and dialing parameters.
- Set up the Calling List by either importing a CSV file of contact information or by integrating your CRM to dynamically populate contacts.
- Configure Caller IDs
- Define the follow-up rules for when calls do not reach a contact.
- Assign agents to the campaign.
- Finalize and launch the campaign.
Create a new Dialer campaign
To create a new Dialer Campaign, navigate to Outbound > Dialer campaigns from the navigation bar to open the Dialer campaigns interface. This page lists all the campaigns in your contact center, displays their statuses, and lets you start, pause, and stop campaigns.
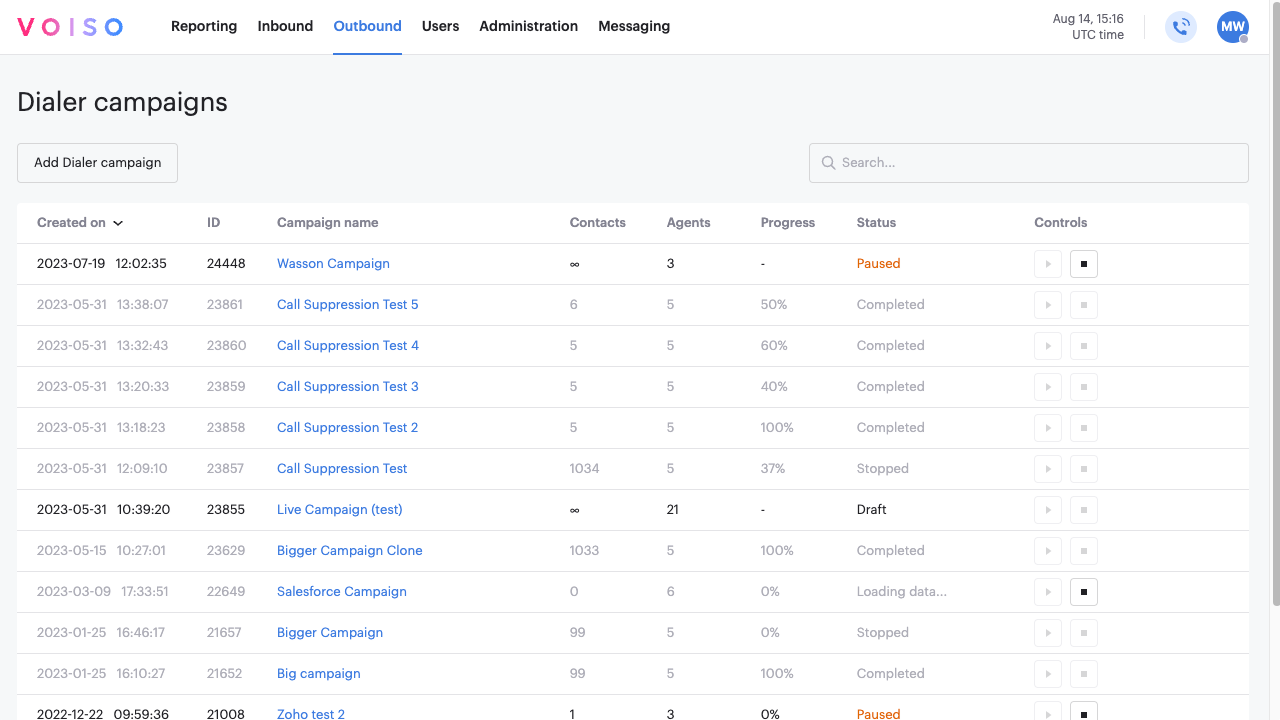
To add a new campaign, click Add new campaign.
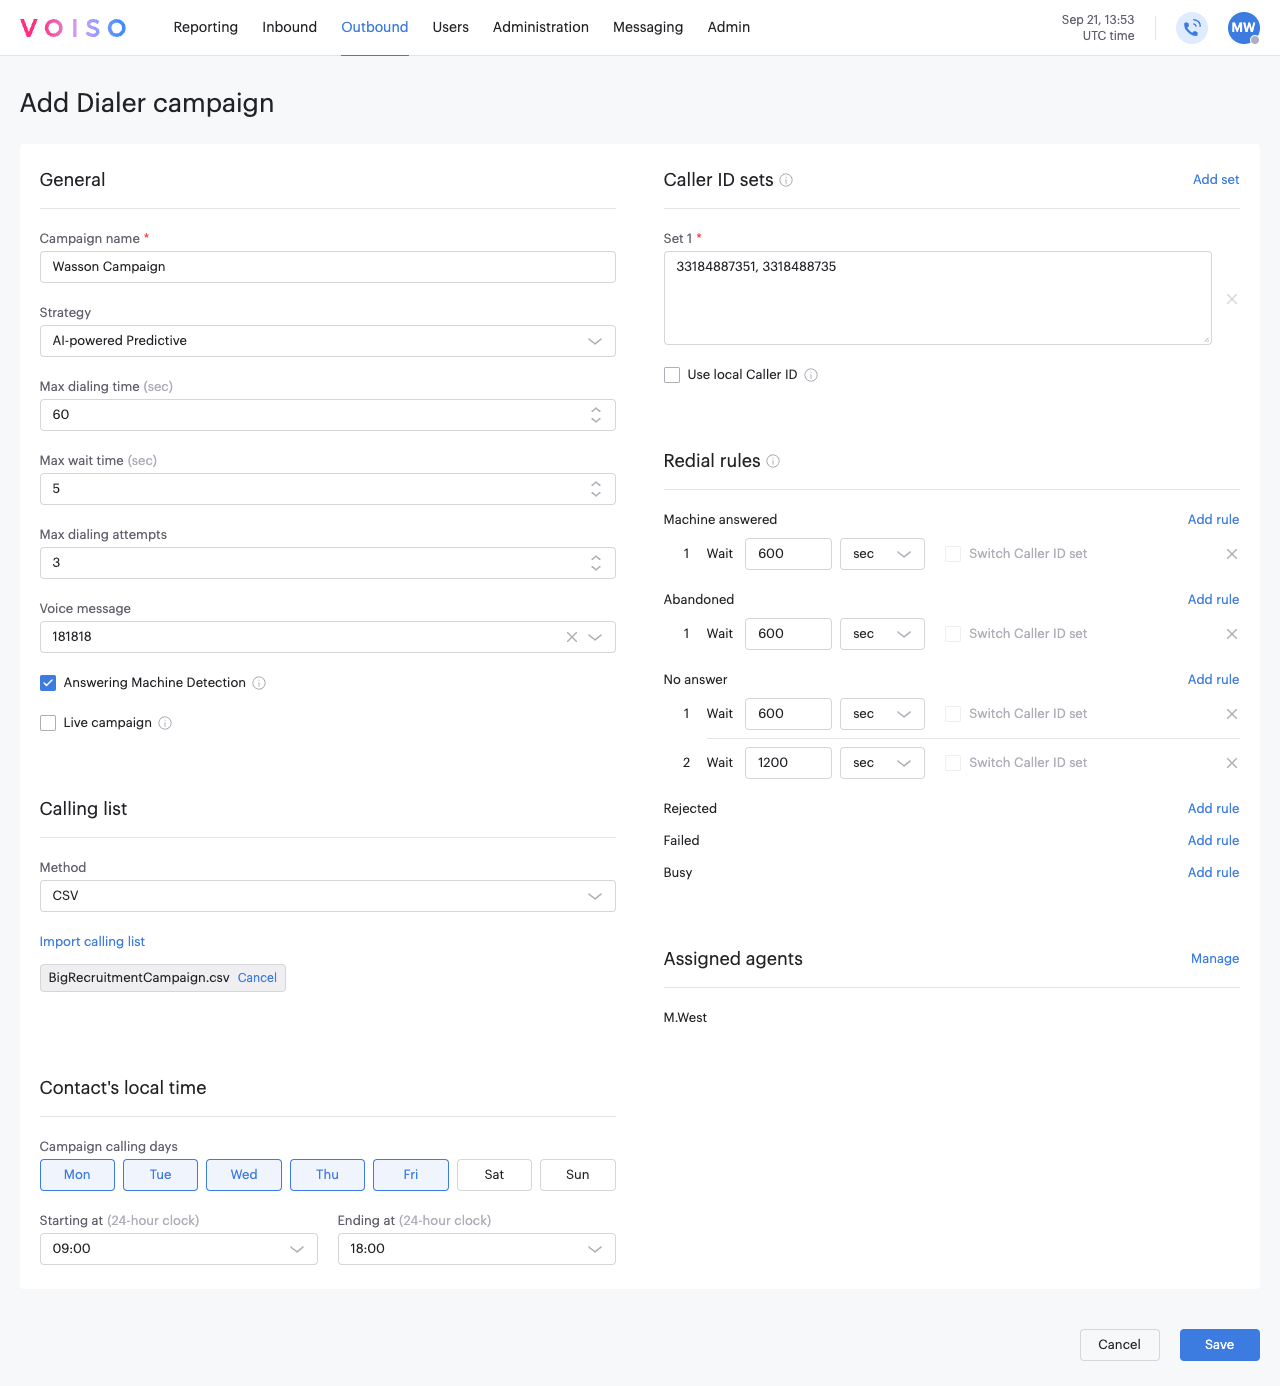
The Add campaign page includes the following sections that you configure to set up your campaign:
| Section | Description |
|---|---|
| General | The name and basic campaign dialing settings |
| Contact's local time | When you want contacts to be called |
| Calling lists | The list of contacts to call – this comes either from a CSV you import or from your CRM |
| Caller ID Groups | The numbers that you are calling from |
| Follow-up rules | The rules for redialing calls or sending a follow-up WhatsApp message, depending on whether the call is answered by a machine, Abandoned, not answered, rejected, failed, or busy |
| Agents | The teams and/or individual agents who are part of the campaign |
The following sections provide detailed steps for adding a new campaign to your contact center. Once the configuration is complete, click Save at the bottom of the Add campaign page to finalize your campaign setup.
General settings
The General settings enable you to tune the campaign to suit your contact center resources and objectives.
Campaign name
Give your campaign a unique name that makes it easy to identify and find using the Search feature in the Dialer campaigns list.
Strategies
Voiso offers different dialing strategies, dependent on your needs: Progressive (Progressive Dialer), Predictive (Predictive Dialer, and AI Powered Predictive).
Progressive strategy
With the Progressive strategy, you can control the Dial level, which determines the number of calls dialed per available (logged-in) agent in the campaign.
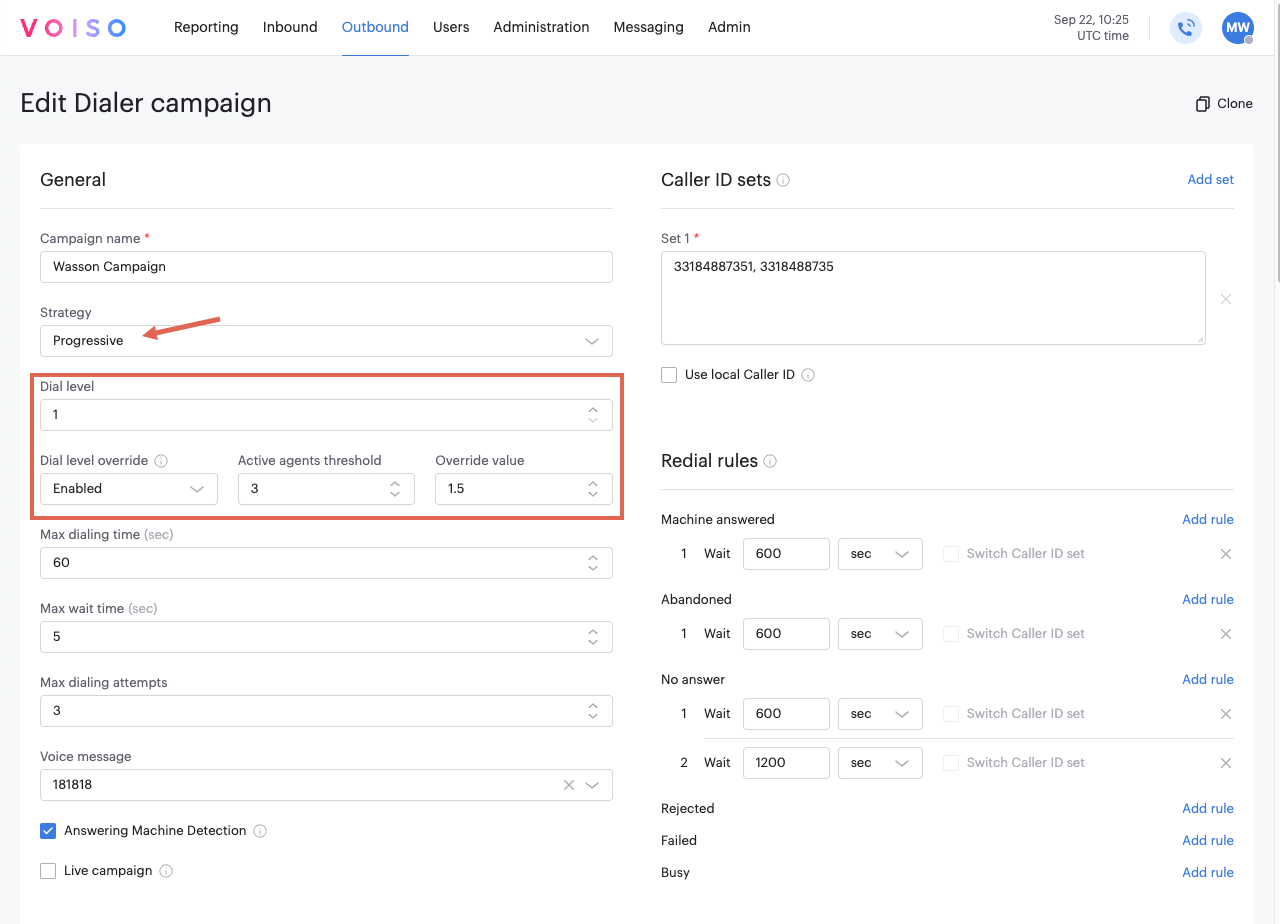
The number of calls dialed = the number of active agents x the Dial level.
For example, with 4 agents and a dial level of 2, the system makes 8 simultaneous calls. Fractions like 2.5 can be used (for example, 4 agents x 2.5 = 10 calls).
To handle the condition where there is only a small number of active agents, select if agents less than option, specify the limited number of agents, then specify a lower dial level.
AI-powered Predictive strategy
This strategy with AI-powered predictive dialer uses Artificial Intelligence (AI) to dynamically adjust the Dial level based on campaign metrics and historical data.
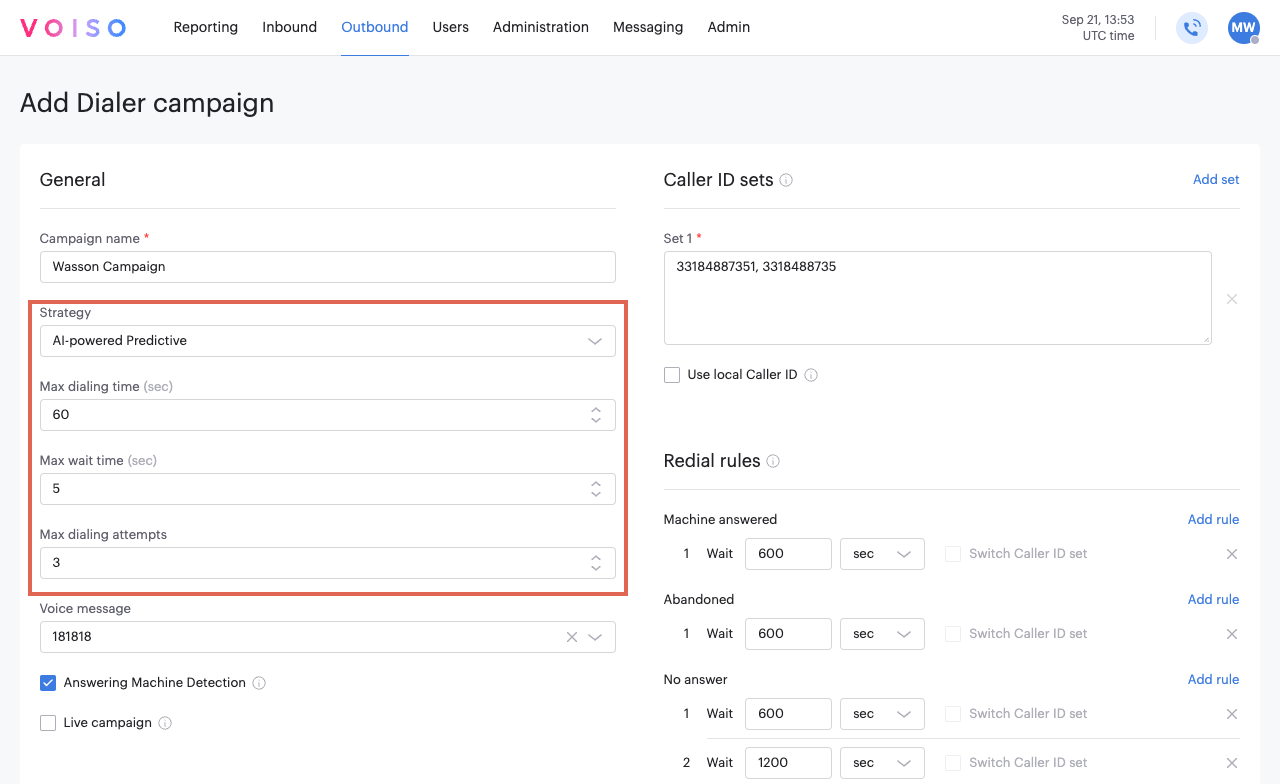
The AI-powered Predictive strategy considers factors such as:
- Abandonment Ratio – the percentage of calls placed when all agents are busy
- Answer ratio
- Agent waiting time
- Average call duration
This strategy reduces manual adjustments and ensures optimal performance throughout the campaign.
Answering Machine Detection (AMD) is required for AI-powered predictive campaigns.
The old Predictive dialing strategy is no longer supported. Please use the AI-powered Predictive strategy instead.
Max Dial Time
The Max Dial Time parameter sets the maximum time the system waits for a contact to answer. The default is 60 seconds, but for greater efficiency, Voiso recommends 30 to 40 seconds. Avoid setting this value below 15 seconds to ensure contacts have adequate time to answer.
Max Wait Time
Max Wait Time specifies how long a contact waits after picking up for an agent to answer. If all agents are busy, calls exceeding the default 5-second wait time are terminated.
Max Dial Attempts
This parameter defines how many times (redial attmepts) the system attempts to call a contact if they do not respond. Set this based on your campaign goals:
- To find new clients by calling through a list as rapidly as possible and eliminate the possibility of callbacks, set Max Dial Attempts to 1.
- To reach as many customers as possible, try setting Max Dial Attempts to 5 or higher.
You must specify follow-up rules for different incomplete call scenarios for Max Dial Attempts to apply.
Voice message
Select an audio file from your media library to play to contacts when agents are busy. If no media is specified, contacts hear nothing while waiting to connect.
Answering Machine Detection
Answering Machine Detection (AMD) analyzes the first 3.5 seconds of a call to determine if it is answered by a person or a machine. Thanks to AMD, calls answered by machines are disconnected automatically, ensuring agents only handle live calls.
Live campaign
The Live campaign feature allows campaigns to run indefinitely by periodically retrieving leads through integrations such as:
Contact's local time
The Contact's local time feature allows you to control when contacts in your campaign may be called. Voiso automatically identifies the local time zone of each phone number in the campaign and ensures that calls are placed only during the days and hours you specify. This prevents calls from being made at inconvenient times, such as late at night or during dinner hours.
For example, if you set the calling window to 11:00 AM to 3:00 PM, Voiso will only place calls to contacts within that time frame in their respective local time zones, regardless of the time zone of your agents or contact center.
If no destinations are available within the specified calling window while the campaign is running, the campaign will pause automatically.
Calling list
Voiso offers two methods for adding contacts to a campaign:
- Importing a comma-separated values (CSV) file.
- Integrating directly with your CRM.
CSV
To use this method, prepare a file containing phone numbers and optional contact information for the campaign. Save the file in CSV or CSV UTF-8 format. Each line should include up to two columns of data for a contact:
- The first column contains the contact's phone number.
- The second column is optional and may include additional information such as the contact's name, email, or location.
Each line is separated by a carriage return line feed, and columns are separated by a comma. For example:
16321450333,Alice Cook alice.cook@mail.com Manchester 11757509511 11734505466,Kevin Cooke kev.cooke@mail.com Liverpool
In a spreadsheet, the CSV would look like this:
| Number | Information |
|---|---|
| 16321450333 | Alice Cook alice.cook@mail.com Manchester |
| 11757509511 | |
| 11734505466 | Kevin Cooke kev.cooke@mail.com Liverpool |
Symbols other than "@" are not supported. Avoid using characters such as "^", "$", and "§". Commas should only be used to separate phone numbers and contact data.
Importing a CSV file
To use a CSV as your calling list:
- From the Method menu, select CSV.
- Click Import calling list (.csv) and navigate to the file on your computer or network.
CRM
To use contacts from your CRM as your calling list:
- From the Method menu, select the name of your CRM.
- Fill out the required fields based on your CRM integration details.
Refer to your CRM documentation or integration setup guide for specific requirements.
Omitting destinations
After saving your campaign, Voiso analyzes the calling list to identify all destinations (countries and regions) and adds the Contact sources and countries section to the campaign settings.
To exclude specific destinations from your contact list:
- In the Dialer campaigns table, click the name of the campaign to open the Edit campaign page.
- Scroll down to the Contact sources and countries section to view the destination list.
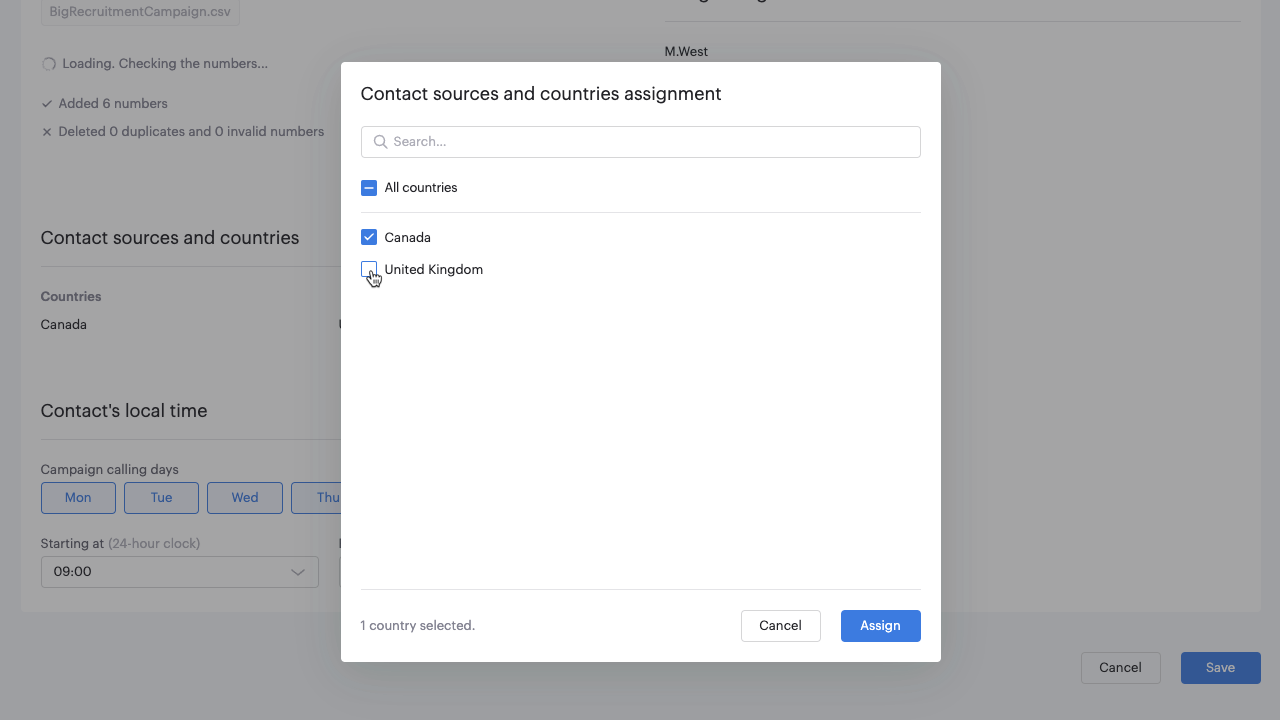
- Deselect any countries or regions you want to exclude from the campaign.
- Click Save to apply the changes to the campaign settings.
Caller ID sets
To run your campaign, you must specify at least one number from which your contacts will be called. Campaigns typically include multiple Caller IDs, organized into Caller ID sets.
To add a Caller ID set:
- Click Add set. A text field will appear, labeled Set 2. Each additional set you create will be numbered sequentially (for example, Set 3, Set 4).
- Enter Caller ID numbers manually by typing them or pasting a selection of numbers. Separate numbers using commas or by placing each on a new line.
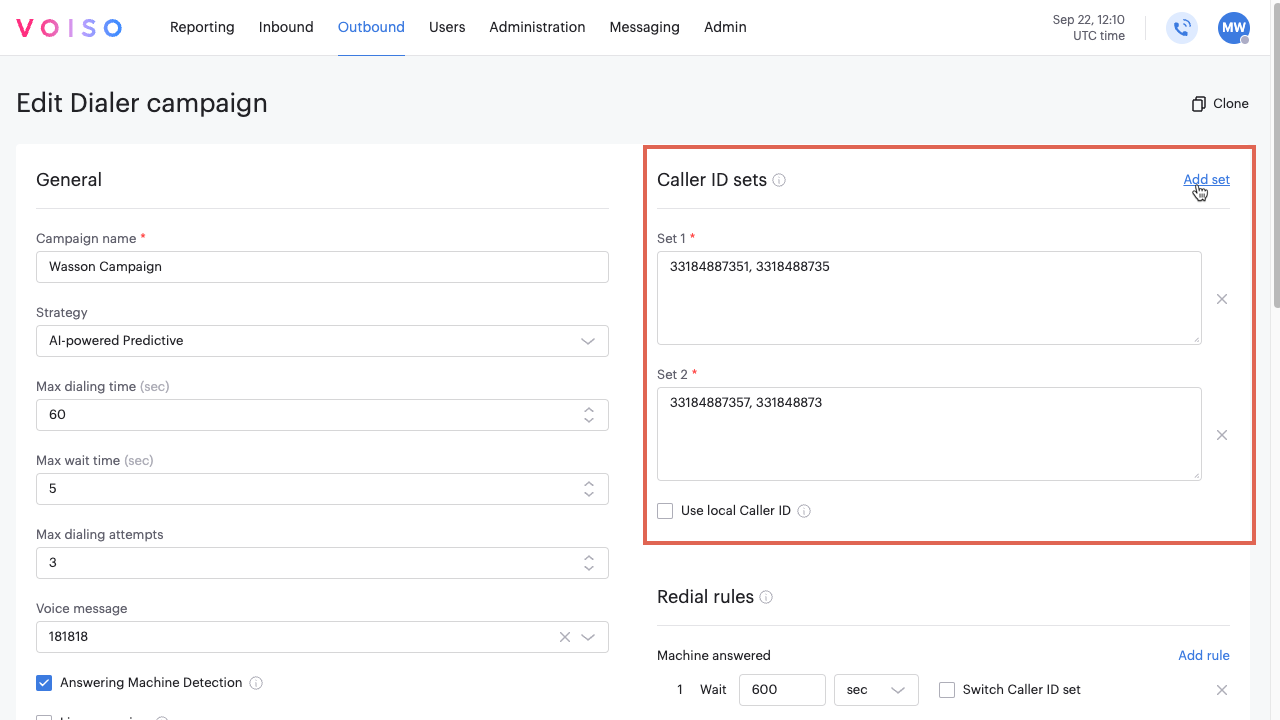
Caller ID numbers within a set are used in rotation for each call. This ensures varied representation for your outbound calls. You can run multiple campaigns simultaneously and assign the same or different Caller ID numbers for each campaign. Caller ID sets can also be configured for redialing scenarios.
Local Caller ID
For campaigns targeting multiple countries or regions, you can assign a Caller ID that matches the destination of each call.
- Select Use local Caller ID to activate this feature.
- Assign Caller IDs for each destination. If you add multiple numbers for a destination, they will be used in rotation.
- If no local Caller ID is available for a specific destination, Voiso will randomly select a number from your list.
For example, a campaign targeting Germany, France, and Italy will rotate through the German numbers for calls to Germany and the French numbers for calls to France. For Italy, where no local Caller ID is available, Voiso will randomly use any number from your list.
- Use different Caller ID numbers for campaigns than you do for manually dialed calls.
- Voiso recommends having at least 1 Caller ID for every 1000 to 1500 contacts in your calling list to ensure efficient processing. For example, for 6000 contacts, maintain 4 to 6 Caller ID numbers.
Follow-up rules
Follow-up rules allow you to define how the campaign should handle various scenarios when a call is not completed. If you elect to redial the call, the total number of redial attempts (callbacks) is constrained by the Max Dial Attempts setting. If you elect to send a WhatsApp message to the contact, review the following article for details on how to set up your contact center: Automating WhatsApp messaging in a campaign. You can configure rules for the following scenarios:
| Scenario | Description |
|---|---|
| Machine answered | The call was answered by an answering machine. This rule is only available if Answering Machine Detection is enabled for the campaign. |
| Abandoned | The call was answered by a person, but no agents were available, and either the person hung up or the call was terminated by the system. |
| No answer | The call was not answered. |
| Rejected | The call was rejected by the carrier, the contact, or due to technical issues. |
| Failed | The call did not go through. |
| Busy | The contact was on another call or was in Do Not Disturb mode. |
Adding a follow-up
To configure redial rules:
- Click Add Rule next to the rule type you want to configure.
- Select Redial from the action menu.
- For each action, define the redial attempts and set a Wait period.
Wait specifies the duration (in seconds, minutes, or hours) before retrying a call. You can define multiple redial attempts with varying wait times for a single scenario. For example, you might configure shorter wait times for a Busy line and longer wait times for No answer scenarios.
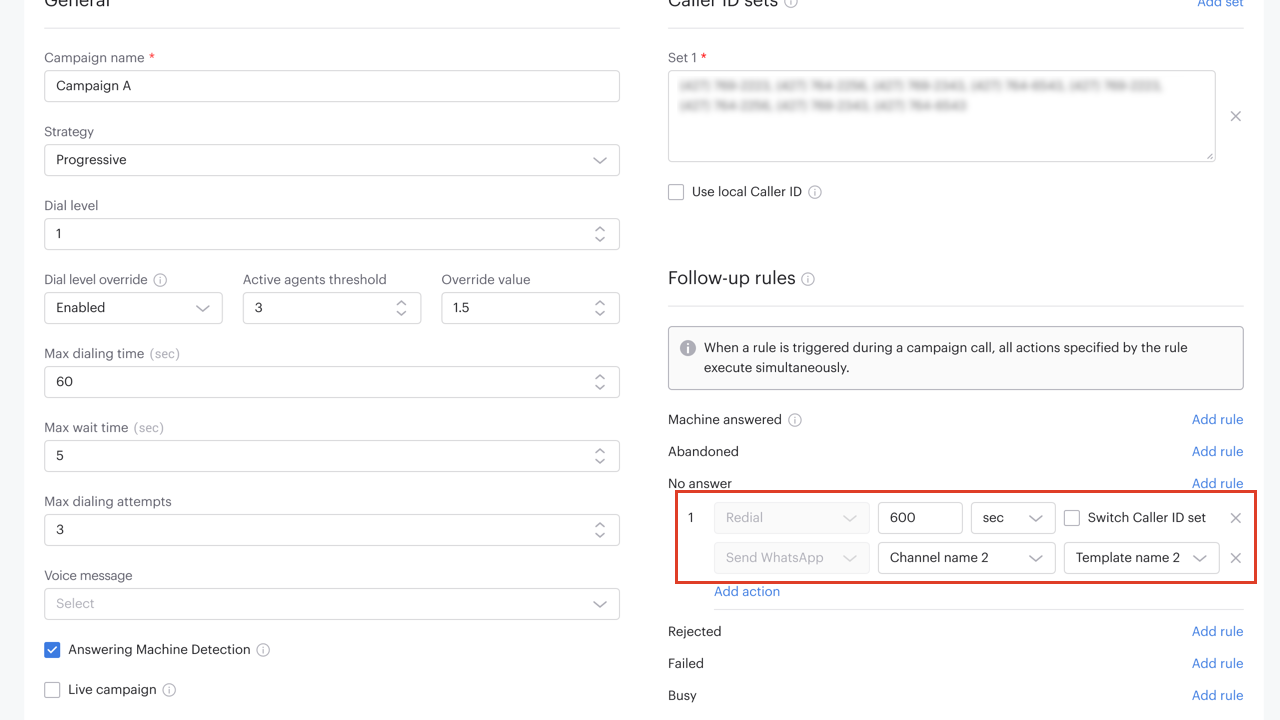
When the maximum number of attempts is reached for any individual rule, the system will stop redialing that number. However, the system tracks separate attempts for each rule type. For instance, if a call is first answered by a machine, later goes unanswered, and finally encounters a busy signal, those count as three distinct attempts.
Redialing will continue until either Max Dial Attempts is reached or all specified attempts for each rule type are completed.
Switching Caller IDs
To prevent multiple calls from the same Caller ID, select Switch Caller ID set next to the rule. If Use local Caller ID is enabled, the new set will inherit this rule.
Adding a Send WhatsApp message rule
To configure Send WhatsApp message rules:
- Click Add Rule next to the rule type you want to configure.
- Select Send WhatsApp from the action menu
- For each action, specify the WhatsApp channel and WhatsApp message template to use.

Agents
Before adding agents to a campaign, ensure you have created the necessary users, teams, and skills.
Voiso provides flexibility in assigning agents to campaigns. You can add agents as part of a team, individually, or include all agents or teams. If you assign a team, you can still remove specific agents from the campaign without removing them from the team by expanding the team entry and deselecting individual members.
Adding teams
- To add all teams, select Teams.
- To add specific teams, select the team name.
Click the expand icon to open a team's details, where you can select or deselect individual agents to include or exclude them from the campaign.
Adding agents
- To add all agents, select Agents.
- To add specific agents, select the agent's name.
If you have added all agents and want to exclude certain individuals, simply deselect their names from the list.
You can run multiple campaigns simultaneously; however, each agent can participate in only one campaign at a time. Agents can decide which campaign to join from their assignments using the Join a campaign feature in the Agent Panel. Learn more: How to join a campaign.