Who should read this article: Administrators
This guide is for experienced Salesforce administrators who do not require a full set of steps to configure objects in Salesforce related to integrating with third-party applications.
Introduction
Integrating Voiso with Salesforce is simple and only requires a few easy steps on both platforms:
- Install the Voiso Softphone Package from the Salesforce AppExchange.
- Configure an integration user
- Create and assign a permission set to the integration user
- Connect Voiso to your Salesforce org
- Configure and embed the Voiso softphone (Agent Panel) and inbox (Omnichannel Workspace) inside Salesforce
- Set up a call center in Salesforce
- Add the Voiso Phone and Inbox components to the Salesforce Utility Bar
- Configure the Voiso call logging and history features.
Prerequisites
Ensure that the following prerequisites are in place before beginning:
- The Salesforce CRM integration is activated for your contact center.
- Your agents and other users use Salesforce Lightning Experience.
- For users who create Dialer campaigns and import calling lists from Salesforce, ensure their account email addresses are the same in both Voiso and Salesforce.
- The edition of Salesforce organization you are using has API access available and active.
- Your administrator's Salesforce user account must have REST API Enabled permissions and Administrator privileges set.
Integration
Follow these numbered steps to set up, configure, and connect Voiso to Salesforce.
Step 1: Install the Voiso Softphone Package from AppExchange
Click the link in step 1 of the Salesforce CRM settings section to open the Voiso Softphone Package page on the Salesforce AppExchange.
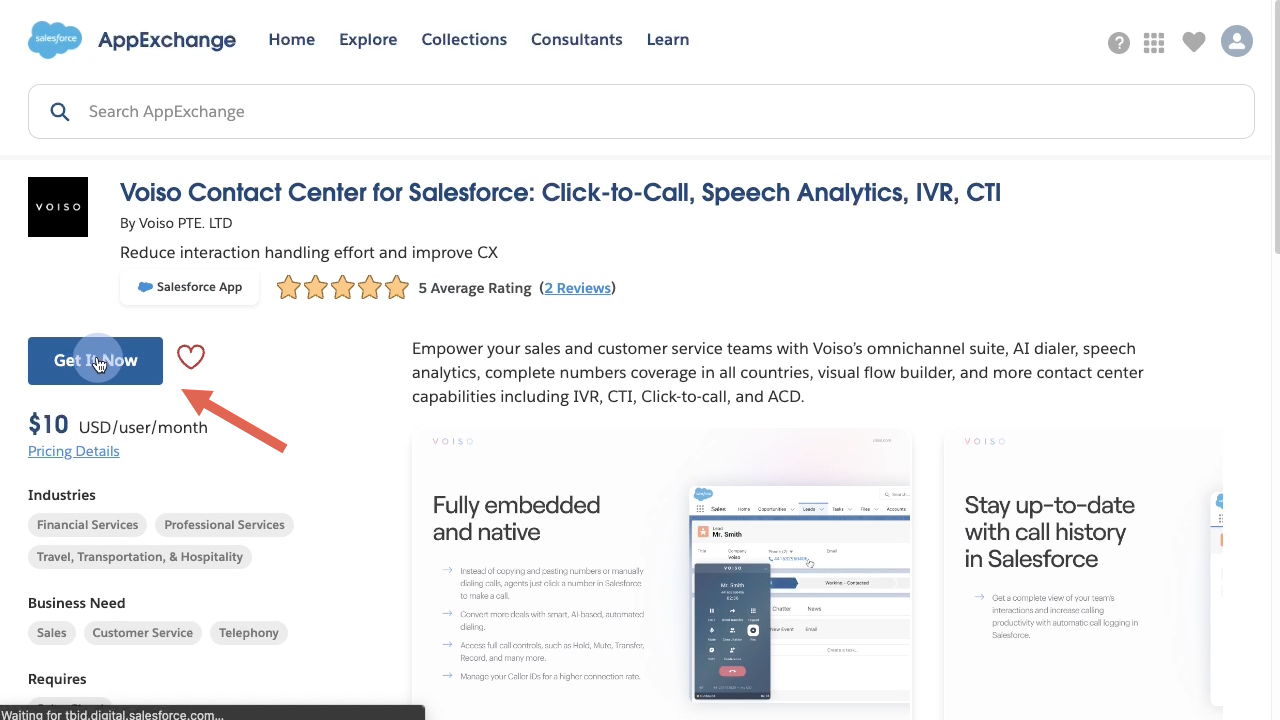
- Click Get It Now.
- Select a Salesforce account associated with your contact center.
- Choose either Install in a Production Environment or Install in a Sandbox.
- Select the connected Salesforce Account from the drop-down menu.
- Review and confirm the installation details.
- Choose which user to install for, then click Install.
Step 2: Configure an Integration User
Grant the required permissions to the integration user by creating your own permission set, as recommended by Salesforce, or by modifying an existing user profile. Refer to Step 2.1 for details.
Step 2.1: Create a Permission Set
Perform the following steps:
- Create a new permission set.
- Label:
Voiso Integration User (System & User Permissions) - API name:
VoisoIntegrationUser
- Label:
- After saving the set, click Edit, then select the following options:
- Apex REST Services (Voiso uses the Apex REST Endpoints for both the Call Logging feature and authentication).
- Customize Application (Voiso uses Custom Settings to cache static Voiso call center settings in your org).
For information about Salesforce Permission Sets, check out these articles:
- Create Permission Sets
- App and System Settings in Permission Sets
- Manage Permission Set Assignments
- Trailhead: Control Access to Objects – Create a Permission Set
Note: These links direct you to Salesforce documentation. Voiso does not control this content and cannot ensure the links will always point to the latest version.
Step 2.2: Assign the permission sets to the Integration User
Perform the following steps:
- From Setup, navigate to the user who will be the integration user with Voiso.
- Assign the following two permission sets to the integration user:
Voiso Integration User (System & User Permissions)– the one you created in Step 2.1Voiso Integration User– the one provided by the Voiso Software package
For information about Salesforce Custom Records, check out these articles:
- Trailhead: Build a Custom Record Page for Lightning Experience and Salesforce Mobile App
- Trailhead: Build a Custom Home Page for Lightning Experience
- Trailhead: Add Visibility Rules for Dynamic Pages
Note: These links direct you to Salesforce documentation. Voiso does not control this content and cannot ensure the links will always point to the latest version.
Step 3: Connect Voiso to Salesforce org
From the Voiso navigation bar, select Administration > Integrations.
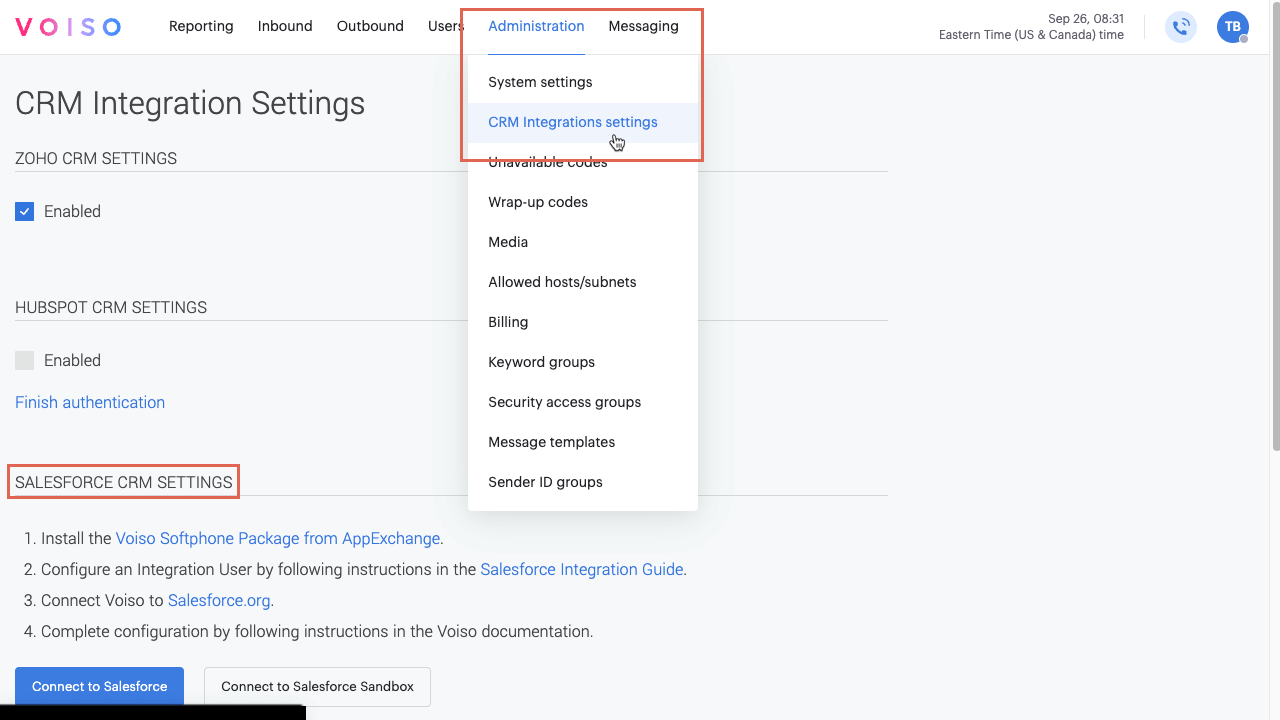
Follow these steps to connect Voiso to Salesforce org:
- In the Integrations page, click Connect on the Salesforce tile.
- Review the About and Prerequisites sections and ensure all prerequisites are met in your contact center.
- Click Connect.
- In the Integration setup panel, click either Connect to Salesforce or Connect to Salesforce Sandbox, depending on your choice in step 1.
- Follow the on-screen instructions.
- When the Voiso Allow Access? page displays, click Allow to complete the connection.
The following video walks you through the integration process.
Select features
After the integration process is complete, the Settings tab is available on the Salesforce page.
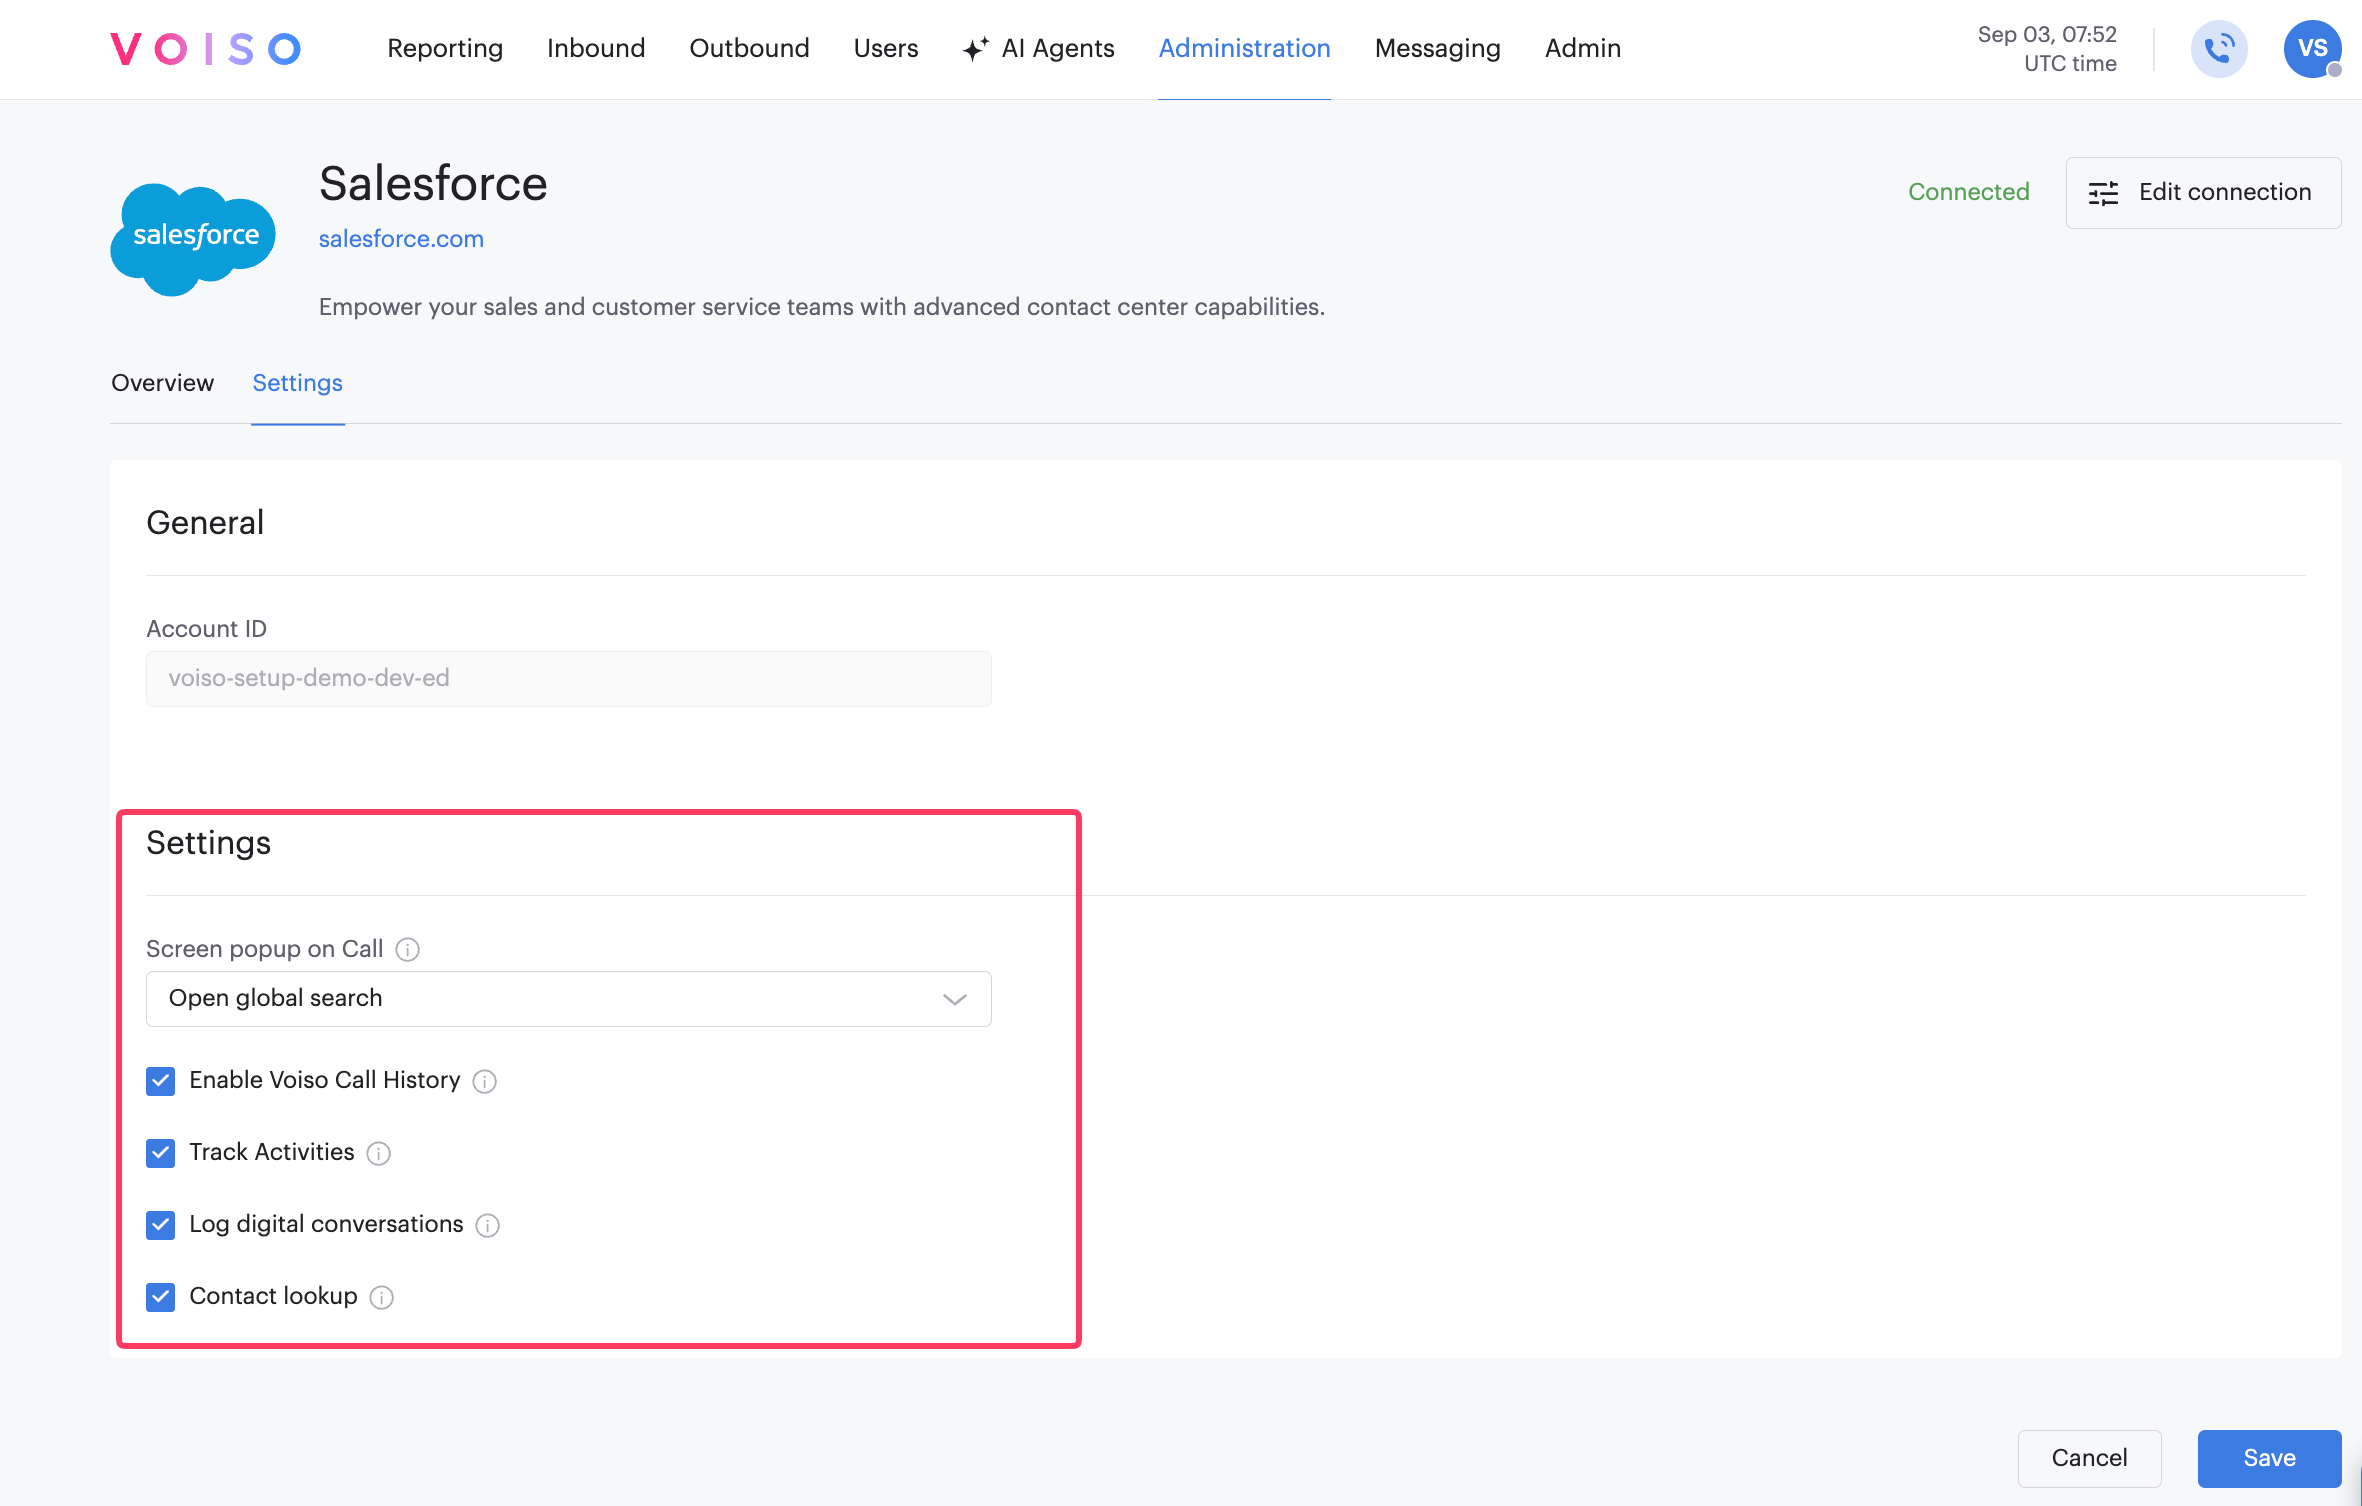
You can choose to enable or disable the following integration features in Step 4:
| Feature | Description |
|---|---|
| Enable Screen Popup on Call | When a call is routed to an agent, display the relevant Salesforce objects, such as cases and contact records. |
| Enable Voiso Call History | Automatically send call details, notes, and conversation summary to Salesforce after each call. |
| Track Activities | Add information about the call to the Activity Task in Salesforce. |
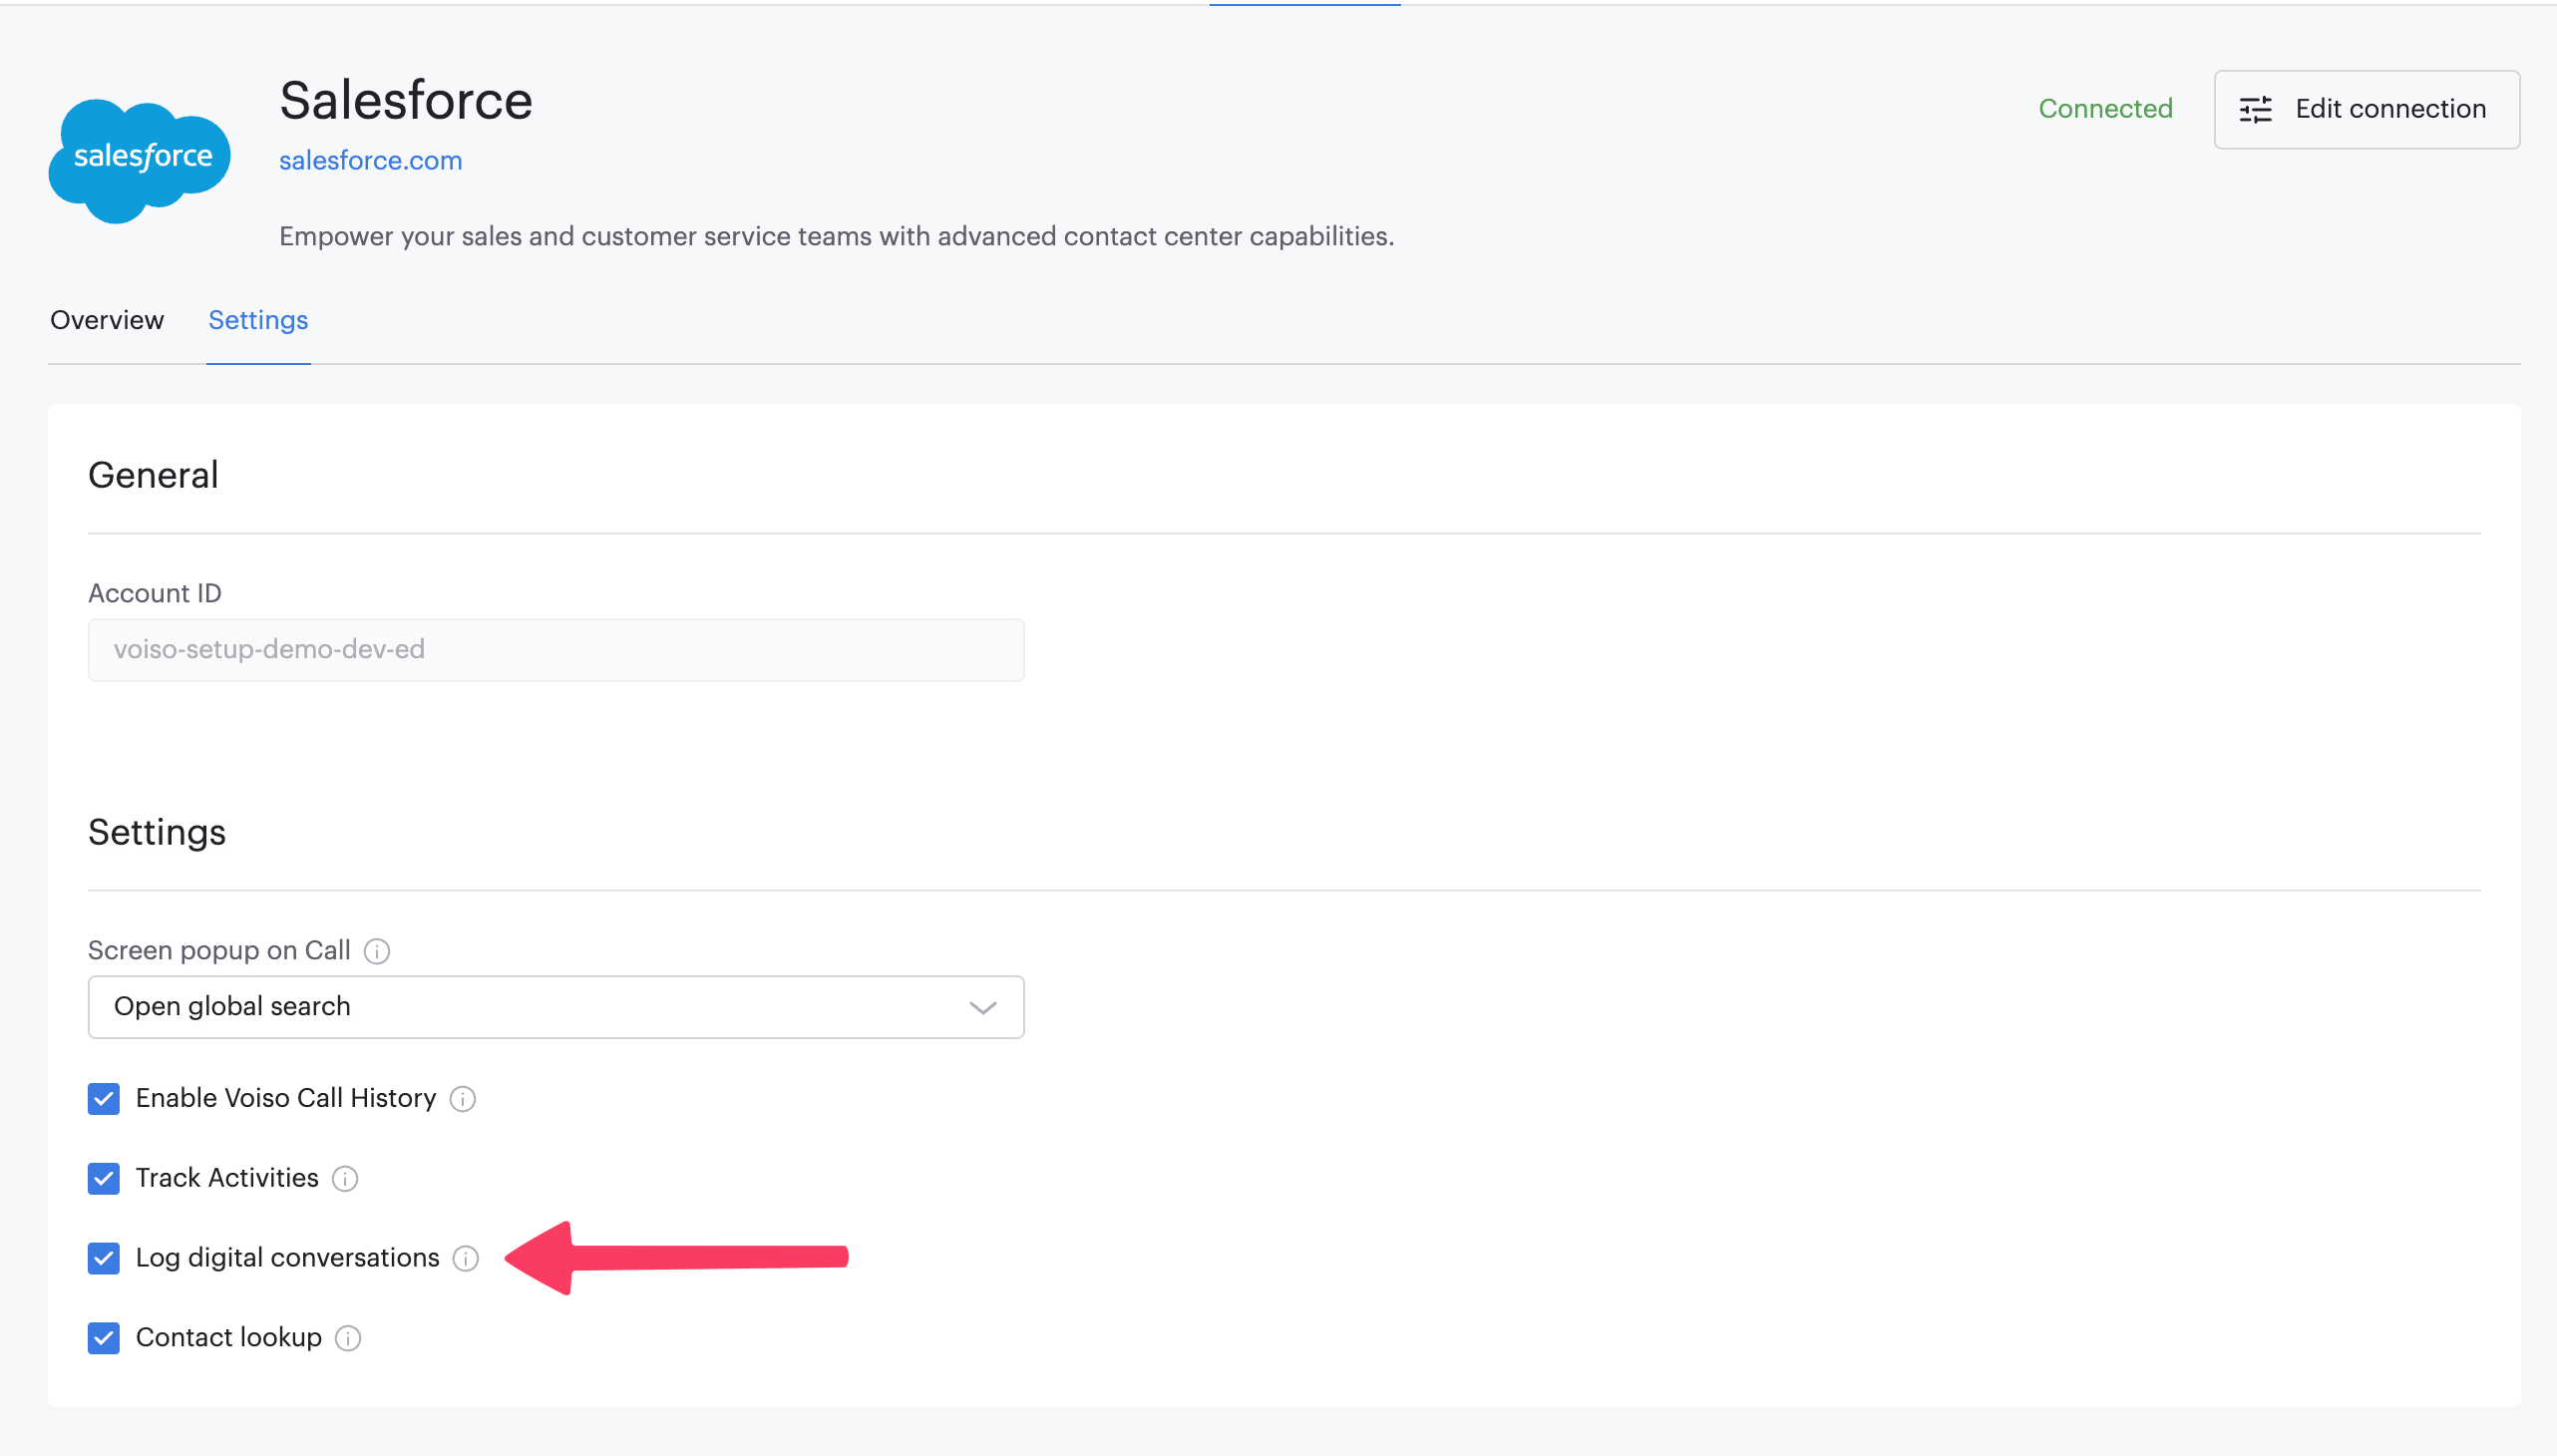
| Log digital conversations | Record each WhatsApp conversation handled in the Inbox widget on the matched Lead or Contact. |
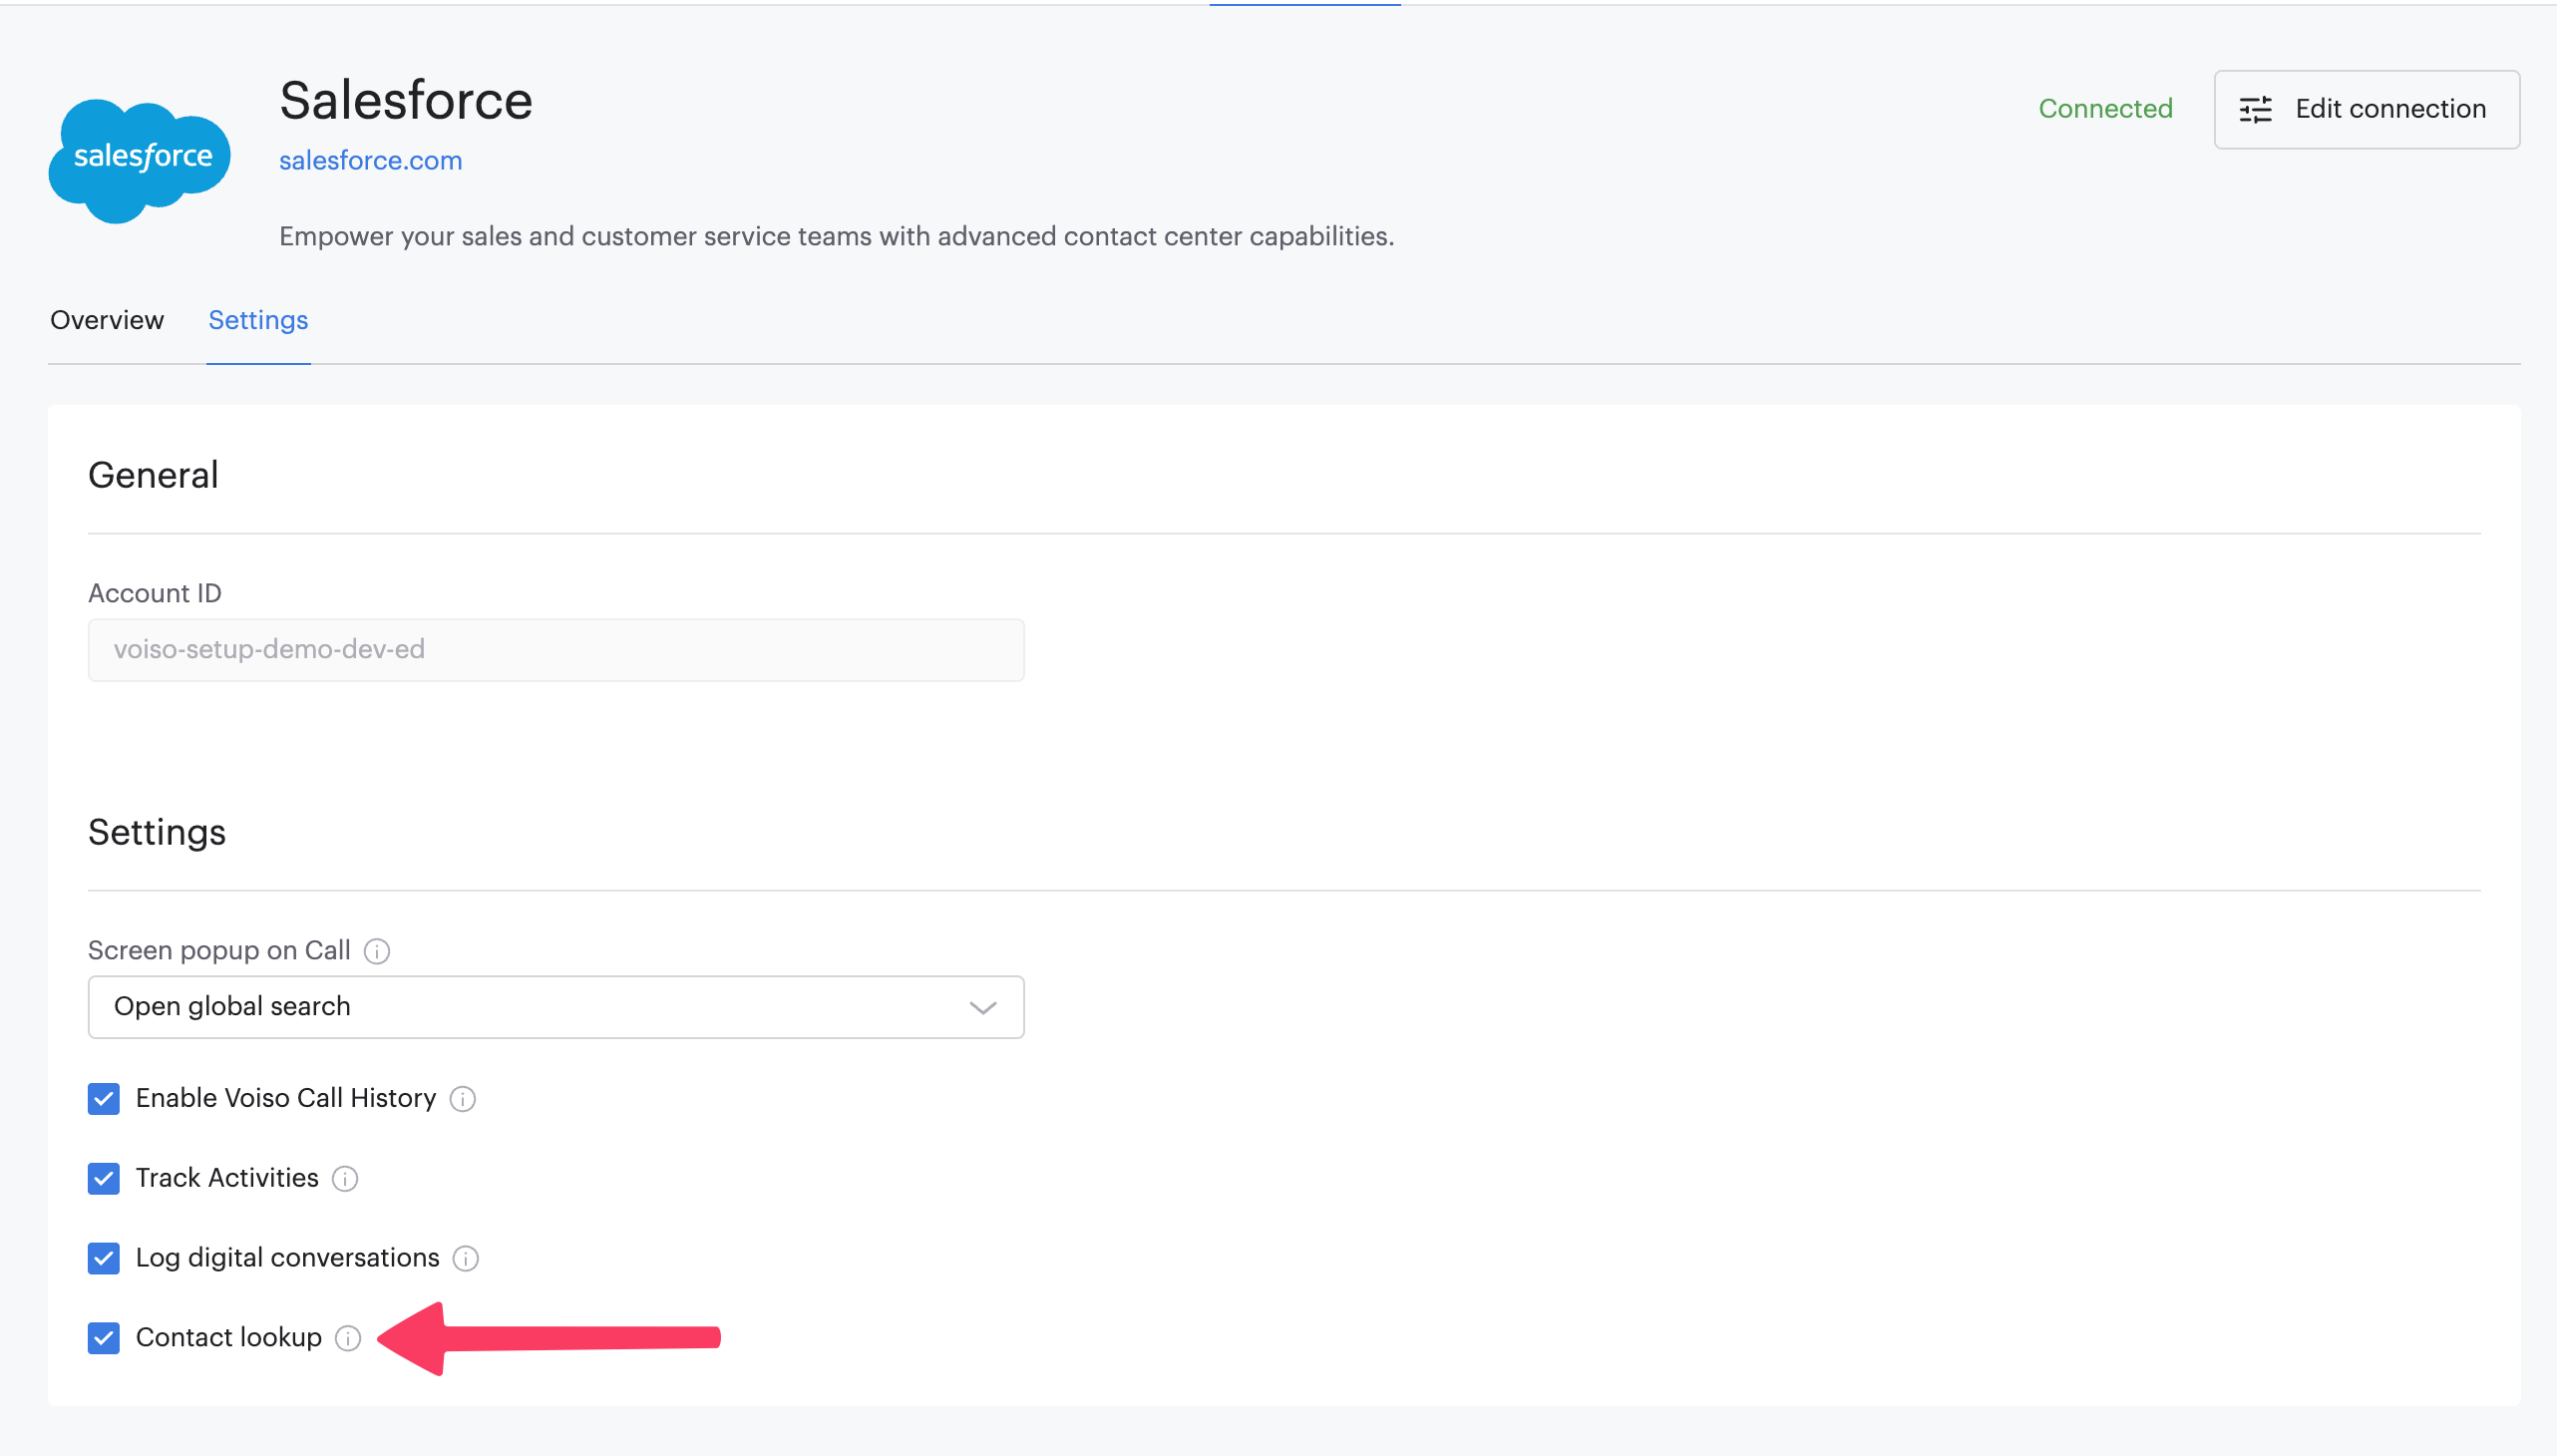
| Contact lookup | Match the customer on a call or WhatsApp conversation to a Salesforce record and show their details in the Inbox widget. |
Step 4: Complete configuration
In this step you configure the embedded softphone component into Salesforce.
- Set up a Call Center by importing a Call Center Definition file.
- Add the Voiso softphone directly into the Salesforce Utility Bar.
- Configure the Voiso contact center features you want to use.
Step 4.1: Set up a call Center in Salesforce
Follow these steps to set up a call center in Salesforce Lightning:
- Create a Call Center Definition .xml file using the following contents:
<callCenter>
    <section sortOrder="0" name="reqGeneralInfo" label="General information">
        <item sortOrder="0" name="reqInternalName" label="Internal name">VoisoPhoneCTI</item>
        <item sortOrder="1" name="reqDisplayName" label="Display name">VoisoPhoneCTI</item>
        <item sortOrder="2" name="reqAdapterUrl" label="Container URL">https://my-domain--c.container.force.com</item>
        <item sortOrder="3" name="reqVoisoClusterUrl" label="Voiso Cluster URL">https://yourcc.voiso.com</item>
        <item sortOrder="4" name="reqUseApi" label="Use Open CTI API">true</item>
        <item sortOrder="5" name="reqSoftphoneHeight" label="Voiso Phone height">472</item>
        <item sortOrder="6" name="reqSoftphoneWidth" label="Voiso Phone width">264</item>
        <item sortOrder="7" name="reqSalesforceCompatibilityMode" label="Compatibility Mode">Lightning</item>
    </section>
</callCenter>
- Import the Call Center Definition file into Salesforce.
- In the All Call Centers view, next to your contact center, click Edit, then:
- Modify the Voiso Cluster URL by replacing:
https://yourcc.voiso.com
with your fully qualified cluster URL.
For example,https://cluster.voiso.com. - Modify the Container URL by replacing:
https://my-domain--c.container.force.com
with your fully qualified container URL.
For example,commerce2-dev-ed--c.develop.container.force.com.
To generate the container URL, open a Salesforce page, then pastelocation.origin.replace('.', '--c.').replace('.lightning.', '.container.')into your browser's developer console and press Enter.
- Modify the Voiso Cluster URL by replacing:
- Add users to the call center.
For information about Salesforce Call Centers, check out these articles:
- Create a Call Center Definition File
- Sample Call Center Definition File
- Import a Call Center Definition File
Note: These links direct you to Salesforce documentation. Voiso does not control this content and cannot ensure the links will always point to the latest version.
Step 4.2: Add the Voiso Phone component to the Utility Bar in Salesforce
Follow these steps to add the Voiso softphone directly into the Salesforce Utility Bar:
-
In App Manager, choose the Salesforce Lightning app to which you want to add the Voiso softphone, such as LightningSales, then click Edit.
-
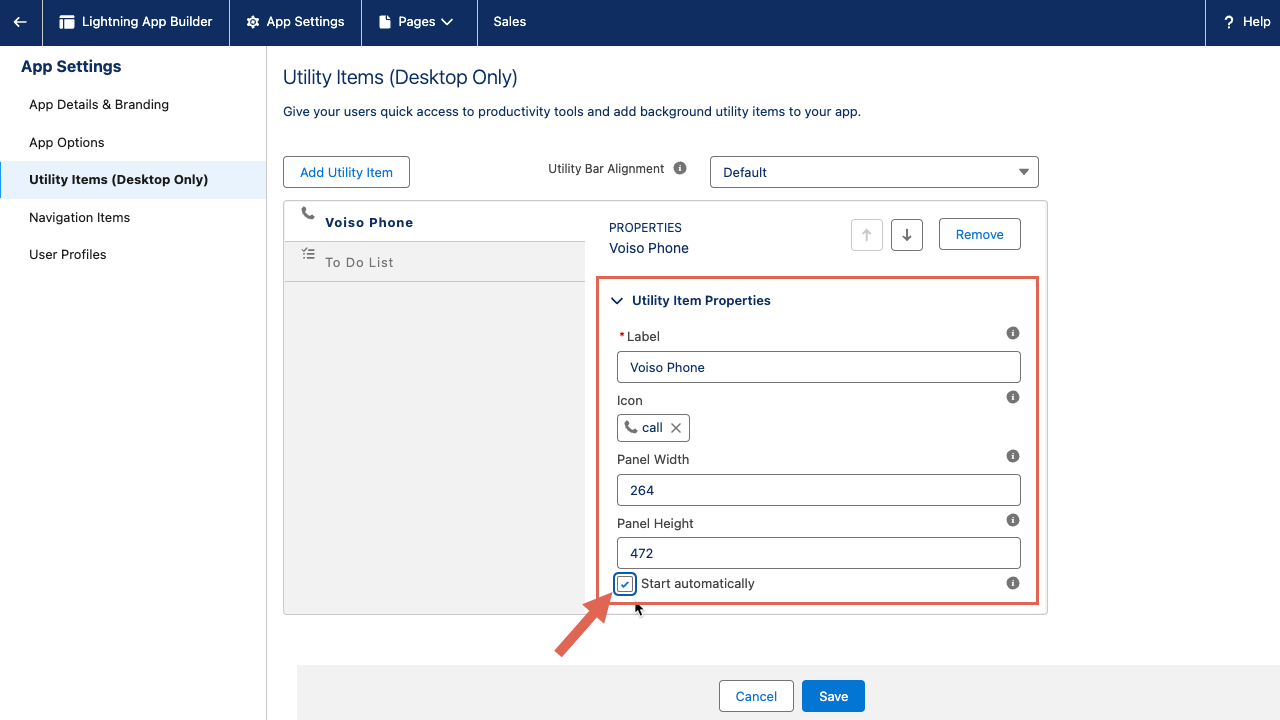
Add the Voiso Phone component as a Utility Item with the following parameters:
- Label: Voiso Phone (or any other label you choose)
- Icon: Select a call icon of your choice (any icon is supported)
- Panel Width: 264 (264 to 360 is supported)
- Panel Height: 472 (472 to 600 is supported)
- Enable Start automatically (it's required for Click-to-Call and receiving inbound calls).
-
Click Save.
For information about the Utility Bar, check out these articles:
- Get to Know the Utility Bar
- Add a Utility Bar to Lightning Apps
- Create and Edit a Custom Lightning Console App
Note: These links direct you to Salesforce documentation. Voiso does not control this content and cannot ensure the links will always point to the latest version.
Step 4.3: Add the Voiso Inbox component to the Utility Bar in Salesforce
The Voiso Inbox component embeds Omnichannel Workspace directly inside Salesforce, providing access to digital interactions and voice calling from a single Salesforce workspace.
- In App Manager, select the Salesforce Lightning app to which you want to add Omnichannel Workspace, then click Edit.
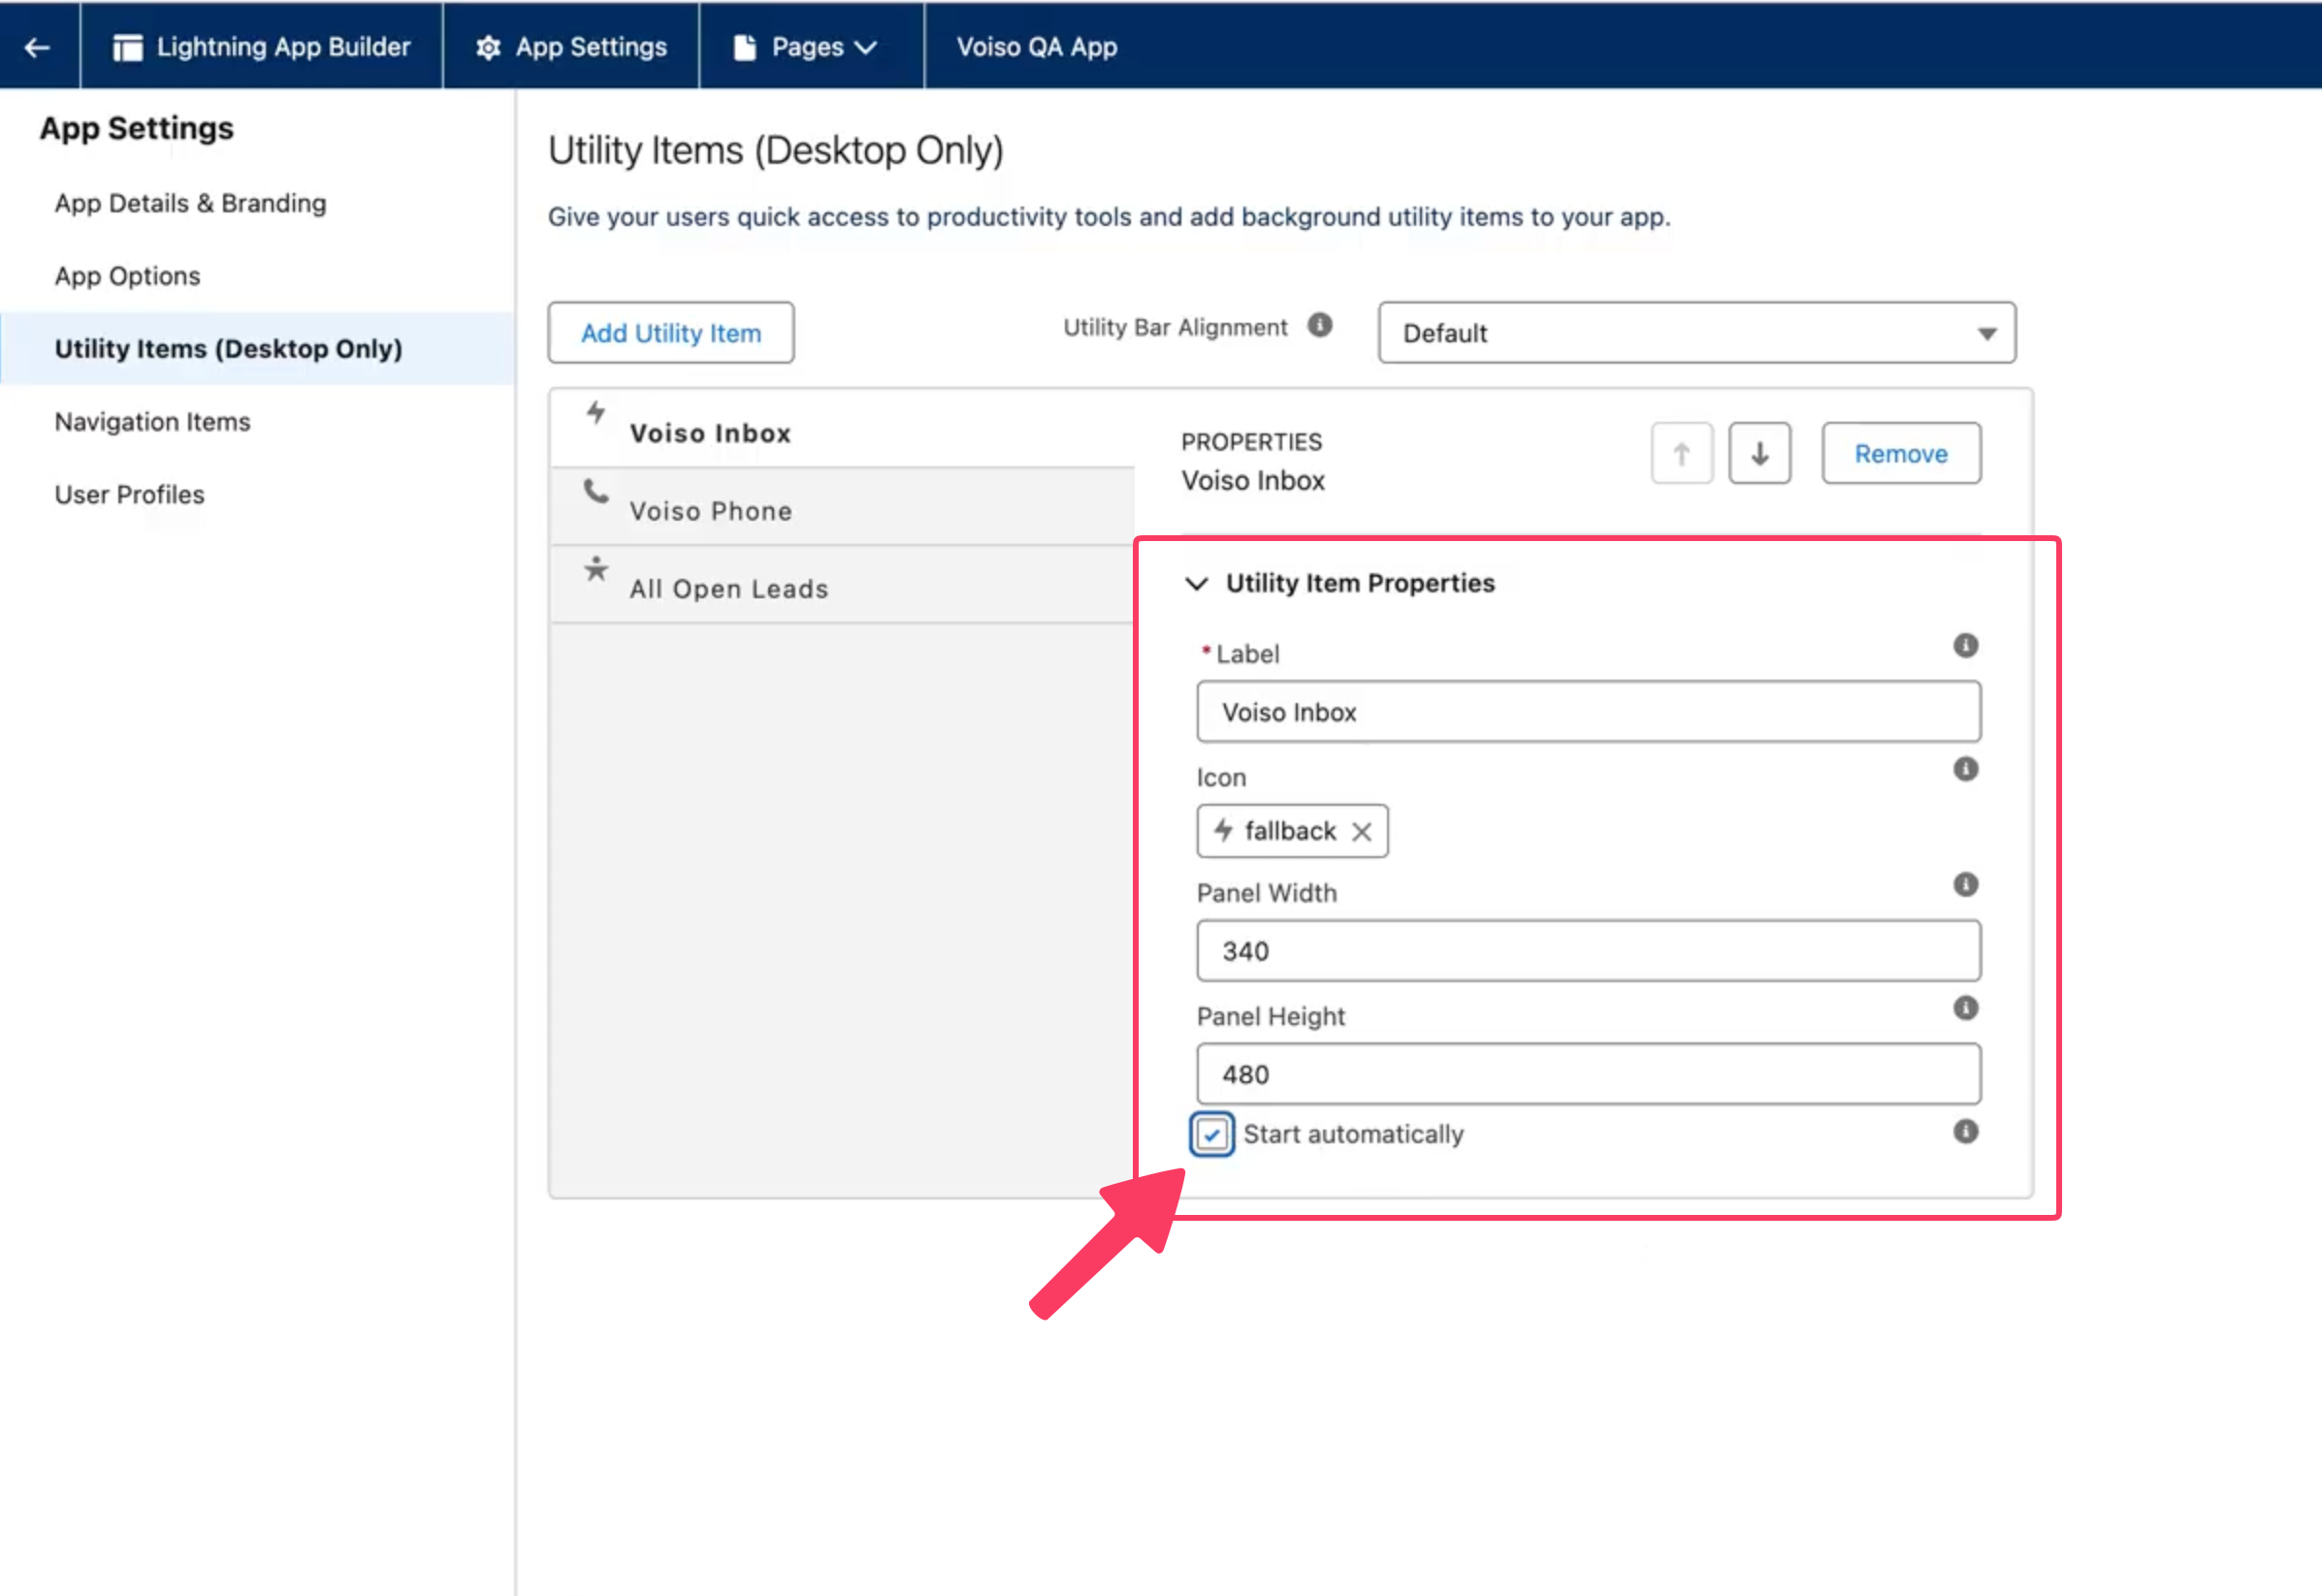
- Add the Voiso Inbox component as a Utility Item with the following parameters:
- Label: Voiso Inbox (or any other label you choose)
- Icon: Select an icon of your choice (any icon is supported)
- Panel Width and Panel Height: The Omnichannel Workspace is responsive, so any size you set works — choose whatever fits your Salesforce environment.
- Enable Start automatically — without it, the Inbox doesn't load until the agent opens it, so the first call or conversation of the session can be missed.
- Click Save.
No additional URL configuration is required. The Omnichannel Workspace URL is automatically derived from the connected Voiso cluster during Salesforce integration setup.
If Salesforce has not yet been connected to Voiso, opening the component displays a message indicating that integration setup must be completed before Omnichannel Workspace can be used.
The Inbox widget needs the Voiso User permission set, the same one used for Call History, and the agent's Voiso account must have Omnichannel Workspace access.
If your Voiso cluster is not on a *.voiso.com domain, add a CSP Trusted Site for the cluster URL in Setup > Security > CSP Trusted Sites with the frame-src directive enabled. Without it, the Inbox widget cannot load.
The embedded Omnichannel Workspace includes voice calling capabilities. If your Salesforce deployment currently uses the Voiso Phone widget, remove or disable it to prevent agents from handling calls in multiple embedded interfaces.
For information about the Utility Bar, check out these articles:
- Get to Know the Utility Bar
- Add a Utility Bar to Lightning Apps
- Create and Edit a Custom Lightning Console App
Note: These links direct you to Salesforce documentation. Voiso does not control this content and cannot ensure the links will always point to the latest version.
Step 4.4: Add Voiso WhatsApp to Lead, Contact, and Account
The Voiso WhatsApp action lets agents start or continue a WhatsApp conversation from a Lead, Contact, or Account. The Voiso package includes the action for these three objects; add it to the layouts your agents use:
- In Setup > Object Manager, select Lead.
- Open Page Layouts and edit the layout your agents use.
- Add the Voiso WhatsApp action to the page's actions, alongside the other Voiso actions.
- Click Save.
- Repeat for Contact and Account.
The Inbox utility item must have Start automatically enabled (see Step 4.3) and must be part of the same app as this action.
Choose which phone fields are eligible. The action reads the Voiso Omnichannel Phones (WhatsApp) field set on each object. By default it includes:
- Lead — Mobile, Phone
- Contact — Mobile, Phone, Other Phone
- Account — Phone
To change it, open Setup > Object Manager > [object] > Field Sets > Voiso Omnichannel Phones (WhatsApp) and add or remove phone-type fields. Only Phone-type fields work — a number kept in a text field does not appear. Field-level security still applies: an agent with no read access to a field never sees its number.
Enable Screen pop
To enable screen pop for agents follow these steps:
-
Navigate to Administration > Integrations, and select the Salesforce tile.
-
Click the Settings tab.
-
From the Screen popup on Call menu, select one of the following options:
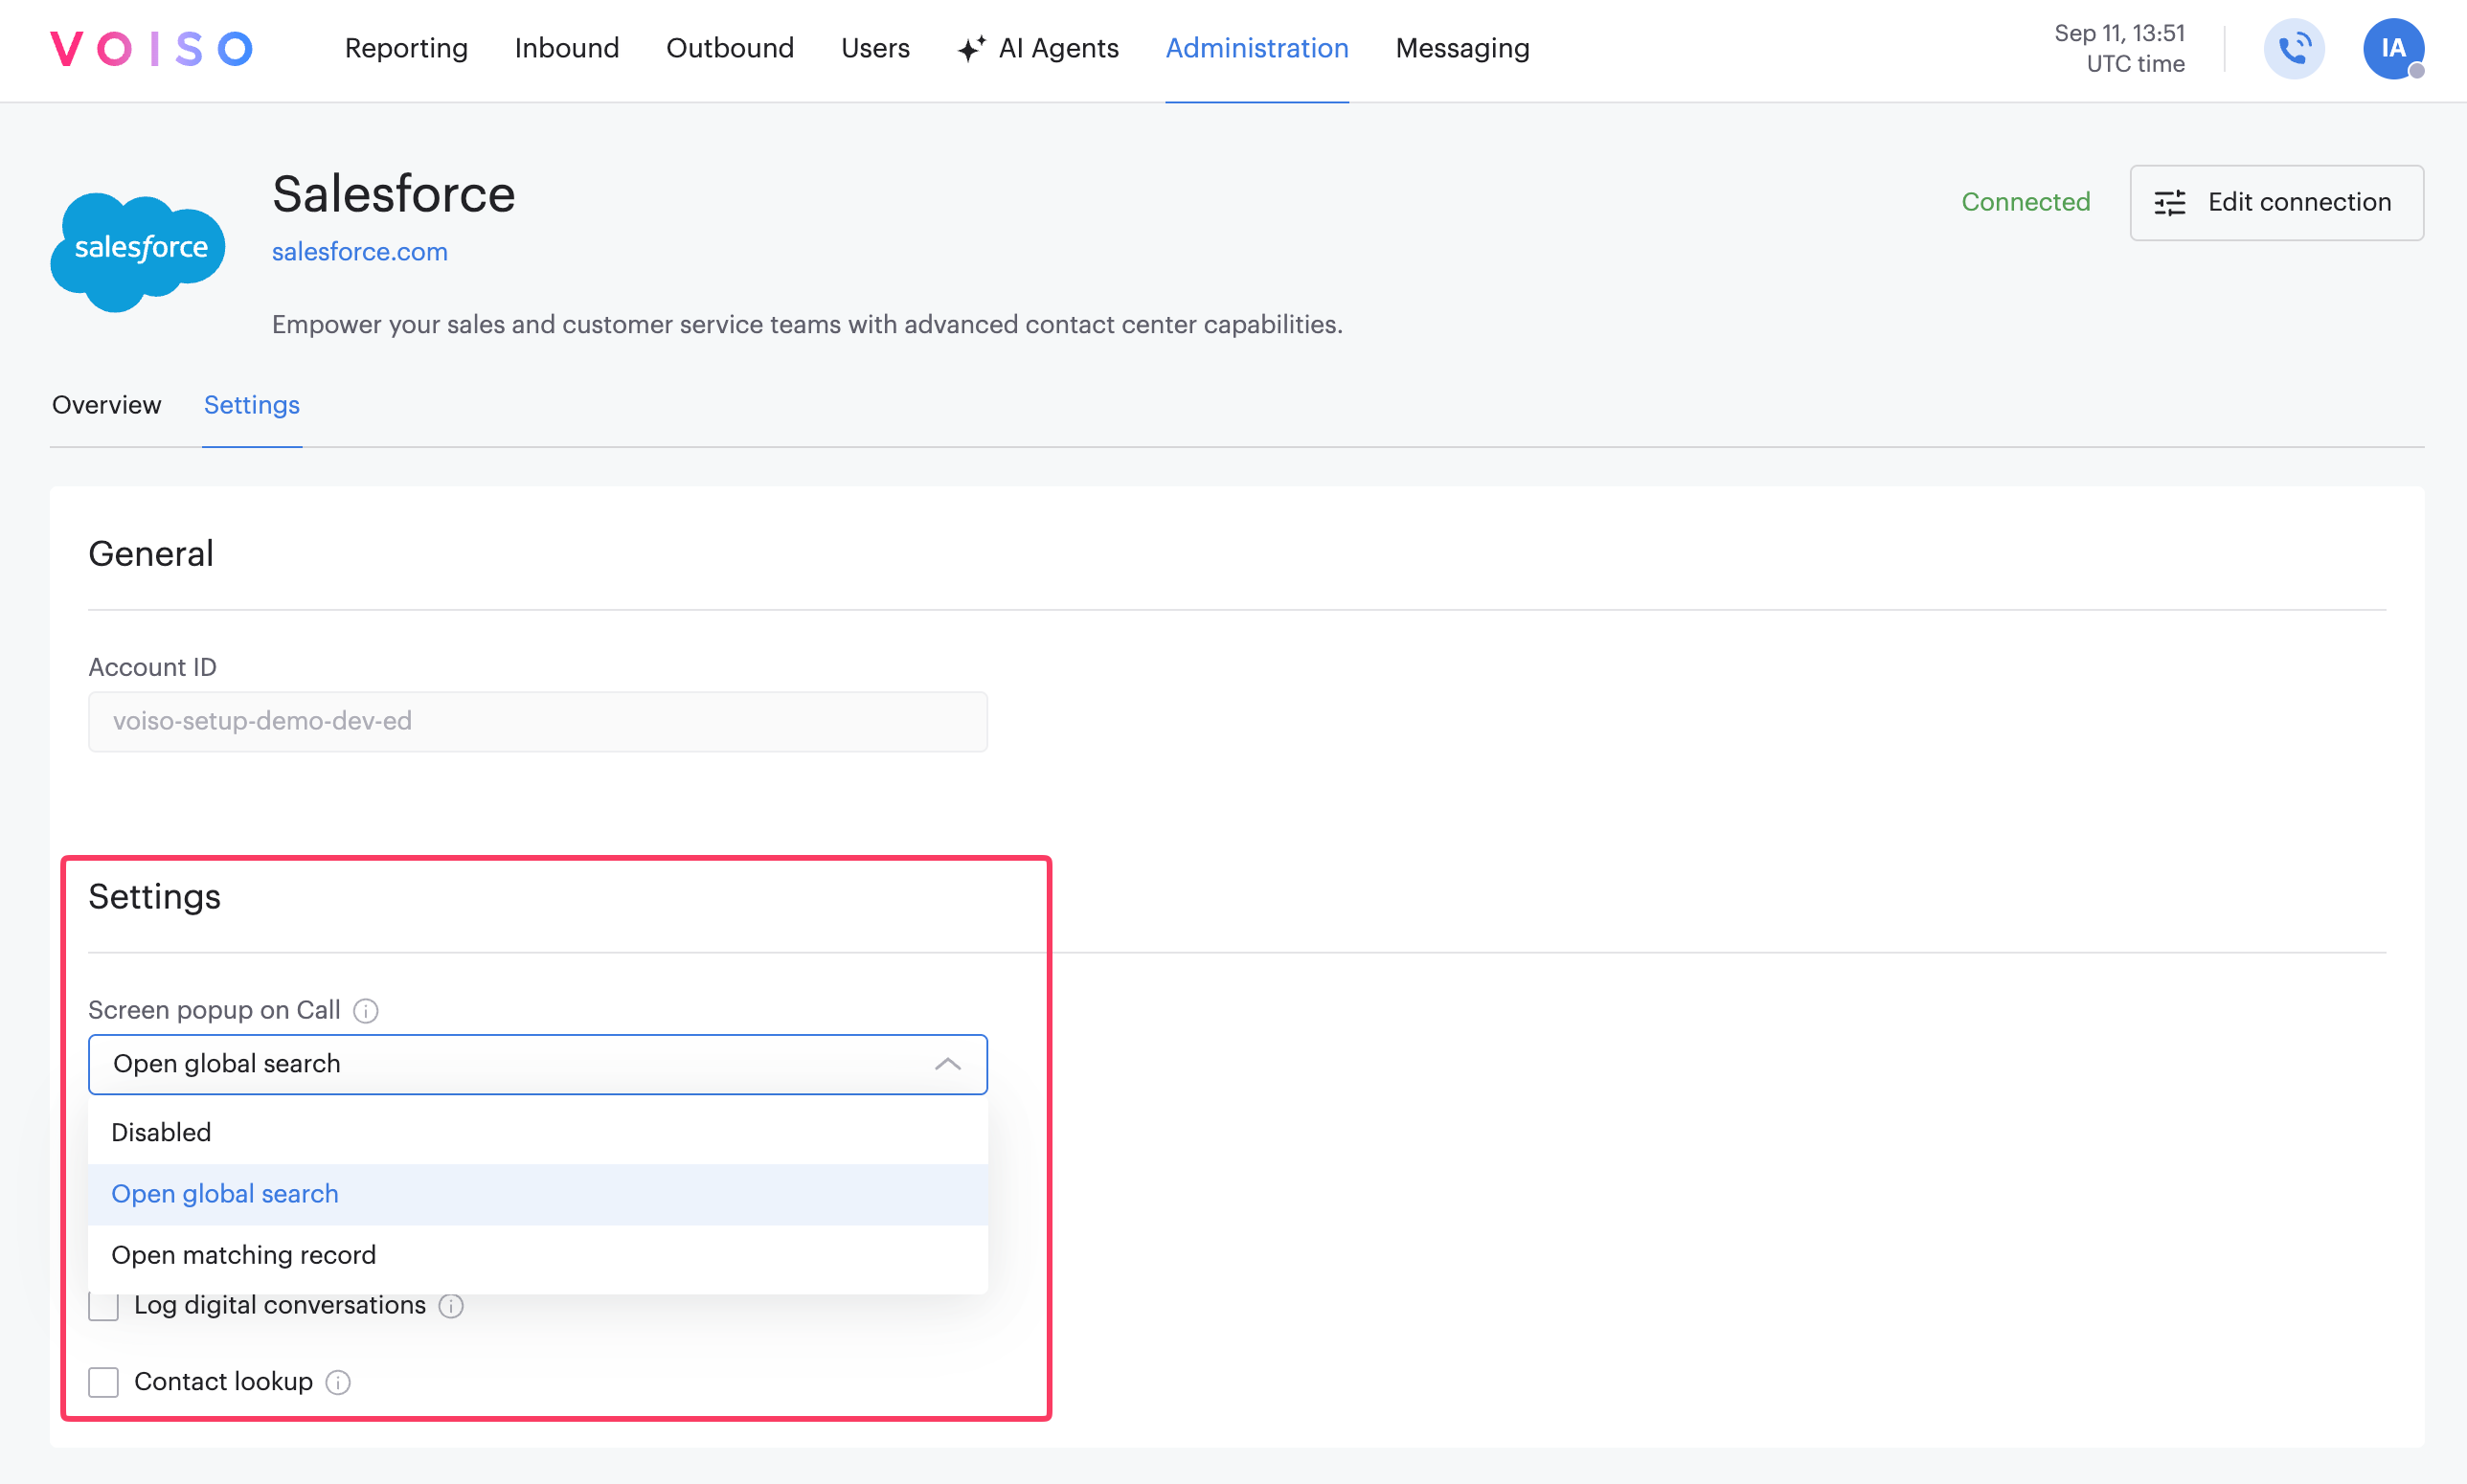
- Disabled: Screen popup is not enabled.
- Open global search: All objects related to the inbound phone number, such as Leads, Tasks, Contact record, and so on, are displayed on the Global search page. The agent selects which object or record to view.
- Open matching record: Screen-pop the exact matching record, based on the following module priority:
- Accounts
- Contacts
- Leads
-
Click Save.
Enable Call History
Unlike the Track Activities feature, Call History is not linked to records through lookup relationships. You can add Call History to any Record Details page using the App Builder. This component collects and displays call history records based on phone fields accessible to the current user, sorted by call start time.
Follow these steps to add the Voiso Call History Related List component to the Record Details page:
- Choose the Salesforce object to which you want to add a component and navigate to any record details page for that object.
- From the gear icon menu, select Edit Page.
- From the component list (left sidebar), drag and drop the Voiso Call History Related List component onto the page canvas. Tip: Voiso recommends experimenting with different locations on the page to find the best placement for your environment.
- From Setup, navigate to Permission Sets.
- Find Voiso User in the list, then click its label to open it.
- Click Manage Assignments at the top of the page, then click Add Assignment to display a list of users to whom this set of permissions can be assigned.
- Select the users who should have access to the component.
- Click Next, then click Assign.
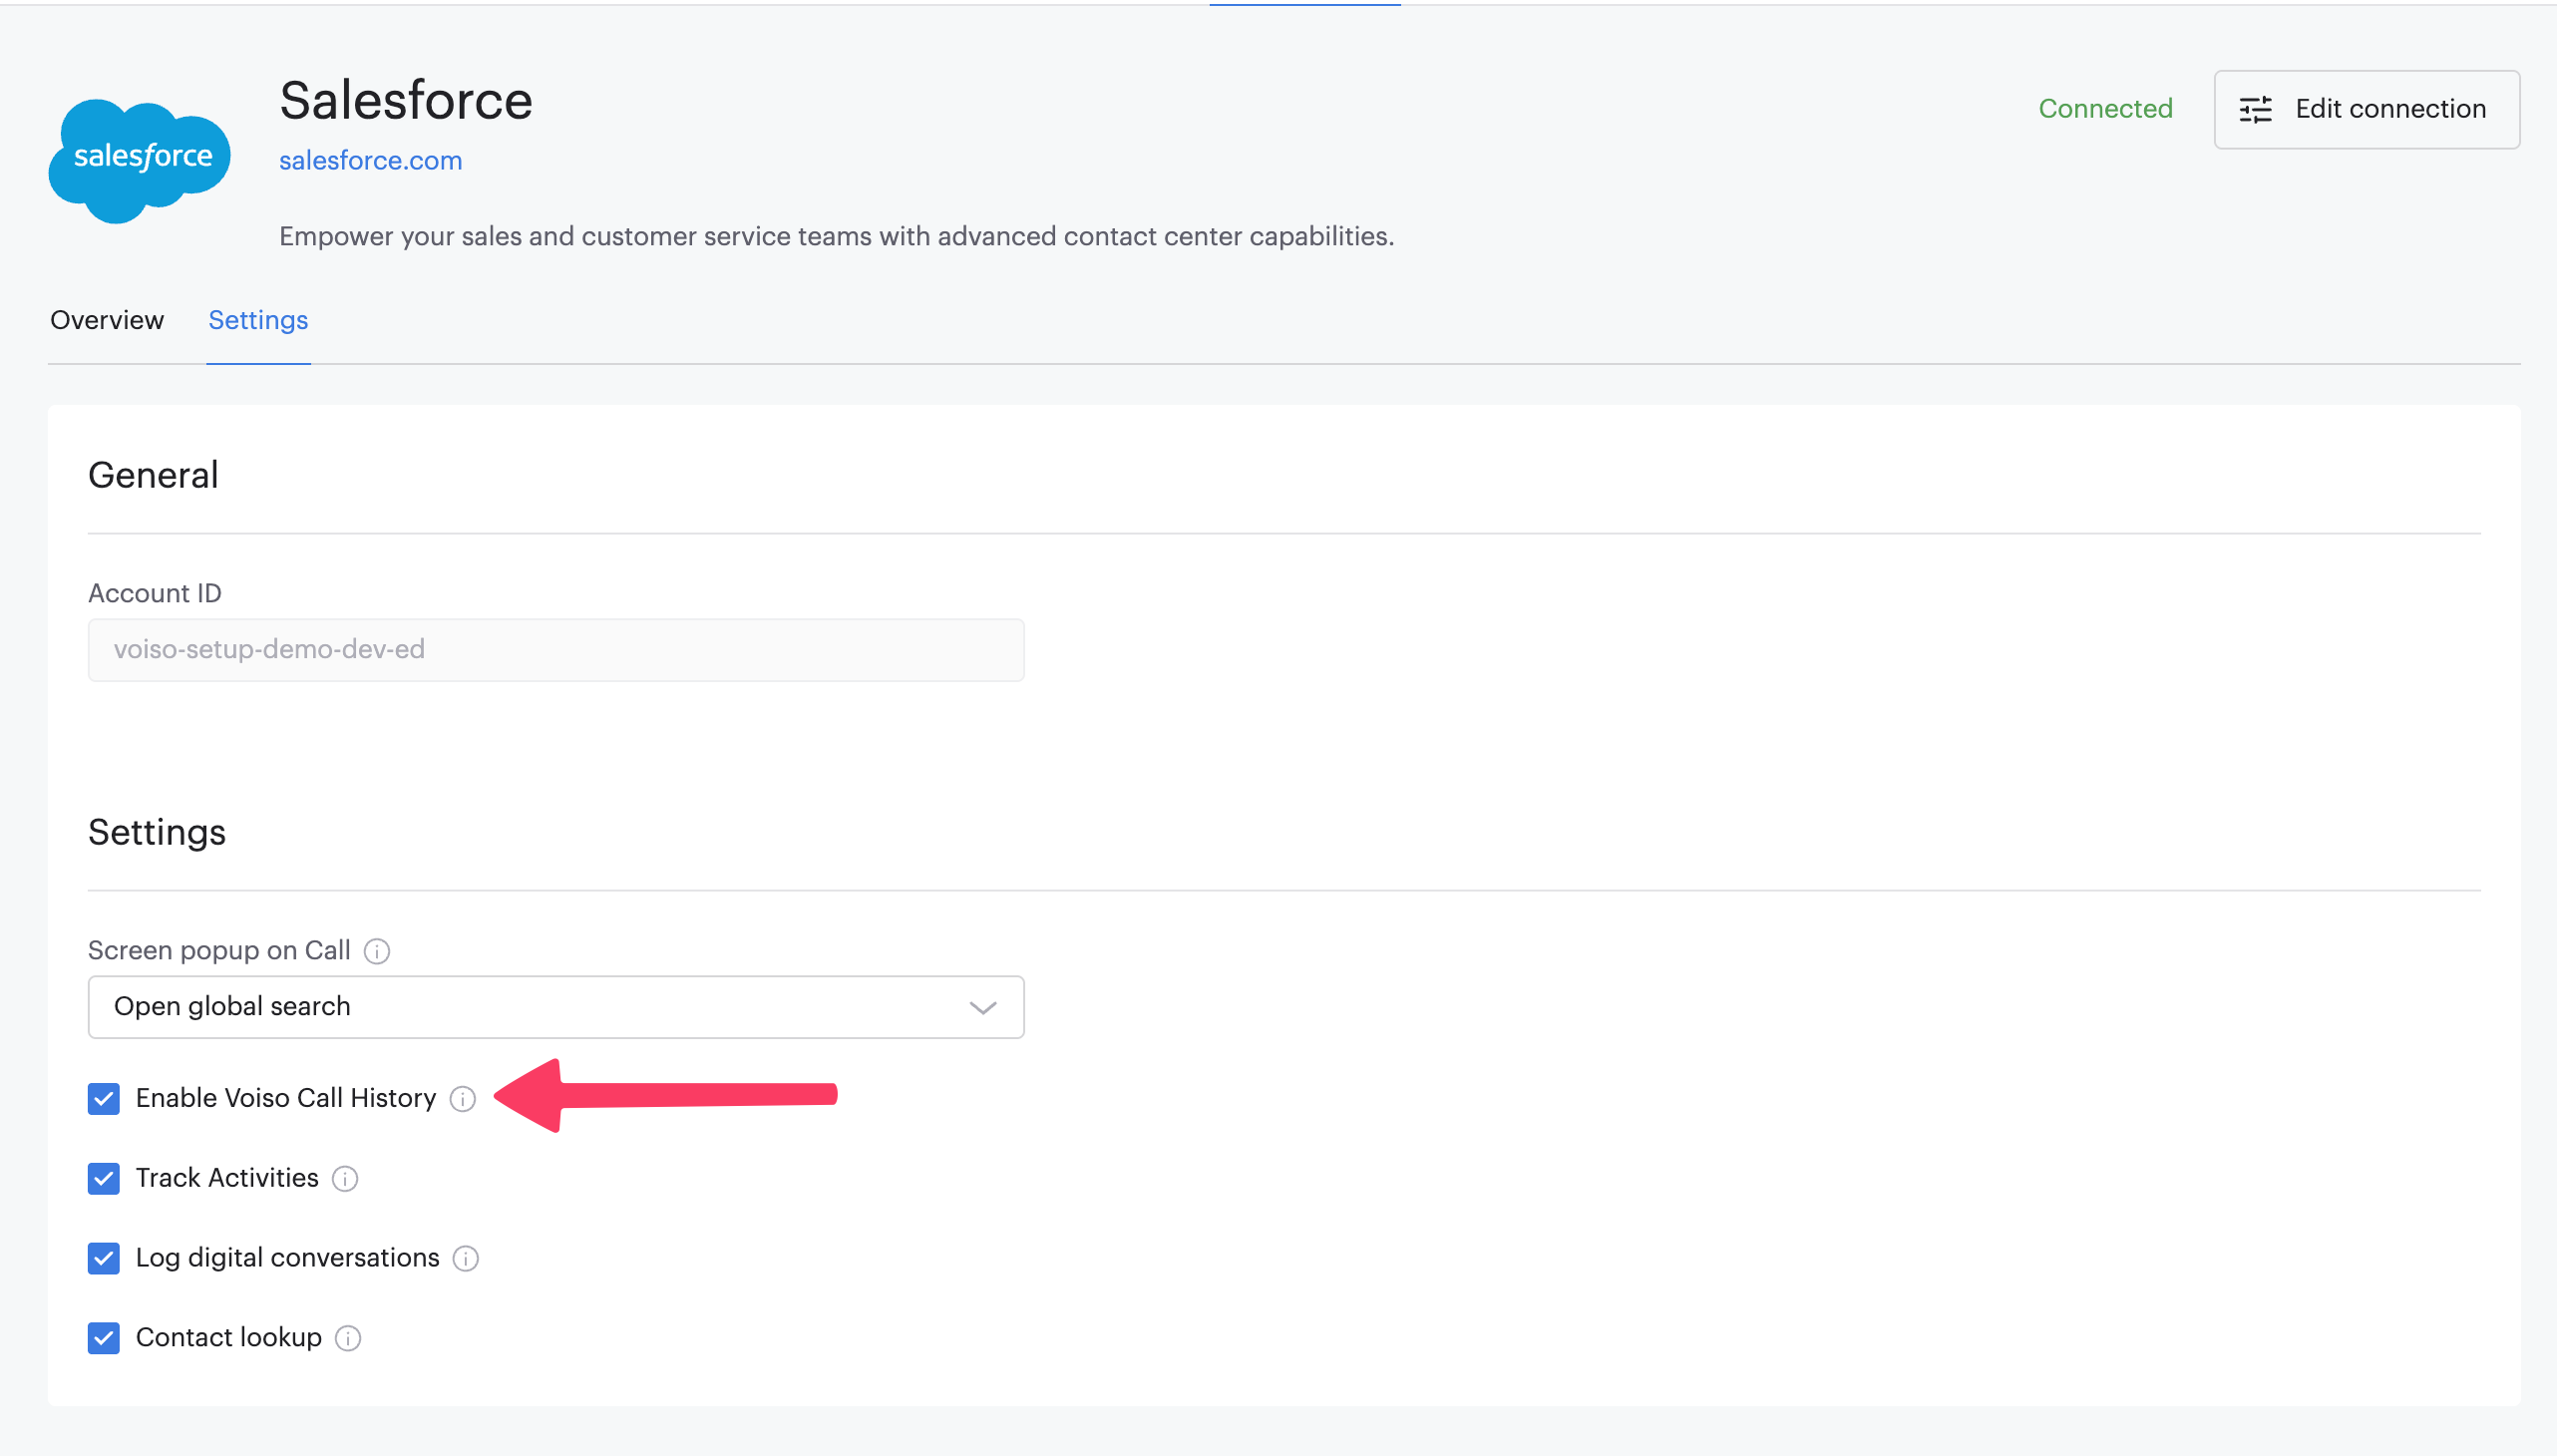
To enable Call History, navigate to Administration > Integrations, and select the Salesforce tile. Click the Settings tab, select Enable Voiso Call History, then click Save.
Enable Track Activities
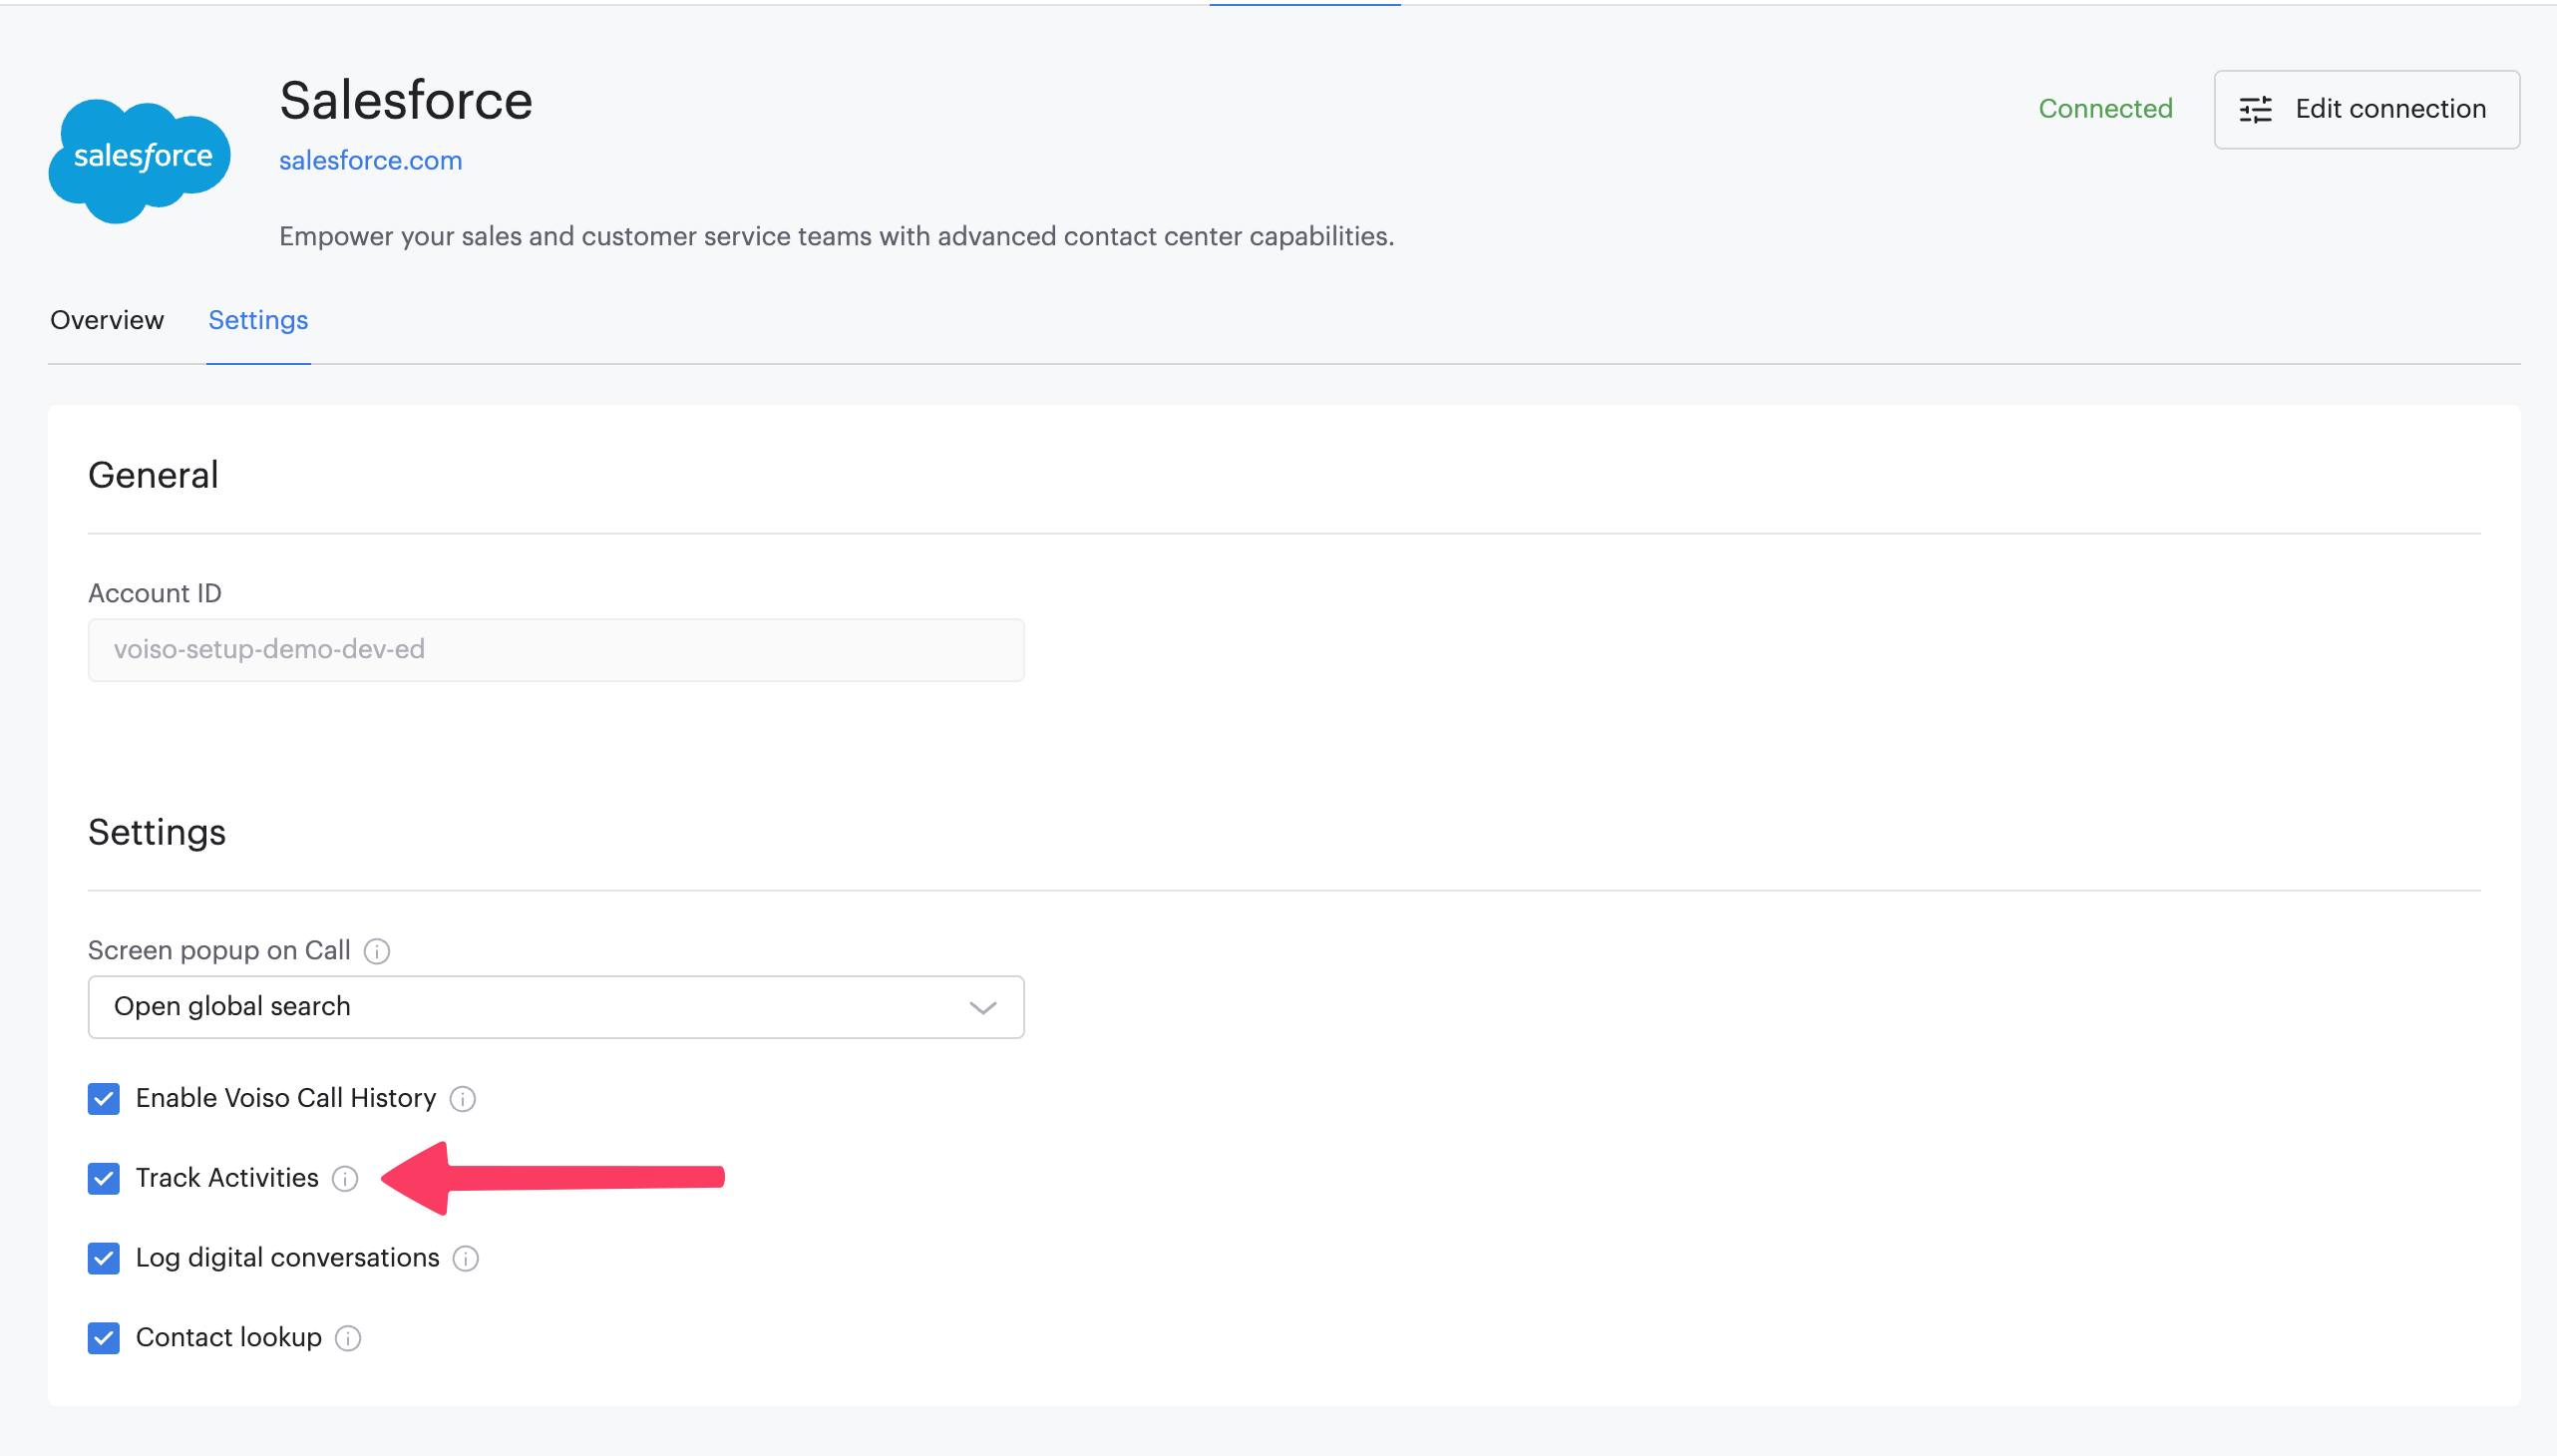
The Track Activities feature is enabled by default. For Activities to link to records, define which objects handle external contacts and store phone numbers. To manage this feature, navigate to Administration > Integrations, and select the Salesforce tile. Click the Settings tab, select or deselect Track Activities, then click Save.
Enable digital conversation logging
When Log digital conversations is enabled, Voiso records each WhatsApp conversation handled in the Inbox widget on the matched Lead or Contact. A Voiso Omnichannel History record and a linked activity task are created when the conversation is assigned to an agent, and completed when it is archived. The record holds the conversation details, the transcript, and any files exchanged; files are also attached to the Lead or Contact.
Conversations that Voiso cannot match to a Lead or Contact are not recorded.
- In Salesforce, add the Voiso Omnichannel History component to your Lead, Contact, and Account record pages, next to Call History: open a record, select the gear icon > Edit Page, drag the Omnichannel History component onto the page, then Save and activate the page.
- In Voiso, go to Administration > Integrations, select the Salesforce tile, open the Settings tab, select Log digital conversations, then click Save.
Enable Contact Lookup
Contact lookup matches the customer on a call or WhatsApp conversation to a Salesforce Lead, Contact, or Person Account and shows their details in the Inbox widget contact panel. To turn it on, in Voiso open Administration > Integrations > Salesforce > Settings and select Contact lookup.
See Salesforce Contact lookup.
Enable Click-to-call
Once you complete the following steps in the integration procedure, Click-to-call is enabled automatically after an agent logs in to the softphone:
The Click-to-Call feature can be used with standard Salesforce objects (Lead, Contact, Account, and others) and custom objects. Ensure that Track Activities is enabled for custom objects in Salesforce to link Task records correctly.
Mobile click-to-call
The Salesforce integration supports mobile click-to-call using the Voiso mobile app on Android and iOS devices. Agents can initiate calls directly from supported Salesforce records in the Salesforce mobile app, and the call is automatically routed through Voiso.
To use this feature, agents must install and sign in to both the Salesforce mobile app and the Voiso mobile app. Administrators must also add the Voiso Call action to the appropriate Salesforce objects and page layouts.
For configuration instructions, refer to Salesforce mobile setup guide.