Who should read this article: Administrators
Use the Voiso Campaigns APIs to add contacts to your live outbound Dialer campaign.
Introduction
Voiso provides a variety of APIs that you can use to automate many processes and manage your active Live campaign.
Voiso supports Dialer campaign integrations with several common CRMs (refer to Running a CRM campaign). If you use a CRM, Helpdesk, or other data source for contacts that is not currently supported by an integration, you can easily use the Voiso Add leads to a campaign API to submit a list of contacts to your Live Dialer campaign.
For details, refer to the Campaigns APIs in the Voiso Developer Portal.
List campaigns API
Use the Get list of campaigns API to get a list of your current campaigns and to add a list of contacts to an active Live campaign.
Add campaign contacts API
The Add leads to a campaign API enables you to programmatically add multiple contacts to an active Dialer campaign. For example, you can enable third-party automation to add contacts based on certain conditions, such as adding a contact to a campaign when a new lead is created in your CRM, Helpdesk, or other data source.
- Maximum contacts: Each
LeadsAPI call supports a maximum of 1000 new contacts. The Campaigns API verifies the phone numbers to ensure they are valid and unique. Invalid or duplicate records are rejected. - Rate limiting: Voiso recommends not invoking multiple simultaneous
LeadsAPI calls to the same campaign. Wait at least two seconds after the first request is complete before invoking a second one. If processing is not complete, a new request will be rejected.
Update campaign contacts
Use the Update campaign leads API to update existing contacts/leads in a live Dialer campaign. Contacts are identified by their phone number. You can only update the contact name, source, URL, active state, and priority.
Change campaign status
After you create a live Dialer campaign in your contact center, you can use the start, stop, or pause endpoints to manage your campaign.
Update campaign agents and teams
Use the Add users to a campaign API to manage agents and teams assigned to a campaign programmatically. This endpoint enables external applications to dynamically assign agents and teams from an active Dialer campaign. Use Remove user from a campaign endpoint to remove agents from a campaign. This is useful for automating campaign workforce management, especially in real-time dialing scenarios where campaign membership changes frequently.
How to run an API campaign
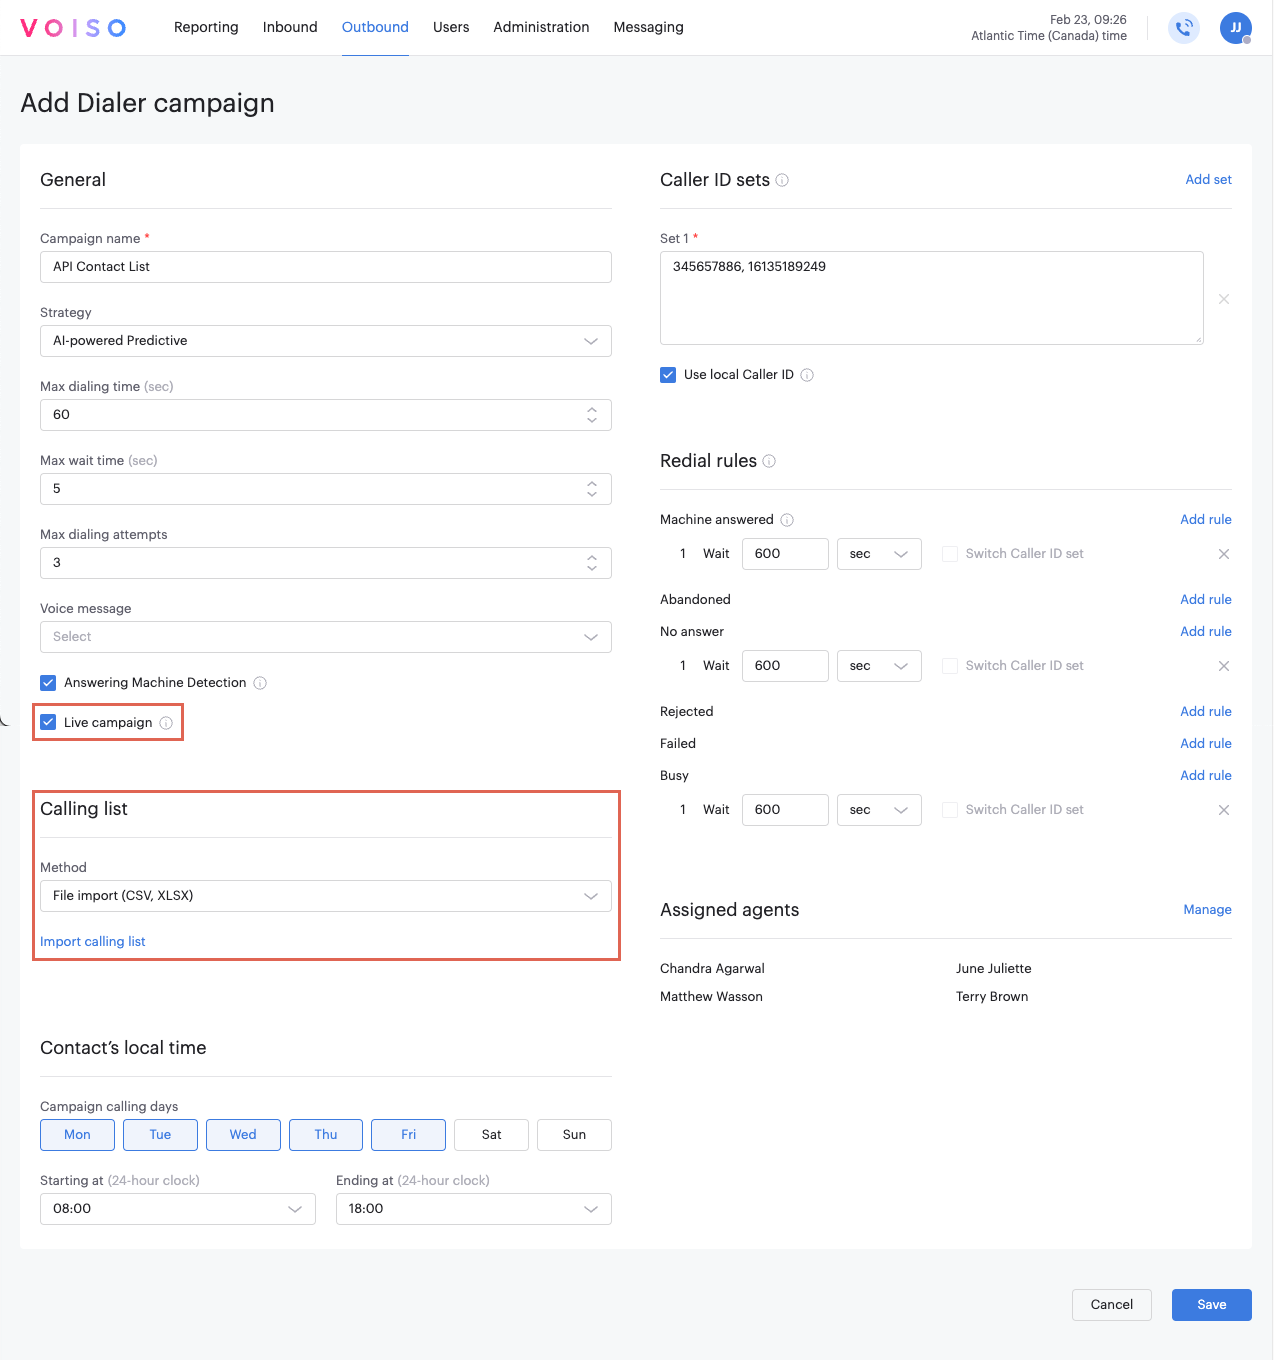
Create a Live Dialer campaign
Live Outbound Dialer campaigns automatically dial a list of contacts that you have added to the campaign. The campaign remains active until you stop it. When all the contacts in the calling list have been called, the Live Dialer campaign waits for more contacts to be added before resuming dialing.
Follow these steps to set up a Live Dialer campaign:
- From the main menu bar, navigate to Outbound > Dialer campaigns.
- In the Dialer campaigns page, click Add Dialer campaign.
- Follow the steps in Adding a new campaign to configure the campaign.
- Select Live campaign. You do not need to specify a Poll interval as this will be determined by the application you create to use the Add contacts API.
- In the Calling list section, set the Method to File import (CSV, XLSX). You do not need to import a calling list file if all of the contacts in the campaign are being provided by the Add contacts API.
- Click Save.
If the Dialing order feature is enabled for your contact center, the Enable Dialing order option is available. Refer to Adding a new campaign for details.
Create an application
To automatically add contacts to your Live Dialer campaign using the Add leads to a campaign API, create an application that extracts contact information from your CRM, Helpdesk, or other data source and adds it to the body of an Add contacts POST request:
https://{{baseUrl}}/api/v4/campaigns/{campaign_id}/leads
| Name | Description |
|---|---|
| {{baseUrl}} | The name of the Voiso cluster where your contact center is located. Refer to Base URL. |
| :api_key | The scoped API key of the user making the request. Voiso responds with the list of campaigns the requesting user is permitted to access. Refer to Authentication. |
| :campaign_id | The ID of the campaign, which can be obtained by using a Get list of campaigns API request or from the Outbound > Campaigns page. |
The following is the expected format of the body of the request:
curl -X POST "https://{cluster_id}.voiso.com/api/v4/campaigns/3/leads" \
  -H "Authorization: Bearer <contact_center_api_key>" \
  -H "Content-Type: application/json" \
  -d '[
    {
      "phone_number": "15551234567",
      "name": "John Doe",
      "priority": 10,
      "active": true,
      "source": {
        "system": "my_crm",
        "url": "https://example.com/leads/123"
      },
      "context_headers": {
        "X-Call-Context": "discount_promo_code",
        "X-Client-Order-Id": "1234"
      }
    },
    {
      "phone_number": "15557654321",
      "active": false
    }
  ]'
Running and monitoring the campaign
When you first create a Live Dialer campaign without contacts, its status on the Dialer campaigns page is Draft (1). The total number of contacts in a live campaign is unknown while the campaign is running, so in the Campaigns table, the infinity symbol (∞) is displayed in the Contacts column (2) and a dash (-) is displayed in the Progress column (3). The controls (4) are not enabled until contacts are added to the campaign.
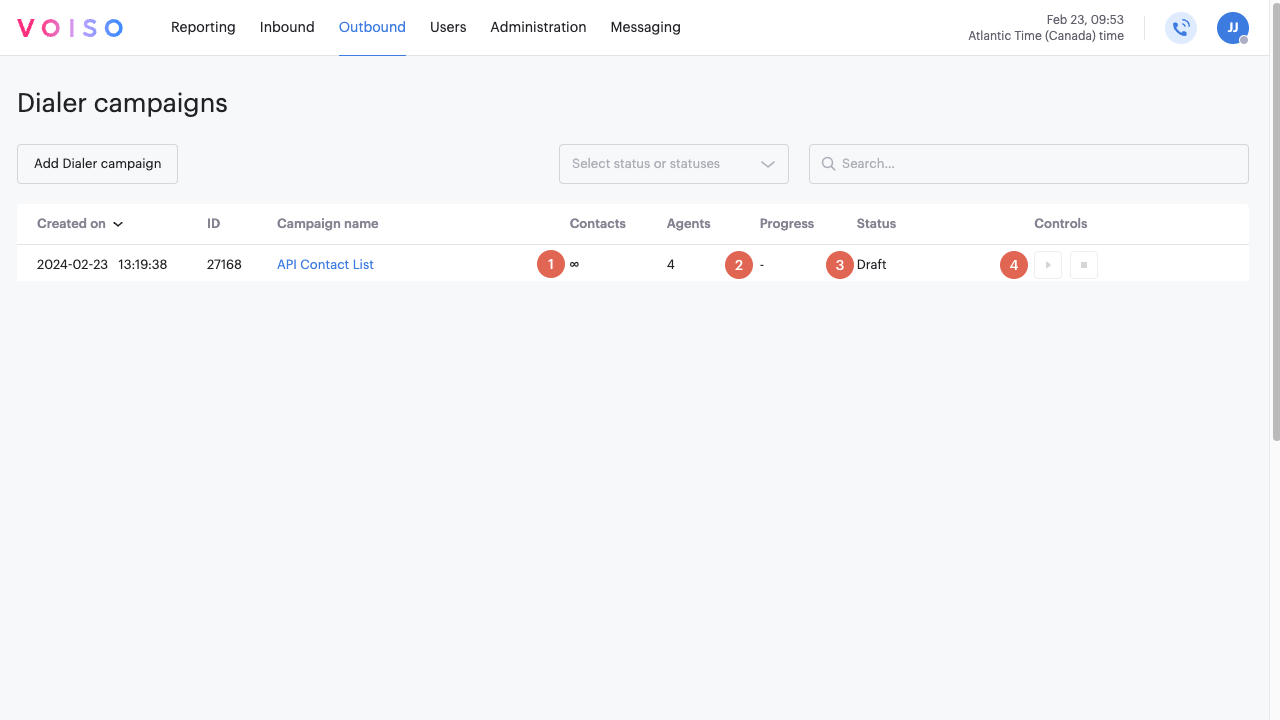
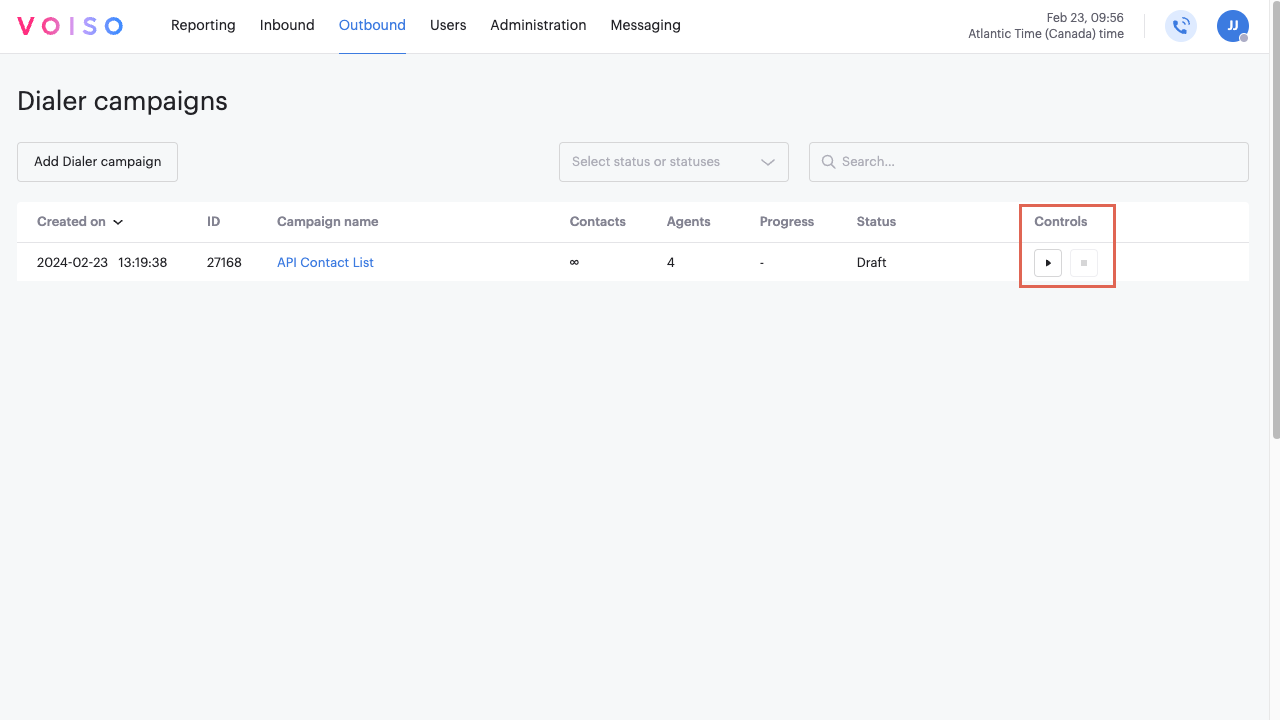
When contacts are added to the campaign by your application, the controls become available.
While a campaign is running, use the Ready to dial column in the Dialer campaigns page to monitor how many contacts are currently available for dialing. This value represents the number of contacts Dialer would attempt to call immediately if there were no limits on available agents or concurrent call attempts.
Start, pause, or stop the campaign via API
You can control a campaign’s state programmatically using the Campaigns endpoints. This is useful for integrating campaign control into custom dashboards or automations, such as starting a campaign when agents become available or pausing it when contact quotas are met.
Use one of the following endpoints:
- Start campaign
POST /api/v4/campaigns/{campaign_id}/start - Pause campaign
POST /api/v4/campaigns/{campaign_id}/pause - Stop campaign
POST /api/v4/campaigns/{campaign_id}/stop
Example requests
Start a campaign:
curl -X POST "https://{cluster_id}.voiso.com/api/v4/campaigns/{campaign_id}/start" \
  -H "Authorization: Bearer <contact_center_api_key>" \
  -H "Content-Type: application/json"
Pause a campaign:
curl -X POST "https://{cluster_id}.voiso.com/api/v4/campaigns/{campaign_id}/pause" \
  -H "Authorization: Bearer <contact_center_api_key>" \
  -H "Content-Type: application/json"
Stop a campaign:
curl -X POST "https://{cluster_id}.voiso.com/api/v4/campaigns/{campaign_id}/stop" \
  -H "Authorization: Bearer <contact_center_api_key>" \
  -H "Content-Type: application/json"
Response
If successful, each endpoint returns the updated campaign object, including the current status.
Only users with the required campaign permissions can use these endpoints.
Live campaigns can pause automatically in these cases:
- There are no new contacts available.
- There are no contacts available that meet the local time requirement.
- There are no signed-in agents available.
Live campaigns resume when new contacts are available that meet the local time constraint and there are signed-in agents available to handle the calls.
Live campaigns run until you stop them. You can stop campaigns in the Campaigns page or by using the Stop campaign endpoint.
Manage agents assigned to a campaign
You can manage campaign membership programmatically using the Campaigns endpoints. This is useful for automating campaign staffing from external systems.
Use these endpoints:
- Get users assigned to a campaign
GET /api/v4/campaigns/{campaign_id}/users - Add users to a campaign
POST /api/v4/campaigns/{campaign_id}/users - Remove user from a campaign
DELETE /api/v4/campaigns/{campaign_id}/users/{user_id}
Example requests
Get current campaign users:
curl -X GET "https://{cluster_id}.voiso.com/api/v4/campaigns/{campaign_id}/users?limit=100&offset=0" \
  -H "Authorization: Bearer <contact_center_api_key>" \
  -H "Content-Type: application/json"
Add users to a campaign:
curl -X POST "https://{cluster_id}.voiso.com/api/v4/campaigns/{campaign_id}/users" \
  -H "Authorization: Bearer <contact_center_api_key>" \
  -H "Content-Type: application/json" \
  -d '{
    "user_ids": [42, 128]
  }'
Remove a user from a campaign:
curl -X DELETE "https://{cluster_id}.voiso.com/api/v4/campaigns/{campaign_id}/users/{user_id}" \
  -H "Authorization: Bearer <contact_center_api_key>" \
  -H "Content-Type: application/json"
Response
- Get users assigned to a campaign returns a paginated
usersarray withmetadata.total. - Add users to a campaign returns the users that were added.
- Remove user from a campaign returns the removed user.
To use these endpoints, the authenticated user must have the required campaign permissions for the specified campaign.
The Agent experience
When a campaign is active, the agents you have assigned to the campaign are notified in the Agent Panel that a campaign has started. Agents join the campaign from the Dialer campaign page in the Agent Panel. If you have specified an audio file in the Notification sound on Dialer connection menu of the System Settings Contact center tab, the first 2 seconds of the audio is played to the agent when the call connects. Refer to Outbound campaigns for more information about how agents participate in Dialer campaigns.
Monitoring a campaign
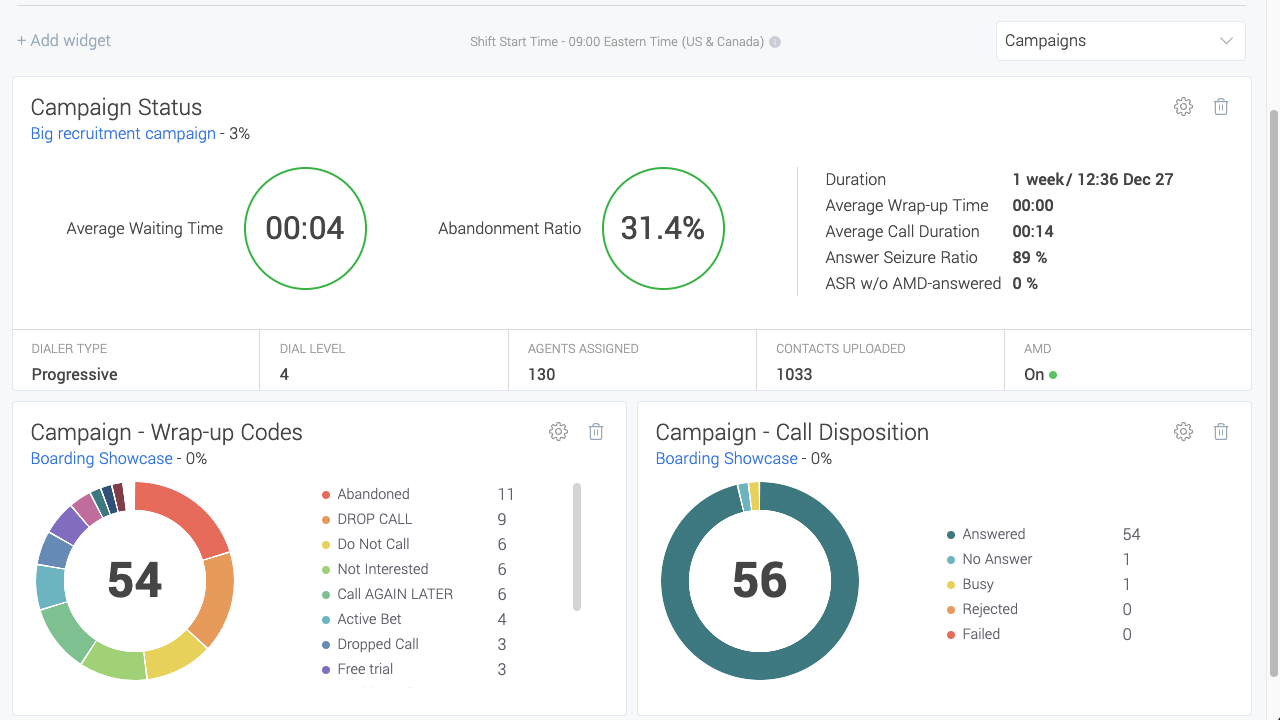
While a campaign is active or paused, you can monitor the progress using one or more widgets in the Real-time dashboard.
To add a widget to the Real-time dashboard, from the Voiso navigation bar, navigate to Reporting > Real-time dashboard. If you do not already have a dashboard, click Create dashboard. To use an existing dashboard, select it from the Dashboards menu or select Add dashboard to add a new dashboard.
There are several widgets you can use to track your campaign progress and performance in real-time:
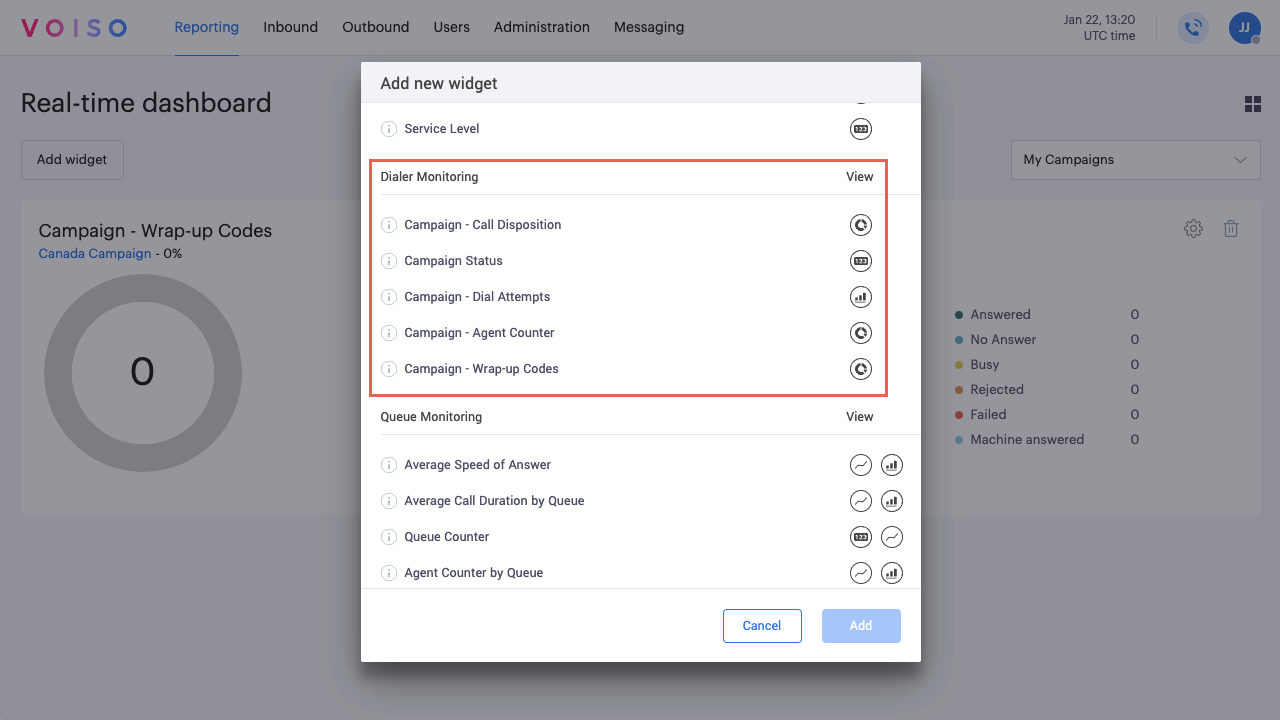
For detailed information about a widget, in the Add new widget panel, click the "i" icon next to the widget name.
| Widget | Description |
|---|---|
| Campaign – Call Disposition | A pie-chart displaying calls by network response: answered, no answer, busy, rejected, or failed |
| Campaign Status | A dashboard summarizing various campaign metrics, such duration of the campaign, the average time an agent waits for the next call, how often customers drop off, the average time spent on calls, and the ratio of calls answered to total calls made |
| Campaign – Dial Attempts | A bar graph displaying the number of times that each campaign contact was dialed |
| Campaign – Agent Counter | A pie chart displaying the number of agents who have joined the campaign and their status: outbound (on a call), waiting, and wrapping-up |
| Campaign – Wrap-up Codes | A pie chart displaying the number of campaign calls by the wrap-up codes (after-call work completions) that you defined |
Campaign reports
Voiso provides campaign reports for active, paused, stopped, and completed campaigns. Use campaign reports to monitor performance while a campaign is running or to review results after it has finished.
- For information about monitoring campaign performance in real time, refer to Part 5: Real-time Dialer campaign monitoring.
- For information about campaign reports and calling list reports, refer to Part 6: Reviewing campaign results.